This master class will help you create a beautiful basket from satin ribbons and soap. You can put a small gift in it or it can become an original gift.
- Siberian Marie
- Author's blog
- Without claiming primacy, I want to present you with a different way of braiding the warp, not the usual one.
- Its difference is that due to the satin ribbon and its matte backside, a weaving effect is created.
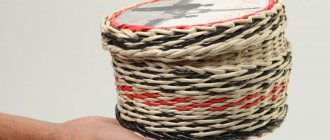
We will need: scissors, a candle (matches, lighter) for singeing the edge of the ribbon, soap, pins with knobs and simple ones with a “loop,” and of course, ribbon.
You need a satin ribbon, 0.8-1.2 cm wide. I try to take 1 cm, because... Based on experience, this is the most optimal width.
Soap can be anything. I closed the brand so as not to advertise. As a rule, I choose soap that is convex on one side. But if the shape is not entirely satisfactory, it can be corrected using a table knife, straightening the corners a little.
The convex side is “bottom”, the opposite side, naturally, is “top”. The main requirement for soap is that it must be greasy or “fresh”. That is, when pressed with a fingernail, a dent should remain on the surface.
Dry soap crumbles, as a result of which the pins do not fit tightly, or even a piece of the base breaks off.
We don’t need this, so when buying, we choose soap in a transparent wrapper and press it with our fingernail (sellers quickly get used to this).
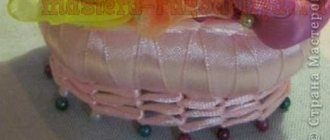
So, I chose a semicircular soap with a wide “top”. The edge of the oval will act as the top edge of the basket.
On the bottom part we mark an oval with a needle - this is where we will stick the pins at the bottom. If they don’t stand exactly along the intended line, it doesn’t matter, after a couple of holes everything will align.
We singe the edge of the tape (it’s safer to do this with a candle or lighter).
On the upper edge of the soap, the edge of the ribbon, retreating 1-1.5 cm, is secured with a pin stuck in and a little diagonally we lead it down.
At the bottom we stick a pin almost vertically into the ribbon into the intended oval. We bend and lead the tape up.
We stick the pins at the top at an angle, and try to do it at the same angle. We apply the tape so that it lies slightly on top of the previous layer.
- Fix the place of the overlay with a pin as close as possible to the edge of the new layer.
- We fold the tape and lead it down.
At the bottom we fix a new fold, capturing the two previous layers. Moreover, the distance between the pins at the bottom should be less than at the top, where we stick the pins, trying to use the width of the tape to the maximum.
- We lead it up again and fasten it in the same way as below.
- The result is folds of different textures - matte and satin.
At the corners (turns) we make the folds a little smaller, making sure that the soap is completely covered with tape. If at the same time the tape goes a little differently than before, we simply correct its direction by making a small “tolerance” in the place where the pin is inserted.
- At the same time, the folds at the bottom become smaller and smaller to maintain the shape of the soap.
- Now they have braided the entire basket, the last uncovered part remains.
- We lay the tape, take out the already attached pin...
- ...and carefully insert it again.
We also secure the second edge of the ribbon with a pin. At this point you need to trace a little how the tape lies. The distance between the last two and the two pins surrounding them must be “adjusted” so that the two balls do not fit tightly to each other, but are at approximately the same distance.
- This is how it happened on the one hand...
... and so on the other. The last fold dominates a little, but in the general background, when the basket is ready, this is practically not visible. In addition, it can be “covered” with a leaf, flower, butterfly or anything else.
- We do not break the ribbon, but begin to braid the pins of the side on which the last fold came (it is almost impossible to guess in advance where it will lie).
- We braid the pins simply by wrapping the ribbon around them: turn and onto the next one.
We do this from 2 to 4 rows of braid, as you like. I made three.
- We secure the edge of the ribbon with a regular pin, cut it and singe it
- We also secure the singed edge of the tape on top with a simple pin.
And we braid the top of the basket in the same way as the bottom. You can secure it with the same pin you started with.
This is what we got. View from above.
- Side view.
- View from the other side.
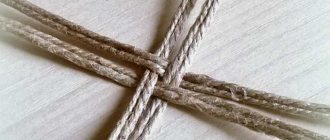
Now about the pen. She can be anyone. For some time now I have been making it, braiding it with knots using the macrame technique.
We take plastic tubes.
I cut off the size I needed, stuck a regular pin into the edge, and slightly bent it. But the fold did not hold, so I slightly warmed the bend area with fire.
- After warming up, I easily bent it and held it for a while until the tube froze in the desired position.
The result is a pen like this. And then I braided it using the Macrame technique.
I’ll say right away that I only do macrame when I feel like it, so I can’t give any competent advice. I braid a round handle in the same way as shown in the picture, only instead of internal threads I have a tube.
When the handle is flat, I braid it this way, using a strip of plastic instead of internal threads. I take the plastic from thin transparent sheets that cover computer monitors during packaging. If you take 2-3 layers, simply cutting them to the desired width and length, it turns out great, strong and stable.
The only thing I can say about the handle is that I calculate the length of the tape as follows: it needs to be 10, or better yet 12 times greater than the length of the handle. I simply apply the handle to the tape 5-6 times, and then double the resulting length by adding it in the same way. I secure it to the handle with a pin, the handle itself to the back of the sofa and weave it according to the diagrams above. With a round handle, the knots begin to wrap themselves.
- We also secure the handle with simple pins. You can use two if the fastening does not seem reliable to you
Now we fill the basket with flowers from ribbons, fabric, whatever. I won’t show you how to make flowers; there are many such master classes. I prepare a "bunch" of flowers whenever I'm in the mood. And then I store it in a box and use it as needed.
- Here's what happened:
- And this one has a flat handle.
Source: https://www.mastera-rukodeliya.ru/korzinka-na-myile
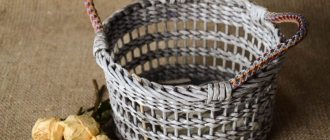
Weaving baskets with your own hands from plastic tapes
Once upon a time, our ancestors, after finishing work in the field, sat down to weaving bast shoes and baskets for their large families, so that there would be no shortage of them next spring and summer. Today, only a few craftsmen weave bast shoes, and only for tourists (it’s a pity that we forgot such comfortable, versatile shoes).
But there’s a problem with baskets in general. Those sold in stores are only suitable for souvenirs. My grandson went into the forest with one, and it fell apart and fell apart.
For his sake, I had to remember what my grandfather once taught me for fun - to weave baskets myself.
But since you can’t find bast now during the day with fire, I decided to use plastic tapes as the material. I suffered a little, but my hands quickly remembered everything.
And now I am happy to weave baskets for everyone (in my house, it seems, I have “basketted” all the residents; there is not a single person dissatisfied).
I think anyone can master this craft. Of course, not everything will work out at first, but the main thing here is painstakingness and perseverance. It’s easier for me - I’m a pensioner, a disabled person of the 1st group, and therefore I have nowhere to rush. Therefore, I decided to tell all readers of the magazine in detail how to make comfortable, practical and beautiful baskets.
I use the following tools for work: scissors, an awl, a hammer, nails and a stapler. I lay ribbons according to the size of the future basket on a wide board, and I always use only an odd number of them. I begin to braid them, having first bent each one in half.
I lay the first two central strips in a cross and nail them in the middle with a nail to the board (Fig. 1). I begin to apply other ribbons to them on both sides and weave them together. The result is a braided braid (Fig. 2). Its size depends on how big the basket needs to be made.
Having decided on this, I nail the braid to the board with nails in the corners (Fig. 2). This will be the base of the bottom of the basket. I make a box using the size of the braid from a cardboard fruit box (Fig.
3), corresponding to the height of the future product (essentially making a model of the basket). I place this box on the wickerwork of the basket and lift up all the ribbons (Fig. 4). I link them at the top.
Then I start braiding horizontal ribbons.
Weaving baskets with your own hands from packing tapes
When weaving, I move them with an awl to each other as tightly as possible. But you won’t achieve great density with this, since the tapes are very rigid and they need to settle. To do this, I take out one ribbon from an almost woven basket (I say “almost” for a reason) and replace it with three of the same kind.
I do this first at the bottom of the basket. If even after this good density is not obtained, then I repeat this operation in the upper part of the basket. There is another way: to do this, I twist two ribbons next to each other in the same way and only then run a third one between them, which goes crosswise (Fig. 6).
Now regarding the handles. If you noticed, I have missing the two longest ribbons along the length of the basket (Fig. 4).
They are installed along the bottom so that they divide it into three parts. So they will be the handles - I simply connect them together and wrap them inward along the walls of the basket (Fig. 5).
I choose the size of the handles so that they meet in the middle of the basket. If you plan to load your container with a heap, then the handles need to be made a little longer. And for greater strength, the tapes can be connected to each other with a stapler (and for beauty, I sometimes wrap them with colored insulating tape).
Related link: How to weave a basket from twigs
Having finished weaving the horizontal rows, maintaining the height of the basket, I trim the protruding ends of the strips of the stands, if necessary, then wrap them in braid, leaving two ends on one side and the other (opposite) side, and make basket handles from them (as already described above) .
Weaving homemade baskets with your own hands: material plastic tapes
How to weave a basket from a plastic tube
© N.AKULIN. Moscow
Tools for craftsmen and craftswomen, and household goods are very cheap. free shipping. recommended - 100% verified, reviews available
Below are other entries on the topic “How to do it yourself - for a homeowner!”
- How to weave a basket with your own hands? DIY weaving of willow baskets...
- How to weave a basket for shelter Do-it-yourself basket for shelter For…
- Do-it-yourself folding basket (photos and drawings) How to make a folding basket -...
- How to weave a basket from a plastic tube with your own hands Weaving baskets with your own hands A famous expression...
- How to weave a laundry basket with your own hands (+ step-by-step photos) WEAVE A LAUNDRY BASKET FROM…
- Weaving baskets and tueskas from birch bark or packaging tapes - lesson. How to weave a basket and decorative…
- How to weave a basket from paper tubes A bunny basket from paper tubes with your own…
Source: https://kak-svoimi-rukami.com/2014/11/pletenie-korzin-svoimi-rukami-iz-plastikovyx-lent/
From our ancestors to us
Our ancestors were very talented people. Probably, the knowledge received from them, passed on from generation to generation, is the most important and accurate. Is it possible to do something if you don’t have the skill? Of course not. Therefore, even in ancient times, ancestors, returning from work in the field, cleaning the house, began to do handicrafts. Then there was not such a huge range of materials, so baskets and bast shoes were woven from improvised materials. The work was difficult, but because the whole family worked together, fatigue was not felt at all. Weaving began its development precisely from those times.
Unfortunately, now few people know how to create wicker containers and make high-quality bast shoes. And few people are interested in creativity. After all, you can buy everything and not bother. But where is the confidence that tomorrow such a basket will serve for a long time, withstand the load, etc.? Things created with your own hands, with love, will serve faithfully for many years.
You can weave real strong baskets yourself. You just need to know how. To do this, you can use lessons and instructions from masters.
Of course, weaving from tree bark like our ancestors is the pinnacle of skill. This is quite difficult and problematic, so you need to use a substitute - packing tape. The material is durable, modern and completely inexpensive. It can be easily found at a hardware store or ordered online. This weaving has gained popularity among professionals and craftsmen. Let's consider all the intricacies of the work. And the master class will help with this.
Wicker baskets from ribbons. Master classes
Wicker baskets from ribbons. Master classes
BASKET WITH ROSES
To make such a basket you will need the following kit:
The latter should hold its shape well (it can only bend if there is a significant impact on it). For example, a thin rim, a handle from a children's bucket, some kind of long knitting needle, a steel string, etc. will work well for this purpose. I used a frame for collarless dresses that I bought at a fabric store. It is more convenient to start work by making a basket. Take a piece of soap and stick pins in a circle at a distance of about 7-8 mm, first at the top and then also at the bottom. The number of pins on top and bottom should be the same.
Then we take a satin ribbon 1 cm thick, leave its end about 8 cm free, temporarily fix it with a pin so that it does not “run away,” and begin to braid the walls of the future basket. To do this, we hook the tape to the top pin, lower the tape down, hook it to the bottom pin there and lift it back up. Then we continue in the same order. As a result, all the walls of the basket will be braided, and you will return to the initial place of weaving. The short end of the tape left should be at the top and the long end at the bottom. Using the long end of the ribbon, we begin to braid the bottom side of the basket. The knot technique in the photo. After a few knots, the side of the basket will begin to form. Having made a full circle from the bottom, throw the ribbon to the other side and also begin to braid the top side of the basket. At the end of the upper circle, the short ends left at the beginning and the long working ends of the satin ribbon will “meet”. Form a bow out of them, cut off the excess ribbon and the basket is ready. Next, from the remaining 1 cm wide ribbon, weave a handle for the basket. To do this, take the wire prepared for the handle and fix the satin ribbon with a regular knot at a distance of 1.5 cm from its edge. In this case, you need to leave one end of the satin ribbon free, its length should be 6-8 cm longer than the handle. Next we braid the handle, as shown in the photo. It is very important to tighten the knots tightly, while the ends of the satin ribbons must be pulled in different directions. After a few nodes, a spiral will gradually begin to form. When the wire is completely braided, tie the free ends of the satin ribbon together and cut off the excess. We stick the finished handle on the sides of the basket.
Progress
So, let's take a closer look at what weaving a basket from a plastic bottle is. A weaving master class will always begin with the preparation of the material. Bottles must be clean and dry. If there were labels on them, then remove them with water and a stiff brush.
Next, you will need to cut the bottle so that the neck and bottom are separated. That is, for work we need the central part of the bottle. However, do not rush to throw away the bottom; you can easily make a beautiful flower out of it to decorate our basket.
We now need to cut the central part into many long strips. What width and length they will be depends on what kind of basket you want to make. We bend each cut strip in half, and then hide the ends in the central part of the workpiece. This can be done either by hand or with pliers.
As a result of the work done, you should have modules. Any weaving of baskets from plastic bottles involves a kind of assembly of these modules. First, a braid is made, then three more, and then they are connected to each other into a square. Or a rectangle, if the basket you have in mind should have exactly this shape.
Now we make a few more frames or squares, only each one is smaller. The square modules must be secured together using a thread and a needle. This way we get the bottom. It remains to make more blanks that will serve as the sides of the basket. When the basket is the desired height, all that remains is to make a handle. It is made according to the same principle - weaving a chain or braid from small modules.
Basket made of polypropylene packaging tape. Weaving
- Basket made of polypropylene packaging tape for 7-8 liters.
- Master class on weaving from Sergei from Kostroma
It took for the craft:
— Tape 15 mm wide and 0.8 mm thick. — 88 meters (36 stripes of 2 m and 16 of 1 m)
- — Stapler clips 10 pcs.
- — Time 4 hours.
- Tool used:
- - roulette
- - pencil
- - stapler
- - anti-stapler
- - narrow-nose pliers
- - scissors
We cut 36 strips of 2 m each. For ease of weaving, we cut the ends immediately at an angle.
Using a tape measure and a pencil, mark the middle and 15 cm in both directions on 4 strips, 2 times.
On the remaining strips, for convenience, we mark only the middle.
We weave a square of 18x18 strips with sides of 30 cm. There are 4 stripes marked along the edges. We fasten the corners with a stapler
We weave the first corner of the future basket. We divide the side of our square in half and weave 9x9 strips. We align with the marks and staple.
One corner is ready.
We weave the second corner.
Third.
All four corners are ready, aligned with the marks on the tapes and stapled together.
Turn it over. The bottom of the basket is ready.
We stretch the corners of the basket so that there are no large gaps.
The corners are drawn out.
We measure the sides and diagonals of the bottom. If somewhere else we tighten or weaken it.
Turn the basket over and weave the sides above until the marks intersect, and staple.
The sides are woven.
We determine where the edge of the basket will be and begin to pick up the strips.
One by one.
Up to the strip with marks.
At the same height we weave the other side of the edge of the basket.
We stretch the edges.
After pulling the edges, we weave the strips all the way through the entire basket.
Let's weave.
The edges are woven and we move to the sides.
We bend and weave the strips as shown in the photo, tighten the edge so that it is even.
On both sides, When pulled up, we weave the strips to the end. You can now remove the stapler clips.
We weave as far as it will go and trim it so that the tip can be hidden under another strip.
They hid it, and nothing is visible, neither outside nor inside.
We hide the ponytails in the same way when two ribbons meet.
They hid it and went on weaving.
The ribbons that curved outward were woven, leaving ribbons that should be woven into the inside of the basket.
But it’s extremely inconvenient to weave inside. Therefore, we thread them as shown in the photo. (second tape from the left)
And we weave it out.
We weave the ribbons to the end.
With each woven ribbon, the basket becomes stronger and stronger, and sometimes you have to use a tool.
We braid the other side too.
Let's move on to the most difficult part of the product - the handle. We cut 16 strips of 1m each.
We weave 2 strips from the edge on the right and left.
From the outside and from the inside. Total 8 strips.
And we begin to weave a handle. Weaving goes in a circle. It may not work out the first time.
We determine which strips should go where and weave the handle into the other side of the basket.
We stretch and weave the strips to the end.
To give rigidity to the handle, we weave it again with the remaining 8 strips.
The basket is ready.
Source: https://podruzhkii.ru/blog/43989496686/Korzinka-iz-upakovochnoy-polipropilenovoy-lentyi.-Pletenie
Materials and tools
First of all, when preparing to weave a basket, you will need to stock up on enough polypropylene packaging tape. It will be used in a very large volume. For example, to create one medium-sized basket, about 70–80 meters of the specified material will be spent. Buying it now is not difficult. You can find plastic ribbons suitable for weaving at construction markets and similar stores. You can order the material of interest to the buyer via the Internet.
Some thrifty owners even use tapes that have already been used . For example, they ask for leftover material in large stores and then clean it of contaminants. But this is quite a labor-intensive process, so it is best to buy new packing tape. It has a price that is quite affordable for any master.
In addition to plastic satin ribbons, you will also need to prepare additional materials and tools . Among them:
- scissors;
- roulette
- stapler;
- pencil;
- narrow pliers;
- wide, strong board.
Of course, to make a beautiful, durable basket with your own hands, in addition to all the materials and tools used, the craftsman will need to be patient. The manufacturing process of the products under discussion requires perseverance and painstakingness.
Basket made of packaging (polypropylene, strapping) tape
Basket made of packaging (polypropylene, strapping) tape
SOURCE
author: Sergey from Kostroma
For 7-8 liters.
We cut 36 strips of 2 m each. For ease of weaving, we cut the ends immediately at an angle.
Using a tape measure and a pencil, mark the middle and 15 cm in both directions on 4 strips, 2 times. On the remaining strips, for convenience, we mark only the middle.
We weave a square of 18x18 strips with sides of 30 cm. There are 4 stripes marked along the edges. We fasten the corners with a stapler
We weave the first corner of the future basket. We divide the side of our square in half and weave 9x9 strips. We align with the marks and staple.
One corner is ready.
We weave the second corner.
Third.
All four corners are ready, aligned with the marks on the tapes and stapled together.
Turn it over. The bottom of the basket is ready.
We stretch the corners of the basket so that there are no large gaps.
The corners are drawn out.
We measure the sides and diagonals of the bottom. If somewhere else we tighten or weaken it.
Turn the basket over and weave the sides above until the marks intersect, and staple.
The sides are woven.
We determine where the edge of the basket will be and begin to pick up the strips.
One by one.
Further.
Up to the strip with marks.
At the same height we weave the other side of the edge of the basket.
We stretch the edges.
After pulling the edges, we weave the strips all the way through the entire basket.
Let's weave.
The edges are woven and we move to the sides.
We bend and weave the strips as shown in the photo, tighten the edge so that it is even.
On both sides, When pulled up, we weave the strips to the end. You can now remove the stapler clips.
We weave as far as it will go and trim it so that the tip can be hidden under another strip.
They hid it, and nothing is visible, neither outside nor inside.
We hide the ponytails in the same way when two ribbons meet.
They hid it and went on weaving.
The ribbons that curved outward were woven, leaving ribbons that should be woven into the inside of the basket.
But it’s extremely inconvenient to weave inside. Therefore, we thread them as shown in the photo. (second tape from the left)
And we weave it out.
We weave the ribbons to the end.
With each woven ribbon, the basket becomes stronger and stronger, and sometimes you have to use a tool.
We braid the other side too.
Let's move on to the most difficult part of the product - the handle. We cut 16 strips of 1m each.
We weave 2 strips from the edge on the right and left.
From the outside and from the inside. Total 8 strips.
And we begin to weave a handle. Weaving goes in a circle. It may not work out the first time.
We determine which strips should go where and weave the handle into the other side of the basket.
From braid
Zigzag braid is used today for finishing women's dresses and blouses. It is also widely used to decorate folk costumes. The cost of this material is affordable, so if you don’t have any skills in needlework, try making a bud from braid: two options will be presented below.
Using braid
Daisy made from zigzag braid
To make a beautiful daisy from the specified material, you will need 20 cm of braid in your favorite color. If you want to reliably convey the texture of a chamomile, take a white shade, and prepare a yellow bead or cabochon for the middle. The procedure is so simple that it won’t take 10 minutes, so it’s easy to do chamomile during a break:
- Connect the ends of the cut braid and sew them together so that the edges are firmly fixed.
- Start stitching the braid along its entire length, stitching only on the downward part of the zigzag.
- When all the braid is stitched, gently pull the thread and the flower will come together into a single whole.
- All that remains is to make the middle: to do this, sew a bead in the center or glue a cabochon.
The material is affordable
This daisy will be a good addition to a hairpin for a little girl. The flower can be used for a country-style interior in the kitchen by fixing it on a curtain tieback.
Ribbon flower
Master Class
Miniature rose made from finishing braid
Another simple method of creating a rose is making a bud from zigzag braid . In this work you will need several shades of material at once; it is better to take contrasting ones. A good combination is white and red, but if you only have a plain braid at home, feel free to take it.
- Fold the braid in the form of an accordion: to do this, weave a zigzag together. Sew the braid along the entire length with threads by hand or using a sewing machine.
- Take either end of the ribbon and begin twisting the bud. Make sure that the petals fit snugly against each other.
- Sew the second edge to the bottom of the product to avoid frayed threads. It can also be glued using a glue gun.
- All petals must be straightened to give the rose splendor. Then take a thick green fabric and cut a circle out of it. Its diameter should match the size of the rose. Glue the flower to the base, secure with a hairpin or elastic if desired.
Zigzag braid is often used for finishing women's dresses and blouses
The longer the braid, the more magnificent the rose will be. If you take a wide braid, the flower will come out tall.
By adding felt leaves to roses, you can get a nice headband decoration for a girl. It is appropriate to decorate bracelets and textile beads with these flowers, as well as make brooches and hairpins.
Weaving baskets from plastic bottles + photo
Recently, many housewives who have free time are choosing various exciting activities for themselves. For example, some people are interested in bead weaving, others like creating unusual decorative refrigerator magnets. All family members are involved in such activities, gathering together in the living room, discussing pressing problems and concerns.
Weaving baskets from plastic bottles can be considered not only as a hobby, but also as an option for additional income. Craft various
make baskets from plastic bottles with your own hands together with children, while organizing joint leisure time.
For those summer residents who do not want to buy ready-made products to decorate their gardens, weaving a basket from a plastic bottle will be an excellent option for creating unique decorative elements.
Tools and materials
Let's talk about how to make a basket from plastic bottles with your own hands. In order for the result to meet your expectations, you need to take care of the tools and materials in advance:
- scissors;
- nylon threads;
- old plastic bottles;
- thick cardboard;
- glue or tape
Sequencing
In order to make a basket of plastic bottles beautiful and original, it offers a certain algorithm of actions.
- First you need to decide on the color that the original basket of plastic bottles will have. The color of the source material depends on this.
- Next, you can move on to cutting the bottle.
- From it we make strips of the same length and width.
- We bend them into “corners” blanks.
- We intertwine them with each other.
- We connect individual rows with each other.
- We attach a handle to the product.
- The final step will be attaching the bottom to the finished product.
This handmade basket of plastic bottles will be an excellent decorative element for any suburban area.
Advice! It is better to prepare in advance a sufficient number of strips, the width of which is 1 centimeter. Depending on the size of the product, a different number of such strips will be required.
Each piece is folded in half so that there is a fold towards the center. Then the halves are bent again, obtaining a strip whose length is four times less than the original sample.
A beautiful basket of plastic bottles with your own hands can be made from bottles of different colors. For example, the bottom of the product will be brown, and the sides will be green.
Designers offer a variety of options for creating such decor; it is quite possible to choose the method that seems most understandable and accessible.
To prevent the product from spreading, you can arm yourself with a fishing line.
Advice! If the finished basket will be used outdoors, it is best to glue the individual parts into one product with a glue gun.
Cardboard will quickly lose its performance characteristics when exposed to moisture, and the appearance of the product will be lost.
Second option
A basket from a plastic bottle can be made with your own hands using the “chess” method. This weaving is much more complex and requires the master to have certain skills.
For work you will need the same tools as in the first case. A cardboard box is used as additional material.
First, long strips are cut from a plastic bottle. The middle part of a plastic bottle is optimal for this.
Advice! To make such strips even and uniform, you can first stick electrical tape onto the bottle, and after the process of cutting the strips is completed, remove it.
The cardboard box will serve as a model for the basket being created, and it can also be used as a basis for creativity.
You need to turn the box upside down and fasten two plastic strips side by side in a horizontal or vertical direction. For this you will need tape. Then new plastic strips are attached in a checkerboard pattern, they are threaded between those that are already attached. Similar actions can be carried out without a box, for example, on a table.
After the bottom is woven, the side parts of the product are made in the same way. After completing the work, you need to carefully bend the edges of the plastic and glue them inside the basket.
If desired, add a handle to the created accessory. Such a basket will not be empty; for example, you can put flowers in it. Among the many advantages of such products, we note:
- ease of care for them;
- minimum cost of the product;
- aesthetic appearance;
- basket mobility
With the right color selection, you can create a real work of art with your own hands, which will become a source of pride in front of your guests.
Useful tips
Decorative items offered in stores are not always interesting and unique. That is why many summer residents try to create decorative elements on their own.
Any craft you make yourself will be much cheaper, and no one else will have such a product.
For example, wicker baskets made from old plastic bottles can be turned into original containers for country small items.
Modern designers consider plastic to be a universal and inexpensive material, so they are increasingly turning to plastic bottles in their work.
Advice! If you plan to use a plastic basket to place flower pots, you will need soil.
Lately, you can increasingly see homemade polyethylene flower pots at your summer cottage, which are not inferior in appearance to ready-made flower pots.
Nowadays, many craftsmen create unusual products in the handmade style, which involves the use of a variety of improvised means. Plastic bottles have become the most popular.
They are not only accessible, but will also be completely free, which is a significant plus. Three types of plastic are suitable for creating crafts.
We have already talked about the plastic from which bottles are made. The second type of raw material for creativity is packaging polymer. Its main advantage is its length.
It is much easier to divide a wide ribbon into narrow fragments than plastic bottles.
- You can also make unusual decorative baskets from polycarbonate, milk packaging boxes, paper folders, and plastic cups.
- Such materials are much denser than packaging polyethylene, so the finished basket will have a more impressive and presentable appearance.
MK..Soap baskets
author: Evgeniya 2
The material we need to make a soap basket: soap of the correct shape, needles, various ribbons, beads and deco material.
We draw lines and ovals on the soap with a pencil or a needle, where the needles should be. If the needles have no beads at the end, then you can string beads onto such needles, as I did
We attach the ribbon to the needle and begin to braid the top part
With this knot you can secure the ribbon to the needle
This is how the top part of the soap is braided
Then we begin to braid the bottom part of the soap
After we have finished braiding both the lower and upper parts, move on to the top
Currently, completely different available materials are used for needlework and handmade style products. Plastic drink bottles have become especially popular. This material is not only publicly available, but also absolutely free, which is a big plus.
Weaving baskets from plastic bottles has recently become very popular. The step-by-step instructions are so simple and clear that even a child can handle the craft. The advantage of this material is that there is always a variety of textures and color solutions at hand.