Santa Claus with a face made of polymer clay from a bottle and two hats
I want to show you how to make Santa Claus under the Christmas tree using available materials. Less words, more photos :) Let's start...
For the face we need:
- polymer clay;
- tablespoon;
- the stacks are flat, which is convenient for you to work with;
- silicone stacks;
- stacks with a ball at the end of different sizes (boules or dumbbells);
- acrylic paints;
- dry pastel;
- matte acrylic varnish (preferably varnish in a can like “Clear” or varnish from a car dealership). Trouble can happen with creative varnishes; over time, the varnish will begin to stick and collect all the dust.
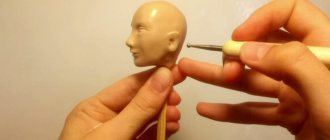
We take about half a pack (25-30 g) of any light-colored polymer clay or the remains, then the workpiece will have to be repainted in flesh color.
We send this blank to bake according to the recommendations for your polymer clay. After cooling, we tint with dry pastels and paint with acrylic paints. Finally, coat with varnish and leave for 2 hours for the varnish to dry completely.
While the face is drying, let's make the body.
We will need:
- glue gun;
- scissors;
- a needle and thread of a suitable color;
- wooden base (in principle, any base, if made from a smaller bottle, then a metal lid from a jar will do);
- plastic bottle 2 l;
- snow maiden hats with pigtails, now sold everywhere, I bought them at a chain hypermarket for 29.90 rubles per piece;
- a piece of white fabric, enough to wrap the bottle and make the head;
- various ribbons and lace for decoration.
Using a gun, glue the bottle to the base, align the white fabric, and glue one edge of the fabric to the base. We cut off one braid from the hat, wrap it in fabric, form the head and try on the face :)
We cut off the neck of the bottle, turn it over and insert it back (for rigidity), seal it, insert the head and seal it again.
We cover the bottle with fabric and sew it to the head, having previously folded the edge of the fabric. We try on the hat, cut the hat along one of the seams and cut off the end of the cap with the pompom.
Next, we wrap the bottle with a fur coat blank and glue on the face. We cut off the excess from the “fur coat” so that it fits well.
Take any ribbon or braid you like and glue it in the center of the workpiece. Carefully sew our fur coat along the ribbon and in the neck area. This is how old Dracula turned out :)
Cut off the excess collar. We cut off the white trim from the second hat, form a collar and sew it on. We cut off all the braids from the hats and unravel them into fibers, this will be the fur on the fur coat.
Sew on the “fur”. From the fibers of the loose braids we form a wig for the Girl and sew it to her head. Now we have an Indian shaman :)
We make a mustache from a small piece of fiber. We take one “strand of the braid”, fold it in half and sew through the fold, this is how we get a beard. Carefully glue the mustache and beard with superglue.
This is how Grandfather with kind eyes turned out. There is very little left. We make a boyar semicircular hat for Grandfather Frost.
For the handles I made a rough pattern. I folded the remaining hat into four layers. Now we cut out and sew the blanks in pairs.
I sewed by hand, since I’m still only dreaming of a sewing machine, but it’s much faster. Then we cut the blanks and turn them inside out, stuffing them with the same fibers into the “braids”. We sew on the “fur” by analogy with a fur coat. These are the handles we got, all that remains is to attach them to the body in any convenient way, sew or glue them :)
All we have to do is make the most important attribute of Santa Claus - the Magic Staff. The materials can be anything, for example, a tree branch decorated with sparkles. I have a piece of polymer clay, skewers and ribbon.
This is the kind of Grandfather Frost I got :) My daughters really liked it, the eldest Varyusha (she is 4 years old) talked to him for a long time and told him what gifts she wanted for the New Year :) And the youngest Vlada held several tea ceremonies with him :) On my own behalf I can add that the toy turned out to be very strong, it is simply impossible to break or smash by accident, we checked :) Good luck and health in the coming year!!!
Thank you for your attention! If anything is unclear, I will be happy to answer questions.
PS: If you liked my master class, please click on the “Like” button just below, and then perhaps Santa Claus, through the administration of the Masters Fair, will give me a gift :)... Thank you!
Delicious craft made from mastic
- To decorate the New Year's table, you can sculpt a delicious Santa Claus from mastic. You will need red, white and black raw materials. The technique is the same as when modeling from plasticine. Roll the body into a cone with a diameter of 20-25 mm at the base and two thin sausages (white and black).
- Make sleeves and hands out of mastic. Use a toothpick to press the fingers through.
- Collect the torso of Santa Claus. Use plain water as glue. To make your arms hold better, pierce the torso with regular raw pasta and place arm parts on it on both sides. Make a buckle from two squares of mastic.
- Sculpt the details of the head. Use stencils and molds.
- Collect your head. The cheeks can be colored with food coloring or beetroot.
- Glue the head to the body.
- Delicious handsome Grandfather is ready to decorate any New Year's table. Also, but with a braid instead of a beard and with a small nose, a Snow Maiden is sculpted.
Santa Claus from toilet paper rolls - making a craft from scrap materials
Materials:
- Two toilet paper rolls.
- Colored paper - red, white, blue, a little yellow, flesh and orange.
- Scissors.
- Glue.
- Pencil.
Manufacturing:
- Wrap and glue the roll with red paper.
- Wrap the roll with a red strip, which should lie flat.
- Cut out parts for the body and face, glue.
How to make a craft from nylon tights, master class in video
There is a cool idea for creating dolls using the stocking technique. Unfortunately, I am not a master at this, so I am providing a master class in video format.
And here I’ll give you an idea from a sock
You can make a body without handles. The main thing is that it is sustainable.
Well, do you often find balloons in your house? They also make wonderful Santa Clauses.
That's not all. We can say that we are only at the very beginning of the journey!
Do-it-yourself Santa Claus doll made of fabric - step-by-step master class with patterns
Materials:
- Hot glue, thread and needle.
- Cotton body fabric.
- Fabric for a coat, hat and bag (you can use any fabric).
- Felt 2 mm thick to make felt boots, and 1 mm thick to put in a coat.
- Sintepon.
- White wool for felting (beard and hair).
- Acrylic paints.
- Wire for a staff.
- Metallized tape and zigzag braid.
Manufacturing process:
- Draw a template of the body, arms, legs and clothes of a fairy-tale character, and then cut it out.
- Transfer to fabric. For the parts of the arms, legs, coat and body, the fabric is folded in half.
- Sew Santa Claus by stitching the fabric according to the translated template. You need to leave holes to turn the product inside out.
- Cut with an indent from the seam.
- Turn out, iron and fill tightly with padding polyester.
- Sew up the holes.
- Sew the legs across the entire body.
- Sew along the back seam on the front side and on the back.
- Iron the seam.
- Place the front and back of the coat with the right sides facing each other, and place felt 1 mm thick on top. Sew, leaving a hole for turning inside out.
- Turn the coat inside out and iron it.
- Take metallic tape and zigzag braid to sew around the perimeter.
- Sleeves can be sewn without lining and decorated with the same details as the coat.
- Insert Santa Claus's hands into the sleeves.
- Cut felt boots from 2 mm thick felt and sew them with floss threads.
- Sew the coat and sleeves to the body.
- Paint eyes, nose and cheeks with acrylic paints.
- Glue the hair and beard with glue.
- Make a staff, decorating the end with a bead and ribbon.
- Sew a bag, a hat and decorate the edges with ribbon.
From cardboard
Fairy tale characters always attract children. Even a preschooler can create it. You will need to cut a blank out of cardboard according to the template. A fur coat, hat, and face are created from colored paper and glued to the base. Such simple Santa Claus crafts made from cardboard will help decorate your room for the holidays.
It is worth sprinkling the fur coat with glitter to make the figurine stand out among other decor. If you make a Snow Maiden or a Snowman, you will get a real fairy tale. Place all the magical characters near the Christmas tree.
Fleece Santa Claus
You will need: bright and flesh-colored cotton fabric, white and red fleece, felt, padding polyester or holofiber, combed tape (wool for felting), foam rubber, felting needle, thick and thin wire, glue gun, Moment-Crystal glue, dense cardboard, acrylic paints and brushes, wire cutters, pliers, stationery knife, buttons, beads, seed beads, floss threads.
Master Class
- Make a pattern from cardboard: cone with sides 13 cm; circle with a diameter of 6 cm and handles (optional).
- Draw a line through the center of the circle and divide it into 3 equal segments, then make holes for the wire at their joints.
- Place a padding polyester circle and a slightly larger diameter cotton circle on the cardboard circle, then pull the fabric around the cardboard using thread and a needle as shown in the image.
- Bend a thick wire into the letter P, then insert it through the holes in the cardboard, padding polyester and fabric.
- Bend the ends of the wire so that you get feet.
- Prepare a piece of thin wire 25 cm long and screw it to a thick wire, then glue it with hot glue. At this stage, make sure that the structure is stable.
- Prepare 2 pieces of cotton fabric 22 cm long and 4 cm wide. Fold in half lengthwise, sew, turn out, pull over the legs and sew with a blind seam to the bottom.
- Make a cone pattern from flesh-colored fabric, fold it in half, sew, leaving 2 mm of the tops unsewn, fold the edge around the circumference, baste and turn the cone out.
- Place the cone on a thin wire, leading its end through the hole in the top. Stuff the cone with holofiber so that the wire is in the center of the body, then sew the folded edge to the body around the circumference with a blind seam.
- Cut out large feet from cardboard, then hot glue them to the wire feet.
- Cut the boots out of foam and make a recess in the back for the ankle wire, then attach them.
- Cut 2 ovals from red fleece, cut a triangle at the top, cover the foam boots, sew the heel with a blind stitch and pull the fleece around the cardboard sole.
- Cut 2 felt ovals slightly larger than the cardboard sole, hot glue them to the sole, trim off the excess and sew the felt to the fleece with a blind stitch.
- Mark the lines for the top of the jacket and the bottom of the cap on the cone, then roll a padding polyester ball, cut a circle from the fabric, pull it along the edge and sew the nose in place.
- Draw a face to your liking.
- Cut the red fleece jacket into a truncated cone shape, fold it in half, sew along the edge, then turn it inside out.
- Sew handles and gloves from red fleece and cotton fabric as shown in the image.
- Pull the jacket over the body-cone and sew at the bottom and along the neck with a hidden seam.
- Cut out figures from felt - Christmas trees, houses, then glue them with Crystal glue and only then sew them on as desired.
- Sew a white fleece snowdrift ribbon with a hidden seam and decorate the composition with beads and buttons.
- Cut boot cuffs and cuffs from white fleece, fold in half, sew along the edges, stretch over the arms and legs, then hand sew. Make a wavy collar in the same way.
- Sew the arms to the body using a button fastening: pull the thread a little, tie a knot and glue it with Moment.
- Tear 10 cm of wool from the combed strip, gather it into a bun and felt the beard with a felting needle.
- Tear off a bunch 2 times thinner and 2 times longer, then roll it in place of the mustache.
- Tear off 2 more bunches as for the beard, then roll on both sides of the face.
- Felt the hair on the sides and back of the head in the same way.
- Cut out an elongated and narrowed cap from cotton fabric based on half a cone, sew it together, leaving a hole at the top.
- Turn it inside out and put the cap on, bringing the wire through the hole and sew it along the edge to the head. Bend the end of the wire into a loop.
- Make a pom pom and flap out of white fleece, then sew them on.
- Make a small felt Christmas tree and glue it to the hat as a decoration.
Fleece Santa Claus is ready! I recommend watching this video!
DIY Santa Claus from CUPS | Christmas decor
Santa Claus made from popsicle sticks
An interesting Santa Claus is made from disposable wooden spatulas or ice cream sticks.
Craft materials
Glue them in a row.
Glue the sticks together
Cover the sticks with white paint.
Let's color them
We decorate the face with cardboard eyes and a nose, and make a beard from cotton balls. We glue the cap from red cardboard and decorate it with a cotton pompom.
Glue the cap and face
Santa Claus made from popsicle sticks is ready!
Santa Claus made from popsicle sticks
You can make a craft from one stick.
Popsicle sticks
We paint it red, leaving some free space - this will be the face. We decorate the face with a cotton beard and the edge of a cap, and glue on toy eyes.
Santa Claus made from an ice cream stick
The suit is completed with buttons. Even kids can cope with this task.
Decorate with cotton wool and buttons
Advent calendar “Head of Santa Claus”
An advent calendar for anticipating a holiday can be hung a month before Christmas or New Year. Children will be happy to move the arrows in the morning and announce to everyone at home how many days are left until the event.
To make an advent calendar, you need to prepare the following materials: paper, template, simple pencil, hole punch, felt-tip pens or paints, scissors, soft wire, colorless glue, stapler. The order of our actions:
- We prepare a template (print it on a printer) or buy a ready-made one in the stationery department.
- We paint the details using our imagination.
- We cut out the finished head and dial and fasten them together using glue (stapler).
- We draw, color and cut out the arrow for the clock.
- Using a hole punch, we make neat holes and thread the suspension wire through them.
Our holiday advent calendar is ready! Next to it you can place a list of tasks that need to be completed. Every morning we move the needle, and every evening we cross off the completed task from the list!
However, you can make a slightly different waiting calendar with your own hands. Here the passing days need to be sealed with cotton balls.
Every day more and more numbers will be closed, the beard on the face of Santa Claus will grow, and the child will be able to control how soon the holiday will come! The template will look like this.
May you have the best Santa Claus. I wish everyone good luck in the New Year!