Part marking is the most important operation in the production process chain. Depending on the requirements for accuracy and legibility of lines on the surface, the method of applying them is selected. Pencil, chalk, and marker are easy to use. No effort required when marking. However, these methods are not effective enough in many cases. The lines are too wide, easily removed during operation and are difficult to see during processing. The optimal tool for high-quality marking is considered to be a metal scriber. The lines are clearly visible and cannot be erased. The thin contour allows for the production of high precision parts.
How to make a metal scriber from a bolt and a drill bit
A scriber (scriber or Scriber) is a tool for marking metal surfaces. Such products of various designs are produced by industry and in terms of quality they differ greatly. In order not to waste money, you can make it yourself, even with low qualifications and without expensive materials.
The process of making a metal scriber
Holding the bolt in a vice, cut off the head and most of the threads.
We insert the bolt shaft into the chuck of the drilling machine, turn it on and use a grinder to round the end formed after removing the head.
We turn the bolt over and form a cone in place of the remaining thread and dull its tip.
We correct the cone with a file and make two belts on the rod to make it easier to hold the tool with your fingers in the future. We finally form the other end.
We clamp a drill (broken) made of HSS steel with a diameter of 3 mm in the drill chuck and form the working part in the form of a sharp cone. The tip can also be made of silicon carbide or tungsten.
We tap the blunt cone of the bolt and drill an axial hole with a diameter of 3+ mm and a depth of about 25 mm.
Squeeze a drop of superglue into it and insert a pointed drill with the fastening part.
The scriber is completely ready to work on both soft metal and steel.
Mechanization of marking actions
Marking operations are among those areas of construction and design processes that are reluctant to transfer to mechanization. Especially when it comes to important procedures, manual verification is indispensable. Nevertheless, certain stages are still subject to a transition to modern operating principles. Today, mechanized marking tools are represented by electric cores. Unlike traditional models, such modifications are equipped with a power filling that drives the impact mechanism. Actually, the centering of the tool and its working part is carried out directly by the master, but instead of a light blow with a hammer, the sharp part of the tool is automatically hammered.
Metal scriber
Part marking is the most important operation in the production process chain. Depending on the requirements for accuracy and legibility of lines on the surface, the method of applying them is selected. Pencil, chalk, and marker are easy to use. No effort required when marking. However, these methods are not effective enough in many cases. The lines are too wide, easily removed during operation and are difficult to see during processing. The optimal tool for high-quality marking is considered to be a metal scriber. The lines are clearly visible and cannot be erased. The thin contour allows for the production of high precision parts.
Description of the tool
For many years, domestic manufacturers relied in production on strict rules regulated in legislative acts. Thus, the metal marking scriber GOST 24473-80 must comply with the dimensions and characteristics specified in the document. The following types of tools were allowed before production:
- one-sided;
- two-sided;
- single-sided with handle;
- double-sided with handle.
The material of manufacture was also discussed. The scriber could be solid carbon steel or carbide-tipped. Replaceable needles were sometimes used as a cutting element. The tool is made from steel grades U10, U12. Such models have their pros and cons. The disadvantages include rapid wear of the tip. The advantage is the ability to sharpen the device on any abrasive equipment. In addition, the steel sample is cheap. A metal scriber with a Pobedit tip will cost more.
Its service life is many times longer, it is not afraid of scale, dust, and dirt on the surface. A special diamond wheel is required for sharpening.
A brief overview of catchy bait
Beginner fishermen and more advanced fishermen look for stripers with a variety of gear and methods. But the arrival of the winter season forces them to change their summer preferences, looking for something more unique and functional. In most cases, no-attachment jigs are used for winter fishing, which demonstrate good catchability under any conditions.
The devilless reel is a real masterpiece in the fishing field, which has practically no competitors in terms of efficiency in catching perch . Every fishing fan has such a jig at his disposal, because he knows how useful it is for the winter season.
You can catch not only perch with the devil, but also many other inhabitants of the depths, including:
However, the minke whale reacts to such an invention much more intensely than other types of fish, which is why the bait is often called “perch”.
Externally, it is an elongated drop-shaped jig, about two centimeters long, which is fixed to the fishing line using a small ring located in the upper part of the bait.
At the other end there is not a classic hook, but a tee with multi-colored beads. itself can be painted in different shades , so it can be used for different fishing conditions.
For fishing with a reelless bait, you should take a classic jig tackle, which is pre-equipped with a medium-hard nod. As for fishing line, it is customary to give preference to high-quality and reliable products with a cross-section from 0.1 to 0.15 millimeters.
Such baitless baits can have different weights, sizes and shapes, so experienced fishermen always have several baits in their arsenal for any occasion.
Unlike beginners, who prefer to buy everything at the store, seasoned professionals almost always make their own devil jigs. In fact, it is not difficult to complete such a task, if only you have the desire. And if you also find special molds , then you can pour several dozen of these products without spending a lot of effort, energy, and most importantly, money.
DIY making
The home master is not limited by strict production regulations and requirements. He has the right to make a metalworking scriber for himself from the desired material, the desired size, and shape. Experienced craftsmen, even at large enterprises where it is possible to use a factory-made product, believe that a self-made model is better. A homemade scribe takes into account the individual characteristics of the worker and the peculiarities of performing operations. A comfortable handle is more comfortable to use, since you often have to exert significant effort when applying markings.
Having decided that a tool is necessary, the question arises - what should a metalworker’s scriber be made of so that it is convenient and lasts a long time?
There are many options, for example:
- Bench tools: file, tap, tool steel drills, core.
- Part made of high-strength alloy: valves, shafts, needles, spokes.
- Drills, drills with pobeditovy tipped.
Home production technologies require the availability of the necessary tools and work skills. Deciding how to make a scriber with your own hands in this case is the choice of the master. Among the most popular methods are the following:
- sharpening of convenient parts according to drawings;
- production of a holder for a scriber with replaceable needles;
- welded structure of handle and cutting edge.
When working with an abrasive tool, remember that it is unacceptable to overheat the workpiece. The appearance of scale on the surface is a defect. A minimum of 0.5 mm of metal should be removed in this case. Cooling liquids and a gentle processing regime are used.
A good solution for making your own scriber would be to use sewing needles. For their production, high-strength carbon steel is used. Having made the handle, which can be made of wood or other materials, a clamping mechanism for the needle is inserted. It is first shortened to the required size. It is even easier to use sewing needles by removing the rod from the faulty machine.
A completely different, modern approach to solving the problem is offered by savvy craftsmen. You can purchase a set of electronic scribers online. It works on the principle of arc engraving. To implement the idea, you need to know the principles of electrical engineering and skills in working with devices. Although the power supply voltage is small, even a cord from a computer USB port will do, you should follow safety precautions.
Punching marks
The mark itself is a depression made on the surface of a workpiece or structure using a core, that is, a metal scribe. This operation serves as a fixation of previously completed markings. It would seem, why essentially deform the material if you can mark the same contours with paint. But, firstly, the core creates a depression that will not be erased, unlike the outer coating, and secondly, it is the deepened risks that, in addition to spatial notches, can immediately prepare for drilling. The core itself is a simple and unpretentious tool. As a rule, it has a rod base that turns into a cone with a point. The core is guided by the mark with two fingers, placed perpendicular to the given point and easily driven in with a hammer. Thus, punching is carried out on metal surfaces.
are the simplest tool for applying the contour of a part to the surface of a workpiece and are a rod with a pointed end of the working part.
Scribblers are made from tool carbon steel grades in two versions: single-sided and double-sided. Scribblers are made with a length of 100… 120 mm.
The working part of the scriber is hardened over a length of 20...30 mm to a hardness of HRC 58...60 and sharpened at an angle of 15...20°. Marks are applied to the surface of the part using a scriber, using a scale ruler, template or sample.
Scribblers (needles) are used to draw lines (scores) on the surface to be marked using a ruler, square or template.
Figure 3.2.1.1 Scribblers (collage by the author)
For marking on a steel, well-treated surface, brass scribers are used; Marks are applied to aluminum with a sharpened pencil. Four types of scribers are widely used - round, with a bent end, with an insert needle and pocket.
is a steel rod with a length of 150...200 mm and a diameter of 4...5 mm, one end of which is hardened at a length of 20...30 mm and sharpened at an angle of 15°, and the other is bent into a ring with a diameter of 25...30 mm.
Scribble with bent end
It is a steel rod sharpened on both sides, one end of which is bent at an angle of 90°. The middle part of the scriber is thickened and knurled for convenience. The bent end is used to apply marks in hard-to-reach places.
Scribbler with insert needle
made like a watch screwdriver; sharpened and hardened steel rods can be used as an insertion needle.
made in the form of a pencil with a retractable tip. The scriber body consists of two parts that rotate relative to each other on four balls, which are inserted through longitudinal grooves during assembly. A holder is provided to secure the scriber in the worker’s pocket and to prevent it from rolling off the stove. A rod made of VK6 hard alloy, sharpened to a cone with an angle of 20°, is soldered onto the working tip.
The scribers must be sharp. Their conical surface should be well processed (smooth) and not scratch the ruler or square. The sharper the working part of the scriber, the thinner the marking mark will be and, therefore, the higher the marking accuracy.
The scribers are sharpened on sharpening machines. The scriber is taken by the middle with the left hand, and with the right hand by the end opposite to the one being sharpened. Maintaining a constant angle of inclination relative to the abrasive wheel, with light pressure apply the scriber with a cone to the rotating circle, evenly rotating it with the fingers of the right hand. To avoid tempering, the scriber tip is periodically cooled in liquid.
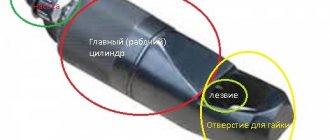
What is core
A center punch or core is a metalworking impact-cutting tool in the form of a metal rod made of hardened steel with a point at one end, designed for marking on metal necessary for positioning the drill. It is used in conjunction with a hammer. The last blow is struck on the core, as a result of which the tip of the tool leaves a dent in the metal, which is used to install the drill. Due to the hole, the possibility of slipping during drilling is eliminated.
Typically, cores are a round rod. Its edge is sharpened at 100°-120°. This angle was chosen for a reason. It is with this slope of the top that the cone sinks quite well into the metal, while its tip is deformed to a minimum. It should be noted that tools designed to work with soft metals can be sharpened at a smaller angle. Due to this, the geometry of the hole changes, and it is easier to get into it with a drill for non-ferrous metal, which has a different cutting edge angle.
The part of the core that is struck with a hammer is called the buttplate or striker. The central area of the instrument is usually made in relief, for more comfortable holding in the hand.
The center punch is made of tool steel. Its tip is hardened to a length of 20-30 mm. Its firing pin can also be heat treated. In this case, the central part is not processed, which allows the tool to absorb impacts very effectively and prevents it from breaking. The reserve length of hardened steel near the tip allows, if necessary, to sharpen a worn tool without the risk of losing its chopping qualities.
Types of center punches
Although the core is a very simple tool, its design may differ depending on the tasks for which it is made.
Popular varieties:
- Ordinary.
- Bell.
- Auto.
- With extension spring.
The usual one is just a steel rod with a round or multifaceted cross-section. It is only used in conjunction with a hammer. Although the core has its own specific sharpening angle, it can be used as a scriber. In this case, the accuracy of such a line will be worse due to the specific cone-shaped structure of the tip. This tool is produced in various length variations. Usually it is 140 mm, but it can be increased. The tool should be chosen at hand. If it is too narrow, your hand may be damaged by the hammer.
The bell is very similar to a regular center punch, but has an additional element in the form of a funnel. Due to it, it is able to center on convex and spherical surfaces. With this tool it is easy to core a metal ball, which is difficult when using a conventional straight core. The circle around the tool prevents the tip from sliding to the side. This is a very specific and highly specialized core, unsuitable for any other work other than marking spheres. Its skirt is made of fairly hard rubber. It effectively absorbs shock and does not slip, which facilitates the correct direction of the tip.
The automatic core can be used with one hand. This is a completely self-sufficient tool that does not need to be used in conjunction with a hammer. It is a hardened tip embedded in a tube with a spring system. To operate the device, you need to place the tip at the drilling point and press. As a result, the main internal spring is compressed, then the release mechanism is triggered, and it rebounds. As a result, the hard tip strikes the surface. This device makes holes of the same depth, which distinguishes it from a conventional metalwork core.
Automatic punches are very well suited for use in hard-to-reach places where it is impossible to reach with a hammer. When choosing this tool, it is best to pay attention to devices with a round handle in place of the butt plate. This makes pressing easier and does not create pain in the palm after the mechanism is activated. If you do dozens of holes in a row, then the absence of discomfort will be very important.
The core is a very simple tool that is often made by hand. Often, homemade devices are no worse than purchased ones. A fairly common punch design is the spring punch. It consists of a separate tip and striker. They are connected to each other by a conventional extension spring. To trigger such a device, you just need to pull the firing pin and release it. Due to the elasticity of the spring, it will accelerate forward and hit the tip, which will go deeper into the metal. This type of punch is used without a hammer, but it requires two hands to operate it, so it is not as good for hard-to-reach places as the automatic store-bought counterpart.
Materials for marking workpieces, cutting points
- Log in to reply to this topic
#41 AVN
- Top
- Insert nickname
#42 Shurpet
- Participant
- Messages: 4,141
- Saratov city
prices are probably normal there. The site is in the by domain zone (Belarus). Their ruble is no longer the same.
- Top
- Insert nickname
#43 Lenka
I’m at a loss for words here, joke around: Industrial markers for cars and tire shops. The lower on the page, the funnier it is.
- Top
- Insert nickname
#44 Vasyan
Post edited by AVN: 27 September 2013 17:58
- Top
- Insert nickname
#45 Lenka
What is the best way to mark the cutting location if cutting by welding? Chalk is not visible!
Post edited by AVN: 27 September 2013 17:59
- Top
- Insert nickname
#46 Lepilo
for that price they should not only be able to draw, but also cut and cook
Post edited by AVN: September 27, 2013 18:00
- Top
- Insert nickname
#47 AVN
- Top
- Insert nickname
#48 Lepilo
What if chalk is prohibited for use? Just like cutting RDS itself is an invention of stingy business executives.
Post edited by AVN: September 28, 2013 00:32
- Top
- Insert nickname
#49 Hephaestus
Painting tape - 160-1500-20 pipes - ideal for angle grinders, gouging, or anything else, but it burns, but this is its plus, it immediately gives both an angle (any) and a line, if you trim it with a scalpel, then pattern cut, it is also a marking cut, you can then go through it like a Sculpted scratch, and quickly, and most importantly, there will be no unnecessary marks, which at the 12th hour of work can be confused, and cut off in the wrong place, in general, Guide Removal Tape, and chalk and others - and expensive and extremely, as it turned out in life - stupid, the tape is painted - on stainless steel - contrast - on black - contrast. In fact, this is a soft ruler, so in the 2000s they cut pipes with one hand using the first makitas, from the knee, marking with wide tape, it is impossible to make a mistake even by 0.5 with either thermal cutting or abrasive cutting. Even if the pipe is under the receiver, even if it’s on the top side, it’s still a paint job - and here’s the cut you want. I was also taught in chalk, because of this once. I promised not to swear anymore. Removed.Font and color.A.V. Gouging is good because by hitting the edges with a sledgehammer you can get a tight cut without holding the part with your hand, but it’s strange to save on 1500 angle grinders and 150 per pack of disks, forcing people to cut metals with an electrode at 250A, this is something from the realm of classical literature, something even according to Tolstoy, if not according to Saltykov-Shchedrin. The most amazing scriber is a 4 mm self-tapping screw for metal with a 6-sided head. Eternal. You can still screw it in somewhere when things get really bad.
The old trumpeters marked with an electrode - just casually about the lines, you can see it perfectly, plus by selecting the speed you get points, this is the highest measure of skill - when they didn’t even give out chalk, in general it’s marking with the same chemical material as the cut, plus it’s a support for the cutting electrode, some people, instead of a mark, drew a pattern, beating it with a mandrel, a mark of the master, a mark is easy to fake, but this is a bummer
- Top
- Insert nickname
How to make a metal scriber from a bolt and a drill bit
A scriber (scriber or Scriber) is a tool for marking metal surfaces. Such products of various designs are produced by industry and in terms of quality they differ greatly. In order not to waste money, you can make it yourself, even with low qualifications and without expensive materials.
The process of making a metal scriber
Holding the bolt in a vice, cut off the head and most of the threads.
We insert the bolt shaft into the chuck of the drilling machine, turn it on and use a grinder to round the end formed after removing the head.
We turn the bolt over and form a cone in place of the remaining thread and dull its tip.
We correct the cone with a file and make two belts on the rod to make it easier to hold the tool with your fingers in the future. We finally form the other end.
We clamp a drill (broken) made of HSS steel with a diameter of 3 mm in the drill chuck and form the working part in the form of a sharp cone. The tip can also be made of silicon carbide or tungsten.
We tap the blunt cone of the bolt and drill an axial hole with a diameter of 3+ mm and a depth of about 25 mm.
Squeeze a drop of superglue into it and insert a pointed drill with the fastening part.
The scriber is completely ready to work on both soft metal and steel.