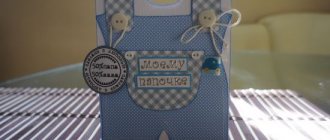
Do you want to make a gift with your own hands, but don’t know how? The Ukhtybox gift service will help you! Tell us a little about the recipient of the gift, and the service’s creative team will do the rest. All you have to do is choose the perfect box from the options offered.
In the modern world, fewer and fewer people think about what to give to this or that person. Of course, today you can buy almost anything or give money as a gift. But we recommend not to forget that you can make a really good gift with your own hands. After all, any thing made with love is much more valuable and more expensive than a store gift.
What can you give with your own hands?
A similar question is faced by most people who want to do something with their own hands. To begin with, we recommend thinking about what this or that person likes. It is quite possible that you can make this a reality.
It is also worth thinking about how close the person is to you. For example, a small present for an employee at work should not be too bulky or expensive. Otherwise, it may not be perceived very correctly.
If the gift is intended for family or friends, then problems with the choice should not arise. After all, you probably know all their hobbies, dreams and aspirations. And we, in turn, have prepared a selection of stylish and modern gift ideas that are suitable for a variety of holidays.
Book of recipes
Your grandmother probably has an old notebook with her favorite family recipes that everyone still uses. Why not make a nice thick cover for it? Just don’t overuse the decor, because it won’t be too practical!
You can completely organize your grandmother's notes and make a cover with rings or any other fastener inside. Cover the cover made of thick cardboard with fabric, decorate it with embroidery and mark the binding.
To attach larger pieces, use craft wire. Seal the inside sides of the cover with the same cardboard covered with fabric so that nothing sticks out.
Photo: samrukamy.ru
Photo: wotboxs.ru
DIY fabric bull: beautiful patterns and ideas (photo)
Decorative pillow
If you want to give a gift to a child or one of your friends, we suggest making a pillow. But not quite ordinary, but decorative, in the shape of a donut. It will be a great decoration for your room and will always remind you of you.
To make it you will need the following materials:
- felt or fleece in beige and pink colors
- threads to match each shade
- small colorful pieces of felt
- pillow filling (for example, batting)
- sewing machine
- scissors
- pins
- pencil.
Cut out two beige circles from felt. To do this, place pieces of fabric on top of each other and draw a large circle using a plastic bucket or other container. Then draw a small circle in the center, outlining the plate.
Another pink circle should be a little smaller. To make it resemble the icing on a donut, let's make its edges wavy.
As a topping we use multi-colored pieces of felt, cutting them into small strips. We attach the blanks to the pink circle with pins.
Sew on the colorful pieces and then pin the pink felt to the beige base.
Using a sewing machine, sew the pink part along the edge.
We connect the beige rings and sew them with a zigzag. Be sure to leave a small hole to fill it.
We fill the pillow with batting and that’s it, a beautiful gift is ready!
Depending on the hobbies of your family and friends, you can make a variety of pillow options.
Real players will be delighted with this pillow!
Cute pillows in neutral shades will be the perfect decoration for a child's room.
Features of crafts
How to please your grandmother on her birthday with your craft? You need to choose a topic:
- The main hobbies of the birthday girl. You should remember what your grandmother especially likes to do. A popular hobby is growing indoor plants. The beautiful decoration of a flower pot will delight your grandmother. If she likes to spend time in the kitchen, then an apron, napkins, etc. would be a good idea.
- Memories. As people age, they become more sentimental, and pleasant memories evoke tender feelings. You can help with this with postcards and drawings that remind you of unforgettable events and family history.
- Useful trinkets. What can be useful for a woman at any age? Jewelry boxes, various boxes, napkins, clothing accessories, handbags, etc.
- General tokens of attention - homemade flowers, beautiful compositions, greeting cards, souvenirs.
Attention! When working, you can use any craft material that is not dangerous for the child when making crafts.
Most often used:
- Cardboard and paper (white or colored, glossy, smooth or corrugated, for scrapbooking, etc.).
- Plywood, fiberboard.
- Plastic.
- Materials for modeling (plasticine, clay, press mache, salt dough).
- Fabrics of different types and colors, threads (floss, wool), yarn, lace.
- Beads, sparkles, beads and other elements of jewelry.
- Natural materials (stones, driftwood, branches, straw, fruits and seeds, dried flowers and leaves, shells, etc.).
- Available materials (containers and various packaging, plastic bottles, cans, bottle caps and caps, etc.).
Crafts for grandma can be made in different ways. From her granddaughter, grandmother will be happy with knitting, sewing, embroidery, appliqué, macrame, origami. When preparing a gift from your grandson, you can expect to use techniques such as wood burning and sawing, modeling and pottery, drawing, and decoupage. It is necessary to carry out the plan using the technique that the child masters best and can demonstrate his talent.
Advice! Adult relatives should unobtrusively help the child both in choosing an idea and in making it.
The complexity of execution is not so important. Attention and sincerity are most valued
Sweet gifts
Not only children, but also adults will be delighted with such a gift. After all, what could be better than your favorite sweets? That's right - a lot of sweets.
To make this gift, purchase:
- favorite sweets
- glue
- pot
- floral foam or polystyrene foam
- artificial grass
- skewers.
Connect all the parts as shown in the photo. The sweet gift is ready!
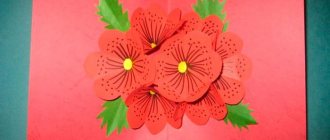
Collage "Cosmonaut"
Every man in childhood traditionally dreamed of becoming an astronaut. Therefore, a space-themed collage would be an excellent gift for dad or grandfather on February 23rd. The list of necessary materials is simply obscenely simple:
- Jar lid
- Paper
- Glue
Take a blue or black color and roll it evenly over the lid, previously glued with paper. This is the background of our craft, onto which we will attach the remaining parts.
Then form a rocket using the color purple. Complete the composition with a red rocket exhaust and white stars.
Similarly, you can depict cosmic landscapes - for example, the spectacular rings of Saturn. After finishing the work, coat it with varnish.
Thread painting
If you want to congratulate a person who loves different home decor items, then try making a picture.
To do this, you don’t need to be able to draw, because you will need completely different details:
- wooden plank
- nails
- hammer
- threads of any shade
- paper for drawing.
Draw a big heart on paper. We place the drawing on the board and nail the nails along the contour at intervals of 2 - 2.5 cm, after which we remove the paper.
We tie the end of the thread to one of the nails. We weave the thread in random order from one nail to another. We do this until the entire space is covered.
We fix the thread on one of the nails.
A beautiful picture in the shape of a heart is ready. Every person will definitely like such a gift, as it will perfectly complement the interior and will remind them of you.
Depending on preferences, interior style or a person’s hobbies, you can make a picture with a different design. Beautiful and unusual examples are presented in the photo.
Embroidery ribbons
A cute picture embroidered with ribbons will melt the heart of your beloved grandmother. If this is a new experience for you, then stores sell ready-made kits, but you can make the simplest drawings yourself. The main thing is to stock up on ribbons of different thicknesses and a needle with a wide eye.
First, stretch the outline on the hoop and outline the design with a pencil. To prevent the edges of the ribbon from unraveling, they are carefully burned with a lighter, and to prevent the ribbon from fidgeting in the needle, tie a knot near the eye. If at first you can’t embroider some complex elements, lay them out like this and secure them with thread.
Photo: vsempopodarku.ru Photo: livemaster.ru
Stylish bracelet for your sister or girlfriend
As you know, girls are real fashionistas. That is why a homemade decoration is an excellent gift for any occasion.
To make such an accessory you will need:
- simple thin bracelets
- beads or garland of beads
- Super glue
- threads of any shade.
Glue the beads to the bracelet with superglue. We wrap each bead with thread several times. Finally, secure the thread with glue.
You can make several bracelets in different shades to make them easier to combine with clothes.
By the way, as an addition to such a gift, you can make a small tray for bracelets and other accessories. Just follow the instructions in the photo.
Small items basket
At one time, paper weaving was popular. Why not remember old traditions? Moreover, the gift turns out to be simple and inexpensive to make. To create this you will need old newspapers.
You need to roll the sheets into thin tubes and glue them together to form a basket. The size of the basket is woven as desired. It will be convenient to put various little things into such a useful gift. Then they definitely won’t get lost.
Beach bag with original print
A gift in the form of a bag with an unusual design will definitely surprise even your best friend. You can sew it using cotton material or purchase a ready-made one-color bag.
Acrylic paints are best suited for creating a picture. You can draw by hand or use a stencil, as shown in the photo.
Coffee table
A craft for a grandmother from a grandson involves a more brutal execution. An example would be a coffee table made from fruit crates. To do this you will need 4 plywood products:
- Each container is varnished, placed on its long side and secured with the short side to the bottom of the adjacent box.
- Glass is installed on top.
- Books, baskets for needlework, vases, and dolls are placed in the resulting shelves.
So that the original table can move from place to place without problems, it is better to attach furniture wheels to the bottom. You can complement the piece of furniture with a wall shelf to match the table.
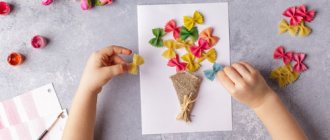
Bouquet of sweets
If you are invited to a party with a person who has everything, don’t worry, make an original composition of sweets. Believe me, you will definitely like such a gift and will attract the attention of all guests.
In order to make flowers, you will need:
- candies
- corrugated paper in different shades
- scissors
- transparent mica
- skewers
- strong threads.
Cut out four pieces from different shades of corrugated paper, as shown in the photo.
Take one of them and fold it four times.
On one side we cut off the sharp corners.
We unfold the paper and give the petals a convex shape, stretching them.
Repeat the same with the remaining pieces of paper.
Curl the edges of the petals using a skewer.
Wrap the candy in transparent mica and secure with thread.
We attach the smallest piece of paper.
We gradually add everything else.
These flowers can be combined into a beautiful bouquet or an unusual composition can be created. It all depends on your imagination.
Drawing
The easiest gift to make for children of all ages is a drawing. The youngest children can simply make handprints on paper, while older children can draw a story.
Grandma will be pleased to receive both a plot drawn based on a fairy tale or cartoon, and her portrait. It all depends on the age and skills of the child.
Volumetric letter
A wonderful gift for those who love creative things is a three-dimensional letter. This can be the first letter of the first or last name. It is very easy to make, as you can use cardboard or wood. Then decorate as you wish.
Frame
You can also make a photo frame from absolutely any materials that your imagination is capable of. You can make it out of plasticine; older children, with the help of their parents, can make it out of salt dough. Some even use food products - for example, pasta can be painted and used to decorate a ready-made base.
Ready-made kits for making photo frames are also sold. As a rule, they are made of plaster; all you have to do is paint them and insert a photo.
Photo frames created using spools of thread and buttons look interesting. Decor made from bobbins and buttons is also glued onto the base. The needlewoman will love this gift.
To decorate a photo frame, they also take shells and paste over the base. You can insert photos from your vacation into such a photo frame.
A gift for a true traveler
Is your loved one crazy about a certain country or just dreams of going there? We offer to help him or motivate him to travel with our gift.
Properties of plasticine
Plasticine is a material intended for modeling. It includes wax, clay, petroleum jelly, animal fats, and synthetic substances.
Nowadays stores offer a huge selection of plasticine; you can get confused if you want to buy material for modeling.
Any plasticine has the properties of softness, plasticity, and the ability to glue parts, expressed to one degree or another.
Let's look at some types of plasticine:
- classic, made by us, affordable, holds its shape well, easy to mold. The individual parts fit together well. But it is too harsh; you need to warm it up for a long time before work;
- imported, suitable even for crumbs, bright, plastic, soft, amenable to any hand. The composition includes natural ingredients. Individual parts do not stick together well;
- modeling dough, also containing natural ingredients: flour, water, salt, dyes. The parts are easily glued together, can be stored and painted for a long time. When interacting with water, it gets wet;
- floating, easy to sculpt, does not get dirty, floats on water. Perfect for the youngest children. But it doesn’t hold its shape well and falls apart;
- The modeling mass is unique, it molds well, does not stick to your hands, is pleasant to the touch, you can play with crafts for a long time. Quite expensive to purchase;
- ball, great for decorating parts and smoothing out unevenness. Bright, rich colors attract attention. But the parts do not attach well and fall apart easily;
- Modeling paste is suitable for older children. Pleasant to the touch, easy to mold, and can be painted. It dries very quickly, you may not have time to finish the work, which will upset the master;
- wax plasticine, holds its shape well, is bright, does not stain the surface, sticks well. Excessively sticky material.
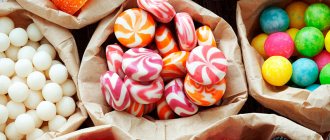
Edible gift
If you don’t know the person very well or want to give a small present to your colleagues, we suggest making an edible gift. You can use literally anything for this: cocoa, nuts, homemade cookies, marshmallows and much more.
Butterfly
To make this cute surprise you will only need basic modeling material. Roll out the green sausage and roll the end into a ball.
Then form four plasticine circles - two small and two larger. These will be the wings that need to be attached to the sides of our sausage. Using different colors, give the butterfly a face, antennae, and wing decorations.
In order for the resulting item to last as long as possible, you need to cover it with colorless varnish. You should not leave such crafts on the windowsill, especially in summer. By following these simple rules, you can preserve your memorabilia for many years to come!
DIY night light and candlestick
Making such a gift is not at all difficult. Moreover, overly complex materials are not required. Follow the instructions in the photo and be sure that the result will definitely please you.
A handmade gift is a truly valuable thing. After all, its production often requires a lot of effort and time. But still the result is worth it. Be sure to try to bring at least one idea to life and share the results in the comments.
Do you like to make gifts with your own hands or do you prefer to buy them?
Holiday card
A card is a traditional way to express your best wishes. It is attached to the bouquet and the gift itself. Making an eye-catching greeting card is easy. For this you will need:
- multi-colored balloons, the smallest;
- double-sided colored cardboard;
- double tape;
- scissors;
- your full-length photo;
- threads
The form of the postcard will be simple. You need to fold a sheet of cardboard in half, walk your fingers along the fold line, forming a clear crease, and write your wish inside.
To decorate the front side of the postcard, you will need to cut out your figure from the photo and inflate the balloons. Don't inflate them too much. They should remain small. As a last resort, you can cut an ordinary ball into two parts and make small ones from it.
Glue the balls to the top of the card using double-sided tape. Place a thread between each piece of tape and the ball, leaving the opposite end free for now.
Gather all the threads together and place them under the cut out figure. Also attach it to the card with pieces of double-sided tape.
How to paint cereals
In order to give unusual shades, it is best to take white beans, rice, and pumpkin seeds for this procedure.
You will need thick plastic bags. They are filled with cereal. Alcohol is added there in the amount of 2 tablespoons or 4 tablespoons of vinegar. The next step is to pour the dye into the bag. It should then be closed and shaken so that everything turns into the desired color.
The contents of the bag are poured onto the surface of the plate and time is given to dry. And the result was colored grains.
You can create products for every taste using cereals, beans, and grains. Effective for children. Since this is a great activity, and at the same time has a great impact on the development of the child.
Master class on flat applique from colored paper “Cook”
Oksana Seitmedova
Master class on flat appliqué from colored paper “Cook”
Master class on flat applique from colored paper “Cook”
Author: Oksana Seitievna Seitmedova, teacher, GBOU School No. 1503
Description of the material: This material will be useful for educators, additional education teachers, parents, and is intended for an audience of 4 years and older.
Goal: Creating a flat applique from colored paper.
Tasks:
1. Develop the skills and abilities of creating planar appliqué from colored paper.
2. Develop the child’s fine motor skills.
3. Develop the child’s creative abilities through the creation of applications.
4. Strengthen the technical skills of cutting and gluing parts.
5. Instill the skills of perseverance and accuracy.
Sanitary and hygienic requirements
1. The light source should be on the left.
2. Every 1 – 1.5 hours, the eyes need a 30-minute rest.
Taking a break and relaxing is necessary to restore eye function.
3. To maintain health while working, it is useful to warm up your arms, eyes and back.
For work we will need:
Cut out a head from beige paper.
Draw hair with a black felt-tip pen.
We draw eyes with a black felt-tip pen, draw a mouth with a red felt-tip pen, and draw blush on the cheeks with a red wax pencil.
Cut out a cap from white paper.
Cut out a shirt and sleeves from white paper.
Cut out black circles from black paper and glue them to the shirt; these will be buttons.
Cut out a ladle from black paper.
Draw dots with white paint.
Let's put together our composition.
We glue the cap to the head.
Afterwards we glue the shirt, sleeves, arms, ladle.
Cut out a tie from red paper and glue it to the shirt.
Master class on flat applique from colored paper “Aquarium” Master class on flat applique from colored paper “Aquarium” Author: Oksana Seitievna Seitmedova, teacher, GBOU School No. 1503 Description. Master class on flat applique from colored paper “Cheburashka” Master class on flat applique from colored paper “Cheburashka”. Author: Oksana Seitievna Seitmedova, teacher, GBOU School No. 1503. Master class on flat applique from colored paper “Flower” Master class on flat applique from colored paper “Flower” Author: Oksana Seitievna Seitmedova, teacher, GBOU School No. 1503 Description. Master class on flat applique from colored paper “Rainbow Fish” Master class on flat applique from colored paper “Rainbow Fish” Author: Oksana Seitievna Seitmedova, teacher, GBOU School No. 1503. Master class on flat applique from colored paper “Mermaid” Master class on flat applique from colored paper “Mermaid”. Author: Oksana Seitievna Seitmedova, teacher, GBOU School No. 1503 Description. Master class on flat applique made of colored paper “Fish in an aquarium” Master class on flat appliqué made from colored paper “Fish in an aquarium” Author: Oksana Seitievna Seitmedova, teacher, GBOU School.
Source
Execution technique
The most common techniques when using this material are:
- sprinkling;
- indentation
For the first type, you will need to draw the outlines of the design on a piece of paper. It is best to take colored cardboard. Drawings for crafts made from cereals are thought out in advance, in advance, or are found on the Internet and printed. Then you need to cut it out and glue it onto cardboard.
Next, you need to grease the pattern with PVA glue. For starters, you can use buckwheat, millet cereal and rice. These materials are easier for children to work with.
The next step is to pour the cereal onto the contours of the parts and press down a little so that it sticks. You can shake the excess onto a piece of paper.
For the second type, instead of glue you will need plasticine. Creating a drawing on cardboard is the same. The resulting contour is filled with plasticine. Next, the cereal is taken and pressed into it. For this work, you can take peas, coffee beans, beans, and seeds.
In order to develop imagination in children, you can fill the entire sheet with plasticine and let the child come up with what to depict on the sheet.
Crafts made from plasticine and cereals are suitable for kindergarten when you need to do something using natural materials.
These two techniques are easy to use, but if the child masters them perfectly, then you can create works of a complex level with him.