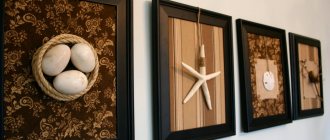
A three-dimensional New Year's panel will complement ikebana much better than a banal poster
Both adults and children take more than one master class to create a truly incredible New Year's composition. And you can welcome 2018 with a homemade wall decoration. This could be a craft on canvas, where things that are not the most common in creativity are used as the main material. You can hang elegant collages, panels made of plasticine, panels depicting the Snow Maiden or Santa Claus, or perhaps the symbol of 2018, on the wall.
It all depends on your imagination, what materials are used for crafts - cereals, buttons, sparkles, old puzzles, etc.
New Year's panel for kindergarten
Often parents have to work hard and do something with their own hands for their children. These are the same decorative works for kindergarten; as for panels, every third master class is dedicated to them.
Or maybe you yourself work in a kindergarten, and you are faced with the task of making beautiful wall compositions? Then shake your head!
New Year's pasta panel
Why from pasta - yes, because pasta is wonderfully aged into shapes, beautifully painted, glued, and from pasta, like from a construction set, you can make anything you want.
A panel for the New Year made of pasta could look like this:
- Panel Snow Maiden . It is not necessary that the entire Snow Maiden should be made of pasta; you can decorate the fur coat with pasta, or the hat. Snowdrifts can be made of pasta, or a sleigh in which the Snow Maiden rides. Or the Snow Maiden will have two braids made of pasta.
- DIY Christmas panel . The Christmas panel is dedicated to the theme of the bright holiday of Christmas - it is a spruce, the star of Bethlehem and, of course, angels. If the panel is for children, then everything that is depicted should be understandable to children. Volumetric paper angels, a star made of shiny textured paper, snowdrifts made of cotton pads. Children themselves can make panels for Christmas from pasta - simple figures of angels are made from different types of pasta.
Pasta can be used as a central element or for auxiliary decoration (for example, a frame).
Of course, this is not all, but the simplest place where pasta can be used is snowflakes. For the youngest children, this is a feasible task - to make a simple panel with your own hands, where large snowflakes made of painted pasta adorn a plain canvas.
New Year's panel made of pine cones
A panel of pine cones is a more difficult job, since pine cones are not very easy to work with. By the way, you can make snow-white ones from simple pine cones, and all this with the help of simple whiteness. Well, already such white cones - you can use them wherever.
Cones for panels require certain processing before use. To prevent the panel from deforming when the temperature changes, the cones must be dipped in a warm adhesive solution for 30 seconds before starting work.
Floral panels and collages for the New Year made from pine cones:
- Herringbone . The composition can be large - Santa Claus, his granddaughter, animals. It is not necessary to make everything out of cones; it will be enough to just arrange the tops of the cones painted green in a herringbone pattern.
- Fantasy composition . To do this, you need to watch a master class where many natural materials are used at once, where only the center of the composition, the dominant, is made of pine cones.
- Minimalism. And this is the so-called empty panel of cones. Considering that such minimalism in decor is relevant today, it is worth taking note of the topic. Moreover, it is so simple: you hang or fix ribbons with cones in a painted hollow frame at the top. It turns out that you have the cones inside the frame, right on the wall.
You can also make the same monkey, the symbol of 2018, out of cones.
New Year's panel made from disposable forks
This is a good way to make a large patterned snowflake.
When making a New Year's panel from forks with younger preschoolers, follow safety precautions and do not leave your child unattended at work.
The master class will be simple:
- In the center of the composition there is a dense circle where rays from disposable forks will be attached;
- This circle is decorated, wrapped in tinsel, and the ends of disposable forks are fixed to it with hot glue;
- The wide part of the forks is also covered with tinsel in a circle.
It turns out that the forks are the edges of a snowflake. On the other hand, if you decorate this composition more, you will get a New Year’s wreath made from disposable forks. In the center of such a circle can be depicted Santa Claus, or the number 2022.
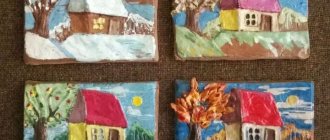
Salty dough
A New Year's panel made from salt dough is an incredibly popular form of creativity that is loved by children and adults. Working with the material does not cause any difficulties and is accessible to everyone.
From the outside, stucco molding looks like an exclusive and original piece of interior decoration.
Preparing the dough
The material for stucco molding includes three main components: wheat flour, fine salt, and water. There are recipes that also consist of hand cream, wallpaper glue, and starch. Flour contains a lot of gluten, salt gives the products the desired smooth shape.
Classic recipe:
- flour - 1 tbsp;
- fine salt - 1 tbsp.;
- water - 120 ml.
The ingredients are thoroughly mixed with a mixer or by hand - you should get a mass of homogeneous consistency. The test is performed as follows: a piece of dough is torn off, a ball is rolled off it and pressed down with your fingers. The mass does not spread and retains its shape - it is suitable for work.
Advice! When mixing the above ingredients, you need to add a little nourishing cream or vegetable oil and then the dough will not dry quickly and will not stick to your hands when modeling.
The working material is painted with natural juices from beets, carrots, spinach, cherries, watercolors, and synthetic pigments.
How to store leftover dough?
There are many known ways to use such material. Various figurines, toys, photo frames, and festive Christmas tree decorations are made from it.
The figures can be three-dimensional, flat, with or without a base. The work resembles molding from plasticine; crafts made from salt dough are stored for a very long time.
Leftovers are placed in a container with a plastic lid or carefully wrapped in film and stored in the refrigerator.
Advice! To extend the shelf life of the dough, add citric acid to it at the rate of 1 sachet per 2 cups of flour. Without lemon juice, working material can be stored in a cold place for up to three days, and with it - about 30 days.
How are crafts dried and painted?
There are several known methods:
- The panel dries in natural conditions for a month.
- The product is placed near the heating device.
- Or in the oven, preheated to a temperature of 60°C for 10–15 minutes, after which they are browned at 130°C.
To make crafts shine, they are glazed or covered with several layers of acrylic varnish. The first method is suitable for white products, the second - for all other tones.
To add shine, the panel is often coated with an aqueous salt solution and dried in an oven at temperatures up to 50°C.
Advice! To give the craft a pleasant golden hue, it is coated with egg yolk or white.
How to dry a salt dough product
New Year's panel made of cotton pads
Children love to make various things from cotton pads. You can start with a simple applique and end with a beautiful panel.
An evening village made from disks or just cotton wool looks great. It turns out that only two colors are used: the white color of the cotton wool and the dark color of the background
Moreover, you can make shapes with round outlines from cotton pads, or you can use the cotton wool itself. For example, it’s clear how to make a snowman or a hare from disks, the same snowdrifts. Well, the background can be made from cotton wool itself.
What will you need?
To make a panel of average complexity, it will take approximately 3-4 hours. It all depends on the skills of the master, as well as the ability to work quickly. To make the creative process as comfortable as possible, all necessary materials and tools should be prepared in advance. For the Christmas panel you will need the following:
- glue gun;
- pruning shears and regular scissors;
- a beautiful branch (without leaves) for the base;
- several green twigs of thuja, pine or spruce;
- red holly or rowan berries (you can get by with regular beads of the same color);
- lace ribbon;
- New Year's decor: beads, small stars, sparkles.
New Year's panel made of plasticine
A plasticine panel can be a real work of art. And for 2022 this material is relevant.
Plasticine panels can be made using various techniques: drawing, sculpting, embossing
From plasticine you can make:
- DIY Santa Claus panel . Santa Claus is the center of the composition, but he can be surrounded by a spruce wreath made of plasticine, or snowflakes made of plasticine. The Christmas tree and Santa Claus are a familiar plot, but Santa Claus and the monkey are already something interesting. You can also make a three-dimensional panel from plasticine, where numbers can be three-dimensional (2018), or some details of the panel - the same Santa Claus or individual elements of his outfit. Or maybe use real candies in his bag?
- DIY panels for children. Make your own master class, where a whole New Year's fairy tale will be sculpted from plasticine. Ask the children to add something to the plot of this fairy tale, perhaps a little star or a bird, but let the child, with your help, do it himself.
You can also make interesting panels on the window.
Glowing crafts
New Year's LED panels are considered very impressive decorations. That is why they are not cheap in stores, but it is easy to make them yourself.
What original ideas can you give for such light crafts:
- Christmas star. All you need is wooden sticks of small and necessarily the same size, a light garland (white or colored as desired), paint, and thick thread. Fasten the sticks together with a thread in the shape of a star, paint with diluted white paint, only to make the color softer, but at the same time remain natural. As soon as the craft dries, wrap it with LED garland.
- If you don’t want to bother too much and do the craft yourself inside and out, but want to save money, you can buy a beautiful New Year-themed canvas at any store. This panel cannot be hung on the wall, but it can be placed on a table or bedside table. Place a light garland behind the poster. This makes an excellent LED panel.
- Another idea for New Year's light panels is no less interesting. Cut out the numbers for next year 2022 from thick cardboard, wrap each detail of the future design with colored thick threads, and attach them to a light garland. It can be hung on a wall or door, as long as there is access to an outlet.
New Year's panel on the window
Usually, such words usually mean plot compositions on the window, where a whole New Year's fairy tale is played out. Here is Santa Claus riding in a sleigh, here are the cheerful snowmen frolicking, and the Christmas tree is all covered in snow.
You can decorate the window with snowflakes, hand-cut from paper or an entire New Year's composition.
How to glue such a panel onto a window:
- Arm yourself with an ordinary brush and liquid soap; you can simply smear the parts on the back with soap and glue them to the window;
- There is another interesting method where milk is used instead of glue;
- As an option - starch paste;
- If all else fails, you will have to use narrow tape.
And the snowflakes themselves and other New Year’s figures can be printed on a printer by downloading a sample from the Internet, and then cut out with a stationery knife.
Preparatory stage
So that nothing overshadows the joy of creativity, select all the components and buy the missing ones in the stationery department or in a craft store. You will need:
- thick paper white, blue and colored with glitter,
- felt sheets,
- breadboard knife,
- self-healing scrapbooking mat,
- glue pen or pencil,
- a can of white shiny paint,
- double sided tape,
- grommet installer,
- photo frame or box with wide sides,
- templates of winter trees and animals,
- ruler,
- pencil.
You can draw the templates yourself or find them among the numerous New Year’s protrusions; if you don’t have a grommet installer, small circles can be punched out with a hole punch, carefully cut with scissors, and the rug can be replaced with an ordinary board or plywood.
DIY panel for the New Year 2022
Panels with retro pictures are rightfully considered interesting and one of the most popular. Again, you can download them on the Internet, and then cut out the necessary fragments. You can also get backgrounds there, which are called “backgrounds for decoupage.”
You can make panel collages where symbols and stories of past times are intertwined, combining plots, characters, and patterns. Even beginners can make such collages using the decoupage technique, the main thing here is accuracy and varnishing to the same final thickness of the panel.
Decoupage using napkins on the theme of the New Year and Christmas holidays is both simple and extremely beautiful
Decoration with fir branches
Spruce is a mandatory attribute of the New Year. But not everyone wants to install a tree in their home. An excellent way out of the situation can be to decorate the room with fir branches. This will take little time, and the result will delight you throughout the Christmas holidays.
To create the necessary New Year's atmosphere, the presence of large branches is not necessary. If desired, you can get by with small branches. Every home has old baskets that are a pity to throw away. New Year is a magical holiday and these baskets can do a good job, create an atmosphere of fun and kindness.
Place a special floral sponge in the basket and insert several spruce branches. This will help keep it fresh throughout the holidays. Additionally, put several small soft toys in the basket or place Christmas tree decorations on the spruce legs and create a specific theme for the composition.
Even if you don’t have suitable baskets, it doesn’t matter. You can hang fir branches on furniture or on mirrors. They will look great if you decorate a chandelier or lamps with them. If desired, you can create small compositions with toys in which spruce branches can play the role of full-fledged trees. The main thing is to show your imagination and make your desires come true. If desired, the compositions made can be presented to friends as a New Year gift.
Panel "New Year's Fantasies"
New Year's fantasy is a composition in which there is more creativity than technology. It's just a combination of techniques.
Examples of such work:
- Batik + decor with beads and rhinestones;
- Decoupage + embroidery (embroidery can frame the work);
- Applique + patchwork;
- Applique + quilling;
- Decoupage + painting with acrylic paints.
Well, the heroes of such works can be Santa Claus, New Year fairies, angels, and children from pre-revolutionary postcards. Mix, match, decorate - creativity also comes with eating.
Decorative composition
You can also make an unusual New Year's composition from the twigs. Slices of citrus fruits (orange, lemons, tangerines) are placed at the bottom of a transparent vessel. Larch or willow branches are placed in it, multi-colored grains, shells, dry moss balls, small pieces of bark, cinnamon trimmings, etc. are attached to them with glue. The vase can be replaced with an ordinary clay pot, the bottom of which is covered with floral foam.
New Year's composition - fruit ekibana.
Craft “Boat”
A bunch of thin branches are aligned along the length and tied with a “boat”. Christmas tree cuttings, wax candles on a stand, beautiful balls, chestnuts, walnuts, etc. are placed in the middle.
The delicious aroma of the craft is given by orange, lemon or cedar oil, which is applied on top of the shell.
The best New Year's ideas Decor of bonsai and branches new year
New Year's panel (photo idea)
Master class on making a Christmas nativity scene
The tradition of making nativity scenes and staging performances on biblical themes appeared many decades ago.
The nativity theater came to Russia in the late 17th and early 18th centuries. Over time, a huge variety of its variants appeared - from home tabletop to large street festival productions.
The Christmas theme depicts the greatest event for Christians around the world - the birth of Jesus Christ.
Many homes honor this heritage and make small nativity scenes with their own hands.
And in this small master class we will tell you about the general composition of this theater and the materials used.
Cardboard or paper nativity scene
It is good to do at home or in kindergarten. Such a nativity scene clearly conveys to the children the essence of Christmas.
Here's what you'll need to make it: a cardboard box and thin cardboard, multi-colored fabric (you'll also need a bright one) and white threads, pins and wire, lace ribbon, cotton wool, compasses, a stapler, scissors and double-sided tape
The overall composition will be the house itself, its interior decoration and character figures. They are easier to make from cardboard and pieces of fabric. Well, experienced craftswomen can, of course, add something individual.
House and figurines
The Magus's hands are made in a similar way, only smaller. Here you need one small circle. Divide it into two halves, roll each half and set aside for a while.
2) Then cover all parts with a cloth, maybe velvet. Secure the edges with tape and additionally with a stapler. Next, attach the hands of the future Magus to his body with pins or tape.
3) For the head, take a ball of white thread. If it is not nearby, then you can get by with paper balls and wrap it around it. Make sure in advance that the Magus’ body and his head are proportional!
4) We will make the headdress from fabric of bright colors. The result should be something in an oriental theme - with flowing edges. Then, tie the braid around the top of the headdress.
Connect the Magus’ body to the head using a wire: insert one part of it inside the ball, and insert the other into the body and straighten it.
5) Shepherds, figures of Joseph and Mary are made in the same way.
6) The nativity scene itself does not require any special designs. In our case, this is a box draped with fabric. All that remains is to hang the garlands in it.
7) Place another small box inside it - a manger. Place some hay and the Baby in them.
Remember safety precautions!
Sheep
They will be located next to the cradle. The easiest way is to make them on paper and draw the faces with felt-tip pens. This option is generally good for children.
All living creatures will turn out great from plastic eggs (kinder surprise) and cotton swabs.
- Heat the awl with a candle
- Open the egg and bake it in the places where the legs will be
- Remove one fluffy end of the cotton swab and insert it into the hole of the egg.
- The rest of the legs are done the same way
- Apply glue to the places where the sticks come into contact with the surface of the egg and close the egg
- Next, cut several sticks in half and make the same number of small holes in the egg
- Insert the sticks into them. This will be wool for your sheep
- The animal's face is made from three sticks. First, fold them so that the ends slightly diverge. Then wrap cotton wool around it, placing it between the sticks. Give the image the desired shape with glue. Then insert the sticks through the holes into the egg. The details of the sheep's face can be made from any materials - for example, from decorative buttons, or simply drawn on.
Now place the figures in their places, turn on the garland and - the fairy tale begins!
Plasticine nativity scene
They are made together with children - from paper or plasticine. In the first case, making a house and characters is easier. With plasticine, the work looks different, but the result will be more interesting.
Wedding celebration
For a wedding celebration, it is customary to give useful and practical, fairly large and expensive gifts to newlyweds. To choose a small wedding gift, you don’t have to save on its cost, having first checked with other invitees the approximate price of their gifts:
- home comfort; blankets and bedspreads, home textiles (tablecloths and curtains), and a tabletop bio-fireplace are suitable for creating and maintaining it;
- organizing leisure time and choosing such gifts requires a good knowledge of the characters and habits of the newlyweds (board games, travel accessories);
- in the bathroom, a good set of exclusive soaps or candles, bath accessories, shower caps, accessories for decorating the room;
- For the kitchen, dishes, a set of expensive glasses or a candy bowl, a cake stand and personalized mugs for the newlyweds are perfect.
One gift for newlyweds can consist of two gifts intended for newly-made spouses, which will please both.
Other design ideas
Homemade interior decor is the best way to use your creative inclinations. At the same time, you can hide surface defects or decorate an accent wall, updating the design of the room:
Festive decoration is an original way to prepare an apartment for a birthday or discharge from the maternity hospital. This may be a reminder of a memorable date. A photo of a wall panel is a good example of how real artists and simple crafts lovers do it. Decoupage is a popular technique for updating furniture. The same materials, including special patterned napkins, are used to create unusual panels using this technique. Children's panels are a great way to decorate a child's personal space
An important warning - children put everything in their mouths, and this can be harmful to their health. Therefore, carefully select materials for room decor and methods of attaching parts
The safest are fabric appliqués that are tightly secured with stitches.
New Year and Christmas panels are one of the ways to look forward to your favorite holidays. To create a festive atmosphere in your home, use available materials:
- colored paper and cardboard;
- foil and shiny fabrics;
- beads and stones;
- tinsel and sparkles;
- pine cones and branches.
It is advisable to involve school-age children in making homemade panels. They will willingly do whatever part of the work they can. We offer you to evaluate examples of panels and the work of decorative artists in different techniques.
Christmas paper crafts for Sunday school children
The Christmas star is a decoration that meant a lot in the beliefs of Christians. And it can be made from one sheet of paper. You just need to pick up a red double-sided sheet.
Fold the sheet diagonally and cut off the edge. This is how we get a square. We fold the workpiece folded in half 2 more times (like making a snowflake).
This is what the workpiece should look like with a sharp top. On the side where the long edge is, measure 5cm. From this point we draw a line to the second edge.
We cut the workpiece along the line. Straighten the workpiece. We sharpen all bent edges (draw a ruler or scissors along the fold).
We bend the star in half again, then again and again. Cut some rays by 1/3. Straighten the star and glue the ribbon onto one long edge with a loop.
This is a very simple and interesting craft. More star options here.
Step-by-step master class on creating Christmas crafts from all sorts of things
Well, the last angel for today we will make from what is at hand. That is, from everything that is called waste material. Don't worry, the quality of the craft will not suffer from this.
So what is needed:
Subsequence:
We make a head and arms for our angel from foil.
Glue them to a plastic glass. You first need to cut off his leg.
Decorate the glass with lace. Secure it with hot glue. We wrap the lower part with cord. We also put it on glue.
We make wings for an angel from former spoons.
Those parts of the spoons that we have left will not be lost either - these are the legs of the figurine.
This is the kind of Christmas craft we make. You can make it quite quickly.
What else can be made from waste material? For example, here is a panel. Impressive, isn't it?
Volumetric compositions always look interesting.
You can buy acrylic paints for children and offer to paint their favorite mug.
Or make a group craft from cotton wool.
Or maybe the children themselves will give you an idea.
And in conclusion, I would also like to show a video on this topic:
Source
Christmas master classes for children from 5 years old
Painting Christmas balls
In this program, children will learn how to decorate a toy for a Christmas Tree. The master class works on fine motor skills, creative thinking and imagination.
Participants will receive information about numerous techniques and design options: marbling, decoupage, and painting with acrylic paints.
And in the practical part, everyone will create their own ball - glowing in the dark, shiny, comic or with their own design.
Snow globes
Snow globes - this program is traditional during the New Year holidays and is sure to please everyone!
You will find a story about “winter jars” that have become integral home elements of Christmas.
Kids will use a glass ball, glitter, glycerin, fake snow, glue, and water to create this awesome Christmas gift.
A great gift for home, parents and friends!
Decor of candlesticks
On such a holiday, you can and should start creating decorations for your home table.
The guys will listen to the Master's interesting story about the first candles in palaces and then create their own candlestick!
Materials used: candles, candlesticks, jars and decorative decorations, such as beads, balls, twigs and leaves.
Christmas card
Have you ever dreamed of creating a postcard in the scrapbooking style?
Each card will be decorated in a special way, with different materials and signed in the unique child's handwriting.
Taking into account the chosen plot, the children will be offered different decoration options.
Materials used: velvet paper, white, colored and shiny cardboard, scissors, pencil, glue, glitter gel, beads and sequins.
New Year's quilling
Do you want to teach your children a new technique - quilling?
This very unusual and beautiful technique will appeal to children and adults. Participants, using special devices, will learn to make wonderful patterns and create entire paintings.
The program will use: copier paper, glitter, paint, glue, pencil, ruler, scissors and a wooden skewer.
Christmas Tale for Children
Or maybe you want to capture on film a good story dedicated to the heroes of Christmas?!
For this we have a special program in which children and their parents will make a real cartoon with their own hands.
This is one of the most beloved and creative master classes!
To create a plot we use:
colored paper, cardboard, scissors – decorations
Plasticine - character modeling
Lamp – stage lighting
Camera – manual shooting
Digital technology with editing program - editing footage
Gingerbread painting
In the theoretical part, guests will find an interesting story about the appearance of the first gingerbread.
And in the practical part, all participants will learn how to prepare dough for gingerbread cookies and beautifully decorate the finished products.
The master class uses: disposable tableware, pencils and paper, wet wipes, wooden sticks, gloves, various glazes in bags and gingerbread preparations.
Felt toys
Making toys and felt is a great Christmas activity. Especially for girls!
Participants will make their own toys and decorate them with beads, beads, ribbons and rhinestones.
This craft can be given as a gift to a friend or as part of your home decor.
In the master class the following will be used: soft and hard felt of different colors, synthetic felt, markers: for fabric and eraser, ruler, stick for stuffing, blush or pastel, satin ribbons, threads to match the color of felt, scissors, needle, fabric glue and roller for clothes.
Creative workshop: family portrait in puzzles
A great idea on how to make a small gift with your own hands is the idea of making a puzzle in the form of a family portrait to decorate a living room or children's room. For such work, a home craftsman will need a family photo and PVA glue, a drawing with the outlines of the puzzle elements, thick cardboard and a sharp utility knife:
- a family photo in digital format can be printed in advance in any format, preferably on high-quality photo paper;
- the drawing of the puzzle elements is transferred to the cardboard base to form a complete composition;
- the photograph is pasted onto the cardboard, on the side where it is not lined, and left until completely dry;
- Using a sharp stationery knife, the resulting picture is carefully cut into individual elements;
- The finished puzzle pieces can be additionally opened with a thin layer of colorless acrylic varnish or the edges can be sanded with fine sandpaper.
To present such an interesting and unusual gift to your loved ones or family of friends, you can prepare beautiful packaging in advance. In addition to a homemade gift, it’s easy to choose and purchase a beautiful and stylish photo frame or picture frame in which you can place the completed puzzle.
Women's Day
Even the smallest gift to a friend on March 8 will please the girl, because this is an excellent occasion to present not only an item, but also emotions. For beautiful ladies of any age, you should select gifts for International Women's Day based on personal preferences and wishes, not forgetting the surprise factor, surprising them with gifts:
- It is better to give a girl gifts that confirm her uniqueness and specialness; romantic gifts, such as a set of aroma candles, tickets to a concert of her favorite group or performer, are suitable for this;
- You can give your wife what she dreams of, it could be an exclusive handbag from a famous brand, your favorite perfume or your favorite jewelry and jewelry, cosmetics sets for a beautiful lady;
- It’s better for mom not to choose gifts that help her immerse herself even more in everyday life, such as a good garden rocking chair, a certificate for a spa salon, an air scarf or exclusive perfumes that match her image;
- It’s better for grandma to choose really useful gifts for everyday use, devices for maintaining the microclimate in the house, an ionizer and purifier, an air humidifier, a lamp with a salt lampshade;
- For a sister and friend, yoga or fitness mats, a gift card to a cosmetics store, a certificate for attending cooking classes or a makeup application program, stylish headphones or a phone case are suitable.
Work colleagues can choose original and useful stationery or gifts to decorate their desktop. For a female executive, you will have to choose a gift with a good balance between a business and a personal gift; it could be an exotic plant, a mini-safe, or a stylish photo frame with an exclusive design.
Sweet Christmas tree
A Christmas tree is an excellent option for a winter craft for 1st grade school or even for older children, depending on the technique used.
For elementary school children, making a New Year tree with candies is suitable; this method is both simple and exciting, because you will have to work with sweets, and the children will be delighted with them.
For a sweet Christmas tree you will need:
- whatman;
- PVA glue;
- green rain;
- candies;
- Double-sided tape.
Fold whatman paper into a neat cone and glue its edges so that it holds tightly. Starting from the top, wrap the cone in circles with green rain, securing it with tape.
It should be wrapped so that the Whatman paper is not visible; to be on the safe side, you can initially paint the Whatman paper green. After the green tree is ready, use tape to glue the candies to it in a fairly orderly manner. You can also use not only candies, but also small Christmas tree decorations as decoration.
How to do it?
In fact, there is nothing difficult about making a panel yourself; no special skills or knowledge are required. The first thing that is necessary is to choose the place where it will be placed, choose a thematic direction and prepare the necessary materials, which most often are available to any housewife.
Wall panels are an opportunity to create an individual interior
A few important points
- If the room is small, you should not use large panels, they will not look harmonious and will make the room visually smaller.
- When the room is large and a bare wall is being decorated, you can use a large panel or several small ones of the same theme.
- If the room is colorful and has many decorative elements, the panels should be chosen in soothing colors, with a minimal combination of colors.
- When using several panels on one wall, they need to be perfectly combined with each other, support the same theme, or be perfectly harmonized in color.
In small rooms you should not use large panels
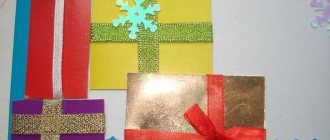
Butterfly and dragonfly
To create a panel we need:
- frame;
- base (cardboard);
- fabric or canvas;
- tweezers;
- glue;
- brush;
- coriander or buckwheat;
- white and brown rice;
- dye;
- dried flowers and herbs for decoration.
Let's start making:
- Wrap the base in canvas and secure on the wrong side;
- Apply the outline of the design to the fabric;
- Using a thin brush, apply a layer of glue to the outline of the design and, using tweezers, lay out coriander or buckwheat;
- Using the same principle, lay out the outline of insect wings, fill in the space of the wings and veins;
- Next, let's decorate the painting. Glue dried flowers and herbs in a chaotic manner.
- To make the picture sparkle with colors, paint the butterfly in bright colors. Apply paint to the cereal with a thin brush and let dry.
To make paintings from cereals, you do not need intricate and expensive materials. Be patient, use your imagination, and all the materials for creativity will be in the kitchen!