Autumn is such an ambiguous thing that it seems that there is shining gold, and the sun is bright, and it’s warm outside, and the leaves are falling of insane beauty, but from time to time melancholy and melancholy suddenly attack, and you urgently need a delicious homemade candy, a cup of hot tea or coffee and something completely touching, which makes you want to smile and be happy simply because it exists. DIY giraffe
- just such a case.
It would seem, well, why feel happy if it’s just an animal? Toy, decor, pillow, embroidery, etc.? On the other hand, seriously, it’s impossible not to smile! These long-necked comrades have some kind of incredible charisma, they have a special energy, and if you need something that will make you happy for no reason, make giraffes with your own hands
, it’s a win-win option. Don't argue now, just try it. And then you will tell us whether the recipe worked and how much.
How to make a giraffe with your own hands - 5 master classes:
We sew a bright giraffe from felt with our own hands
A felt giraffe will be an excellent decoration in a nursery or just a toy gift.
The toy is comfortable to hold in a small child’s hand, and the safe sewing without small parts will allow the child to play with the giraffe for his own pleasure. Bright colors will cheer up and delight the owner of the toy! For work we will need:
The pattern is your own drawing of a giraffe.
Cut out the pattern and trace the giraffe on yellow felt on both sides.
We also outline the remaining details (spots and nose) on orange felt on both sides. We cut everything out.
We sew the nose with orange threads from the side where it does not adhere to the edge of the giraffe. I sew it with an “over the edge” seam, or you can use a “back needle” seam. We also make a nostril with brown threads - an asterisk from the seams. Make eyes with black thread.
Using the same seam as the nose, we sew the remaining parts to the giraffe. Important! Sew only on those sides that are NOT adjacent to the edge of the giraffe.
Sew the details on the other side of the giraffe in the same way. To ensure that the parts on the two halves are symmetrical, I recommend that you first put them together before sewing on the other half to check the symmetry.
We sew the two halves together with yellow threads using a buttonhole stitch. The starting point is circled in red. We sew the giraffe's ear to the end.
Now you can stuff the entire giraffe’s head with horns and ears with padding polyester. I use a wooden skewer for stuffing, it helps when stuffing small parts.
We sew almost to the end, leaving a hole of a couple of centimeters. We stuff the entire giraffe tightly and sew up the left hole with the same buttonhole stitch.
Source
Sheep: how to do it step by step
To create a sheep, elongated bottles are useful. It is necessary to prepare the container:
- 1.5 liters – 4 pcs;
- 2 liters – 11 pcs;
- 1 liter – 3 pcs;
- 2 liters – 20 pcs. with a figured bottom.
You also need some bendable wire and a can of white or gold paint. The top parts with necks are cut off from liter bottles, and one bottle is inserted into another. Process of creation:
- Ears are cut out of a liter container and secured with wire.
- The body and neck are made from two-liter bottles.
- The head is attached to the neck, the legs of the sheep are made from 1.5 and 2 liter containers.
- For curly wool, the sheep are connected with curly bottoms using wire.
Giraffe pattern
Before starting work, you need to think through the drawing and draw it on a sheet of cardboard. If you do not have artistic talent, then use the diagram below. Just redraw the picture onto a sheet of cardboard and cut along the contours with scissors. This will make an excellent template for a giraffe pattern. Next you need to put it on the selected fabric and trace it with chalk or a simple pencil. Before cutting out the part along the contours, step back 0.5 cm from the edges, making allowances for the seams.
If the giraffe figure is flat and consists of only two identical patterns, then one template is made. For a voluminous toy, tailoring contains many elements. The sample giraffe pattern in the photo above shows that you need to cut out 7 pieces. You need 2 identical ones for the body, 1 element is sewn on the bottom of the belly and 4 pieces for the ears, 2 pieces for each. The giraffe figure in the pattern differs from other animals only in its long neck. If you have a ready-made pattern, for example, a horse or a dog, then use it, just extend the neck line up a few centimeters.
Step-by-step instructions for making a Keshi parrot
Step 1. From two five-liter bottles we make the frame of the bird’s body. To do this, cut off the bottom of plastic bottles and connect the upper parts together. We fix the neck of the bottom bottle to stabilize the figurine on a pre-prepared stand.
Step 2. From white bottles (containers for milk, drinking yogurt, household chemicals are suitable) we cut out identical rectangular parts with a rounded edge - feathers. Using a heat gun, glue the feathers in the center in a checkerboard pattern, starting from the bottom of the body. Each subsequent row is placed on top and secured with a glue gun. We glue the sides and back of the body with brown parts.
Advice! To eliminate the possibility of injury from the sharp edges of plastic parts, you can treat the cut lines with a bar of soap or a wax candle. It is also recommended to hold each cut piece over the fire - the sharp edges will melt.
Step 3. Cut out blanks for wing feathers from green bottles. We connect them in a semicircular shape and attach them to the sides of the body.
Step 4. Cut blanks for the tail feathers from brown rectangles, then glue the fastened parts at the back.
Step 5. Cut out a round piece for the bird’s head from foam plastic. You can form it from two cut two-liter bottles, glued or stitched in the middle (similar to the body). We cover the head with red feathers in a circle in a checkerboard pattern.
Step 6. Cut out parts for the beak from foam plastic or a flat shampoo bottle. If necessary, cover the surface of the workpiece with yellow paint and attach it to the head.
Step 7. Glue the finished plastic eyes. If you don’t have them in stock, you can make the parts yourself: cut them out of plastic bottles and glue them in pairs.
Step 8. Assemble the parrot: attach the head to the body, glue the cut out legs on the bottom, and a bright crest on top of the head.
Parrot Kesha is almost ready! All that remains is to install the figurine in a prominent place and surprise your friends. Undoubtedly, such a souvenir will only evoke positive emotions not only in children, but also in adults. And the best thing is that your Kesha will never fly to Tahiti!
Related Posts
leave a comment
DIY giraffe toy
Cats are known for their curiosity, but what about giraffes? This cute stuffed giraffe toy, named Gerbera, is very inquisitive, although sometimes he can be a little nervous if things don't go his way. In addition to basic sewing techniques, you will need a technique for making a frill that will be used to make the mane and ears. The giraffe toy may be spotted, similar to its wild counterparts, but our fun Gerbera giraffe toy has bright colors and beautiful body patterns. She is as cute as the mouse toy Mabel and somewhat similar to the elegant soft zebra toy Pearl.
Model size: about 40 cm in height 1. Copy all the patterns for the Gerbera giraffe toy onto polyethylene and cut them out. 2. From white polka dot fabric, cut a strip 6.5 cm long and as wide as the fabric. Sew the long edge of the strip to the same long edge of the blue fabric, folding the parts right side inward. Fold the two-color piece in half crosswise, right sides facing in, so the seams match.
We sew the legs and hooves of the Gerbera giraffe
3. Copy the pattern for the torso of the giraffe toy and the inside of the legs onto the wrong side of the folded fabric so that the bottom of the legs are on the polka dot fabric. Cut out the pieces to create two body pieces and two inner leg pieces. 4. Place one body piece and one inner leg piece with the right sides facing inward. You'll notice that the top edge of the inside leg piece is a little narrower than the torso piece, so you'll have to baste the edges of the pieces together to secure the raw cuts. 5. Stitch the inner leg piece to the giraffe body piece, starting at the top edge of the inner legs and gradually making a seam that extends 6mm from the edge. Baste the opposite edge of the parts and also stitch as shown in the figure. The lower edges of the hooves do not need to be stitched. Trim the corners to create rounded edges. Sew the remaining parts of the torso and the inside of the legs in the same way, but do not turn them right side out.
To avoid wrinkles in the fabric, constantly roll and smooth the leg pieces of your Gerbera Giraffe toy as you sew on the bases of the hooves.
Although Gerber's cute toy giraffe can be irritable at times, she has a fickle but cheerful disposition, just like the bright, colorful spots on her hooves! Choose a fabric for the hooves in a color that contrasts with the fabric of the body, but matches the color of our model.
Garden Decor Ideas
This is perhaps the most widespread use of plastic bottles. To design a garden plot, you don’t need to be a master; you just need to use your imagination and read useful tips.
Fences for flower beds of various shapes and beds
This option for designing beds is not only beautiful, but also useful: the soil does not crumble from them, is not washed away by rain, and the appearance is bright and attractive. To decorate, you need to collect a lot of plastic containers of the same size, pour sand into them, and then close the lids again.
Then, by digging the bottles into the ground around the garden bed, we create a “fence.” You can make the bed rectangular, oval, or any fancy shape according to the author’s wishes. The finished border can be painted in different colors, you will get a unique vegetable garden that will delight the eye all season long.
Flowers and butterflies for garden decoration
To make flowers, you need to cut off the necks of prepared bottles. By cutting the necks lengthwise, but not all the way, you can get petals (usually 6-8 pieces), rounding them at the edges. Then the edges of the petals need to be scorched on a lit candle, they become even.
Bending the petals, we singe them at the base, at this time bend them back and give them shape. When plastic is heated, it lends itself very well to shaping into various products. The stem for flowers can be made from wire, thinner wire, and beads - stamens. You can fasten all the components with glue and wire, using an awl to pierce the plastic.
To make a butterfly, you must first cut out a template from paper. You need to cut off the bottom and neck of the bottle, leaving only the middle, cutting it lengthwise. By ironing the middle with an iron and placing a sheet of paper, you can get a smooth surface. Having placed the template, you need to draw a butterfly on the blank, cut it out and bend the wings up. You can decorate with varnish and paints as desired.
Zoo in the garden
You can make various animals from bottles. For example, to make a crocodile, you need to cut two 1.5 liter bottles in half, and then so that 7 cm remains to the neck. Then insert the bottles into each other. The edges need to be connected so that the body is slightly bent, so the crocodile will look more natural. The lids will serve as legs. Cut out the paws and teeth on the back from cardboard. Glue all the parts with glue and paint with paints.
Pigs are very easy to make. You need to cut out the ears, bend them, glue the tail and paint it. The pigs are ready. Coca-Cola bottles have a special shape, the bottom looks like the fitted body of an animal, so it’s easy to make penguins out of them, for example.
You need two bottles: from the bottom of the first you will get the body of a penguin, the second will only need the bottom, it will serve as a cap. Now you can take brushes and paint the animal as you please. You can glue a pompom to the hat and tie a scarf around your neck. It will be a lot of fun.
This way you can put together a whole zoo, thanks to which it won’t be boring at the dacha.
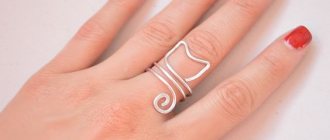
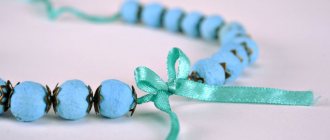
Key ring
A small long-necked creature can be sewn from felt. This is an excellent material for DIY crafts, which is loved by many craftsmen. To sew a felt giraffe like the one in the photo below, prepare the following materials:
Anyone, even a schoolchild, can draw the figure of a giraffe for such an easy craft. For the body, two identical turquoise parts are cut out using one template. A similar figure is prepared from a thin sheet of padding polyester and placed between felt blanks. To prevent the padding polyester from peeking out at the edges of the pattern and from crawling out between the seam threads, it is cut without allowances on the sides, but by carefully moving the scissors along the contours of the pattern.
Then the parts are sewn together with an external decorative seam over the edge. Don’t forget to immediately insert a ribbon loop onto the top of your head to thread the metal ring through. All that remains is to cut out an oval to form the muzzle and sew it onto the lower part of the giraffe’s head. The remaining small details are embroidered with black thread. That's it, the giraffe keychain is ready, you can put on the keys!
Polyurethane foam - as easy as shelling pears
Fans of decorating their garden with their own hands claim that garden figures made from polyurethane foam are the first step towards the transition from amateur experiments with plastic raw materials to the level of real mastery in the field of garden design.
Friendly, made of polyurethane foam
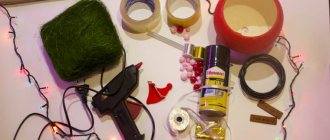
So let's start with a simple example. How to make a colorful bun using polyurethane foam?
Necessary materials:
- an old ball or any ball-shaped object (not very heavy);
- polyurethane foam;
- sharp knife;
- wire;
- a pair of wooden blocks;
- cardboard;
- tube or hose;
- 2 table tennis balls;
- stump;
- paint (yellow, red, black, colored - for scarves);
- brushes
Work order:
- The ball should be covered with foam. The number of layers is at your discretion. The main thing is to dry each of them thoroughly.
- Thread the wire along the sides, bend it, giving the shape of hands. Put on the pieces of hose and cover everything with foam.
- Make a foam “scarf” on your head. For “ties” or “bows” you should take cardboard forms.
- Using a knife, trim the shape of the bun, cut out the mouth and eye sockets.
Holes for the eyes and mouth are cut using a sharp knife
- For the legs, it is necessary to attach cardboard (feet) to the bars and also cover the structures with foam.
- You can use old tennis balls as eyes and paint them black.
- The finishing touch is paint. According to tradition, it is advisable to cover the bun itself with yellow paint, make a red mouth and blush. Paint the scarf and shoes in different rich shades.
The fairy tale bun is ready! All that remains is to place it on a stump and “settle” it in the garden.
Meet the newborn foam bun
We sew clothes for a giraffe
Giraffe dress - girls
We use a small piece of floral fabric. We perform the actions as in the pictures:
We will decorate the dress with a flower, which we will sew from a piece of fabric.
Secure the flower to the dress using a hidden seam.
Beautiful girl - giraffe is ready!
Overalls for a giraffe - boy
Sewing clothes for a boy is even easier. Using this we sew a simple jumpsuit with pockets.
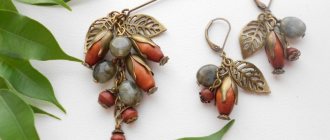
Fashionable tilde giraffes are ready to play with the kids!
Photo by MK - Button757
This tilde giraffe in blue checkered pants is a rather large toy. Place him on the sofa or armchair and he will attract the attention of everyone who enters the room.
For work you will need: beige cotton fabric (or coffee-dyed fabric), checkered flannelette fabric, blue plain fabric, white floral fabric, four buttons, padding polyester, beige, blue and black threads, a needle.
Materials
- A piece of natural fabric (linen, calico or cotton) for the giraffe’s body
- Fabrics of cheerful colors (it is better to take several pieces of different colors) for the doll’s clothes, lace for the trim
- 200-300 grams of holofiber or padding polyester for stuffing
- A couple of buttons to secure the legs
- Blush and black acrylic paint for the giraffe's face
Tilde giraffe pattern large and small
Finger theater character
A flat giraffe toy can be made without internal filler. The size of the craft should be slightly larger than your finger. To demonstrate the finger theater, the hero of the fairy tale is put on the phalanx, so when sewing two parts of the body together from the bottom side, they are not sewn together.
It turns out to be a small pocket. The main work is done on sewing and decorating small details - horns, spots on the entire body of the animal, the image of the nose and eyes. It is most convenient to sew characters from a theatrical performance from sheets of felt. The crafts are bright and colorful.
Crafts for kindergarten. Zebra made of tires and logs.
Just like a giraffe, you can make a zebra, and the African savannah will be filled with another animal.
You will need:
1 tire
2 logs
Eyes from an old toy
Plastic bottle
1. First dig the tire in halfway.
2. Make a muzzle and neck from logs. The body of the craft in the image is about 70 cm long, and the head is 25-30 cm.
3. Dig in a log next to the tire.
4. Make ears from a plastic bottle and attach them to the face.
5. You can make eyes from plastic bottle caps or use parts from an old toy.
6. Make a tail from the spout of the watering can, and insert a brush made from an old tire inside.
7. The nose can be made using thick rubber.
8. All that remains is to color the craft.
Small toy with pattern
Children love small soft toys that they can take with them on the road, put in their backpack or under their pillow when they sleep. A child will definitely like such a small version of a craft, as in the photo below. You already know how to sew a giraffe from felt sheets. Let's look at another example of a soft toy with a tail, a large head and a muzzle, made in the form of an applique of white felt.
It will not be difficult to redraw the pattern onto a sheet of cardboard. Ears, an oval muzzle and horns are drawn immediately on the main template. Then they are covered on top with elements cut from fabric of other colors. So, the horns can be black or brown, the muzzle can be white. The spots are cut out in arbitrary shapes and then simply glued onto the craft. How is felt convenient to use? It is not only pleasant to the touch, as well as warm and soft, but also perfectly cut with scissors, sewn with thread and glued with hot glue.
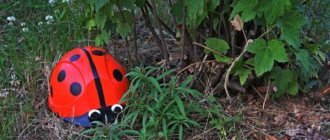
Decorative ball - an original figure in the garden
In order to make a dense and openwork ball with your own hands, you will need to prepare several dozen plastic containers from under water. It is advisable to take bottles with a volume of at least 1 liter. The basis for gluing the bottles will be a ball of cement; it is not difficult to make. To do this, you need to mix water and cement with sand in a ratio of 1:3. The process then looks like this:
- The bottoms of all bottles are cut off.
- Each bottom is painted a certain color; you can use several shades and make a rainbow ball.
- When the bottoms are ready, they are attached to the cement base.
- You can secure the products with strong glue or insert them into the cement while it is still wet.
The result is an original and unusual ball that will decorate the space near the house. The sphere can be placed near the gate, and can also be made the center of the composition in the garden.
Sewing toys
The first step is to make the correct cutting according to the pattern proposed in the article. All parts are cut out with seam allowances of about 0.5 cm wide. The elements of the figure are sewn together on the wrong side using a sewing machine or by hand using tight stitches. Leave a small hole for filling with filler.
Then the workpiece is turned right side out and filled with padding polyester. To fill the entire inside to the end, you will need a thin rod. With its help, the filler is pushed into the farthest pockets of the workpiece. When part of the body of the soft giraffe toy has acquired the required shape, the seam is sewn up to the end with internal neat stitches.
The animal's paws are attached to the body with buttons. On the outside of the neck attach a strip of felt cut into “noodles”, ears and horns.
Flower making methods
The most common crafts made from plastic bottles are garden figurines and flowers. Read about garden figurines here. There are other interesting ideas there, but there are a lot of collected interesting animals and insects. And we’ll tell you about flowers made from plastic bottles below - these are probably the crafts made from plastic bottles that bring the most pleasure. The process is simple, there are a lot of possibilities, and the result is amazing.
You've probably noticed that the bottom of a PET bottle looks like a flower. All you need to do is find a bottle of a beautiful color and cut off the bottom. Now you have a nice flower. In the middle you can add petals cut from the central part, a core from plastic strips cut into noodles, or glue beads inside, but more on that in a little more detail.
If you paint the cut off bottoms, you will get magically beautiful flowers.
Using the power of fire
To work, you will need a marker, a lighter or a candle (it’s more convenient with a candle). If you have them, take pliers, tweezers or pliers to hold the workpiece while processing. You will also need acrylic paints, glue and beads may be needed. The entire manufacturing process comes down to a few steps:
We take a bottle and draw the outlines of a flower on it with a marker. You can draw on any part. The petals will just be curved to different degrees. Cut along the contour.
Light a candle and gently warm the petals
It’s important to seize the moment and not melt the plastic. Heat the edges a little more so that they melt a little, forming a more natural edge of the petal. Using an awl heated over a fire, we make holes in the middle of the resulting petals. Paint with acrylic paints
The flowers will turn out opaque. There are also paints for glass (for stained glass), but they are expensive, although they turn out beautifully.
When the paint is dry, you can assemble the flower by lining up the holes in the center, unfolding the petals the way you like. They can be secured with thread or thin wire with a button or large bead threaded through. A button or bead is the core. You can combine the petals and fasten them with a drop of glue, and decorate the core with a strip of the same plastic (or a different color) cut into noodles. The stem can be made from green wire, or you can wrap any wire in a strip of green plastic heated over a candle fire (in a spiral).
There are a lot of options here. Just start doing it. It may not work out perfectly right away, but you will understand what and how you can fix it. Look at a few more pictures with step-by-step photos of the process of making flowers from plastic bottles.
The simplest
For beginner crafters, you can try making flowers from plastic bottles in simple shapes to decorate the garden. In this case, you can also use milk containers. To avoid painting plastic, look for colored ones.
And it doesn’t matter so much whether they are transparent or not. They can be combined to produce flowers of different shapes.
From the part near the neck we cut out petals
To create such flowers, use the part near the neck. It is cut to form petals. Next - warm it up a little, giving the desired bend to the petals, a little paint, the core from a melted piece with a thread (a bottle of a smaller diameter, a pharmacy bottle will do). So it turned out to be a buttercup.
Another option is to cut from the neck into strips of equal width - 1-1.5 cm, bend them (warm up a little at the base). Make a middle whisk from the side of a milk bottle or paint clear plastic with acrylic paint.
It’s even easier - for the outer rim, cut into strips, make the middle from the white plastic of a milk bottle
The middle is any bright. Here is a piece of cork, but you can cut it into thin noodles, roll it up and then heat it. You will get a shaggy core.
The topic is actually inexhaustible. A variety of flowers are made from plastic bottles. From simple and uncomplicated to very realistic. It's not so much a matter of skill as different tastes and desires.
Tilda giraffe: detailed master class and pattern
Tilda the giraffe, however, like all other toys in this style, is best sewn from natural, durable and high-quality fabrics. You can come up with what your doll will look like and what she will wear on your own, or watch our master class, which will definitely give you some interesting ideas.
To repeat our master class, you will need:
The first question that many people face is how is it made or where does the pattern come from? Alternatively, you can display the image of the giraffe yourself, the way you see it, or at least draw the main details. Also, today, there are a lot of books on needlework, materials, and each master class (ours is no exception) has a detailed description, so finding a pattern should not cause you any special problems. Choose a toy pattern that suits you best. To begin with, we advise you not to take an overly sophisticated model and a master class, because if you do not have experience in sewing dolls with your own hands (or too little), you may encounter certain difficulties.
First, let's print out the selected pattern and transfer it to the fabric. Then you can start stitching the parts together. Please note that an unstitched piece with a cutout must be left in the arms, legs and head. We trim it taking into account the allowances, and fold it so that it can be sewn along the drawn lines (perpendicularly and as if in a cross relative to the stitched outline).
Then turn it inside out and fill it with padding polyester or other stuffing. The finished head should look like this:
By stitching the fabric this way, we add more dimension to the pieces, resulting in a very nice shape.
We turn the arms and legs through the holes, which will later be sewn to the body (they are shown as a dotted line on the pattern).
We sew up all the holes and proceed to sewing the ears and horns. We sew the horns along the edge, turn them inside out and stuff them. We attach them with pins to the head and sew them on using a hidden seam.
We sew the ears like this: for one side we take bodily material, for the second - another (it is desirable that it matches the giraffe’s clothes). Sew, turn right side out and shape the ears by sewing the edges towards the middle. When all this is done, we sew them to the head.
Now we will sew on the legs and arms. We sew the legs using a dense thread with one seam. This is done for the purpose of making them move around the giraffe so that he can sit.
The arms can also be sewn on, or you can use a hidden seam.
Then we will sew a jumpsuit for our Tilda. We take the prepared fabric and transfer the pattern onto it.
We have four of these parts, on two of which we will place pockets.
We sew the parts together, sew on the pockets and you should have a design like this. Fold and iron the bottom of the panties. To decorate the overalls, we take two identical strips of the same fabric from which we made the pockets and sew them along the bottom of the legs.
To make the bib, sew on a small square cut from the main fabric. This is what we should end up with:
All that remains is to make the straps. We will need two small strips of fabric, we process the edges so that the fabric does not droop. We sew first at the top, and then at the back.
The overalls are wide at the waist, and in order to bring it back to normal, we use pins to give it the required volume and then calmly stitch everything together.
You can use buttons, lace and all sorts of accessories as decoration.
After we have sewn and dressed the giraffe, we just need to draw his eyes and apply a light blush.
The master class is completed, and we have such a cute giraffe Tilda! As you can see for yourself, there is nothing difficult about making a doll with your own hands. The main thing is that you have a desire. Then there will definitely be a special toy with its own soul!
Tilda the giraffe is an unusual puppet creature, ruddy, long-legged and completely without the spots inherent in these animals in real life. Below you will find a tilde giraffe and a step-by-step description of the process of making a tilde toy.
So, what will you need for a master class on making a textile doll?
Pink flamingo made from plastic bottles
Plastic bottles are the most economical option
. Everyone has them, and you can create anything from them. One of the popular figures today is the pink flamingo. Such a garden sculpture, created with your own hands, will be a wonderful decoration for your site.
Materials and tools:
First you need to make a flamingo body
. To do this you need to take one large bottle. You need to make a hole in the lid. A metal rod is inserted into this hole. He will act as a neck. You need to make two holes at the bottom of the bottle; legs will be inserted into them.
Now you need to make plumage for the flamingo. The remaining bottles need to be coated with pink paint. Now you need to cut them into feathers.
After the plumage is ready, cuts are made in the body of the bird in the number of feathers expected. Each part is attached to a notch.
Now it's time to make the neck and head. The rod that was attached to the hole on the bottle cap must be covered with a hose. The flamingo's neck is ready. The head is cut out of a bottle. The beak can be made from wood, plaster or foam.
Now let's make the legs. To do this, the two remaining metal rods are inserted into the holes at the bottom of the bottle and carefully secured.
At the last stage, you can decorate the bird as your imagination dictates.
On average, flamingos are 1.5 meters tall. You can make it higher or lower. But you should remember that the figure should not be too large.
Big toy
You can sew a large giraffe from fabric with your own hands according to the following pattern. The photo below clearly shows what parts the torso, belly and tail are made of. In the sample, they are cut from blue flannel, as are the outer parts of the ears.
The hooves, horns and inner parts of the ears are represented in a different, lighter shade. Sewing a large soft toy is easier than fiddling with small bends in the fabric. This craft can be placed in your child’s bed as a pillow.
As you can see, sewing soft toys using patterns is not difficult, the main thing is to try and want to please your baby. Using this principle, you can make any animal or fairy-tale character. Happy endeavors!
Papier-mâché: animals
A master class on creating animal figures is offered by many papier-mâché professionals. But, it is not necessary to have an art education. After all, you can conduct a master class at home with your child. Making animals with your own hands using the papier-mâché technique is not at all difficult.
Giraffe: master class
The frame of a future craft in the form of a giraffe is made from rigid wire. Soak toilet paper in warm water. Some even use paper egg boxes. After mixing the paper with glue, you can start creating a masterpiece with your own hands. An adhesive mixture is applied to the frame and the body of the animal is formed. The technique is similar to modeling with plasticine.
After one part is applied to the wire, you need to let the layer harden. Then apply another layer, forming the tail, ears and face of the giraffe. Let dry. Each layer must be dry, otherwise nothing will work. When the body is ready, you can move on to decorating. Using gouache, paint the body yellow and make spots with brown. Eyes and mouth - with black marker. After the paint has dried, coat with varnish.
DIY sheep
To create a sheep you will need plastic frames from chocolate eggs, cotton wool, paper, paints, and PVA glue. The surface of the frame should be treated with vegetable oil before starting work. This will help you later remove the plastic base without any obstacles. The adhesive composition prepared in advance is applied to the frame halves in a layer of about 3-4 mm. After hardening, the base is removed and the halves are glued together. Accordingly, you need to prepare two blanks: for the body and head.
The legs are made either from paper, by twisting it into a tube, or from wire, which must then be attached to the body and adhesive material applied to each of them. After drying, coat the figure with PVA glue and apply cotton balls on it. The more balls, the larger the sheep will be. The eyes are cut out of paper, the ears are formed from cotton wool and glued. You can clearly see the process by watching the master class.
Tilda-Giraffe doll
If you like handicrafts, soft toys, or simply interesting things made by yourself, then you have probably heard the name of such a trend as “Tilda”. Modern needlewomen enjoy making wonderful dolls in this style. Tildas are used as interior elements, cute toys for children, amulets, guardians of the family hearth, and they can also be a unique, original, warm gift for loved ones. If you have ever seen or held such a toy in your hands, then you will understand exactly why this is so.
Tilda is a special, interior, soft doll. At first glance, all the toys made in this style are different, but if you look closely, you can find some similarities in all these dolls: the typical blush on the cheeks, black eyes, the creation technique, the absence of some facial elements. Also, all these dolls are made entirely of fabric, a simple cut predominates, they have long limbs, and Tildas are sewn exclusively from natural fabrics. Tilda dolls are not only people, but also animals (for example, bunnies, elephants, giraffes and others), birds, and just cute little things.
A handmade soft toy is not just an excellent reason to be proud of your loved one, but also a wonderful present for anyone. Today we would like to present to your attention a master class on creating such a charming animal as a giraffe. Only this will not be the ordinary giraffe that we are used to seeing. It will be different in that it will not have black spots. But if you want to make it in your own way, then in this case you will probably end up with an excellent Tilda giraffe. In order to complete our master class, you will need to stock up on all the necessary materials in advance. So let's get started.
Source
Such a different flower bed
The flower bed is always in demand and relevant on the site. And there are a great many options for execution.
Tire flower bed
- Take an old tire and install it in place of the future flower bed. Fill it with soil. Black rubber can be painted as desired. The remaining tread pattern will create its own pattern. If desired, you can additionally paint the tire.
- If you need a large flower bed, you can dig up its perimeter and fence it with tires installed vertically. They can be placed straight, at an angle, or diagonally, depending on the problem that needs to be solved. And, of course, paint the resulting flowerbed.
Flowerbed made of plastic
- The simplest option is to make a low fence out of bottles turned upside down. To do this, you need to bury 1/3-1/2 bottles in the ground. The flowerbed will look more attractive if you make it a non-classical regular shape, and add curved, broken lines or even depict the outline of some animal. The color of the fence should be chosen to match the overall color scheme, then it will complement and emphasize the composition.
- You can make multi-level flower beds. To do this, add more soil to the already completed perimeter and fence off a separate area. It should turn out higher, creating a second stage.
- A more complex version of crafts made from bottles for the garden, but also more interesting - a flowerbed right in a bottle. Take a large container, place it horizontally, carefully cutting off the top layer. And then add characteristic ears, draw a muzzle, and equip it with paws and a tail. Next, pour soil directly into the bottle and plant flowers. This is how unique pigs, cats, hedgehogs and other cute creatures appear on the site.
The video shows how to make a flower bed from ordinary bottles
Flower bed made of stones
Flower beds made of stones look very impressive in almost any landscape. It can be artificial stone or natural cobblestone, sandstone or pebbles - any option is a winner.
- Flowerbed without fasteners. To do this, you need to stack fairly large stones on top of each other, forming a low wall. And fill the inside of the resulting well with soil. The fence should not be made strictly vertical, but slightly tipped inward. Thus, the stones will lie under their own weight, additionally resting on the ground.
- Flowerbed using a solution. Here the stones need to be used like bricks, laying them on cement mortar. Also a nice solution. If you do not spare the solution, then it begins to play not only a functional, but also a decorative role.
Flower bed made of logs
DIY log retaining wall
- Small round chocks can be used to fence a flower bed. Install them vertically, specially select logs of different heights. This will give the florist a cozy, rustic look.
- A flowerbed can be made directly in a log. To do this you need a fairly voluminous log. The larger its diameter, the better. Select the required length according to the length of your flower bed. We place it horizontally, and then there are two options. If you need a stationary flowerbed, then cut out a through rectangle in this log, fill it with soil and plant flowers. Over time, they will reach the ground and will receive nutrients from there as well. And if you need a mobile structure, then you need to cut off the bottom edge a little so that a plane is formed and the flower bed is stable. And then carefully cut out a fairly deep, but not through, rectangle from above, which is covered with earth.