I have a story connected with this stand, thanks to which the value of the product has increased several times.
Background
The laptop began to overheat greatly, and the fan began to scream like a fighter plane, gradually driving me crazy. I looked at ready-made stands for additional cooling and read reviews. It became clear: the thing was not the cheapest and not as effective as required.
I drew a sketch on paper and thought about it. All that remained was to get to the hardware store. The whole problem was that it was not just closed, but closed forever. Imagine: early morning on a weekend, I’m joyfully heading to the store. I approach the supposed place and search for the entrance for 20 minutes until I realize that there is no longer a store in that place.
I have difficulty finding the phone number of a network of construction hypermarkets and contacting the operator, who helped me find out that there is another similar store within a radius of several kilometers. Orientation on the terrain, adjustment of the plan and a new forced march.
I had to go across the bridge. I’m used to the fact that all the bridges in St. Petersburg are over water - you rarely see others with either a regular highway or a railway under them. When crossing bridges, the fact of the presence of water is always reassuring - if something happens, it will soften the fall. I'm not particularly good with heights, and they don't like me either.
The bridge turned out to have a sharp climb. I spent a lot of energy and nerves to overcome it. I got to the store and realized that there was not enough cash. I had a credit card with me just in case, but not mine. I had to make a huge circle in search of an ATM, and then return to the store again. There was a long road of several kilometers left to the nearest transport. Instead of 1.5 hours I spent 5-6.
Cut a hole in the case to reduce the temperature
In addition to the booth itself, we also had to come up with a laptop. HP gets very hot. I don't remember when, but I had to take out the standard laptop fan and replace it with a small Gelid Silent 5 FN-SX05-40 - I wouldn't say it helped much, but it worked for a while. He also linked it via reobass.
At some point, it was decided that an additional hole would need to be drilled into the laptop to improve airflow and reduce temperatures.
It was also simple:
- Disassembled laptop
- Mapped
- I made a lot of holes with a drill
- Side drilling done with care
- Clean file
- Made small holes for screws
- Screwed to the network
- Colored the silver screws with a black marker
A simple design made of polystyrene foam and a homemade fan
This method is suitable for those who want to save as much as possible, because the resulting fan will cost you several tens of rubles, and it can be made from any bottle and a piece of foam rubber.
The base of the structure will consist only of foam plastic.
To make the product last longer, we recommend using dense extruded foam or polystyrene foam (sold at any hardware store).
Cut it to fit your laptop.
The cooler design should not come into contact with the table surface. It is advisable to make 4 more small figures from polystyrene foam on which the product will rest.
This will ensure better air circulation.
Please note that the correct position of the cooler involves a slight tilt towards the user, so make one leg 3 centimeters high and the other two centimeters high.
Therefore, the first two parts will support the back.
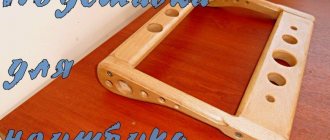
Rice. 6 - create a frame for the stand
See also: DIY rope knife
You can attach the foam parts to each other using simple PVA glue or superglue
Wait until the frame is completely dry before moving on to the next working steps.
Cut 4 more squares and attach them to the corners of the top of the refrigerator to create this look:
Figure 7 - Creating the front part of the chiller frame
When you place the laptop on top of the product, it will not stick to the case, creating more room for airflow.
All 4 squares must be the same height. As shown in the image above.
Now we need to create a ventilation mechanism. It will be made of ordinary plastic. Take any bottle, cut off the top and draw this detail:
Rice. 8 - create a fan
The resulting element will become a fan base. In order for the blades to rotate, forming a direct air flow, it is necessary to slightly change the shape.
To do this, take a candle and light it. Bring the fan up to heat and heat the base of each blade by rotating them in one direction at a time:
Rice. 9 - formation of blades
Drill a hole in the center of the cooling system according to the size of the fan.
If the blades are too long, trim them and turn the edges again over the heat to smooth them out.
Take 4 popsicle sticks and secure them to act as a support for the vent. You can fasten the sticks with regular masking tape.
It is better not to use glue. Install the fan as shown below.
Rice. 10 - create a cooling structure
Take a simple motorized mechanism (available at any electronics store) and attach a bottle cap to it. Place the resulting part in the center of the blades:
Rice. 11 - create cooling
Take a USB cable and solder it to the motor. Construction is ready. Now you can decorate it by painting it any color.
Fig. 12 - checking the operation of the device
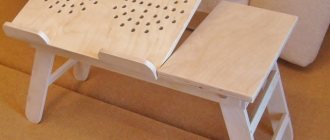
Compact folding do-it-yourself laptop workstation
In this instructional article, I want to talk about one of the options for creating a workspace at home, when you want a comfortable place, but there is no free space for a desk (or you don’t want to take it up).
How to do this in just a couple of hours of time and reasonable costs, I want to tell and show with my own example.
This option will primarily be of interest to people who work at home (fully or partially) and do not have a normal workplace or who want to increase the free space in the room by replacing a bulky old workplace with such a compact one. If you don’t want to read how I spread water over the text in my thoughts - go straight to section “2. Purchase"
Lyrical digression
It all started with the latest redecoration of the room. Then it was decided to abandon the large (huge) desk with drawers. “That’s not how I need it,” I thought then, and my renovation went under the motto “out with furniture, give me space.” The only flat horizontal surfaces left were the coffee table (actually for magazines, coffee, all sorts of small things). The computer moved under the TV as a media station, and its place for me was taken by a small 13.3″ ultrabook. Visually, there was 2 times more free space in the room and I was happy until the demands of working at home began to arise. After a couple of days, it became clear that working in the shrimp position on the sofa at the coffee table did not bring any joy, and after an hour or two it brought back pain and “eyes in a heap.” This is where the process of creating a “workplace that does not take up space” began.
Options
Because
one of the main conditions for me was maintaining free space - I was considering the option of a small table within 60x100 cm and about 70-80 cm high. I had a small space at my disposal near the wall
In general, there were two options - either stupidly buy such a table and put it against the wall, or hang the table directly on the wall, getting some advantages (which I will talk about at the end). Suddenly, the idea came that the hanging table could be made not just screwed to the wall, but also removable/foldable. That’s where I stopped, deciding to first rush to the nearest Ikea/Obi.
Purchase
The idea was to buy a tabletop from Ikea, and then purchase various fasteners from OBI and assemble the structure myself. But it turned out that Ikea already has a ready-made table that suits me for a reasonable 2,500 rubles. Realizing that my dream was closer than I thought, I bought it (by the way, that’s why “with my own hands” is in quotation marks in the title - minimal hands were involved, but the article went from the category “wow, I wish I could do that” to “hmm, I can do it too, I’ll go do it”)
The table has dimensions of 50x90 cm. Of the 50 cm, 12 cm is occupied by a fixed shelf and another 38 cm by the folding tabletop itself. When disassembled, you get a perfect surface of 50cm without any noticeable gap. The table is made of thick chipboard and covered with a dark wood film (black and brown classic IKEA colors). Folding and unfolding the table takes about two seconds and is not inconvenient.
On the Russian IKEA website this table is www.ikea.com/ru/ru/catalog/products/20217522/#/80217524
Assembly and installation
For assembly, in addition to the table itself, you need: a good screwdriver (in my case, a screwdriver), a hammer drill, 6 dowels + screws for fastening to the wall (traditionally, IKEA does not attach them to furniture) Like the rest of IKEA furniture, the table is not of fantastic quality, but it is made quite tolerable, all the holes are prepared evenly and the design is both simple and reliable.
First, the corners for attaching to the wall are screwed to the smaller part (shelf)
We must pay tribute to the designers - all metal parts are made of very thick metal - about 2-3mm.
Holes in the wall are marked (here you need to think carefully about the height of the structure) As a level, in the absence of a real one, I used an Android program
I took reasonably large dowels and screws, because... the table itself weighs about 10 kg + laptop and other junk + hands on it when working. Moreover, you don’t have to be an engineer to understand that leaning on the edge of the table we create a significant load on attaching it to the wall.
Then the hinges and the main tabletop are attached
And all this is hung on the wall, tightly screwed. Then the central leg is hung. Ready!
The support leg is made very intelligently - thick square metal does not allow it to bend even a millimeter, while the L-shaped design does not interfere with the legs.
Result
The folded table has a convenient shelf on which all my “work” things fit.
The ultrabook is kept from rolling down by small silicone “bumps” glued to the table. The shelf can easily accommodate a lamp, a cup, a mouse pad, the mouse itself, its charger, the ultrabook itself, and even a panda.
When it is folded, the space in the room practically does not suffer!
When unfolded, the table turns into a full-fledged laptop workstation.
In the evening
Advantages and disadvantages
Compared to a classic workstation, I can highlight the following differences:
Pros of my version: + Takes up less space (almost none when folded) + When folded it almost disappears. The classic table needs to be disassembled for this; you can’t hide it that easily. = Relatively inexpensive (a similar table for the floor may even cost more due to the presence of legs, or about the same) + Very stable (I don’t know how it will happen in the future, but now it is a monolithic structure at all angles and in all planes, which is difficult to swing even per centimeter. This cannot be achieved from an ordinary table of similar dimensions) + Can have any height (as you hang it, so it will be)
And the disadvantages - We can’t move it (except for hanging it with a hammer drill. But even in this case we are limited by walls) - Limited in depth (if you like to stretch your legs, this is not your option, there is a wall. Normally, it allows you to sit correctly - depth 50cm is enough for my height ~185cm). I would even say that this is a bit of a plus - it teaches you to sit correctly and not smear around the chair. — You can sit at the table only on one side (you can strain on the sides, but this is an option for 10 minutes)
That's probably all. I solved my problem without disturbing the space of the room and getting a comfortable workspace.
The article was written in a new workplace - conveniently and comfortably, without thoughts of “finishing it quickly and leaving.”
UPD: according to “numerous requests” (one whole) a quick panorama of the room. Sorry srach, etc. Click for more
Homemade cooling system
Photos
That's what came out of it:
Laptop Cooler Laptop Cooling System Cool Your Laptop Laptop Cooler
Description
I have Asus X51RL. I can say that I was lucky because the radiator does not come out from the side, but from the back. Thanks to this, the homemade system is located at the back and covers the screen. Before installing this device, the processor temperature in quiet mode rose to 55 degrees, then the standard fan turned on, lowered the temperature to 47 degrees and turned off. And so on every five minutes. Of course, this damaged the processor and my nerves. After installing the artificial cooling system, the processor temperature is constantly maintained around 43-45 degrees. That is, the temperature dropped by an average of 10 degrees. An ordinary refrigerator is resting. Sometimes it connects at the slowest speed in games and with heavy storage. Due to the fact that the device draws air through the heatsink, the overall temperature of the laptop has decreased and it does not heat up. For example, before installing the system, the hard drive warmed up to 45-50 degrees, and now it’s no more than 40.
Design
The design is very simple. The body is a piece of cardboard from a document folder. In principle, it can be made from anything. The fan is a standard 120mm cooler for a 12V system unit. It can be powered from the laptop's built-in USB port, but there is a risk of burning it out in the event of a short circuit. Therefore, it is better to buy the simplest 12 volt power supply. If the cooler is too loud when running on 12 volts, you can easily reduce the voltage using a resistor. The cardboard and cooler are glued together with glue and additionally secured with electrical tape. The cooling system inlet must be closed from opening the radiator.
Operating experience
More than 5 months have passed since the installation began. I decided to clean my laptop from dust and wrote an article about it. If you read it and look at the photos, you will notice that a very thin layer of dust has accumulated under the back cover. As it turned out, the homemade cooling system literally pulled out all the air by force. Dust has appeared on the chiller impeller.
Layer of dust on the cooler Dust on the impeller
Thus, this device prevented dirt from accumulating inside the laptop. For preventive purposes, I supplemented the lubrication of its bearing with machine oil.
Lubricant replenishment
Functionality of a folding table
A folding table appears to be an attractive design. The model is designed to install a laptop.
At the same time, as belonging to the multifunctional, portable type of design, the table is multifunctional.
The most optimal functions include:
- using it as a tray;
- exploitation as a magazine model;
- using the table as a place for morning tea.
The last function, when the conversation is about serving coffee or tea in bed, will appeal to romantic people.
In this case, they will have to look for a section on the Internet on how to make a laptop table for a bed.
Advantages and disadvantages
The Cooler laptop stand is good because:
- very easy to do. By following the tips and collecting the necessary information on the Internet, making such a specific stand for your laptop is absolutely not difficult;
- the cost of the material is the cheapest;
- good performance.
Disadvantages of this design:
- not strong enough;
- it only lowers the temperature by a couple of degrees. This can be changed. The lower part of the computer is unscrewed and air is taken directly from the heating pipes;
- the presence of a noise effect, which mainly depends on bearing wear.
Useful tips
Below are useful tips developed by craftsmen with experience in making homemade coasters:
- When installing a large number of fans on a laptop stand, it is worth considering that a lot of noise will come from it.
- Using furniture board in the process of constructing a laptop stand with cooling allows you to achieve the most stable design as a result.
- Having an adjustable laptop stand will help prevent situations where a cup of coffee accidentally spills on the device.
Where to begin
As with any workflow, you should start by drawing up a proposal/plan and defining future installation steps, which will be discussed below.
Step 1. Budgeting and schematization
- To get started, it’s worth answering a few questions:
- “What are the expectations from the future creation” - for example (to the author of the article below), this is a comfortable substrate with a slight angle and 1/2 cooler for blowing and blowing. And the goal is to achieve a reduction in temperature indicators by at least 5 degrees.
- “How much money can I save for this?” — budget 500 rub.
- “What size/dimensions” - since the device has a diagonal of 18.4 inches, taking into account the position of the legs, the length will be approximately 36 * 38cm, width 35-37cm.
- “What to make the body/base out of.” Considering that the ASUS K95VJ weighs more than 4 kilograms, the material must be durable, but at the same time it is desirable to achieve small dimensions and lightness. Polypropylene water pipes with a diameter of 20 mm had to cope with these requirements very calmly.
- “What to make a substrate for installing a cooler from” - the weight of the cooler is minimal and there will be no load on the substrate, so no excessive effort is required. As a result, the choice fell on an assortment of office supplies, namely a folder for papers with a metal clip and the thickest / roughest cardboard.
- “What is already available” - there is already an old cooling pad from a device of the same Asus brand, but with a 13-inch screen diagonal, from which you can remove the cooler and power port.
- “What additional tools/items are needed”: Ruler, tape measure or tape measure.
- Stationery knife or scissors.
- Drill/screwdriver, drill and screwdriver.
- Metal hacksaw or jigsaw.
- Marker, tape.
- Bolts, nuts, washers.
- Glue gun or double-sided tape.
- Furniture stapler or clear tape.
Step 2. Purchasing materials
Considering that the above list of items and tools does not require additional costs, since any average person has all this, you will only need to additionally purchase:
- “Polypropylene pipes” - 1.5/2 meters of pipe (with a markup) costs on average about 100 rubles (in the example it actually turned out to be 75 rubles * 1.5 m).
- “Angles and tees” - four 90-degree angles and two tees - a total cost of 27 rubles.
- “Folder-folder” - from what we managed to find in the nearest stores, there was a folder with quite thick cardboard costing 120 rubles.
Total: 222 rub.
Why is it beneficial?
Of course, everyone needs to sensibly assess their capabilities both in the selection of components and in their installation and, in principle, be aware of the appropriateness of the intended action. So why is it beneficial? For example, we have an ASUS K95VJ laptop with a screen diagonal of 18.4 inches. The search for the cooling system in question found that all noteworthy options cost about 2,000 rubles and more. Indeed, taking into account modern realities, this amount does not seem significant, but I also don’t really want to pay that kind of money for a beautiful backlit case, which is essentially a dummy. And in principle, this is a rather dubious investment of funds, the savings of which can, for example, be invested in the purchase of components. That is why the author of this article, like many other users, set out to make a cooling pad on their own with a minimal investment of money and time.
Advanced homemade products
But it was a pretty cheap option. If you have at least one “five-wheeler” in your pocket, you can plunge into the steppe of homemade products. The shopping list is as follows: a simple computer fan, a USB type A socket, electrical tape and glue. In general, an old charger will do instead of USB, and for convenience you should get a ten-centimeter cable. The tools you will need are a soldering iron. Plywood is a good base for support, although binder will work.
In the holder, whatever it is, we drilled a hole in place of the laptop ventilation grille. Not just in any case, but according to the size of the purchased cooler. It must be fixed in the hole in any convenient way. And it is advisable to blow from the laptop. Also, the algorithm may differ depending on the materials.
If you have an old charger, cut off the end and expose the electrical cord. We do the same with the fan, but only with two wires. Red and black are often necessary, but yellow will be superfluous. Next, we connect advantages with advantages, disadvantages with disadvantages, and isolate the junction. Ready! Connect the charger and the fan will start spinning.
With USB things are a little different. We will need to take a soldering iron and solder the negative wires to the fourth terminal of the plug, and the positive wire to the first. Here it is very important to have a good understanding of pinouts and avoid mistakes. Otherwise, a short circuit will damage the laptop. And then do the same again - connect cable to cable and isolate the joint. The USB drive is connected to the laptop and the fan spins.
If desired, you can also get confused with the map, speed controller and other gadgets. It will still be cheaper than getting the refrigeration from the store.
Bottom line
Creating a powerful laptop cooling system and maintaining all its internal parts in good condition is a completely doable task.
By spending a few hundred rubles, you can make an excellent cooler of the required size and power with your own hands.
The product options presented in the article can be easily supplemented and improved, it all depends on your imagination and ingenuity.
Thematic videos:
DIY laptop stand. - How to do it? #1
In the video I will show you how you can save money on buying a laptop cooling pad. I’ll say right away that this is not the final version, a lot can be improved. The video shows the principle of operation of the stand.
DIY laptop cooling pad
DIY laptop cooling stand. To make it you will need a pair of hands, plexiglass, and a cooler.