A simple device allows you to create light illumination even where there is no electricity.
A garden lantern can be used individually or as a whole complex to organize decorative lighting for plants and stones. You can make a glowing solar-powered flashlight on your own.
Let's look at possible schemes for creating a decorative lighting fixture for a garden plot.
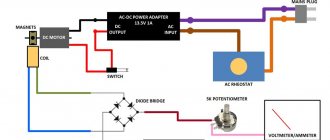
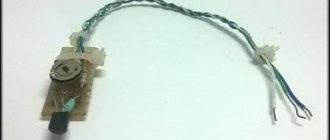
Wiring diagram of a garden lamp
The operating principle of a solar lantern is very simple, regardless of the size of the device. For its operation, you will need a panel that will collect the sun's rays, a storage battery, a voltage converter, and a luminous element capable of receiving energy.
The elements are arranged in a chain that will work with the correct selection of LEDs and other parts.
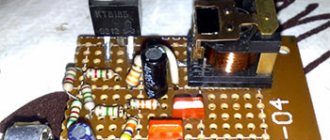
Electronic circuit diagram for assembling an LED flashlight:
Panel glow
Since LEDs were used to create the solar battery, they will glow. The spontaneous glow of such elements is another disadvantage of the idea of using LEDs to create a panel to convert electrical current from solar energy. This effect is due to the fact that some of the circuit elements will generate electricity. But the other part of them will consume it. Note! It is impossible to remove the glow effect from an LED solar battery. Here, to the disadvantages of the design, we can add the fact that the panel will generate electricity only in direct sunlight. If there is at least one cloud in the sky or just a cloudy day, then the output voltage will be zero.
How does a garden lamp work?
The absence of a power connection makes the LED flashlight a very convenient and cost-effective way of lighting. During the day, while the sun is shining, the flashlight stores solar energy in its battery.
The weather must be cloudless and clear to collect light as efficiently as possible. Some flashlights have a controller inside that turns on the light as soon as it gets dark enough outside. Then the accumulated energy in the batteries begins to be consumed.
When completely discharged, the lamp stops producing light. The work looks like this :
- During the day, the storage panel converts the sun's energy into low-power electricity.
- The resulting energy is redirected to the battery using a diode.
- The positive potential through a resistor controls the absence of glow before dark.
- As soon as dusk or another type of dimming sets in, the transistor turns on (the effect is obtained due to a small positive potential in contact with the base) and starts the LED to glow based on the energy contained in the battery. The flashlight emits light.
- The light diode evenly doses the energy production from the battery to prevent complete discharge.
- As soon as it starts to brighten, the positive voltage cuts off the transistor, as a result of which the LED stops receiving energy to glow. During this period, the battery charging process starts again.
Simpler models without a controller accumulate energy and spend it evenly, providing glow at any time of the day.
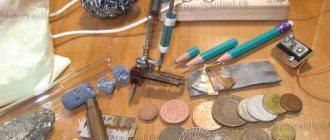
Ideas from scrap materials
You can make a solar battery with your own hands from scrap materials. Let's look at the most popular options.
Solar battery made of foil
Many will be surprised to learn that foil can be used to make a solar battery with your own hands. In fact, this is not surprising, because foil increases the reflectivity of materials. For example, to reduce overheating of the panels, they are placed on foil.
How to make a solar panel from foil?
We will need:
- 2 “crocodiles”;
- copper foil;
- multimeter;
- salt;
- empty plastic bottle without neck;
- electric oven;
- drill.
After cleaning the copper sheet and washing your hands, cut off a piece of foil, place it on a hot electric stove, heat it for half an hour, observing blackening, then remove the foil from the stove, let it cool and see how pieces peel off from the sheet. After heating, the oxide film disappears, so the black oxide can be carefully removed with water.
Then a second piece of foil is cut out the same size as the first, the two parts are folded and lowered into the bottle so that they have no chance of touching.
Next, the “crocodiles” are attached to the panel, the wire from the unheated foil is to positive, from the heated foil to negative, the salt is dissolved in water and the solution is poured into a bottle. The battery is ready.
Foil can also be used for heating. To do this, you need to pull it onto a frame, to which you then need to connect hoses connected, for example, to a watering can with water.
So we learned how to make a solar panel for your home from foil yourself.
Solar battery made of transistors
Many people have old transistors lying around at home, but not everyone knows that they are quite suitable for making a solar battery for the garden with your own hands. The photocell in this case is a semiconductor wafer located inside the transistor. How to make a solar battery from transistors with your own hands? First you need to open the transistor, for which it is enough to cut off the cover, so we can see the plate: it is small in size, which explains the low efficiency of solar cells made from transistors.
Next you need to check the transistor. To do this, we use a multimeter: we connect the device to a transistor with a well-lit pn junction and measure the current, the multimeter should record a current from a few fractions of a milliamp to 1 or a little more; Next, switch the device to voltage measurement mode, the multimeter should output tenths of a volt.
We place the transistors that have passed the test inside a housing, for example, sheet plastic, and solder them. You can make such a solar battery with your own hands at home and use it to charge batteries and low-power radios.
Solar battery made of diodes
Old diodes are also suitable for assembling batteries. Making a solar battery with your own hands from diodes is not at all difficult. You need to open the diode, exposing the crystal, which is a photocell, then heat the diode for 20 seconds on a gas stove, and when the solder melts, remove the crystal. All that remains is to solder the removed crystals to the body.
The power of such batteries is small, but it is enough to power small LEDs.
Selection of parts for manufacturing
Most solar lanterns are created with solar panels that do not exceed 9 sq. cm in area. To make a lighting device with your own hands without using electricity, you will need electrical elements with the following characteristics :
- diodes from 1 to 1.5 volts;
- batteries with a storage volume of 3000 mA and a generated voltage of 3.6 volts;
- solar panels with a total area of 60x60x4 mm, which are distinguished by the production of 4.4 volts with 90 mA;
- for control you will need 4 MLT 20 kOhm resistors;
- transistors KT503;
- glass element as a lampshade;
- PVC base.
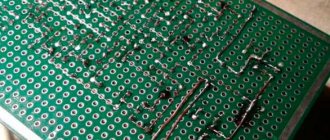
All the elements described above will be located on one board, which you can solder yourself. To simplify the process, you can find universal boards in radio stores that will allow you to quickly start working on an LED flashlight.
To create a circuit, you need to stock up on stranded copper wire, which will allow you to draw electrical paths.
A maximum of 4 flashlights can be included in one circuit. With proper assembly, this lamp will work much longer than the purchased one.
To assemble an LED flashlight, you will need not only to select suitable materials, but also to take care of the tools :
- drill;
- stationery knife;
- soldering iron with solder;
- pencil.
Where can I buy
As already written above, the vast majority of products in this segment of lamps are produced in China, so the easiest way to purchase is to use the services of online stores.
On the website of the company selling the product, you can read the description of the device, its technical characteristics, and also see reviews about both the product and the manufacturer, as well as the supplier.
In addition, you can use the services of companies involved in the sale of lighting products and equipment. In this case, it becomes possible to get specialist advice when choosing a product, to learn about the advantages of using a particular model and its disadvantages.
In this case, even when choosing a similar model, as on Internet resources, the cost of the product will be higher, but thanks to the ability to return or replace a low-quality product, this purchasing option is more reliable.
Step-by-step instructions for creation and assembly
The first thing to choose is a beautiful lampshade. You can make it from a coffee can, bottle, shot glass or any other glass form. It is best to select a small container that will allow the light to spread as much as possible around the perimeter of the area.
You will have to work according to the following plan:
A hole is made in the bottom of the glass container with a drill.
The procedure should be carried out after the glass has cooled to avoid injury. Hold glass containers with gloves and do not press too hard to prevent the glass from breaking.- A base is created that is suitable in size for the neck of the glass container. You can cut it out of PVC yourself using a stationery knife, or at an advertising agency (thanks to the latter option, it will be perfectly smooth).
- A furniture nut or any other bolt is installed into the base using a soldering iron.
- a circuit is assembled to which all the necessary elements are soldered.
- The PVC base is degreased using an alcohol solution or solvent. The coating substance should not touch the electrical parts of the solar cell, otherwise it will not work.
- The solar battery is attached to the PVC base using super glue, you can use the moment.
- Excess glue is removed with a clean napkin.
- Use a drill to make holes in the bottom for the wires.
- We pass them through and seal them.
- We take a PVC tube with a diameter of up to 5 mm and cut it to fit the base for the diode.
- On a PVC base in the center of the future flashlight we place LEDs in a tube.
- We solder the LEDs together with the wires and protect them with a special varnish.
- We connect the lampshade and the base with the working elements.
- Additionally, we protect the board from scratches with varnish or other transparent compound.
When connecting the PVC base and the glass bulb, you should use sealant or glue to prevent moisture from passing through it. As a result of this simple action, it will be possible to increase the service life of wires and other elements.
For flashlights, you can use stands of any diameter and size. They are created from PVC pipes and then painted in the desired color. You can make a low lantern near the ground, or organize a tall lamp, which will serve not only as a lighting device, but also as a beacon.
Bugs and difficulties
When creating an LED lamp, many people make the simplest and most common mistake - they solder the circuit elements in the wrong sequence. You can avoid it if you strictly follow the electronic diagram and do not deviate from the step-by-step plan for creating a flashlight.
Difficulties may arise at the stage of sealing and degreasing. All procedures must be carried out carefully so that individual elements of the circuit are not damaged.
The following substances should be handled with care:
- solvent and degreaser;
- Super glue;
- solder for soldering iron.
All work must be carried out wearing a mask and gloves to avoid damaging your eyes and hands. For the first time, creating a lampshade from a glass container may not work out, so it is better to prepare two containers at once. One will serve as a prototype, and the second will be used for the lamp itself.
Carrying out calculations
A homemade solar panel is a product that must create a current of the desired characteristics. Therefore, you need to determine how many semiconductors to use.
To do this, it is necessary to measure the voltage and current created by one semiconductor. This is done using a special tool. All measurements are carried out after the crystal is exposed to sunlight.
The semiconductor from the KD2010 diode is capable of creating a current with a voltage of up to 0.7 V and a force of up to 7 mA. Glass diodes can generate current with voltages of up to 0.3 V and strengths of up to 0.2 mA.
The best performance is demonstrated by orange, green and red LEDs. Since there are many LED models with different crystal sizes, you should take measurements of each one you purchase.
Calculations are carried out as follows:
- Determine the desired parameters of the solar battery. Let it create a current with a voltage of 9 V and a power of 1 W in normal (average) sunlight.
- The required number of crystals is determined based on the required voltage. The voltage of the KD2010 diode created by one semiconductor reaches 0.7 V. In practice, it will be less. Let it reach 0.5 V. To increase the voltage, you need to connect these crystals in series. With this connection, the total voltage will be equal to the sum of the voltages of all nodes. You need to place 18 crystals in one row.
- Calculate the current strength. In one row of series-connected crystals it will be the same - 7 mA. To expand it, you need to make a parallel connection. You need to make several rows. The total current will be equal to the sum of the currents of all rows. The more rows, the larger it will be. In our case, we need to provide a power of 1 W. That is, the current should be 1/9 = 0.111 A = 111 mA. Almost this current strength can be obtained from 15 rows. It is 7x15 = 105 mA. It is better to make 16 rows.
- Determine the required number of crystals (18x16 = 288).
Pros and cons of a homemade device
In country houses there are often interruptions in electricity, or it is completely absent. The desire to make a lighting design for a garden plot can have great difficulties when laying wires. DIY LED flashlights will help solve the problem.
Their creation and use is associated with the following advantages :
can be made from inexpensive scrap materials;- do not require professional skills during assembly;
- easy to install and dismantle as needed;
- does not require any energy source other than natural light;
- does not involve expenses during operation;
- environmental friendliness of the device.
Despite the visible advantages, a homemade LED flashlight also has some disadvantages :
- In order for the flashlight to work, you will have to work on quality connections;
- if you install it in a dark place, the batteries will not be replenished and the LED will light up;
- when working on a lamp you will need to use tools that not everyone knows how to use;
- you will need to purchase some parts for the circuit board and organizing the parts of the lamp, which contributes to costs;
- cannot be repaired if broken.
conclusions
Of course, everyone decides for themselves, depending on their employment and financial situation, what to do - buy such a lamp or make it with their own hands. But it’s not even about the amount spent on new flashlights, although here the savings come out to be more than 4 times.
Isn’t it nice to know that there is a lamp working on the site of a house or apartment that was created not in a factory, but with your own hands, as they say, “on the knee”? This is probably the main reason why you should try to assemble a solar-powered garden lamp yourself.
Approximate expenses
The cost estimate for creating a garden solar lantern is difficult to estimate due to the difference in design elements. If you use available materials, the costs will be small. To purchase a board and other radio components you will need no more than 500 rubles.
The most expensive part will be the solar panel . Its cost can start from 10 rubles to 1000 rubles, depending on the quality of the product and the brand. The most expensive elements will last a long time and delight the owner of the site with bright light.
Cheap boards break quickly and may not work immediately after manufacture. Additional costs may include PVC pipes. The best option is to find an alternative to them, or use existing supplies.
The expense table might look like this:
| Details | Price | Quantity | Purchase amount |
| Solar panels | 170 rub. | 1 PC. | 170 rub. |
| Storage battery | 220 rub. | 1 PC. | 220 rub. |
| LEDs | 12 rub. | 3 pcs. | 36 rub. |
| Resistor | 2 rub. | 6 pcs. | 12 rub. |
| Transistor | 5 rub. | 3 pcs. | 15 rub. |
| Diode | 3 rub. | 3 pcs. | 9 rub. |
| total amount | 462 rub. |
A budget option for one LED flashlight will cost about 500 rubles, according to the table. You can purchase what you need to create it in bulk in order to collect several products of this type at once, then the total purchase amount will be even lower per unit of luminous device.
Approximate costs
Possible costs directly depend on the nature of the breakdown, the quality of the purchased spare parts, as well as the number of lamps requiring repair or modification. Therefore, let's look at average prices.
| Housing for small lamps | 120 – 450 rubles |
| Housing for street lamp | 200 – 2500 rubles |
| Rechargeable battery (2 pcs.) | 100 – 1200 rubles |
| Battery rechargeable | 400 – 2000 rubles |
| Wires | 100 – 270 rubles |
| LEDs (1 pc.) | 10 – 130 rubles |
The financial costs of improving street lamps can only be approximately calculated. You will get more accurate numbers when you know in what quantity and quality you plan to purchase parts.
| Powerful LEDs (with classic white-yellow light) | 30 – 100 rubles |
| Powerful LEDs (multi-colored) | 30 – 130 rubles |
| Resistor (40 – 70 Ohm) | 20 – 100 rubles |
| Resistor (75 – 95 Ohm) | 40 – 130 rubles |
| Rechargeable battery (2 pcs.) | 100 – 500 rubles |