APPLICATION OF RUBBER MOTORS ON MODELS
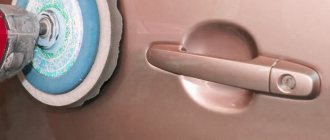
The high elasticity characteristics of rubber with very small residual deformations make it possible to successfully use it as engines for models. There are different classes of model aircraft that use rubber engines. In sports competitions, aircraft models with rubber engines are used, which have the following basic parameters: the mass of the rubber engine should not exceed 40 g in a lubricated state (with a model flight weight of 230 g). The load-bearing area should be in the range of 17-19 dm2. A typical model of this class is shown in Figure 173 below. The model has high flight characteristics. It was built by an international-class master V. N. Matveev.
There are rubber-motor models of smaller sizes, for example class B-1. Their rubber weight is limited to 20 g. The load-bearing surface is no more than 11-12 dm2. The weight of the model is 150 g. Sports competitions are also held for these types of models.
Rubber motors are also used in the construction of replica aircraft (Fig. 174).
Of particular interest are the lightest aircraft - indoor model airplanes, the mass of which in some cases is less than one gram. They are designed for flying in rooms where there is no air movement. Despite their small size and weight, they can fly for a long time - over 20 minutes. The load-bearing surfaces of these models are covered with microfilm. One of the indoor models is shown in Figure 175.
Rubber motors are used not only for flying models, but also for models of various ships: submarines, surface ships, gliders. When rubber motors are used on these models, they are subject to the same operating requirements as for flying models.
Lubricate rubber engines with castor oil.
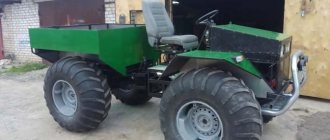
A simple machine with a rubber motor with your own hands
The rubber motor is a convenient and effective way to teach energy conversion. Children will be delighted with this lesson. Yes, there are a wide variety of lessons and designs on the Internet, but this one is perhaps the simplest. This diagram is very easy to understand, even for a small child.
To begin, we will need:
- four rubber bands for money
- one large rubber band for the engine
- four wheels
- juice straw
- two sticks
- hot melt adhesive
- ice cream sticks
- one puff
First of all, we design the frame of our car.
To do this, we use ice cream sticks and hot glue. You will also need six wooden blocks.
We stretch rubber bands for money onto the wheels. We make a kind of rubber for the wheels.
Assembling the wheelbase.
Install the wheels on the rear axle.
We also attach one tie to the back. We make a kind of clamp for the rear axle.
We fix the rubber band on the front axle. We wrap an elastic band around the fastener at the back.
That's all. The design of a car with a rubber motor is ready. In the video, watch how she drives. Thank you for your attention. Good luck in your creative endeavors.
GENERAL INFORMATION ABOUT RUBBER
What is rubber and how is it obtained? The raw material for rubber is the sap of the tropical Hevea tree. In air, it turns into a thick elastic mass called rubber. Although rubber has the properties of rubber, it has a high residual elongation and is not thermally stable - at a temperature of about 50-70 ° C it turns into a sticky mass. Hevea does not grow on the territory of our country, but there are rubber-bearing plants such as kok-sagyz, the juice of which also turns into a rubbery mass.
To obtain rubber from rubber, a few percent of sulfur is added to it, as well as a small amount of other components. The resulting mixture is heated to a temperature of 140-145°C. In this case, sulfur molecules bind together individual large rubber molecules in the form of threads. After cooling, the mass acquires thermal stability and new mechanical properties. This product is called rubber. Since currently the industrial need for rubber is great, and the amount of natural rubber is insufficient, scientists have developed industrial methods for producing synthetic rubber from widely available raw materials. This method was proposed by the Soviet scientist Academician S.V. Lebedev. Synthetic rubbers have high mechanical properties, but they are inferior to natural rubber, which has higher energy characteristics. The best types of rubber for models, for example, Pirelli (Italy), are made from natural rubber.
Rubber mixed with sulfur without heat treatment (vulcanization) is called raw rubber. Vulcanization of raw rubber is usually carried out in ovens or vulcanizers.
Rubber, when interacting with organic solvents (kerosene, gasoline, benzene), absorbs these substances, increasing several times in volume, while losing strength and elasticity.
Rubber glue is a solution of rubber in gasoline, so its use for gluing stressed rubber products is unacceptable. Dissolves rubber and mineral oils derived from petroleum. Vegetable oils of animal origin, as well as fats (castor oil, fish oil) and glycerin do not have a harmful effect on rubber. Special grades of rubber have been created that slightly absorb organic solvents, which have almost no effect on their mechanical properties. These types of rubber are called gasoline and oil resistant. In modeling they are used when operating compression engines. For preservation, the rubber is sprinkled with talcum powder.
Rubber is oxidized, especially in the sun, by atmospheric oxygen. As a result of oxidation, hard compounds are formed on the surface, which, when stretched, leads to the formation of cracks and rupture of the rubber band.
CALCULATION OF RUBBER MOTOR PARAMETERS
The length of the rubber motor of the model is specified when designing the latter. However, during design, depending on the type and quality of rubber, its length can be changed. When the length of the rubber motor is shorter than the distance between the seals (places where the ends of the rubber motor are secured), the propeller locking device does not work and it folds incorrectly, disturbing the aerodynamics of the model. As a result, the gliding turns change, which leads to it falling into a steep spiral or pitching up.
In the case of a greater length, which can be obtained by stretching the rubber, which is typical for some types of Hungarian rubber, or a special lengthening of the rubber motor up to 20%, depending on the cross-section of the fuselage, the rubber is braided. Weaving is possible if the rubber motor has a length twice as long as the distance between the attachment points; in addition, the double length is more convenient when installing it in the fuselage.
The calculation of a rubber motor mainly comes down to determining the maximum permissible speed for the chosen model design. The specified number of screw revolutions depends primarily on the technical data of the rubber used.
The rubber used for rubber motors differs in specific energy, i.e., the work that one kilogram of rubber can do. Domestic grades of rubber have a specific energy of 375 dan/kg, Hungarian round rubber - 400-500 dan/kg; the best grade of aircraft model rubber (Italian) has a specific energy of 500-650 dan/kg. The energy delivered depends on the length of the rubber motor. With relatively long engines, the energy output will increase, since in this case the rubber fibers are stretched evenly and store energy more fully. In short engines, due to the relatively large cross-section, the peripheral rubber threads stretch to a greater extent than the internal ones, which causes uneven loading of the rubber and incomplete use of its elastic properties.
When the short engine spins, friction occurs between the rubber bands, as a result of which the potential energy of the rubber is converted into heat, which reduces the energy output to the rubber engine. However, it is also necessary to take into account the fact that a short engine allows the use of a larger diameter propeller with greater thrust with the same mass of rubber; such an engine has more torque, and a larger diameter propeller has higher flight efficiency. compared to a smaller diameter propeller (for example, B-2 class aircraft models). Flight efficiency is the ratio of the model's flight speed to the air flow speed, which is expressed by the formula:
where Vm is the flight speed of the model,
Vn is the flow speed behind the propeller. The engine dimensions of the B-2 class rubber-engined model are selected based on the requirement to obtain maximum flight duration, which also depends on meteorological conditions.
From the above it follows that increasing the length of the rubber motor leads to an increase in the amount of returned energy, but the flight efficiency of the propeller decreases, and vice versa, reducing the length of the motor worsens the energy qualities of the rubber, but increases the flight efficiency of the propeller. In addition, additional requirements are imposed on the engine; in some cases, it is desirable to have a higher flight altitude of the model - a higher flight altitude increases the likelihood of the model getting into an upward air flow.
In many cases, it is required to have increased energy efficiency from the rubber motor used. As mentioned earlier, in practice, the optimal ratio of the relative length of the rubber motor and the diameter of the screw is chosen. In some cases, for a given screw diameter, energy efficiency can be increased by using a gearbox. The gearbox allows you to increase the relative length of the rubber motor and, consequently, increase the uniformity of tension of the rubber threads and more fully use the energy capabilities of rubber.
The gear ratio of the gearbox should be selected based on specific conditions, but not more than 3. When designing such a gearbox, special attention is paid to its mechanical efficiency. An increase in efficiency is facilitated by the use of ball bearings for installing axles, precise adherence to the center-to-center distances of gears, precision manufacturing of gear teeth, selection of materials and their lubrication. When using a gearbox on rubber-motor models, it is important that its weight is minimal. Otherwise, the excessively large mass will negate the increase in the energy efficiency of the rubber.
The gearbox diagram is shown in Figure 176. The advantage of this gearbox is to obtain greater energy output and, accordingly, achieve a longer flight duration; but in this case the length of the fuselage increases, which can lead to an unfavorable layout that worsens flight performance. For a more compact power plant, the gearbox circuit shown in Figure 177 can be used.
With this arrangement, two or more rubber motors of small cross-section are used, which makes it possible to significantly reduce the length of the model fuselage with high use of rubber energy output. However, there is one drawback here - the design of the model becomes more complicated.
Before manufacturing the engine, it is necessary to calculate it. The initial data for the calculation are the mass of the engine and its length. On sports models of class B-2, the lubricated mass of the engine should not exceed 40 g. The length of the engine is determined by the distance between the rubber motor mounting points on the model. Assuming that the manufactured engine has undergone a certain processing (dynamic molding, see below), it is necessary to know what maximum speeds the engine allows when cranking. The permissible speed is determined by the formula:
If domestic rubber is used for the rubber motor, then it is convenient to determine the permissible speed values according to the graph presented in Figure 178.
The change in rubber motor torque depending on the spinning speed is shown in Figure 179
Rubber is cut into strips, usually sized 1×3, 1×4, 1×5, 1×6; Some types of rubber have a circular cross-section with a diameter of 1.3 mm. Different sections are caused by different purposes, ease of use and other reasons. For example, the size 1 x 3 mm is convenient to use for models with a relatively long rubber motor.
For a given engine length, the mass of rubber is limited by sporting rules. Wider rubber bands are more convenient in the manufacture and operation of a relatively short rubber motor. The circular cross-section is convenient because the friction between the rubber bands is minimal and the possibility of burrs or cuts is less. Rubber of this profile is convenient for the manufacture of rubber motors of small models, such as indoor flying models, submarine models, etc.
How to weave a machine from rubber bands on a machine?
Set up the posts on the machine as shown in the figure below.
First, make wheels, preferably from black rubber bands (in our example they are blue).
Take one rubber band, twist it in half and put it on two posts.
Similarly, put on five more rings.
Twist another rubber band four times on the hook and transfer it to the last filled column.
Now you begin to remove all the rubber bands one by one, transferring them to the adjacent column on the left.
Now remove everything from the machine.
This is the craft you will get on your hook.
Remove the left loop from the hook and insert the hook into the four loops that are located at the end of the craft.
Put on the previously removed loops next.
You put on another iris and pull it through all these layers.
You tighten the knot and the end result is a wheel like this.
From the loop, insert a hook into the fourth loop and pull the next iris on through these layers and also make a knot.
It turns out this is a wheel, of which you need to make three more pieces from rubber bands.
Now you begin to weave a machine from rubber bands on the machine. Take two gray irises and put them on the first three columns.
You put a couple more rings on the eighth protrusion.
Pull the pairs onto the first two outer columns, then onto the next ones.
Using the same pattern, you put on pairs along all rows of the machine.
On the last two columns of the row you put on three layers of elastic bands.
Repeat the same steps with the remaining two rows.
Now you finish the rectangle shape by putting three round pieces on the outer protrusions.
Twist the next iris on the hook three times and remove it to the lowest protrusion.
On wheels, you end up with one semicircle slightly shorter than the other.
How to find your soulmate: tips for women and men
20 Signs You've Found the Perfect Guy
Ten habits that make people chronically unhappy
The short part should be at the top. Pull it over the second three protrusions on the machine, and on the last protrusion you wrap the elastic band around it twice.
Place the second eyelet of the wheel on the parallel three protrusions and also turn it one more turn.
You put on the second wheel in the same way, but only on the reverse side, not forgetting to wrap the ends in two rows.
As a result of this, you were able to put two wheels on your future car.
Place the next two wheels in the same way on the second and third rows of the opposite side of the machine, not forgetting to make a revolution at the end.
Now take one blue iris and string it on the machine as shown in the picture below.
You put on the second one next to it.
Now you begin to weave, removing the rubber bands from the pins of the machine. Hook three layers from the bottom right row and transfer them to the next pin.
Now you continue to weave the machine from elastic bands, throwing the lower layers from right to left, starting from the bottom right row.
Do the same with the middle and top rows.
Move the left layers down.
Take one blue ring and peel off all the layers from the lower left protrusion onto it.
Tighten it tighter, and then, holding this loop, carefully remove the rubber band machine from the machine.
The result is a cart like this.
You must remove the protruding loop. To do this, thread a hook through the rubber band machine as shown in the figure below and pull the protruding tip through these loops.
The craft should have gray bumpers on both sides.
Now make the headlights. To do this, take two pieces of yellow and blue. Wrap the yellow one four times around the hook, then pull the blue one through the yellow rows.
Remove the resulting headlight and begin weaving the second one in the same way.
When both lights are ready, they need to be placed on a rubber band machine.
Pull the hook as shown in the figure below.
Place one loop of the first headlight on the hook, pull it through, and throw the other end over the bumper.
Then carefully tighten the rubber band knot.
Do the same on the left side.
Benefits of Drinking Coffee
How a cat can ruin your life
Habits that will make you happy
You also remove any protruding loops.
Wind the hook as shown above, hook the protruding loop and pull it through the base of the craft. Do the same with the other extra protruding iris.
Now you begin to weave glass so that the machine is pleasant to look at.
To do this, use two layers of white and put them on the machine.
From above you put four pairs on all rows.
Close the rectangle by putting two rings on the rightmost protrusions.
You wind four turns of the white iris on the hook and put these layers on the uppermost protrusion on the right.
Place one iris on the middle pins perpendicular to the main rows.
Continue weaving the machine. To do this, remove the top layers from the upper right pin and transfer them to the adjacent one.
Continue by dropping all the layers of each row onto the left column.
Now peel down the lower layers.
Take a white elastic band and continue weaving, throwing all the layers of the leftmost column from below onto it.
Grab it with a hook and take it out from the other side.
Throw one loop over and tighten the knot.
Now remove the craft from the base.
Knead the window on the fingers of both hands to make it look more natural.
The loop that protrudes is hidden inside the craft.
You also pass the hook through the base, grab the loop and pull it through the layers.
The window will be located on top of the craft.
Using two blue rings, you put them on a white base that you just woven - this will represent your window.
Now you must make the roof. To weave it, use the loom again. Take two blue rings and put them on the posts as shown in the picture below.
Continue stringing double layers perpendicular to this, using four posts on each side of the loom.
Close the rectangle by putting on the pairs on the right side.
On the upper rightmost column you put an elastic band, twisted four times.
Now you start filming. From the upper right ledge, move the lower rubber bands down. Transfer layers from the middle pin in the same way.
Transfer the bottom elastic bands on all horizontal rows, going from right to left.
Pull the next iris through the loops that are on the lower left ledge.
Tie a knot and remove the entire craft.
Take another iris and stretch it through the roof.
Thread its other end onto a hook and tighten the knot.
Take another ring and insert it into the corner of the roof.
Pull it through these loops and also tie a knot.
Pull the next circle through the next edge of the roof.
The result is this craft with four loops.
Now you begin to assemble the machine itself.
Place a hook near the wheel and grab one of the outer rubber bands of the roof and pull it out from the back side.
Do the same with the second roof loop.
Connect the projections of the roof rings using a lock (clip).
Place the “windows” on top and secure the two remaining protrusions in the same way - pull them through the craft and fasten them with a lock on the back side.
That's all!
As you can see, the craft is quite difficult to make, so it is unlikely to be woven using fingers, forks or a slingshot.
Surely all adult men remember how in childhood they loved to play with toy cars, depicting races, chases or other types of entertainment - depending on what type of transport they had in their hands at the moment.
Of course, you won’t have much fun with a car made of rubber bands, but your child will probably be pleased that you made this craft especially for him with your own hands.
For more details, watch the video at the beginning of this method.
In the following articles we will look at how to make other types of transport with your own hands.
Good luck to everyone in your creativity and weaving!
MANUFACTURING RUBBER MOTORS
If rubber bands contain excessive amounts of talc, they should be washed in warm water and soap. Rubber should be dried in a room where it cannot be exposed to direct sunlight and dust. After drying, the rubber is weighed, and a place is prepared for the manufacture of a rubber engine. The mass of rubber should be 96% of the mass of the rubber motor: the remaining 4% is used to lubricate the rubber bands. Two nails are driven into a wooden board covered with plastic film; the distance between them is equal to the length of the rubber motor. To avoid damaging the surface of the rubber bands, put nipple rubber or a PVC tube on the nail. Winding of rubber is carried out with uniform tension.
By winding rubber, one or several bundles of rubber bands are obtained. Tie the ribbon with a nautical knot, as shown in Figure 180.
The knot is performed in two stages: first in the free state of the tape, then in a tense state. To reduce friction at the ligament site, the rubber is moistened with water. Tying rubber bands is a responsible operation, since if the knot comes undone when cranking the engine at the start, this will lead to significant trouble and even rupture of the rubber engine.
Typically, tying rubber bands is done with an assistant. An assistant tightens the rubber band while the operator secures the knot with threads. Thread number 10 is used to tie rubber bands.
For ease of use, the finished rubber motor is tied with a thin elastic band at the attachment points. After the rubber motor is ready, it is lubricated with medical castor oil. The rubber motor must be lubricated evenly. After lubrication, it is left for several days to allow the castor oil to absorb into the rubber. After this, additional lubrication is carried out, and then dynamic molding of the rubber is performed.
Dynamic molding significantly improves the elastic properties of rubber, allowing you to increase the rotation speed of the rubber motor. There are various methods for molding rubber, one of which involves sequentially twisting and unwinding the rubber engine, starting from 20-25% of the permissible number of revolutions with successive additions of 80-130 revolutions.
In between, give the rubber a “rest” for 15-20 minutes. Usually the twist is adjusted to 80-85% of the maximum possible number of revolutions. The molded rubber motor is lubricated with castor oil, packaged in an airtight jar and kept for one to two weeks. After this, it can be used in competitions.
In order to more fully use the energy reserve of rubber, i.e., to obtain the maximum number of engine revolutions, spin one of the rubber engines until it breaks. Depending on the number of engines available, from one to three engines are ruptured, and the minimum number of revolutions at which one of the engines breaks is taken as the maximum permissible number of revolutions.
For critical launches of B-2 class models, it is advisable to have a new rubber motor for each flight. In addition, it is necessary to have backup engines that can be used during repeated starts or in case of unsuccessful starts (engine rupture, flight less than 20 seconds). This will reduce the time required to prepare for the start, which is of great importance if the competition is held in difficult weather conditions or in unfavorable terrain of the surrounding area. According to the rules for free-flying model competitions, at least seven rounds are required. If the competition participants score the same number of points, the next rounds are announced until the winner is determined.
But not all competition participants have the opportunity to prepare the required number of engines for testing. Therefore, some are forced to use the rubber motor more than once. In this case, the impact of the rubber is slightly reduced.
DIY hedgehog
For needlework you will need:
- Elastic bands: orange, black, brown, pink, beige.
- Machine
- Beads
- Hook
The middle row should be removed from the machine; a total of six pegs will be needed. 12 flesh-colored elastic bands should be twisted and thrown over the columns. Next, in the bottom row, stepping back one column at a time, you need to mark the four central pegs and simply throw 3 elastic bands on them.
You can start making needles. Take three elastic bands of different colors and wrap one around the hook twice. They do the same with another color. Then the black one is threaded through them and put on the pegs. Now the resulting needles are pulled onto other columns; you should only skip those in the center. Two elastic bands from under the bottom of each row are moved to the center.
The legs are made like this: a flesh-colored elastic band is twisted in half and wrapped twice around the hook. Two more of the same kind are threaded through it. And they do the same with another one. The resulting foot is put on the posts on the left. And they do the same on the other side. Rubber bands are added to the center. Now we need to make another row with needles. Next, the two lower elastic bands are removed from the posts. So weave 4 more rows.
A hedgehog's ears weave in the same way as its paws. And cheeks are made from pink gum. Take one piece and wrap it around the hook three times. Then another beige one is threaded through it. Now the cheeks are put on between the second and third, fourth and fifth pegs from the bottom.
INSTALLATION OF RUBBER MOTORS
The screw bushing for a rubber motor can have a different design (Figure 181 and 182). The hooks to which the engine is attached are also different. The most common and quite simple to manufacture is the hook shown in Figure 182. It is made from millimeter OBC wire and, when viewed from the rear, has an S shape. This shape of the hook promotes uniform stress distribution in the rubber engine seal. To prevent damage to the rubber by the steel wire of the hook, a rubber or plastic tube is put on the latter. A screw or pin stopper is attached to the hook. In the latter case, the rubber motor is often made twice as long as the distance between the hook and the rear seal.
The back hook is made of a lightweight metal tube with a diameter of 6 mm or bamboo. In some designs, a coil is placed on it. The fastening of the rear pin must be reliable enough to prevent spontaneous movement of the axis, leading to an accident, or the rubber motor jumping off when tightening it or during operation.
The inner surface of the fuselage in which the engine operates is made in the form of a cylinder; the inside is lubricated with a thin layer of castor oil. The fuselage tubes of rubber-engined models of class B-2 have an internal diameter of 32-40 mm.
The engine is installed in the fuselage using a device, which is a rail with a hook at the end.
How to weave from rubber bands on a machine: technique
The machine is an intricate contraption with which you can weave bracelets with a wide variety of patterns - from simple to complex. Take the machine and place it so that the concave side of the pegs is not facing you. Place the first elastic band on the pegs of the first left row. Tie all the pegs, except the last one, with pairs of rubber bands to form a rectangle.
Using multi-colored elastic bands, connect the central pegs to adjacent posts, starting with the second post of the first row. It is necessary to work clockwise. Connect the fourth central pillar with the neighboring one, forming a star. Choose an elastic band of the color that will be your main one, fold it into a ring and throw it over the last column of the middle row. Do the same with the other columns. By the way, handmade bloggers claim that some handmade life hacks and beauty tricks can be applied in life.
Now set the machine so that the last sprocket is the starting one. Take the elastic from the middle post and put it on the post with the core. Starting from the right column, remove the elastic bands counterclockwise, throwing them over the rays. Take the elastic band that connects the outer pegs of the middle and left rows and throw it over the left column. Combine the columns on both sides with rubber bands. Then place the machine with the cuts of the pegs facing you, hook the hook through the loop of the outermost post and tie a double knot. The bracelet with the star pattern is ready! Remove the product, connect the ends with a clip and you can wear it as a bright accessory or make a cute gift.
OPERATION OF RUBBER MOTOR
When starting models with a rubber motor, two parameters are important: the dependence of the hood on the number of revolutions and twisting, and the twisting time. Moreover, the first factor is decisive. They try to keep the twisting time to a minimum. For accelerated tightening, hand drills are used, the gear ratio of which ranges from 2.5 to 7. The pace of work as the rubber motor is twisted is gradually reduced, since the tension in the rubber bands of the motor increases. Excessive tightening may cause the rubber motor to break. It is necessary to tighten the rubber motor all the way to the fuselage boss. If you finish spinning earlier, side “wings” may appear, which, when spinning up the rubber, will cause the propeller to stop prematurely (if the rubber motor is not fully spun up).
Operating rubber engines at low temperatures has its own characteristics. Low temperature has a great influence on the properties of the rubber motor. At a temperature of -22°C, castor oil freezes, reducing the energy released by the rubber. Foreign types of rubber, such as Pirelli, are especially sensitive to low temperatures. Domestic model rubber, especially tape rubber, is less susceptible to the influence of low temperatures. To preserve the elastic properties of rubber, it is lubricated with glycerin mixed with ethyl alcohol.
It is possible to start the model at low temperatures and with regular rubber motor lubrication, but for this it must be stored at a positive temperature. Installation on the model is carried out quickly and the twisting is performed immediately, i.e. the thermal inertia of the rubber is used.
When restarting, the rubber bands are inspected and, if necessary, they are repaired and heated. At very low ambient temperatures -30 -40° C, rubber bands are severely damaged due to the crystallization of water on the surface of the rubber.
In field conditions, repairing a rubber motor is very difficult.
It is necessary to take into account that the lubrication of a drill intended for tightening must be winter lubrication.
After use, the rubber motor should be washed with soapy warm water (Children's soap), removing grease and dust particles. After drying the rubber, it is again lubricated with castor oil, packaged in plastic bags and placed in dark glass jars with an airtight lid. Store rubber in a cool, dark place. After several months of storage, it should be washed again with soap and water, lubricated with castor oil, and packaged for storage.
REPAIR OF RUBBER ENGINES IN THE FIELD CONDITIONS
After starting the model, the rubber motor must be carefully inspected in a slightly stretched state - in this case, cuts in the rubber bands are detected. If the cuts are not large and are less than 0.2 the width of the rubber band, then use scissors to cut out the place with the cut. This delays the tape breaking.
Before the next start, check again the place where the cut was. If it appears again and is about half the width of the tape, then such a tape should be cut in this place and tied again. Rubber threads are usually tied together by two people. The technology for executing the nodes is indicated above.