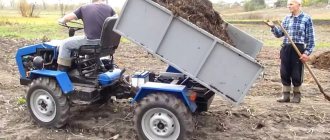
A mini tractor is a modern agricultural technique. A large assortment of canopies expands its functionality. If it is not possible to purchase a small-sized tractor, you can make one based on an old car.
A do-it-yourself minitractor with an Oka engine will not be inferior to a unit from the manufacturer in terms of technical parameters and performance. The homemade product will be economical, productive and reliable. The tractor can be designed taking into account individual preferences.
A mini tractor with an Oka engine can handle soil cultivation, cultivation, hilling, transporting goods and other work.
Preparation of drawings and details
The assembly of complex mechanisms begins with the production of drawings.
Based on your technical knowledge, you need to put your ideas on paper in detail, or use ready-made solutions posted on the Internet. Important! Without the appropriate skills, it is not recommended to create a drawing of a tractor yourself. Incorrect calculation will lead to rapid wear of parts and premature failure
Having a ready-made drawing, it will be very easy to prepare all the parts, and in the future, assemble everything into a single device.
This is interesting: How to make a tractor from a Lada with your own hands: we look at it step by step
Cabin structure
A homemade cabin for a mini tractor creates comfort and convenience for workers - with minimal labor and materials, working conditions change dramatically, allowing you to work according to the planned schedule in almost any weather. This applies to any models of mini equipment, including the popular DTZ, T-25 (Russia), Xingtai, Jimna, Dong Feng (China) and others. Largely repeating the design used on production vehicles, homemade cabins are practically no different from them in quality if they are made by professionals under appropriate conditions.
The main components of the future cabin are:
- Durable steel frame made of bent and welded corners No. 45-22;
- Roof made of sheet steel or composite materials;
- Windows and doors mounted on steel curtains, with locks, gas shock absorbers for the rear window;
- Glazing, thermal insulation, seals;
- Sheathing made of foam rubber and insulation (leatherette);
- Electrical wiring and electrical appliances;
- Front and rear lights;
- Windshield wipers;
- Rear view mirrors;
- Lights (front, rear), fan, car heater.
Beam (bridge) for a mini tractor - do it yourself, drawing, video
A beam or bridge for a mini tractor serves as the basis to which the systems and elements of the machine are attached. The front beam on a motor tractor serves as a support for various components, and the wheels are also attached to it. Often, craftsmen encounter a beam during the conversion of a walk-behind tractor, when they have to make the front beam of a mini tractor with their own hands. The rear axle of a mini tractor is the same system to which the wheels and some elements of the overall system are attached. When designing a mini tractor, many people take the front and rear axles from old cars. As a result, the design is strong and reliable. If you have the necessary tools and materials, as well as knowledge on the subject of equipment, then you can make these parts yourself from what you have in your garage.
How to make a bridge for a mini tractor?
A mini tractor is a technique that helps a person in the process of cultivating land, transporting goods, planting plants, caring for them, and much more. Factory equipment today is quite expensive, not everyone is ready or has the opportunity to spend such money. But in villages you can often find old cars that are already out of order, but there is still hope to give them a second life. It is from them that craftsmen take various parts to construct a homemade mini tractor.
Creating a mini tractor includes designing the chassis. First of all, bridges need to be installed. It is better to make the rear axle for a mini tractor with your own hands the same as the front one. This will save you from selecting a subordinate number, which is impossible to do without the proper experience and knowledge.
The chassis can be taken from a Zhiguli, but it will need to be shortened. You do not have to additionally look for a gearbox that is already on the rear axle. How to make a beam for a mini tractor? The cross beam can be made from a square pipe or from metal corners.
A driven front axle differs from a non-driven one in that it transmits torque from the cardoon transmission to the wheels. With its help, the machine turns, the steered wheels are stabilized, and pushing forces are transmitted from the drive wheels to the tractor frame. How to make a driving front axle for a mini tractor? You will need:
- Beam;
- Main gear. Consists of bevel gears. Serves to increase torque and transmit it to the differential;
- Differential. Serves to transmit power;
- Wheel reducers. Necessary to increase torque, which is transmitted from the main gear to the wheels. They are also needed to make a turn.
All these elements can be taken from old cars or other equipment. If you don’t know how to calculate the front axle, then you can watch this formula with a detailed description and explanation in the video.
How to shorten the bridge from a VAZ?
Sometimes, in order to construct a homemade mini tractor, it is necessary to shorten the building bridge. Let's consider this process using the example of a rear axle from a VAZ. A shortened axle is necessary in order to reduce the width of the wheelbase, thereby making the car more compact and maneuverable.
First you need to carefully prepare for the process. You need the rear axle itself, as well as tools such as a welding machine, grinder, vice, screwdrivers, and more.
You need to trim the rear axle of a VAZ as follows:
- You need to cut off the cup for the spring;
- The end flange must be pulled out;
- The removed axle must be measured, compared with the drawing, and cut to size with a grinder;
- At the tip of the segment, place a notch, which will serve as a mark for the “male” groove;
- Drill a hole inside the cup;
- After this, the axle shaft is joined together and welded;
- The last stage - the finished axle shaft is inserted into the bridge. Welding is done on both sides.
Using the VAZ rear axle
To do this you will need a few materials:
- steel tubular blanks 60x30 and 25x25 mm;
- wheels and springs from the rear axle of a Zhiguli;
- sheet pieces of steel from 0.8 mm thick;
- channels, duralumin sheets from 2 mm thick.
The trailer body can be assembled in various ways. One of the most common options is wooden with metal corners and screw fastenings. The working process is as follows:
- The wooden frame is attached to the metal structure of the rear axle.
- Metal parts are welded together.
- The transverse crossbars are made from a 25x25 mm profile; tubular blanks are useful for the spars.
- From 25x25 mm corners we make a metal frame for the frame and weld it to the lower bridge.
- Next, the beams are connected.
- Using springs we connect the spars to each other. To do this, the edge of the springs is carefully placed on the axis of the beams. The beam is connected to the central part of the structure with stepladders.
- The last part is a triangular drawbar, which is welded from metal pipes. The drawbar is welded to the metal frame.
All that remains is to build a transition from the trailer drawbar to the walk-behind tractor.
Making a tractor with your own hands
If you have the tools and experience in car repair, assembling a mini tractor is not difficult. First you need to prepare everything. At the first stage, drawings are made. You can do them yourself, but it’s easier to take ready-made ones. Then assemble the components from the car. If they were removed from the same car, it will be much easier to connect them, but you can also use spare parts from different cars. They can be found on portals like Avito, at car dismantling yards, or even among scrap metal. All parts must be carefully inspected for serviceability, cleaned of rust, and, if necessary, repaired.
Blueprints
The order of drawing up drawings and a list of works depends on how many ready-made components are used. It is not always possible to have a whole, undisassembled car with working key components at your disposal. On the one hand, the good thing about homemade equipment is that you can use various materials from those lying around in the garage. On the other hand, using components from other old cars increases the amount of work. For example, if you take the rear axle from an UAZ, then it will need to be shortened. All this must be taken into account when drawing up drawings.
It is necessary to carefully determine the size of all parts of each unit and immediately adjust them so as not to be distracted during the work process.
Required materials and tools
To assemble the tractor, you will need the following components and assemblies:
- engine;
- gear box;
- front and rear axles;
- PTO;
- wheel reducers;
- steering gear;
- brakes;
- wheels and rims (18 inches).
Important Design and operating rules for an air dryer for KamAZ
The tools you will need are:
- welding machine;
- scissors or hacksaw for metal;
- wrenches, screwdrivers.
Assembly order
The first step is to weld the frame. To make it you will need sheet steel, a channel, and water pipes. Body parts will also come in handy. The frame is made from 40x80 rectangular profiles. If the front and rear axles are faulty or missing, you can take the axle shafts from the T-25, replacing the hubs, or the axle from the UAZ (pre-shortened).
Next, the engine is installed - from a LuAZ or another car. LuAZs were equipped with an engine from Zaporozhets - noisy, weak and unreliable. Depending on the desire of the master, you can “bring to mind” the standard engine or take another one. If possible, you should give preference to a diesel engine as it is more economical. You can also install a motor from an old powerful walk-behind tractor, if you have one on your farm. The speed level must be reduced by three and a half times using pulleys.
Discs and wheels can be taken from a UAZ or a GAZ-21 (in this case, you will need to modify the rims). The main thing is that the width of the wheels must be at least 18 inches, so standard ones will not fit. A smaller width will not provide sufficient maneuverability on arable land. After installing the wheels, the base for the mini tractor can be considered complete.
The next stage is assembling the hydraulic system. This is an important stage, since the efficiency of the attachment directly depends on the operation of the hydraulics. You will need to install an H-10 pump with a 75x100 hydraulic cylinder and a P80 distributor. Since the pump should not run continuously, it should be turned off using a drive from a Ural motorcycle. To make the shaft fit the sprocket, it is cut to length and the diameter is increased.
A PTO is also installed - a power take-off shaft that transmits rotation from the engine to the working equipment. It was installed on some LuAZ vehicles as standard. If you were unable to find such a model, the shaft can be taken from another tractor or walk-behind tractor.
Once the transmission, steering and clutch are installed, you can begin assembling the top of the tractor. The main requirements for this part are convenience and ergonomics. It is necessary to provide a comfortable seat and protection from bad weather (canopy, awning). Otherwise, the master’s imagination is given complete freedom. As a rule, craftsmen leave the hood cover and windshield. The wings have to be welded and installed separately, focusing on the height and position of the wheels.
Why do you need a PTO?
The power take-off shaft (PTO) is designed to drive various agricultural machinery connected to a mini tractor, for example, various tillers for tillage, potato diggers, mowers, snow blowers, etc.
PTO can be either dependent or independent. In the first case, the shaft is driven by a transmission that transmits rotational motion to the wheels. As soon as the wheels stop, the PTO stops rotating. The independent PTO receives rotation from the engine crankshaft. Therefore, the higher the engine speed, the faster the shaft rotates.
In addition, there are tractors with a synchronous PTO. The rotation speed of the synchronous shaft directly depends on the transmission ratio of the moving tractor. Synchronization of movement and rotation is required when the unit operates with sowing equipment.
Photo of a mini tractor with your own hands
Design features
A homemade walk-behind tractor is most often used to perform simple but labor-intensive work:
- plowing of land;
- hilling up plantings;
- mowing grass or tops;
- application of organic fertilizers.
You can upgrade any walk-behind tractor with a ZiD engine or any other, make it on large wheels, with a belt drive.
Often, craftsmen prefer to reassemble such units using old spare parts from such mechanical devices:
- chain saws of the “Friendship” type;
- scooter;
- motorcycle;
- washing machine.
If a person owns a tool and understands the structure of equipment, then making a walk-behind tractor is not difficult. In terms of material costs, this can cost a minimal amount, while prices for a good unit start at $300. If everything is done correctly, a new device created by yourself can be in no way inferior in reliability and performance to imported models such as Cayman walk-behind tractors.
Often craftsmen use old units from the Druzhba saw as engines. At the same time, the walk-behind tractor is easy to operate; even a non-professional or a minor can work with it. The power plant is able to withstand significant loads without stalling even at low speeds.
This indicator is important for the following work:
- plowing;
- harrowing;
- harvesting.
Stages of manufacturing a mini-unit from Oka
A homemade mini tractor is assembled from key components:
Frame. You need two spars (right, left) and two traverses (rear, front). To make the spars, you need channels No. 10, and traverses - No. 12 and No. 16. A metal beam is needed for the transverse beam; Motor
It is important to consider power and torque figures. The best option is a four-cylinder diesel engine with a power of 40 liters
With. and an air cooling system. For a 4*4 unit, the transmission gear ratio increases; Bridge. Does not need modernization. It is attached to the frame with four stepladders. You can use the driveshaft of almost any machine; Transmission. The gearbox is mounted on the frame. To synchronize its clutch with the motor, a new basket is made using a welding machine. The rear plane of the engine flywheel is shortened and a hole is made in the center; Steering. Hydraulics require an oil pump responsible for pressure. It should be located at the drive shaft. The optimal solution is that each wheel of the drive shaft is controlled by a gearbox. The steering system from Oka is fully suitable for the redesigned design; Wheels. The diameter of the wheels is determined depending on the purpose of the unit used. If the equipment will be used to transport goods, the radius of the wheels should be between 13-16 inches. To perform agricultural work, you need wheels with a radius of 18-24 inches.
A fracture with the Oka internal combustion engine is made according to a certain scheme:
- The frame is being made. A standard rectangular structure should be obtained from a channel or sheet iron. It is reinforced with metal corners welded vertically. You can take the UAZ fist by the inter-frame hinge;
- The front and rear axles are soldered to the key parts of the Oka car. A homemade mini-unit is often springless, so the shocks when moving are very noticeable;
- The motor is installed. The power of the half engine is enough to perform standard work with a mini tractor. Cross-country ability can be improved by increasing the wheel clearance. It is necessary to develop a scheme for fastening the mechanism for coupling with attachments. The front and rear side members are strengthened. More powerful engines, for example, from UD 2, allow you not only to process areas, but also to transport cargo;
- The clutch consists of double-V belts, from which rotation is transmitted to the pulley. The latter is fixed on the gearbox shaft. The gearbox also comes from Oka. When mounted, it is turned towards the operator;
- The steering system is installed;
- The fuel tank and brake system are installed;
- The unit is provided with lighting. Lighting fixtures include necessary electrical wiring and lights. If they are available, a small-sized tractor can be used at night;
- The operator's seat is installed. Vibration loads are reduced and operating time is increased thanks to the installation of soft springs under the chair.
Important TOP 3 telescopic loaders Merlo (Merlo) and their technical characteristics
Oka's old car can be used as a draft vehicle. The rear part of the body is trimmed to allow attachment of attachments. If the power of the equipment allows, then the list of canopies can be very wide, including one for a mini tractor.
You can make a mini tractor from the Oka in disrepair using the working components and systems of the car. In this case, a completely new mechanism is created. Its advantage is the ability to customize the tractor for yourself. A small-sized tractor from the manufacturer cannot boast of this feature.
The proposed video will simplify the process of manufacturing new equipment.
Not everyone can afford to buy compact agricultural machinery. But assembling a mini tractor from Oka is accessible to anyone who has skills in working with metal and understands the structure of cars. Folk craftsmen have developed many original designs that are easy to make at home using available parts.
Body
The first thing that attracts attention when viewing photos representing LuAZ tuning is the changes regarding the car body. The semi-supporting body of the “Volyn” with a spar frame allows you to implement quite bold experiments
Here actions are possible in two main directions - improving what is already there. Or a complete redesign of the body.
The first option usually includes installing roll bars, painting the body with modern materials, installing an off-road body kit and a yoke. A common option is also to replace standard lighting fixtures, which allows not only to transform the car externally, but also to significantly improve the illumination of the space in front of the car. The standard headlights leave much to be desired in this regard.
Also, additional equipment is often installed that may be needed during an off-road trip - various winches and other self-towing devices.
The second option is to remove the roof and install safety showers instead, providing for the use of a removable awning if necessary. The design of the car allows you to cut off the roof pillars, and even make the windshield drop down, in imitation of army “jeeps”. This type of tuning requires a much larger amount of work, but can significantly change the appearance of the “Volyn”, which does not sparkle with design delights.
Advantages and disadvantages
In times of crisis, the defining moment that affects many areas of life and industry is the issue of saving money. It is this circumstance that pushes many enthusiasts to independently manufacture not only mini tractors, but also other agricultural equipment.
This fact, in many ways, becomes decisive, especially for rural areas, where there has been no employment for a long time, and, as a consequence, no money. All that people living in villages and villages have is their personal farm, which feeds them throughout the year.
Advantages
Therefore, homemade units in rural areas will be popular for a long time.
In addition to the obvious savings in money, self-assembly has a number of advantages:
- Due to its compact dimensions, the homemade unit is capable of performing work in fairly small areas. Considering that most private gardens are small, this circumstance becomes important, because the use of large-sized equipment, in this case, is impractical.
- Quickly achieved payback – literally in one season. This is a consequence of the savings on components that were described earlier.
- Quite good performance indicators, which are demonstrated by a homemade unit.
However, no matter how much you might want it, homemade mini tractors also have certain disadvantages that need to be pointed out:
- When assembling, there is a certain problem of finding the necessary parts and spare parts.
- A consequence of the previous problem is the issue of repair, because if a certain part fails, it will be quite difficult to find it.
- Self-assembly requires certain technical knowledge, as well as the ability to work with a welding machine and a lathe. In other words, assembly is not for everyone.
- Due to the fact that an all-wheel drive homemade mini tractor is made mainly from old components, this may affect the frequency of equipment breakdowns.
Flaws
As we can see, there are quite a lot of disadvantages. But, at the household level, self-assembly becomes almost the only alternative due to its relative cheapness.
Areas of use
Due to the fact that homemade mini tractors are in many ways identical to store-bought versions, such as Uralets, Kubota, Bulat 120, Uralets 160, Yanmar according to a variety of criteria, their scope of use will also be quite similar.
Any such equipment is manufactured exclusively for use in the agricultural sector, where the main requirement is ergonomics and reliability of the units.
As for homemade mini tractors, perhaps the most basic type of work they perform is various soil cultivation for its further use. This area is quite extensive and includes a number of specific works:
- cultivating the soil, as well as removing weeds and other vegetation from the land;
- formation of beds;
- planting potatoes using special attachments;
- digging up potato tubers, etc.
As we can see, with the help of homemade mini tractors you can perform virtually a full range of land work, the main purpose of which is growing and harvesting crops.
For the village, this is a primary task, because this is the only way to feed itself in these conditions, hence the indispensability of such equipment, which many note. However, land work is not the only thing that homemade units are capable of.
If you put a little effort into thinking about the use of additional attachments, you can significantly expand the scope of application of such equipment:
- mowing grass to make hay;
- transportation of various goods, as well as removal of construction and agricultural waste from the site;
- clearing the territory of snow, etc.
It is important to understand that additional equipment will cost some money, but you can make it yourself. The same snow blowers and grass mowers have a very simple design that can be made from readily available materials and tools.
Fortunately, there are a sufficient number of diagrams and drawings on the Internet that make this task easier for the farmer.
Mini tractor made from Agro walk-behind tractor
Before you start remaking walk-behind tractors of this brand, you should stock up on the material and necessary tools. To work you will need:
- stainless steel sheets and profiles;
- seat and steering wheel - can be removed from an old car;
- a pair of wheels – their diameter should not exceed 15 '';
- set of fastening elements;
- grinder and electric drill;
- hammer and welding machine.
After preparing everything you need, we advise you to study the diagrams, which will tell you the correct procedure for installing tractor elements. We also advise you to look at the photos, which will certainly help you in the manufacture of an agricultural implement. Unlike walk-behind tractors from the manufacturers listed above, Agro brand equipment has one significant drawback, which must be taken into account when converting a walk-behind tractor into a mini tractor. It lies in the fact that the axis of the walk-behind tractor has very weak fracture strength. This kind of fracture will definitely have an effect if you exceed the maximum permissible load on the frame of the mini-tractor. To avoid further malfunction, the minitractor will need to be equipped with wheel gears.
The procedure for assembling the unit is as follows:
- At the first stage, you need to weld a strong frame for the tractor. To do this, use steel profiles and pipes. Be sure to keep in mind that the heavier the frame made, the better the grip of the minitractor with the ground. At the rear of the supporting structure, weld a towbar, which will be required to couple the trailer to the unit;
- Then proceed to manufacturing and arranging the chassis of the mini tractor. To do this, you can purchase a pair of ready-made front wheels, as well as hubs equipped with brakes. After purchasing the parts, attach the hubs to a steel pipe, and drill holes in the front of the frame that will be required to mount the hubs on the mini tractor. Next, install the tie rods using a worm gear. Following the rods, secure the steering column and rear axle. When installing the latter, press the bearings into the bushings used for installation. Install a pulley on the rear axle and securely fasten the wheels;
- After this, install the engine on the front of the frame. We recommend doing this using an additional frame placed on special shock absorbers - this will avoid strong vibrations under high loads on the engine;
- Next, install the driver’s seat on the mini-tractor, connecting it to the frame through springs - thanks to them, working with the mini-tractor will be much more convenient.
If desired, a compact tractor made by yourself can be equipped with a canopy that will protect you from rain and sun. To make it, 4 steel pipes need to be welded to the frame next to the seat and steering column, to which a steel sheet must be secured by spot welding. As a result, you will receive a reliable unit for your garden that will quickly cope with all the tasks assigned to it.
How to make a cabin for a mini tractor - stages of work
It will take a lot of time to make a cabin for a mini tractor. You need to think through every detail so that in the end the entire structure is solid, durable and beautiful. The process is greatly simplified by purchasing factory elements such as doors, glass, and seals. Don't be afraid of Chinese manufacturers. Many people have the misconception that Chinese production is always of low quality, but this is far from the case. You can save money, but at the same time, if you carefully choose a manufacturer, you can get parts of decent quality that are not inferior to their European counterparts.
The very first stage of creating a cabin for a mini tractor will be drawing up a drawing. Don't neglect this process, as you may end up with a number of serious problems if you do everything by eye. Measure the parameters of the mini tractor to calculate the dimensions of the cabin.
The development of the cabin takes place in several stages:
- The preparatory process, namely the creation of a drawing;
- Making the frame. To do this you will need a welding machine and steel pipes with corners;
- Creating a roof. The roof must be made of steel sheet or composite. Cut the product to the dimensions of the cabin and attach it to a pre-prepared frame;
- After this, you must weld the frame to the frame of the mini tractor;
- To prevent the frame from being exposed to the negative effects of the external environment, it must be treated with special solutions or paints to protect against corrosion;
- After this, you must install the glass, seal them into the base of the structure so that they are securely fastened;
- Installation of door and window locks;
- Installation of other parts, such as handles, wipers, mirrors, headlights, and more;
- Fastening the cabin to the frame of a mini tractor.
Since you can work on a mini tractor all year round, installing a heater and air conditioner will not hurt. The stove is connected to the cooling system and then removed inside the cabin.
Nowadays, not everyone can afford to purchase special equipment, since the price is quite high. However, all craftsmen have the necessary set of tools, materials, and if you add desire, then anyone can quickly make a cabin for a mini tractor with their own hands.
Self-assembly of a tractor from vehicle elements
A mini tractor, assembled with your own hands from automobile parts, is a more serious vehicle with a powerful engine, hydraulics, a full-fledged control system and suspension, and even an all-wheel drive option is possible. Since this is already a serious technique with a large weight of parts, it is necessary to complete the entire structure thoroughly.
Important Technical characteristics and design of the KKS-10 rail gantry crane
At home, it will not be possible to calculate the strength limits and permissible loads, so the entire structure as a whole must have safety margins.
The first step is to make a frame from channels. The channel is cut according to the prepared diagram, then the cut parts are welded to each other. The frame is selected taking into account the weight of the engine and other loads. Spars and hubs are made of durable profile pipes. The means of mounting the motor must exactly match its main structure. For all-wheel drive tractors, the axle is mounted on the frame. The location for installing the transmission is selected so that it is on the same axis with the crankshaft and looks directly at the center of the shaft.
A special frame is welded under the steering column in the front part of the frame. The channel cavities serve as protection for electrical wiring, hydraulics and the fuel system. They are attached there using mounting rings or flagella. And lastly, they mark and prepare a place for the saddle.
- fracture or double with hinges;
- whole.
The first option is more suitable for four-wheel drive tractors. It is difficult to manufacture. An additional locking box from Niva will be required. And some more improvements to the chassis. Two frames are attached using automotive hinges. To transmit power to the rear wheels, a shortened crankshaft is usually used.
The one-piece frame has the best strength indicators. To maintain the required geometry, it is made in a trapezoidal shape. This will allow the installation of a beam with a subsequent increase in the wheel track. This system allows the tractor to be installed together with a loader. But taking into account the loads, the frame must have high strength.
After the frame is fully prepared, the step-by-step assembly of the remaining components begins. First, the axle and wheel axles are installed.
It is necessary to organize a caterpillar track. The simplest option is a roller with tires and wheels. The bridge is borrowed from any rear-wheel drive car. Wheels are selected in accordance with the intended work that the tractor will perform. For loose arable land, wide wheels with a large radius are needed. This will give greater clearance to the unit's suspension. It is advisable to increase it to 40 centimeters or more. This way, in the field, he will not disturb the dirt with his knee. It is better to borrow the bridge from UAZ. It has side gearboxes with a high gear ratio.
The choice of engine depends on the purpose of the tractor. For plowing land and transporting small loads, a low-power motorcycle engine with 15-20 horsepower is suitable. For more serious work, a powerful engine of about 50 horsepower is required.
Usually, engines from a “kopek” or other VAZ models are installed as traction force. Buying them is not difficult. However, the fuel consumption of such engines is more than 10 liters.
After the engine, the transmission is installed. Suitable for GAZ or UAZ. It has a good gear ratio. A shortened shaft is used to transmit torque. The steering and saddle are installed last. To install the steering, the king pins are placed on the front axle of the mini tractor. Trunnions are attached to the top of the kingpins, and a lever control is attached to the bottom. They are connected to each other by a rotary rod. The steering gear is connected to the transverse rod using a bipod. All that remains is to connect the hydraulics, electrical wiring and fuel system and the tractor is ready for the first tests. Whether a tractor requires a body or not, each owner decides for himself.
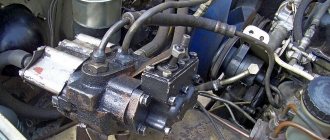
Steering installation
Making a steering mechanism yourself is quite difficult, and in principle there is no point, since all the parts can be taken from any passenger car.
The following is a diagram that shows how the standard steering control installed on most self-propelled vehicles works.
When installing the steering mechanism, the steering shaft with gear is connected to the steering bipods, which are located on the steering knuckles mounted on the front beam (the manufacture of the beam was discussed above).
Security measures
When working with sharp objects or flammable materials, follow safety rules. In addition, welding work carries a risk of electrical injury and thermal burns. When processing metal, use safety glasses and rough gloves - sharp edges can, like a razor, damage exposed areas of the body. In addition, lifting and moving heavy objects is carried out using special equipment to prevent accidental dropping of the load.
Regardless of which mechanism was the main one when assembling the mini tractor, it must be taken into account that it is dangerous. There are no instructions for homemade equipment, and therefore the first safety measure is a careful design layout. All rotating and hot parts are protected with protective covers so that the operator cannot accidentally or deliberately touch dangerous surfaces. The rules for handling flammable liquids must be observed: ignition of fuel is possible due to the use of an open flame near them.
Useful tips
To facilitate the lifting of attachments, hydraulic mechanisms are installed, but for the same purposes you can use a steering rack from a passenger car, which will significantly simplify the design.
The lack of suspension makes riding a homemade tractor uncomfortable. To change this situation, the seat must be installed on springs.
Don’t rush to register: most mini-tractors rarely go on public roads, and their small size allows them to be transported on a trailer.
Source