"Shoestring" redirects here. For other uses, see Lace (disambiguation).
For the footballer nicknamed "Shoelaces", see Denard Robinson.
Black laces
Laces
, also called
shoelaces
(American English) or
shoelaces
(British English), are a system commonly used to secure shoes, boots, and other footwear. They usually consist of a pair of strings or cords, one for each shoe, with rigid sections on both ends known as aglets. Each lace typically passes through a series of holes, eyelets, loops, or hooks on both sides of the shoe. Loosening the lacing allows the shoe to open wide enough to be inserted or removed. Tightening the lacing and tying the ends ensures a secure fit of the foot in the shoe. The laces can be tied in different shapes, most often it is a simple bow.
Content
- 1 Lace design
- 2 Tying shoelaces 2.1 Regular bow
- 2.2 Other more reliable nodes
- 2.3 Length
- 3.1 Common lacing methods 3.1.1 Straight lacing
- 4.1 Myths
Weaving techniques and patterns
You can weave whatever you want using this technique: bookmarks, belts, bracelets, you can weave a headband in this way. The technique of weaving from ribbons or cord is a macrame technique, and you can take the simplest patterns from this technique. For example, here is a diagram for ribbons of two colors, which we fold in half and get 4 threads:
Take 2 threads 1 m long: 1 dark and 1 light. Secure with pins in this way: 2 dark ones on the left, 2 light ones on the right. Wrap the first thread around the bottom of the third thread and attach the first thread to the second (Figure 154, a). Next, with the fourth, go around the bottom of the first and connect the fourth to the third (Fig. 154, b). Next, weave again with the leftmost thread (Figure 154, c). And so continue to work, and you will get a bauble with a dark edge (Figure 155, a, b).
Using the same method, you can braid a rigid base (rope, tourniquet), and double the ribbons. (Fig. 156). When making baubles from a thin strand, you can take the following weaving pattern: cross 2 threads, the same color (Fig. 157, a) or different (Fig. 157, b).
Scheme for weaving a bracelet from ribbons or cord.
Lace construction
Traditional laces were made from leather, cotton, jute, hemp, or other materials used in the production of rope. Modern shoelaces often include a variety of synthetic fibers, which tend to be slipperier and therefore more prone to unraveling than those made from traditional fibers. On the other hand, smooth synthetic laces tend to have a less rough appearance, suffer less wear from friction, and are less susceptible to rotting from moisture. Specialized fibers such as fire-retardant Nomex are used in firefighter safety boots.
There are also various elastic laces:
- Traditional "elastic" laces look just like regular laces and can simply be tied and undone as usual. They can also come with a permanent clip so they can be secured discreetly.
- Knotty laces have a number of thick sections that restrict movement through the eyelets. They can be used to adjust tension throughout the lacing area. These laces can be tied or left loose ends.
- Twirly laces are like a tight elastic spiral that you can simply tighten without tying a knot.
Elastic laces make lacing more comfortable and also allow shoes to be taken on and off without tying or untying, making them a popular choice among children, seniors and athletes.
Three laces with three different tips. aglets: copper, plastic and brass
The rigid sections at each end of the lace that not only prevent the lace from unraveling but also make it easier to hold the lace and pass it through the eyelets are called aglet.
also spelled
eglet.
Laces with a flat cross-section are generally easier to hold and more secure than laces with a round cross-section due to the increased surface area for friction.[1] Very wide flat laces are often called "fat laces". Leather laces with a square cross section, which are very common on boat shoes, are known to come undone frequently.
Laces can be coated either at the factory or with aftermarket products to increase friction and help them stay connected.
Determining the direction of business
Before investing money in organizing a business, it is necessary to thoroughly calculate all possible costs and risks of financial losses that may arise during the production process. In other words, production must be planned from the simplest costs of preparing the necessary documentation to planning a marketing policy for the sale of finished products. There are several basic rules, the observance of which will help you choose the best option.
Therefore, today it is not at all difficult to talk about the need for such a seemingly trivial item, which has become firmly established in our everyday life, like shoelaces.
Tying shoelaces
Main article: Lace knot
Basic knot for knitting shoes The knot crushes the cord and the end of the lace does not pass through the knot.
When the lace is secured with a knot, the lace bends or flattens. First of all, this is what prevents you from unfastening the lace. Essentially, the lace inside the knot is narrower than at the free end, and the free end cannot shrink and slip through the knot. In general, flat tubular lace stays tied more easily than round core lace because flat lace can be curled more into the knot. However, most laces are round and have a cotton yarn core, especially shoelaces. To keep them tied securely, the inside of the lace must be soft and compressible. A secondary factor in untying laces is the slippage of the knot itself. This is due to the lack of friction. Cotton laces have a rough surface and make the knot more secure than polyester (the most common yarn used for laces). In addition, the lace may be smooth or have a rough surface, which will also affect the performance. Finishing processes are available, including wax and silicone treatments, which increase friction and prevent knot slippage. These are important design factors when making hiking boot laces.
Regular bow
The laces are usually tied at the top of the shoe with a simple bow. Besides securing the shoe, it also takes up the length of the lace exposed after tightening. A regular bow consists of two half-knots tied on top of each other, and the second half-bow is tied with a loop for quick untying. If necessary, the knot can be easily loosened by pulling on one or both free ends.
When tying half-knots, a right-to-left half-knot followed by a left-to-right half-knot (or vice versa) forms a square or reef knot, a fairly effective knot for tying shoelaces. However, tying two consecutive half-knots from right to left (or two consecutive half-knots from left to right) creates the infamous granny knot, which is much less secure.[2] Most people who use it will update their laces regularly.[3]
If the loops lie across the shoe (from left to right), it is probably a square knot. If they lie along the shoe (from heel to toe), most likely it is a granny knot.
Other more reliable nodes
Ian's Shoelace Knot, used on a pair of safety boots.
There are several safer alternatives to the regular shoelace bow, with names like the Turquoise Turquoise Lace Knot or the Cobbler's Knot.
, Improved Bow Lace Knot, Surgeon's Lace Knot, and Jan's Lace Safety Knot[4], or
Double Slip Knot
. One such knot was patented in 1999 under the name "Lace-Tying System".[5] These are all variations of the same concept: tying the top of the knot in a loop twice instead of once, resulting in a finished bow with an almost identical appearance, but with the laces wrapped twice around the middle. This double wrap keeps the laces tied more securely while still allowing them to be undone by pulling on the loose end (the stiffer ones). Perhaps the simplest, neatest and quite effective is to tie a regular bow to tie a half-hook with one or the other free end around an adjacent half-circle arc, close to the knot; it is untied by pulling the other free end (disconnected).
Length
The appropriate length of shoelace depends on the type of lacing used as well as the type of lace. However, the following guide can be used as a rough guide.[6]
| No holes | Length(cm) |
| 2 | 45 |
| 3 | 65 |
| 4 | 75–85 |
| 5 | 85–90 |
| 6 | 100 |
| 7 | 110 |
| 8 | 120 |
| 9 | |
| 10 | 130 |
| 11 | |
| 12 | 150 |
| 13 | |
| 14 | 180 |
| 15 | |
| 16 | 200 |
Production process
To increase the competitiveness of the finished product, it is possible to choose a pattern of rigidity and weaving. Upon completion of weaving, the finished laces are sent for rewinding and so-called finishing with tips (most often plastic). Shoe lace production is completed by sorting by width, length, color and pattern. All finished products are packed in boxes.
The cost of laces consists of the following costs: workshop rent, employee salaries (machine operator, as well as packer and sales manager), purchase of raw materials.
The production of shoe laces, if desired, involves further expansion, consisting in the production of several types of braid, zippers, various tapes and other similar products.
Shoe lacing
Straight Lace Oxford
Play Media
Shoe lacing methods
It is the process of threading laces through holes, eyelets, loops, or hooks to secure the sides of a shoe with many common lacing methods.[7] In fact, there are almost two trillion ways to lace shoes with six pairs of eyelets.[8]
Common lacing methods
Straight lacing
Straight lacing appears horizontal and parallel when viewed from the outside. Formal shoes usually require straight lacing to maintain a clean, neat appearance.[9] This is especially true for dress shoes with a closed lacing system, such as Oxfords, because cross lacing in the center prevents the sides of the shoe from meeting in the middle.
Cross lacing
Chuck Taylor All-Stars with criss-cross lacing
The most common lacing method is called criss-cross lacing.
, is also one of the most powerful and effective.[10] However, they are designed for more casual footwear such as sneakers and boots. Derbies can be straight-laced or cross-laced.[11]
Other lacing methods
Many lacing methods have been developed with specific functional benefits, such as faster or easier tightening or loosening, tighter tying, more comfortable use, using more or fewer laces, adjustable fit, anti-slip, and suiting certain types of shoes. One such method, patented in 2003 as the "Double Helix Shoe Lacing Process", is performed in a double helix pattern and results in less friction, faster and easier tightening and loosening.[12] Another method, called "Rinlers Instant Lace Up", uses additional accessories to instantly tighten and loosen.[13]
Pair of Etnies checkerboard lace-up shoes
Many other lacing methods were designed purely for appearance, often at the expense of functionality. One of the most popular decorative methods, checkerboard lacing is very difficult to tighten or loosen without damaging the pattern. Shoes with staggered lacing are generally considered "slip-on".
Sales of finished products
When determining the circle of buyers, sales managers should first of all focus on shoe factories or small shoe production workshops.
For such clients, you can offer wholesale supplies of goods with appropriate discounts.
However, we must not forget about retail sales. Often, shoe stores may sell laces as additional accessories.
You can also open your own store or just a retail outlet where finished products will be offered in the form of various laces or braid.
Story
The exact history of shoelaces is as difficult to determine as that of shoes. Archaeological finds of shoes are rare because shoes were usually made from materials that deteriorated quickly. The Areni-1 Shoe, which dates back to around 3500 BC, is a simple leather "shoe" with leather "laces" passing through "eyelet" slits cut into the hide. More complex shoes worn by Ötzi the Iceman, who lived around 3300 BC, were knitted with "laces" made from lime bark thread.
Regarding laces as we know them in modern times, the Museum of London has documented examples of medieval shoes dating back to the 12th century, which clearly show the lacing passing through a series of hooks or loops on the front or side of the shoe and tied in a knot , rather than drooping.[14] Indeed, the Templar code prohibited the wearing of laces as a “vile and pagan practice.”[15]
Myths
A popular myth has it that Gurkha soldiers who fought for Britain crawled along the ground, feeling the shoelaces of soldiers they encountered. British soldiers used straight lacing or lacing, while Japanese troops used criss-cross lacing. Thus, cross laces can mean the difference between life and death. Thus, British troops emphasized the importance of proper lacing. Whether this is true or not, there are reports of Gurkha soldiers checking the boots and shoelaces of soldiers they meet in the dark to determine whether they are friend or foe.[16]
Square bauble made of four ribbons
You will need: 4 tapes 5-7 mm wide, 2 meters long.
Master Class
- Fold 4 ribbons together, space 15 cm and tie a knot.
- Straighten the ribbons on different sides - up, down, right, left. When weaving, you do not need to look for the front side, since in this bauble all sides will be viewed equally.
- Lower the first ribbon from top to bottom to make a loop.
- Move the second ribbon from right to left so that it overlaps the first.
- Bend the third ribbon from bottom to top so that it overlaps the previous one.
- Move the fourth ribbon from left to right, then pass it into the loop of the first ribbon.
- Tighten the weave slightly, then straighten the ribbons - you should get an even square.
- Repeat steps 3-7 until the desired length of the bauble.
- Secure the weave with a knot.
The square bauble of four ribbons is ready! It is worth noting that the bauble can be worn not just straight - square, but also twisted in a spiral. However, you need to handle it carefully, because if it stretches, it will lose its voluminous beauty. This can be avoided if you insert a fishing line or a strong thread at the beginning of weaving.
I recommend watching the video master class!
DIY keychains – Unusual keychains made from satin ribbons
Accessories for laces
Deubre on Nike Air Force 1 Shoes.
There are many accessories for laces. There are hooks that help you tie your laces tightly. They are especially useful for skates where tight lacing is important. Lace covers protect your laces, especially during wrestling. Chara's laces are decorative, just like the colored laces. Some laces are painted with expensive paints, while others, more “personal” colors, are painted with permanent markers. Few dress codes (especially in high school) specifically exclude colored lace and charms. Lace closures secure laces, eliminating the need to tie them. There are lace tags, sometimes called Deubré, which have two holes or slits through which the lace is threaded. They are placed on the part of the lace closest to the toes, in other words, the last lace, so that the image or writing on the tag is visible (as seen on the right).
A simple bauble made of satin ribbons
You will need: 2 satin ribbons 75 cm long.
Master Class
- Fold one and the second bauble in half, leaving 10 cm ends for ties.
- Weave one ribbon over the other, as shown in the picture.
- Weave a bauble of the required length from 13 to 18 cm.
- Secure the bauble by connecting all 3 pieces into a knot.
A simple bauble made of satin ribbons is ready!
References
- Crowther, Ken. "It's not a knot." New scientist
. Reed Business Information. Retrieved April 15, 2014. - Ashley, Clifford W. (1944). Ashley's Book of Knots
. Doubleday. n.. ISBN 0-385-04025-3. - "Granny's Knot" Jan's cords website. Retrieved 2016-06-13.
- Jan's shoelace knot
- "Shoelace tying system." Free patents online. Retrieved 2010-06-11.
- Royal lace.
- Figgen, Jan W., 47 Different Ways to Lace Your Shoes
, Jan's Lacing Site, retrieved 2016-06-13 - Figgen, Ian W., 2 Trillion Lacing Methods?
, Jan's website on laces, received 2006-09-25 - “How to lace evening shoes | ShoeTree project. ShoeTree project
. 2018-02-05. Received 2018-05-28. - Polster, Burkard (2002), "Math: What's the best way to lace your shoes?", Nature
,
420
(6915): 476, doi:10.1038/420476a, PMID 12466832, S2CID 52871921 - "Ways to Lace Shoes—Derby Shoes—Gentleman's Gazette." www.gentlemansgazette.com
. Received 2018-05-28. - "The process of double-spiral lacing of shoes." Free patents online. Retrieved 2010-06-11.
- "Rinlers Instant Lace Up." Archived from the original on 06/22/2012.
- Grew, F.; de Neegaard, M. (2006). Shoes and cartridges - medieval finds from excavations in London
. Boydell Press. ISBN 1-84383-238-0. - Jones, Dan (2017). The Templars: The Rise and Spectacular Fall of God's Holy Warriors
. Viking. ISBN 978-0525428305. - Fox, Larry (Lew) (09/01/2005), Johnny's Dream The Dream of Cassino
, World War II People's War, Monte Cassino, Italy: BBC, A5458656, retrieved 2012-03-31
Advantages
As photographs of crafts made from ribbons show, such things have the following advantages:
- Low cost.
- Aesthetics.
- Durability.
- Relatively low consumption during operation.
- There is no need to use special tools or skills.
- Excellent compatibility with other decor, be it beads, beads or rhinestones.
- Simplicity of the accessory manufacturing process.
Necessary materials
To get started with ribbons, you will need:
- The main material is tapes.
To implement each idea, material is selected individually. Experienced craftswomen can come up with a model from available ribbons;
- Sharp scissors with straight ends and small ones with rounded ends;
- Pencil and ruler;
- Threads of different colors. They are selected for each product - according to color, quality and thickness;
- Set of sewing needles;
- PVA glue;
- Candle or lighter;
- Small tweezers.
Depending on the manufacturing technique, purpose and design of the craft, you may need additional materials - photo frames, notepads, cardboard, wire for the frame.
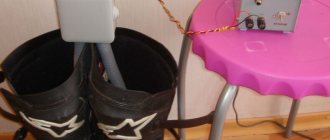
How to shorten long shoelaces so they don't come undone
A long cord can be cut, but you need to secure the end so that it does not unravel.
Required tools and materials:
- scissors;
- ruler;
- felt-tip pen;
- clear nail polish;
- heat-shrink tubing;
- lighter.
How to properly shorten the cord:
- Use a ruler to mark the excess length.
- Make a mark with a felt-tip pen, then cut the cord with scissors.
- Impregnate the tip of the cut cord with varnish.
- Gently twist the threads with your fingers and let the varnish dry.
- Cut 1.5 cm from the heat shrink tubing.
- Place the tube on the end of the cord, then heat it over the flame of a lighter so that the plastic fits tightly around the cord.
In situations where you don’t have varnish or pipes on hand, you can use tape. Use a small piece of adhesive tape to tightly wrap the end of the cord. This is a temporary fixation, as the tape will quickly lose its sticky properties. Then you should secure the tip of the cord in a more secure way.
You can tie long shoelaces in different ways. Correctly executed lacing will allow you to safely play sports, and it can also highlight the individuality of the person who wears shoes with laces.
Simplest
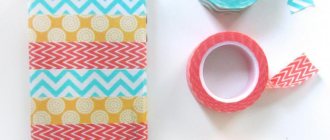
If you are satisfied with the condition of your shoes, but you seem tired of the appearance, try experimenting with laces. Insert colored laces or ribbons. You can use several colors at once. Try a new way of lacing.
You can measure a piece of lace over the shoe, cover it thickly with sequins, glue the lace to the shoe, stitch it with thread again for additional fixation, then fill in the gaps by gluing large rhinestones. The final touch is to trim off any excess lace if there is any.
Want to know how to make your own glowing shoelaces ? There is nothing too complicated about this procedure. There are several ways to make your laces glow. Each of them is good in its own way, but one of them gives a brighter, rich glow.
More homemade products: How to make a beautiful hairstyle for short hair - with photos
If you can’t buy factory made rubber laces, you can make them yourself. You just need to buy a tight round elastic band of the required length (based on 2 pairs) and 2 stoppers.
There are a huge number of original and stylish options for tying shoelaces. The requirement is that this accessory matches the shoes. Agree that bright laces will look absurd with classic shoes and, conversely, leather or round waxed laces with trendy sneakers or sports sneakers.
Properly chosen shoes for your wardrobe make the look complete and memorable. Otherwise, inappropriate shoes will negate the effect of even the most expensive and fashionable suit. You will be surprised, but such an inconspicuous accessory as laces can transform even an ordinary everyday pair of shoes. It is an undeniable fact that shoes should always be clean (this is the first thing that catches the eye), but the laces also attract attention, since they are most often located in the field of view.
What to do with the ends of the laces?
We've already talked a lot about how to lace your sneakers correctly. But even if the knot is made correctly, due to the non-ideal length of the laces, the ends often remain too long
. You also need to do something with them, because during training they can get caught on something or get under the sole.
The basic solution to the problem of long laces is to use the top eyelet correctly. You need to lace the sneakers so that the lace goes inside the top hole and does not come out. This will allow you to conveniently hide the loose edges inside the sneaker - either between the tongue and the walls of the shoe, or between the walls of the shoe and the foot.
If the previous advice was not enough, then there are other tricks
:
- you can make a knot not from above, but under the tongue (suitable only for loose shoes, otherwise it puts pressure on the foot);
- you can tie a “bow” not in the center, but on the side, and then tuck both ends on one side;
- if the laces are too long, you can tie them around your shin (suitable when wearing trousers and jeans);
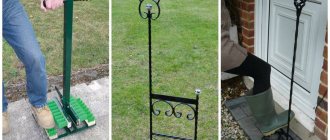
- You can buy lace anchors - small plastic accessories created specifically for “cleaning up” the free edges of laces.