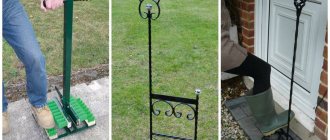
Historians claim that the first shoes appeared in Eurasia more than 30 thousand years ago. Shoes were made from animal skins and woven from plant leaves. Since then, shoe manufacturing technology has stepped far forward; artificial materials are often used for their manufacture, which are not inferior to, and even superior to, leather in wear resistance.
But even the best quality shoes wear out over time, especially in women's boots and shoes with stiletto heels. Usually, not the entire surface of the heels wears out, but only the back part. Therefore, it is necessary to ensure that wear does not touch the base of the heel. If the base is worn out, it will have to be ground down to make the entire supporting surface flat, which is extra work and reduces the height of the heel.
Factory heels, as a rule, are made of plastic and they are fixed to the base of the heel of the shoes using glue and pins, tightly inserted into the holes provided for them in the heel.
How to make heels with your own hands?
Heels on shoes are made specially.
They protect the heel from inevitable damage during shoe use. Note that heels are installed on both women's and men's shoes. As a rule, we are talking about classic shoes (shoes). Of course, the heels need to be replaced regularly. This requires some financial expenditure. It is quite possible to repair shoes yourself if you understand the essence of the negative impact on heels. In the vast majority of cases (if we are talking about branded manufacturers of men's/women's shoes), the box contains additional (spare) heels. Due to this, the service life of the pair increases by 100%.
How to glue shoe soles?
Before sealing your boots, you should assess the damage and choose the most optimal remedy to repair the damage. An effective shoe glue must have the following qualities:
- long service life;
- reliability;
- water resistance and frost resistance;
- reliable gluing regardless of the thickness of the materials used;
- minimal rigidity;
- elasticity.
It is true that, in the absence of more suitable means, shoes can be sealed with sealant. However, with its help you will not achieve the necessary adhesive strength. In addition, if used carelessly, it can ruin the appearance of the product.
Many types of glue have the necessary properties, but not all of them can glue leather to polyurethane, rubber or PVC. Therefore, before purchasing adhesive of a particular brand, carefully read the instructions for use.
The best material for creating heels
By and large, heels can be made from a variety of materials:
- rubber;
- metal;
- plastic, etc.
However, if you plan to carry out repairs yourself, it is recommended to pay attention to sheet polyurethane. This material can be found at almost any construction market.
The attractiveness of sheet polyurethane lies in its ease of processing (it is cut with a sharp knife). At the same time, it withstands mechanical damage very stoically. Professionals recommend cutting heels along the outer edge so that they don't end up being smaller than the heel.
How to prepare a new heel for installation
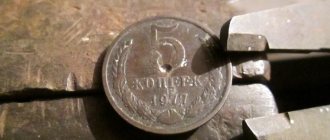
First of all, I would like to note that the best material for heels is considered to be sheet polyurethane, which has a thickness of five to six millimeters. Its hardness should be medium. You can check this by pressing on it with your fingernail, after which it should bend, but only a little. So, let's get to work:
- To make a heel, you need to apply its outline to a polyurethane or rubber plate, attaching a heel to the workpiece and tracing it around the perimeter with a pen. Do not forget that the shape of the right and left heel will be different, take this into account when cutting.
- After marking, cut out a new heel. This can be done using a sharp knife, the blade of which must be moistened with water to improve gliding, or using a jigsaw on which a wood file is installed. The second cutting option is preferable, since it will be much easier to work with.
- Clamp the plate with the markings applied to it in a vice and start sawing. Once you have cut a few millimeters, pull the plate back with your hand so that the jigsaw file is not pinched. This will speed up the work. Saw along the outside of the line to have a small margin. Anything that turns out to be superfluous can be cut off with a knife or sharpened using an emery board.
The second stage of work has been completed. The next step should be preparing the heels.
Heel height can cause injury
When creating heels yourself, it is important to remember that the shoes (already with heels) must stand with the entire sole and heel on the surface. Under no circumstances should there be any additional tilting.
This will only lead to an increase in injuries (when walking, you will hit the ground with your heel).
The heel is installed using shoemaker's nails. Of course, it’s also impossible to do without using glue. It is important to understand that nails do not hold heel in place like glue does.
They guarantee that the heel cannot be rotated around its own axis.
To avoid damaging the heel itself when driving nails, it is important to remove the existing pin and fill the hole with a wooden insert. This is where the nails will be driven. When removing protruding parts of the heel, it is recommended to use a machine. Of course, you can do it with ordinary sandpaper. But in this case, it increases the risk of damage to the outside of the heel (risk of scratching).
The video demonstrates how to absolutely not install heels:
How to remove scratches on patent leather shoes
Scratches on glossy shoes are more difficult to remove, but still possible. To restore colored shoes, we need colorless nail polish. If the material is black, then it is better to take black varnish.
Directions for use: carefully apply the varnish using a brush to the damaged area. If there is a tear, apply varnish to the torn surface. Apply the torn piece to the damaged area. Apply a clean bandage or cloth on top and press and hold for several minutes. After this procedure, the damage will become less noticeable. However, this method has a drawback: the protective layer of varnish will have to be renewed approximately every two weeks.
How to replace a heel at home
The heel is one of the most worn parts of a shoe. The most common breakdowns are wear and tear of the body, abrasion of the heel, kinks, cracks, and loss of strong adhesion to the surface of the shoes (boots). You can easily replace the part at home, saving on the services of a shoemaker, but you need to understand that after the repair, the heel must fit tightly to the sole so that new creases and cracks do not form. Before you try to repair your favorite shoes, it is advisable to practice on old ones. This will prevent damage to your beloved couple.
HOW TO RESTORE SHOES
Don't rush to throw away your favorite pair of boots when you notice multiple scratches on them.
If the shoes are made of high-quality material, then they can be updated using simple and effective methods. Elimination of small scuffs If shoes have lost their shine and the leather has become dull, ordinary cheap products will help restore the original appearance: glycerin, petroleum jelly, baby cream, castor oil. These products will restore shine and smoothness to old leather shoes. Choose one of the products listed, rub into the surface of the skin and leave until completely absorbed.
Shoes made of matte leather can be restored using a mixture of turpentine and milk in equal proportions. Treat the surface with the resulting liquid using a sponge, leave to absorb, and then treat the product with a moisturizer. Regular ground coffee is suitable as a restorative for brown boots. Pour a small amount of water over the product to make a thick paste. Treat the surface with this slurry, gently rubbing in the coffee grounds, and let dry. Then remove the remaining coffee with a soft bristle brush.
DIY shoe repair
The replacement procedure consists of a number of steps:
- Carefully tear off the old element without damaging the sole. After bending the insoles, remove all fastening nails (if the insoles do not give in, they can be moistened with warm water). Remove the staples using a screwdriver or nail puller and unscrew the screws.
- Examine the heel part. If it is too worn, a new heel pad made of insole leather is glued in.
- To make the heel part as strong as possible, you need to put the shoe being repaired on a last, and put dried, moistened, coated with glue and compacted felts on top with a hammer. The latter are fastened with wooden pins. Flicks of two or three elements are also suitable. The upper part should be made of strong sole leather.
- The new heel is selected according to color, style, height and angle of inclination.
- The surface of the shoe footprint and the base of the heel are pre-sanded with sandpaper.
- For gluing, a polyurethane-based product is used.
- Reliable fixation of the connected parts is ensured by metal bearings, which have holes for nails and screws. The latter should be about twenty-five millimeters long and about three to four millimeters in diameter.
- It is better to use special shoe nails. When tightening them, maximum effort is required to ensure strong adhesion of the stud to the trail. The metal thrust bearing should press the instep support.
- It will be easier to screw it on if you first make small holes in the heel using a thin drill. The screwed part must be hammered down. Then it will achieve the desired compaction. The side part can be trimmed if desired to ensure a complete fit to the track.
- Nail the heel.
- When the repaired shoes are dry, reseal them by hammering.
- Remove the pads and bend the protruding ends of the nails with a hammer. Glue the insole on top.
The replacement procedure cannot be called simple and quick. To perform it, you need to purchase special staples and nails, stock up on shoe leather, and, of course, find a new heel. Therefore, before you start repairing your favorite shoes, you need to think: perhaps a shoemaker can do this job better?
How to remove scratches using “liquid skin”
“Liquid leather” is a paint that is used to restore leather items at home. You can buy it at a leather goods store or order it online. With this product you can easily disguise scratches on leather shoes.
The main thing is to choose a color as close as possible to the color of the shoes. Then everything is very simple: apply liquid skin to the damaged area and distribute evenly. Leave for about ten minutes so that the paint dries completely. Then the treated area needs to be polished and the leather treated with balm or shoe polish.
Additional shoe care
You won't be able to get rid of cracks completely. Therefore, the procedure for filling them out will have to be repeated from time to time. To maintain the presentable appearance of your shoes, do not forget to properly care for them. Treat it with a special conditioner every week. It can be applied immediately after shoe repair.
Carry wet wipes or cotton cloth with you to remove dirt from its surface. If dried dirt accumulates on your shoes, cracks will appear faster. Don't forget to use emollient creams regularly.
Found a violation? Report content
Shoe glue: brands for various materials
Wondering which adhesive is best for shoes made of a certain material? Let's take a look at the rating of high-quality special compounds for reliable bonding.
- KENDA FARBEN is a good shoe glue from an Italian manufacturer. It is considered universal and is excellent for gluing synthetic and natural leather. Copes with rubber, textile, wood, plastic, shotgun and metal products. It is often used by craftsmen when repairing boots, because the materials adhere quickly, and the seam is durable and moisture-resistant.
- UHU “SCHUH & LEDER” - this glue is actively used by shoemakers for gluing hard and soft materials. The seam has been characterized by increased elasticity for a long time. Resistantly withstands the negative effects of moisture, alkali and acid. It does not dry out for a long time and can withstand high and low temperatures. If the sole bursts, then using Uhu glue you can glue the separated parts together using the contact method. Use solvent reactivation or heat activation.
- Use professional EVA glue if you don’t know how to seal a hole in your shoes. It reliably connects corner and side cuts, porous surfaces of breaks. In addition, they can be used to glue the insole. This is a reliable waterproof product that does not flow under the influence of ultraviolet radiation and does not leave adhesive marks. Suitable for all types of materials except PVC.
- You can glue the polyurethane sole with Nairit Shoemaker. It is actively used in their work not only by shoemakers, but also by ordinary people. It has high strength and water resistance. Does not contain hazardous substances, therefore completely harmless to humans.
- Russian-made Contact glue has been popular for more than 10 years. This product is suitable for repairing leather, rubber, ceramic and porcelain products. With its help, it is possible to fill all the cracks and gaps. If we glue even heavily damaged parts, the seams will be almost invisible.
- The Henkel company suggests using Moment Marathon for repairing boots. This is a universal adhesive that is highly effective. Economical in consumption and convenient to use. It has fast adhesion and will only take a few hours to completely harden.
If the leather on your shoe is cracked
The following measures will help you avoid cracks in your shoes:
• clean your shoes regularly and use them as intended; • if your boots get wet, dry them at room temperature.
If a small crease appears on the surface, use newspaper to restore its shape. Treat the couple with cream. After this, repeat the procedure. Remove the cream and leave the boots alone for a day.
To prevent cracks from appearing, use wax; in this case, cracks in the skin will not be so noticeable. Liquid skin is considered to be the most effective remedy in the fight against cracks. The product is used for shoe restoration. Apply it to the area of skin being repaired in an even layer and do not touch for a couple of minutes. After this, apply cream.
Restoring leatherette after reagents
During the winter months, roads are sprinkled with chemically active mixtures - special reagents. They minimize the risk of injury, but have a negative impact on the condition of the shoes. During this period, try to devote as much time as possible to her care.
For work you will need: ammonia (ammonia alcohol), vinegar, water, brush and cream. Follow these steps to repair leatherette products:
1. Take care of shoe maintenance. Household departments sell special products to protect against moisture and chemical components. Spray your shoes with a spray, dry naturally, and repeat the procedure. This will protect your pair of shoes from hazardous substances.
This is interesting: How to properly care for and maintain hygiene for leather shoes so that they last a long time
2. Apply cream with mink oil to the leatherette to protect it from getting wet.
3. Boots will have to be treated constantly. After each use, clean the pair with a brush dipped in ammonia solution. Dilute a tablespoon of ammonia in a liter of water, wet the brush and apply to the boots. Dry them. Carefully lubricate the skin with cream.
How to install a patch
If you or your child have fabric sneakers or slip-ons that are fashionable this season, wearing them carelessly can result in the appearance of a small hole or scratch, which can be covered with a modern thermal patch.
You can buy such a useful thing at any craft store. There you can choose not only the density of the top layer of material, but also choose a pattern that suits your material.
So, let's begin:
- The first step is to sew a piece of raincoat fabric onto the sneakers from the outside so as to completely cover the damaged area.
- The second step is to prepare a thermal patch, give the material the required shape and remove the protective layer.
- The third step is to turn on the iron to maximum, turning off the steam supply.
- Apply the patch to the desired area and iron with the hot surface of the iron until the fabric is completely bonded.
Note! All manipulations for shoe restoration must be carried out only with a clean and completely dried product. Take care of this in advance.
Combination top repair
On sneakers with a combined upper made of synthetic material with foam padding or natural and artificial suede, the fabric most often damaged is in the toe area, where the shoe comes into contact with the toes. On the outside, this area can be protected by a rubber insert around which there is a mesh, which is typical for running models of sneakers.
If there is minor damage to the front of the shoe, a patch can be sewn on. If there are large holes, you need to prop up the seams, adjust the size and shape of a piece of durable nylon fabric and sew it in place.
Drying shoes is also important
After cleaning your shoes, it is important to dry them. Take a clean piece of cloth and wipe the skin thoroughly. It will help quickly remove residual soap and water. Rub it in a circular motion until it is completely clean. Pay special attention to cracks. They need to be wiped most thoroughly, because it is in these creases that hard-to-reach dirt accumulates. If it is not removed, you will not be able to properly fill the cracks. After this, leave the shoes to dry for 8-12 hours.
We repair sneakers
To repair sports shoes, epoxy glue or Seamgrip is used, which is used in such situations. To repair the sole of sneakers, you must first clean the surface to be glued from dirt and treat it with a solvent.
In case of volumetric damage, the hole is filled with fiberglass mesh (serpyanka). Then, according to the manual, epoxy glue is diluted and applied in an even layer no thicker than 3 mm to the hole or crack.
The sneaker is left to dry for several hours. Moreover, it is recommended to close the crack from the outside using masking tape. This will allow the sole not to deform.
If the sole of a sneaker cracks in half, it is not recommended to repair it yourself. Take your sneaker to a shoemaker for repairs. In such a situation, a multi-stage repair or replacement of the sole will be required, and for this, toxic drugs are used that can negatively affect the body if you breathe in its fumes.
How to seal burst boots with liquid leather
Often, when walking, we catch our foot on a stone or other obstacle, and our shoes tear. However, if you have liquid skin on hand, then there is no need to worry.
The principle of working with it is as follows:
1. Dry the boots well, and then remove pieces of leather and threads. To do this, use a sharp knife.
2. Degrease the area to be treated using a soap solution. Leave on for 15 minutes and wait until the product dries.
3. If the product you use does not match the color of the leather of the shoes being restored, then mix the options you have and get the desired color.
4. Apply liquid leather to the damaged area, carefully treat the defect. Use a brush. If the shade is chosen incorrectly, you can remove the product within half an hour with a solvent. If everything is done correctly, wait until the product dries.
Were you able to repair your skin?
Yes, it worked No, I'll throw it away
Information. Liquid skin is not quite the same as cream. The consistency of the products varies. You can treat deformed areas with liquid leather and they will look like new.
Recommendations for sole repair
Before starting work, the sole must be cleaned, dried and degreased. For degreasing, use a special solution, gasoline or acetone. After processing, the product is dried again.
Select the load so that the shoes do not become deformed. An L-shaped block with additional weight is ideal. Keep the product under pressure for at least ten hours.
The adhesive is applied up to three mm thick, then left for ten minutes and only then the parts are glued together. Choose only high-quality and proven glue. A suitable option would be classic Moment glue, a product with polyurethane or epoxy sealant. You can also use special rubber shoe glue or shoe glue.
According to experts, polyurethane glue will be the best solution due to its strength and elasticity. It provides a secure fit and can repair any type of shoe. In any case, these are toxic compounds, so ensure safety when working. If the product gets into your nose or eyes, immediately rinse your mucous membranes with running water.
Be careful when working, as the adhesive composition can damage the material of the products, especially if they are suede boots, leather or patent leather shoes. The glue is quite difficult to wash off. Now let's figure out what to do if the soles of your shoes crack.
Recovery methods
Depending on the degree of damage, the location of the crack or the volume of the hole, a person must independently choose a technique that will be relevant in a given situation.
To make it easier for a beginner to solve the problem, it is worth citing several popular methods that most experienced craftsmen resort to; relying on them, the question will no longer look so complicated.
Installing a patch
The rubber element is used in the repair of a wide variety of shoe models, from sneakers to winter boots with large treads.
Most often, such drastic measures are provided to eliminate volumetric defects, holes or significant damage that extends to the main frame of the model.
In order to apply the method and not spoil the appearance of the shoes, and also not make them uncomfortable for walking, you need to clearly measure the dimensions of the patch, then trim the base, and also adjust the element until the mixture hardens.
Gluing the area with special glue
Strong samples of fixing compounds are very popular; with their help, you can reduce the time required to perform manipulations, as well as obtain high-quality adhesion between planes.
Such adhesive models are not cheap, but the result is worth it, the composition was developed at the manufacturer specifically for shoe repair, so the structure of the solution completely fills the gap or hole. At the moment of implementing the technique, zigzag strips are cut out on the base with a knife, they will be filled with glue.
You must work with purchased products exclusively according to the instructions; there is no need to deviate from the manufacturer’s recommendations; in the process, the technician protects his hands, respiratory organs and ensures ventilation of the room.
Partial replacement of the damaged area
In difficult cases, you cannot do without cutting a certain area, but such manipulations will need to be done carefully so that the knife does not jump off and the person does not remove excess part of the material.
A polyurethane piece or rubber is applied to the free space, this element must be adjusted to size, and the edges must be perfectly cleaned; sandpaper creates a matte surface texture to which the fixing mixture adheres.
In rare cases, over time, the insert disappears, but to avoid such an excess, you need to choose the right glue and follow the advice of experienced shoemakers when performing the work.
Repairing cracks and scratches
Once the shoes are completely dry, you can move on to the next step—filling the cracks. Be sure to stuff crumpled up newspapers or rags inside your shoes first. This will help maintain their shape. Fill the shoes as much as possible so that there is practically no free space left. The newspaper will not only help maintain the shape of the boots, but will also absorb any moisture that may get inside.
A hole marker simplifies the work of gardeners: how to make it from plywood and corks
Real treasure: “golden” bugs with the appearance of a turtle
Mulching with cardboard: how to remove wheatgrass and hogweed in the garden without chemicals
Apply a moisturizer to your shoes, for example you can use mink oil. Pay special attention to the cracks, they need to be filled first. Do not skimp on the product, it should completely cover the creases. You can always remove any excess with a rag.
To help the product penetrate the cracks better, you can heat the shoes a little. Place it next to a heater or blow warm air with a hairdryer. This will help absorb the oil faster. Apply it not only to the cracks, but also to the entire surface of the shoe.
Why do I use mink oil? First of all, it is more convenient because it has a solid structure. It can be applied by hand. Moisturizers are made from wax and natural oils, so they are runny.
Restore color and shape to brown boots
To restore the color of boots, use a special paint in a bottle. Before processing, prepare the product:
- clean your boots and dry them;
- degrease the surface;
- place the newspaper inside;
- work in rubber gloves;
- Apply paint with a sponge;
- leave the product to dry for 15 hours.
Sometimes boots wear out and become uncomfortable. Those with narrow feet have to tighten their shoes tightly on their feet.
To restore the shape of your boots, use special insoles. You can find them in any shoe store. Silicone inserts are placed under the heel and glued to the shoe.
To return the boots to shape, it is recommended to store them in a box with holes. Be sure to place special pads inside. If the shoes become unusable after wet treatment, put newspaper inside and wait until the boots are completely dry.