All skaters, without exception, dream of a modern and cool skating board that will arouse envy and admiration among everyone around them. Buying such a skateboard can be quite expensive, and no one can guarantee that even a branded board will satisfy you with its characteristics and convenience.
You can try to continue looking for a board at an affordable price, or you can assemble a skateboard with your own hands, putting very little effort and imagination into it. In addition, a personally made board fully reflects your individuality and certainly will not let you down at the most crucial moment when mastering a new trick or movement.
Board
The board, or, as it is also called, the deck, is the main part of the skateboard. The board can be made of wood (Canadian maple, beech, birch), plastic, fiberglass or aluminum. Aluminum and fiberglass boards are rare and expensive.
Canadian maple is considered the best material for boards. Most modern decks are seven-layer, although there are options from 6 to 11 layers. In general, boards for different riding styles have different shapes and sizes. There are boards for freeride and downhill, skateboards and fish for freestyle, high-speed boards for carving, as well as hybrid boards. But mostly for street and vert skateboarding, standard 7 layers of Canadian maple are used.
The length of the board is proportional to the width. These parameters are measured in inches (1 inch equals 2.54 centimeters).
For children under 5 years of age, about 100 cm tall and shoe size up to 3, the optimal deck sizes are 6.5″ - 6.75" (width), 27.2" - 27.6" (length). For children aged 6 to 8 years, height 130-140 cm and shoe size 4-6, a board 7.0″ wide and 28″ long is suitable. For children aged 9 to 12 years, height up to 150 cm and shoe size 7-8, a board with a width of 7.3" and a length of 29" is optimal. As for everyone else over 13 years of age, height from 150 cm and shoe size from 8, the following options are possible:
7.5″ – 8.25″ – standard board for adults, can be used for street,
from 8.25″ – a board for pool, ramp, performing old school tricks and street.
The front and rear curved ends of the board are called nous (from the English nose - nose) and tail (from the English tail - tail), and the side curved edges are called concave (from the English concave - concave, depression). The more all the ends are bent, the easier it is to perform various tricks on such a board.
When choosing a board, pay attention to the integrity of the plastic packaging, and also ask how long it has been in the store. If the packaging is intact and the board does not remain in the store for long, then the likelihood that it will soon dry out and lose its performance properties is minimized
Pendants
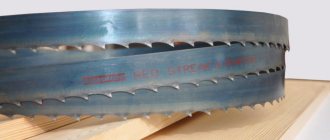
Once you have decided on the board, it's time to think about the pendants. Tracks are usually made of aluminum alloy or steel, painted in any color or pattern. Steel pendants are much stronger, break less and wear out more slowly, but have more weight than aluminum. The tracks must be selected according to the width of the board; they should be slightly narrower (it will be easier to turn) or equal, but in no case wider.
We advise you to choose trucks of such a size that after installing the wheels on them, they are completely hidden under the board and do not protrude along the edges. After installing the suspensions, you can adjust their stiffness. This can be done using a bolt in the center of the suspension (kingpin), tightening the nut on it. The more you tighten it, the stiffer the suspension will be - it’s a matter of taste, as you like.
Manufacturing process
It is better to make a skateboard from hardwood, for example, maple or oak, since they are more durable and stronger.
Preparing the skateboard uniform. The form can be found online and printed on a regular piece of A3 or A2 paper so that the template fits the size of the actual skateboard.
We cut out a wooden blank. Sand the workpiece, both on the surface and along the edges.
Draw a straight line down the center of the board.
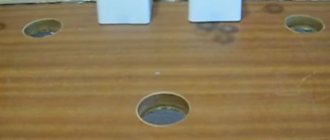
Let's move on to the wheel mounts. Using adhesive tape, glue them to the wooden piece. The drawn line will help you determine the middle. The fastenings should be 8 centimeters from the nose and 22 centimeters from the tail. After you glue the mounts, use a drill to drill holes for the screws in the workpiece, tighten the screws, thereby securely securing the mounts for the wheels, and remove the adhesive tape.
Make your own skateboard
Assembling a board yourself is a sure way to get a board that will suit your personal riding preferences. In addition, such a board will also be exclusive. But how to make a skateboard, where to start, what skills will be needed for this? The SportBus portal will try to answer these questions in this article.
First of all, you must know the design of your board well in order to understand which option will be optimal for you.
Analyze in detail everything that you may need in the design of the future board: decide on a large or small skate, decide on which suspension it will be more convenient for you to perform your favorite tricks, think through all possible modifications in advance, and only with a clear plan, start purchasing the parts necessary for production .
There are two options for making your own skateboard: the first is to buy a factory set of parts and supplement it with all the innovations you need, the second possible way is to create a board from scratch, guided by the advice of people who have already done it. The SportBus portal will consider both possible options.
An easy way to assemble a skateboard
In the case of a purchased factory kit, you will have to attach the skin to the deck surface yourself
This process must be given special attention to avoid wrinkles and bubbles on the surface.
If, however, the appearance of bubbles could not be avoided, you need to wait until the glued skin dries, and then release the excess air with a needle. After this, use a utility knife to remove excess pieces of sandpaper on the edges of the board, and file all the edges.
Once you've finished finishing the edges, you need to prepare holes for screws in the surface of the board. To do this, use an awl to pierce through the existing factory holes the places where the hangers will be attached.
You will have to assemble the wheels separately. The first bearing must first be pressed into each wheel, followed by a special bushing, and then the second bearing. After this, you can attach the wheels to the suspensions: first install washers on both sides, and then connect the structure into one whole. After securing the wheels, do not forget to adjust the tightening of the shock absorbers on them.
Method for professionals
You can assemble a skateboard yourself without using factory spare parts, but assembling it will require the same principle and the same sequence as for assembling a board from factory materials.
In the case of making parts yourself, get ready for the fact that you will have to glue the layers of the board for the deck yourself, so think in advance what shape and width it will have.
Sometimes skaters who make their own boards make special cutouts on their skateboards that make it easier to tilt when riding.
When assembling a skateboard yourself, most often they use not a factory-made sandpaper, but an ordinary roll of sandpaper. The decks, like their factory counterparts, are glued together from seven/nine layers of wood. The ideal wood for the soundboard is Canadian or American maple.
It is still better to purchase factory-made suspensions and bearings; experiments with casting metal products at home often end very badly. For production it is necessary to purchase steel hangers and bearings of type 608.
Raisers, most likely, will also have to be purchased from the factory; it is best to purchase polyurethane or rubber models.
Only a hand-assembled skateboard fully reflects the individuality of its owner.
Having invested all your skill and imagination into making your own board, you can be completely confident that the board will not let you down at the most crucial moment and will help you master new unique tricks. To make our advice even more truthful, we supplemented the article with a skateboarding video that clearly demonstrates all the nuances of making a board at home.
How to quickly assemble a skateboard
How to make a skateboard optimally quickly if, for example, you do not have the skills of a carpenter? With the first and simplest assembly method, you will have to glue the sandpaper to the surface yourself, after which the edges of the skateboard are processed with a file.
Having processed the board, you can begin attaching the suspensions and wheels. The last thing you need to do is adjust the shock absorber tension.
Skin
In essence, this is the same sandpaper only on a self-adhesive base. It is sold in the form of rectangular sheets. It provides better grip of the legs with the surface of the board, which allows you to perform high jumps and complex tricks. Recently, perforated skin has appeared, which is much easier to glue, since air does not collect under it and bubbles do not form. The skin can only be cleaned with a special rubber brush. You cannot wet it with water - it will deteriorate along with the board.
Do not buy cheap Chinese skateboards in stores such as trial-sport, sportmaster, markets, etc., save your nerves and health. It’s better to buy a middle-class or expensive board if you decide to take up skateboarding seriously. The boards of the following brands have proven themselves quite well on our website: Union, Footwork, Absurd.
Required tools and materials
First, before assembling a homemade skateboard, you need to decide what kind of skate you want to make. Large or small size. What is its purpose - just for skating or performing complex tricks.
Having decided what the final result will be like, find drawings and prepare the necessary tools and materials for making the board:
- template for a future model;
- wood hacksaw and stationery knife;
- marker and measuring ruler;
- electric drill;
- grinding tool;
- screwdriver and screws;
- glue, adhesive tape and sandpaper;
- wooden plank;
- polyurethane, soft fabric and linseed oil;
- 2 fastenings and 4 wheels - for hanging the board.
How to make a skateboard with your own hands
2Jun/12Off
You needed a skateboard and decided to make it yourself. The reasons for such a decision can be very different: you don’t like the models that are offered everywhere; you think that skate prices are unreasonably high, and with your experience you are quite capable of opening an underground skate factory, or you have come up with a new trick, and to perform it you need an absolutely incredible skate. There are two ways to make a skateboard yourself: purchase a factory disassembled one and assemble it, adding your innovations, or create a skateboard from scratch, following the advice of other craftsmen. Let's consider both options in turn.
In a purchased disassembled factory kit, you should take out the deck and, having freed it from the cellophane, clean it of all existing contaminants, then glue the special skin included in the kit to it. You should be very careful in this matter: avoid the appearance of wrinkles and bubbles.
Build from scratch
You can make a homemade skateboard that will be no worse than branded models, even without having the same parts that are used when assembling skateboards according to templates in production.
The method of assembling a skateboard from scratch is more complicated, but doable if desired. The operating principle and steps are the same as in the first method, the only difference is that you will have to make the parts for the skateboard yourself.
The skateboard board can be made in 2 ways, using thin sheets of plywood or making the deck from a single piece of wooden board. To make plywood decks, use 7-9 thin sheets, which are coated with glue and placed under a press on a pre-prepared template to give the desired configuration.
It is recommended to make the template from a single piece of foam, giving it the shape of the future deck. The drying time for glued plywood is 48 hours. The deck is processed in the same way as using a wooden board.
Skate templates can be found online and printed. You can make a deck according to your drawings with the necessary parameters and dimensions that satisfy you. After transferring the template to the workpiece, you should once again make sure that everything is done correctly and without any errors. It is recommended to make a wooden deck from durable wood, such as American or Canadian maple.
When assembling a skateboard, the factory sandpaper that is used to cover the upper surface of the deck is replaced with sanding paper. Pasting the surface of the deck is similar to factory sandpaper, where it is also necessary to prevent the appearance of air bubbles under the coating.
It is difficult to make a suspension block with wheels, therefore, in order not to waste extra time and money, it is better to use a proprietary mount and wheels. When assembling a skateboard yourself, it is recommended to select type 608 parts.
It is also necessary to purchase a spacer between the deck and the suspension (riser), which is made of polyurethane or rubber, which serves to increase the clearance of the skateboard and allows you to perform high jumps.
Source
Selection of materials
Making an electric skateboard is an inexpensive project that requires little financial investment. In essence, this is simply upgrading an old board or assembling a new one from familiar items: base, wheels, engine, etc.
You can choose any design for the future board. Externally, a skateboard with an engine is no different from conventional boards, but can reach a speed of 30 km/h and has reliable brakes, which sometimes come in handy.
skateboarding
It is important to pay special attention to the wheels of the product - they should be of medium hardness and large diameter, have plastic bushings that are ideal for mounting the wheels on the axle. Wheels are also sold at skateboard parts stores
Wheels are also sold at skateboard parts stores.
wheels with plastic bushings
Platform
It is advisable to take a longboard as a platform - a long skateboard. It is more stable, and there is also more space on the longboard to accommodate electrical elements - the motor, etc.
If the project starts from scratch, the base is cut out of plywood or carbon fiber. The straighter the board, the better; it may not even have the usual bends. You just need to take into account that there is enough space for the electrical unit and immediately determine the location for its installation.
skate base
A board without wheels can be purchased at special sports stores.
But if the spare part is created independently, this gives room for imagination - the board can be given any shape - and saves the budget.
DIY skate base
Electric motor
Choosing an electric motor (there may be several) for a skateboard is a guarantee of its quality. The device must have sufficient power and torque. Small motors from radio-controlled models are suitable for these purposes.
It is important that the speed controller can withstand heavy loads and be able to connect directly to the motor. A good controller is the key to safety and convenience
engine
Battery
The battery compartment is another element of the future skateboard. A small and lightweight lithium battery is ideal for an electric model. It can provide the required amount of energy
It is only important to securely secure the batteries and protect them from external influences
To assemble the electric skateboard, you will need two 4S1P batteries connected in parallel. Their capacity is 5000 mAh (milliamps per hour).
battery
Advantages of a DIY skateboard
A DIY skateboard is not only an indicator of the level of professionalism, but also the desire to be individual. A board made independently from high-quality materials can literally be considered a dream board.
What are the other advantages of a DIY skateboard?
In fact, there are many of them, here are just a few of them:
- Exclusive. A skateboard is the face of a skateboarder, so it should not only be practical, but also attractive in appearance. The board can have absolutely any decor, decorations or artistic carvings.
- Colorfulness. During production, you can easily experiment with colors and patterns. The board can display your own logo or sign.
- Saving. Assembling a good, high-quality skateboard is several times cheaper than purchasing a professional factory version. In addition, repairing a personally assembled board will be easier and faster.
How much does it weigh and how much weight can it bear?
The weight of a skateboard depends on what material it is made of, what its length and width are, and what materials were used in the manufacture of wheels and tracks. Longboards are considered the heaviest boards. Such devices are designed for a long comfortable trip or descending at speed from a mountain. According to the standard, trick skates weigh much less, because... The heavier the board, the more difficult it is to lift it into the air.
Skateboards for kids weigh less and can support less rider weight. Devices for adults can withstand up to 120-130 kg, which allows people of all ages to join the sport.
There is a list of the lightest boards. It includes:
- Magenta;
- OddDays;
- Polar;
- Primitive;
- Haunted Family/Union;
- Ripndip Where The Nerm At Board Green.
The lightest board to ride is the Magenta. The device weighs only 1.217 kg. In second place was the OddDays platform, which weighs 1.251 kg. The Polar skate weighs 1.261 kg, and the Primitive skate weighs 1.283 kg. The penultimate place in the list of light boards is occupied by the Union, or Haunted Family, weighing 1,286 kg, and in last place is the Ripndip Where The Nerm At Board Green with a figure of 1,333 kg on the scales.
The deck is an important element of a skateboard, so its weight is given leading importance. It happens that plastic platforms show more on the scale than those made of pressed wood.
What do skaters usually do during their first season? And how long does this first season last?
In Russia, of course, the season is several times shorter than in the homeland of skateboarding (the USA). In our country, at best, the season begins in March, unfortunately, and ends in November. But even then, this is in a successful warm and dry year, and even closer to the central part of the country. And also in the south of Russia. But in the worst case it is June-August. And even so, it is difficult to compare with others when much depends on the weather (if the city does not have an indoor training area). Although, if you wish, you can always find a platform under the roof and practice there. And in rare cases, even at home (if quietly).
Therefore, of course, with more active training in skating, during the first season (or the so-called skating year), you can also learn these tricks (not counting those listed above):
- Ollie;
- Frontside 180;
- Backside 180;
- Popshovit;
- Faky ollie;
- Fakey frontside 180;
- Backside fakes 180;
- Fakey popshowit;
- Frontside popshowit;
- Fakey frontside popshowit;
- Nolly;
- Noli frontside 180;
- Nolle popshowit;
- Nolly frontside popshowit;
- Rock-to-fake;
- Rock'n'roll;
- Axel table;
- Tail table;
- Nose table;
- Boardslide at least along the curb;
- Frontside 50-50 at least on the curb;
- Manual on a flat surface;
- Fake Axel table;
- Drop in to the quarterpipe.
So, as you can see, the list has expanded considerably. This, of course, includes “real” tricks that are not necessary for normal skating on a flat surface. And which are definitely worth learning only after mastering the basic movements. That is, feeling confident while driving in a straight line without jumping or sliding. Of course, the first season is not limited to this.
PROFAKultative
In this short article we will give you tips on how to choose components for your ideal skateboard.
If you want to start skating and your budget allows, we advise you not to buy a complete set, but to assemble your own skateboard, in which, if necessary, you can later replace any part, starting with the deck itself and ending with all the screws and nuts. Complete is also an excellent solution for both beginners and amateurs.
IMPORTANT! These tips will help you navigate the variety of components for a skateboard, but they are not the only correct guide to assembling a skateboard. It is necessary to understand from the very beginning that in skateboarding we are constantly progressing and experimenting
The process of assembling a skateboard “for yourself” takes more than one year, and many professionals change boards and components throughout their skating career to suit their unique skating style. The more you ride and try new things, the better you will understand the structure of a skateboard and what you specifically need. These tips will help you take your first steps in this.
Skate deck
The decks differ from each other in design, manufacturer, and, most importantly, size: length and width. An important parameter for us: the width of the board. It varies from 7 inches to 9-10 inches, there are also children's skates and longboards/cruisers.
Width:
1 inch = 2.54 centimeters The standard and most common size for beginners is 8”.
IMPORTANT! “Standard and common” does not mean that it will immediately suit you. Choosing a board =/= choosing a shoe
Only after riding it, you can understand which deck size is preferable for you. Almost 100% of all skaters change board sizes over time, choosing them to suit their style and level of skating.
But it’s easiest to start with the 8” size, since such decks are neither narrow nor very wide.
To make it easier to understand what deck size affects:
- 7 - 8.25 - these are more “street” decks, they are mainly suitable for flat skating (tricks on a flat surface), in the park or on the street (using street structures as figures for tricks).
- 8.25 - 8.5 - universal wide boards, they are suitable for both flat tricks (for riders with a higher level of riding), and for mini-ramps, pools and radii.
- 8.5 - 9\10 - pool and ramp boards, they are easiest to control in radii and are also suitable for cruising.
Concave: If you are new to skateboarding, you can ignore this parameter. Concave is the curves that are found on the nose (front) and tail (back) of the board.
More experienced skaters first of all pay attention to the height of the concave: a deeper concave helps to feel the board better
- Wheelbase: Again, for beginners, this parameter is not important and mandatory when choosing a deck. Wheelbase (or simply base) is the distance between the internal holes for mounting suspensions.
- Color, composition, manufacturer: In skating, these parameters do not affect anything, you can safely choose any deck that you like.
IMPORTANT! Remember that ALL decks are made from wood, so they should never be wet or stored in damp areas. You must also understand that due to the characteristics of this material, the deck will not serve you for several years in a row - with intense and progressive skating, the decks will break, the pattern and coating will wear off, the click will disappear
Therefore, be prepared for the fact that the deck will need to be changed.
Step-by-step instructions for assembling a skateboard
To assemble a complete vehicle, follow these steps:
- Attach the sandpaper to the board: it should adhere tightly and evenly to the wooden covering. Air bubbles formed under the skin can be removed, but you will have to wait until the workpiece is completely dry.
- Trim and sand the edges of the skin after it has dried. Then start preparing the holes for the screw fasteners.
- Poke holes taped with sandpaper in the factory board using an awl.
- Assemble the wheels by filling the interior of each wheel with the supplied factory parts in this order: bearing #1, bushing, bearing #2.
- At this stage of assembly, begin installing the washers that are attached to both sides of the board.
- Having finished working with the washers, start fastening the wheels and complete the assembly of the structure.
- Additionally, adjust the shock absorption system.
By following the assembly instructions, you can figure out how to make a skateboard step by step and create a complete vehicle suitable for learning, riding and perfecting new tricks.
How to make a skateboard with your own hands
The stores are full of skateboarding boards, but is there one that is perfect for your needs? There are doubts.
That is why many are interested in the question of how to make a skateboard yourself.
Often, a skateboard is made not because of a lack of finances, but because of the need to obtain a unique board that is fully suitable for the individual preferences of the owner and his physical characteristics.
Having chosen even the highest quality and most expensive board, you cannot completely eliminate the need for adaptation. Why adapt to the characteristics of a skateboard when you can create a unique board and customize it for yourself!
Making a skateboard with your own hands: where to start
Let's figure out how to make a skateboard at home. Having knowledge about design features and responsibility is the first thing you need to have when starting construction. Answer questions about why you need a skateboard, what size it should be, and which modification is best.
You must clearly formulate the answers for yourself, because it is from them that you will start when forming a design scheme. It is better to purchase parts in a specialized store, and assemble the skateboard itself according to the instructions if you purchased a ready-made assembly kit, or use the recommendations for self-assembly given in the article.
We create a skateboard with our own hands
How to make a skateboard from a kit purchased in a store? Very simple.
This method is reminiscent of playing with a construction set: you have a complete set of parts and all the necessary tools with which you need to assemble the elements, and in the end you will get the desired design.
This design method is the simplest and fastest, but not always factory parts tailored to a specific format produce a comfortable skateboard.
Board from scratch, or how to assemble a skateboard from scrap materials
You can assemble a skateboard no worse than a factory product even from what you have at hand. Are you looking for an answer to the question of how to make a skateboard at home with your own hands? We will find him!
Completing such a task is much more difficult than assembling a vehicle in the form of a skateboard from blanks, but it is quite feasible.
In this option, the assembly scheme discussed above is completely duplicated, the only difference is that you will have to make the parts for the skateboard yourself.
So, how to make a skateboard from scratch. To begin with, you will need a wooden deck consisting of several layers (at least seven). Before gluing the board, calculate the parameters of the future product, take measurements and cut out the workpiece. Then grab the glue.
You can cut a board using a ready-made template, or it is better to design a unique product according to your own drawings.
The issue with the lack of factory skin is also easily resolved. Replace it with thick sandpaper, the gluing principle of which is similar to working with factory material.
The only thing you still have to buy are suspensions and bearings. For assembling a skateboard at home, a set of factory parts No. 608 is perfect.
If you have everything you need, all you have to do is assemble the board of your dreams, give it a unique design and set off to conquer new heights. From this we can conclude: if there is no suitable model on sale, there is nothing left to do but make a skateboard yourself. There is nothing complicated about it!
Source
Preparing to assemble a skateboard
In order to assemble a skateboard with your own hands at home, you need to have a minimum level of knowledge, having studied the theory, have a good idea of the design of the future board and each of its elements. To do this, you need to decide and answer some questions that will further affect the progress of work and the final result:
After answering these questions, using one of the assembly methods, the further course of work will be built, the result should be the planned skateboard.
First season minimum:
- Riding a board in a straight line;
- Skateboard control when turning;
- Going down the slide;
- Roller coaster ride;
- The exit from the curb is 5 centimeters high;
- Driving through small holes by lifting the front and then the rear wheels;
- Jump on the board while riding;
- Squatting on the board while riding;
- Skating in mini-ramp and other radius figures;
- Turn 180 degrees on the bank and in the quarter through the backside;
- Driving backwards (fake);
- Exit from fake (fake reverse);
- Drop in to a small bank;
- Frontside reverse on the bank.
Usually, a student learns all these movements in classes with a trainer if he trains every day for an hour for a month. But, as a rule, it is 2 times faster. Moreover, remember that everyone progresses very differently! And even professionals never compare the speed of learning new tricks with each other, unless we are talking about comic challenges.
Wheels
The wheels are made of polyurethane and differ in size and rigidity. Hard wheels hold speed well and wear out less, but when driving on them you can feel any unevenness. Soft wheels do not hold speed well and wear out faster, but they are more pleasant to ride on and easier to control the skateboard.
Wheels with a diameter of 52-55 mm are suitable for young riders, they are stable on landings, 56-60 mm are for beginners and ramp riding, more than 60 mm are for fans of speed skating, old school and longboards.
Wheels with a hardness of 87A-95A are soft, have good grip, suitable for uneven surfaces, ramps, 98A-101A are hard, with poor grip, but with excellent speed performance, suitable for riding in the park and street.
Assembly of finished parts
This method of creating a custom skate is the simplest and fastest, but it is not equally good in all cases. Nowadays it is not a problem to buy a ready-made set of parts produced by one of the many manufacturers. From these parts, a basic skateboard is assembled, which can be supplemented with the necessary details and add the desired innovations.
To get a full-fledged means of transportation, you must complete the following steps:
- Attach the skin. This process is extremely important, so it should be taken very seriously. There should be no folds or air bubbles. If air still remains under the skin, then they should be removed only after the glued skin has completely dried. Using a thin needle, it is necessary to pierce each bubble and carefully smooth the surface of the skin.
- You can trim off the remaining skin using a stationery knife, which is sharp and has a thin blade.
- Next, a file is used to process the edge of the skin.
- Having finished working with the sandpaper, we move on to preparing the holes through which the screws will be attached. Manufacturers of ready-made kits make such holes on the board, but they turn out to be covered with sandpaper we glued. To free these holes, you will need to carefully poke them with an awl.
- The assembly of the wheels falls on the user's shoulders. We place the parts in the inside of each wheel in the following order: the first bearing, the bushing and the second bearing.
- To attach the wheels to the hangers, you will first need to attach washers to both sides of the board. And only then assemble the structure, giving it the features of a skateboard.
- Adjusting shock absorbers is overlooked by many users, which each of them seriously regrets on their first ride.
Having completed all these simple steps, you can get a ready-made skateboard that can be used for training, full-fledged skating, or improved by making your own adjustments and adding new parts.
Preparing for future work
You need to approach the creation of a skateboard responsibly, having some knowledge regarding its design features. There is no way to do without theory, so initially you need to thoroughly study the design of the board and know about each of its elements. Then you will need to answer several questions that will determine the course of further work and determine the final result:
The answers must be clear and without a drop of doubt, since it is on their basis that a plan for further action will be created and parts will be purchased. There are two ways to create a skateboard at home. Let's look at each of them to choose the best one.
What is needed for making
How to assemble a skateboard correctly? Before starting production, you need to know exactly what end result you want to get. First, you need to decide whether it will be a large or small skateboard, whether it will be designed for performing complex tricks, or whether you just want to learn how to confidently skate on a flat surface.
Having drawn up the initial drawings and purchased all the necessary parts for assembly, you can begin to work.
What you may need in the process:
- wooden board (thick);
- template for the future skateboard;
- hacksaw;
- marker;
- grinding machine;
- drill;
- screwdriver;
- two fastenings;
- four wheels of the required size;
- ruler;
- soft fabric;
- screws;
- adhesive tape;
- sandpaper;
- polyurethane;
- linseed oil.
The board can be assembled in two ways. In the first case, you can assemble an exclusive board using all factory parts, adding something of your own to it. In the second case, the skateboard is created from scratch, following detailed instructions.
Assembling a skateboard from scrap materials from scratch
You can begin work after drawing up all the necessary initial drawings of the skateboard and purchasing parts for assembly.
What may be useful:
- template for the future skateboard; - thick wooden board; - marker and hacksaw; — a screwdriver, a drill, two fasteners and a special grinding machine; - ruler and adhesive tape, as well as screws; — four wheels having the required dimensions; — soft fabric and polyurethane; - sandpaper and linseed oil.
If you are making a skateboard at home, strictly follow all the manufacturing processes, as well as assembling the board for skating. The most important stage of the work is selecting the right type of wood for your future board. More suitable for this are oak or maple sheets, because they are stronger and more durable. You can begin step-by-step assembly only after you have found the necessary material.
First of all create the shape for the skateboard. This process is not one of the most labor-intensive. Find a suitable form on the Internet and print it. You can print on A2 or even A3, that is, in real size. Place the template that came out on the tree, then trace it with a marker. Afterwards, you need to evaluate the dimensions of the future product. To do this, simply stand on it with your feet. If it is too small or large, adjust the size using the same marker. After checking, we cut off all excess.
After cutting the board, sand it (the entire perimeter). If you want the best effect, take a plane first. It copes well with various wood roughness, as well as nicks. if there are still unevenness, take sandpaper and correct it.
In order to make the future fastening of the wheels, draw a line (straight) in the center of the skateboard. To more accurately install the wheels, tape the future mount to the board itself. Be sure to respect the location. After all, maintaining balance during the trip will depend on this. Place the fasteners at a distance of 22 centimeters from the tail and 8 cm from the nose of the board. Next, drill holes in the workpiece for future screws. Peel off the tape from the fasteners only after the screws have been screwed in.
Then take linseed oil and coat the board with it. Leave it to dry. After it is completely dry, it can also be coated with polyurethane. This will protect the skateboard from deep cracks and drying out.
After complete drying, you need to add another very important element to the board - you need to make sure that there is reliable adhesion between the surface of the board and the sole. Before fully assembling the skateboard, cover it with a piece of sandpaper, only one piece. That is, the size of the paper must match the dimensions of the board surface. We also make holes in the sandpaper for the bolts. This will allow the material to lie smooth and even.
After gluing the sandpaper to the board, you can begin to attach the wheels - this will be the final stage.
If you adhere to all the technology, you will get a light, comfortable and at the same time reliable board. You can decorate such a board according to your own taste. To do this, use stencils and spray paint.
Source