Small metal objects are difficult to hold in one position during the welding process. Fixation is carried out using improvised means so that the products do not move. A magnetic corner is suitable as an auxiliary tool.
It is also called a welding square. It will be useful for both the home craftsman and the professional welder. This mechanism improves the quality of the weld and the part as a whole. Let's look at how to make a magnetic corner for welding with your own hands.
Types of magnetic holders for welding
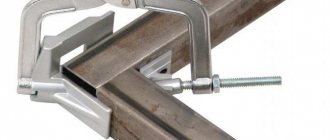
A magnetic square is a mechanism for clamping one part or joining two parts, providing support in a given position during welding. It is suitable for single procedure and batch production. The devices differ in design and operating features. There are the following welding magnets:
- standard square with non-switchable magnet and stationary angles;
- clamp - a flexible device with the ability to adjust angles, suitable for products of varying complexity;
- holders with different powers - used to hold workpieces with different characteristics: for small ones - low power, for large ones - high power;
- switchable models - after switching off, the holders detach themselves, the element is released without effort;
- universal angles – equipped with several angles with frequently used parameters for performing complex and simple work;
- three-coordinate and quadrilateral devices - suitable for welding in difficult high-temperature conditions, they use ferrite magnets that can withstand temperature changes and cylinders.
For home use, you can assemble a magnetic corner for welding with your own hands. Handicraft tools can withstand mechanical loads. It can fix large parts, permanently hold and join parts of products to obtain high-quality seams.
Angular: permanent
Corner models consist of two plates with a magnet placed between them. These are multi-position devices with an adjustable clamping angle in the range of 30⁰-135⁰. They are suitable for quickly fixing elements to be welded. The plates allow you to hold an object in one of 6 positions. Such mechanisms are acquired when, during the welding process, the workpiece needs to be rotated from several angles.
- Important! Devices with fixed angles should be selected in situations where welding is carried out in frequently used positions
Disabled
Switchable models are devices with a magnetic field that is switched off with a special rotary lever. They make it easier to clamp and release the item being welded. Such devices are easily cleaned of metal shavings and small items.
How to use?
The technology for using the device is not complicated. The first step is to connect the welding cable, after which the installation begins.
Most devices have switches that activate the magnetic field. At rest, the magnet will not be attracted to the surface.
One person is required for commissioning. After contact with the countertop, you need to activate the device. Once these steps are completed, the gripper enters operating mode.
When finished, perform the previous steps in reverse order. Do not attempt to separate the switched-on device from the part; many models are resistant to peeling. This may also damage the latch.
Upon completion of work, you should immediately clean the contact surface of the magnet from metal shavings, as this negatively affects the force of attraction.
Main selection criteria
For professional work, you should choose a high quality tool. Devices are exposed to high temperatures, which reduce the magnetization coefficient of low-quality specimens. The fixture must be free of chips, gouges and other defects where it touches the clamped product. Irregularities do not allow objects to be firmly fixed at a given angle.
- Important! The advantage of switchable corners is the ability to turn off the magnetic field both on the entire device and on its individual faces. These devices are suitable for craftsmen who often weld parts of complex configurations
Chinese angles have a budget price, but they cannot withstand temperature changes, so they quickly break. To weld products at different angles, it is recommended to choose a customizable mechanism or purchase a kit containing several types of tools for clamping at certain angles.
Is it worth buying?
The answer to this question can only be given by the master performing the work. For a novice welder who has just started his professional career, this device can make life significantly easier.
If a specialist works primarily with non-ferrous metals, a magnetic clamp will most likely not be useful.
Experienced workers have a set of various clamps for all occasions, including this device.
The cost of the device is quite high. If you have knowledge in the field of electrical engineering, you can try to make it yourself. The technology and manufacturing process will be discussed below.
Homemade magnetic corner
Home craftsmen will be able to assemble a magnetic corner for welding with their own hands. To make it, you do not need highly specialized knowledge. You must first prepare:
- magnet – thickness less than 15 mm;
- steel sheet 2-3 mm thick;
- M6 bolts with a set of nuts or rivets;
- heat resistant glue.
- Important! The magnet configuration does not matter. Practice shows that it is better to choose a round shape. An option from a powerful speaker is suitable
How to assemble a magnetic corner for welding with your own hands? : 1 comment
Your site is useful, a lot of interesting and useful information. Thank you for your work.
Comfort and convenience in any work have never bothered anyone. This also applies to welding. Among the welding tools, there are basic ones and there are auxiliary ones. These include the smallest auxiliary part in size - a wonderful magnetic corner, or, more correctly, a magnetic angle for welding.
Such corners are extremely useful for both artisans and professionals working on stream. Small in size but not in function, these special welding triangles improve the quality of products in general and welds in particular.
Clean Water Welding Gadgets
Here's how they do it:
- While the metal workpieces are precisely and securely fixed, you have more freedom in your actions. Your hands and your attention are concentrated only on the welding seam. Hence the increase in its quality.
- Using a magnetic welding angle, you can prepare and perform all welding work yourself, without outside help. That's labor savings for you. And you also don’t depend on anyone.
- The seam will be neat and precise thanks to the optimal and reliable installation of the workpieces using corners. If your work requires special precision, then the use of angles becomes not a recommendation, but a mandatory condition for welding.
- If you have a large amount of work, you cannot escape without fixing triangles: they will allow you to save your working time to a significant extent.
- It is easiest to weld workpieces of unusual or non-standard shapes using a welding angle with a magnet.
- With corners you can cook not only on horizontal surfaces, but also on vertical ones.
- These squares are useful not only for welding and soldering, but their ability to firmly hold parts is useful when cutting metals.
Rules for servicing the inverter device
Maintenance of an inverter-type welding machine includes the following.
- Visual inspection. It must be carried out every time before and after starting work in order to detect any damage to the insulation of welding cables and power cables. In addition, during an external inspection, the absence of damage to the housing and controls is checked (it is necessary to check the current regulator).
- Internal cleaning of the unit. This is carried out after removing the casing from the device to remove accumulated dust and dirt from all its components. Cleaning is carried out with a jet of compressed air directed at dusty parts.
- Checking and cleaning the device terminals. Power cable connection points should be checked periodically. If oxidation is found on the terminals, remove it with fine sandpaper.
Also avoid exposure to drops of water, water vapor and other liquids that may enter the machine and cause a short circuit in the electrical circuits of the inverter welding machine. If liquid gets into the device, remove the cap and remove all moisture. Dry the inverter electronic board thoroughly with a regular hairdryer.
The direction of electron movement is regulated by polarity by switching the wires to “plus” or “minus”. That is, when working with DC welding, two settings are possible:
- Straight polarity. The negative is connected to the electrode, the negative is connected to the ground terminal. In this case, the current moves from the electrode to the workpiece, and the metal heats up more.
- Reverse polarity. The plus is connected to the electrode, the minus to the ground terminal. The movement of current from minus to plus (from the workpiece to the electrode) creates more intense heating.
Direct and reverse polarity of the connection when welding with an inverter is used depending on the work and the quality of the materials. With alternating current, the type of connection is not important, but with direct current, you can change the polarity manually.
Types of magnetic squares
Welding magnets can vary in both shape and operating principle:
- A clamp is a flexible square with angles that can be adjusted. An excellent tool to help produce parts of any complexity.
- A simple welding angle with fixed angles and a permanent magnet.
- Switchable magnets for welding are an excellent technical solution for ease of work: after welding, you can turn off their action, the holders “unstick” on their own, which allows you to remove the clamps without effort or any deformation.
- Universal magnetic angles for welding with several standard angles are another excellent technological solution for performing a variety of jobs of varying complexity.
- Angles with different power of action. It is clear that fastening massive workpieces requires fasteners that are powerful in action, just as for small work that requires jewelry precision, they must be compact both in size and in terms of attractive power.
- Three-coordinate and tetrahedral squares using cylinders and ferritic heat-resistant magnets for working in difficult temperature conditions and with workpieces of different sizes and weights.
Choosing the right square: here and now
Everything is simple here: for simple home welding work, you will need holders that are simple in design. Complex processes involve fasteners with technological bells and whistles - from switchable magnets to heat-resistant options, from simple corners to 3D models.
One way or another, a high-quality magnetic holder for welding must be resistant to significant mechanical loads and have sufficient tensile strength. In the end, we are talking about fixing not fluff, but heavy metal parts. Our squares must be able to fix them completely and irrevocably. Only in such cases will welding holders make sense at all.
If you are engaged in complex welding work, and if you have the opportunity, then it is best to choose high-quality holders with on/off magnets. Such devices will help you turn on or off not just the entire square, but individual edges.
This mode makes it possible to independently work with complex tasks. Corners of this class are usually made of chrome-plated metal with increased strength.
The cost of welding holders cannot be called low; these are not cheap devices. The price depends on the number of standard angles, attraction power, adjustment mechanisms, brand, etc. The simplest copies cost about four hundred rubles, a standard set costs around a thousand rubles. Well, professional magnetic welding devices with technological additions increase in price to 3,000 - 5,000 rubles.
Clamp types
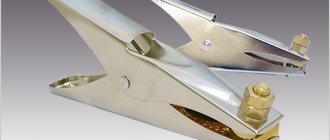
The grounding terminal for the welding machine can be magnetic or in the form of a clothespin, clamp, or centralizer. Let's look at the main varieties.
"Crocodile" ("clothespin")
This type of clamp is used in most electric welding machines. Attaches directly to the workpiece. Among the advantages of an alligator leather clip it is worth highlighting:
- reliable fastening to the surface of the product;
- the ability to attach a wide range of geometric shapes to parts;
- quick attachment/detachment;
- Ease of use;
- low connection resistance;
- wide opening angle.
The disadvantages of clothespins are as follows:
- it is not always possible to attach the “crocodile” directly to the part (for example, to a large diameter pipe);
- The weak point of the mechanism is the spring, which does not have the maximum level of strength.
Alligator clips are most often found in 200 A, 300 A, 500 A versions. Professional welders will need modifications for 400-500 amps.
Magnetic welding compound
This type of terminal is also often used by welding professionals. Advantages of magnetic locking:
- fastening to any surface, in particular to pipes;
- excellent option for hard-to-reach places;
- simple design;
- ability to withstand voltage surges without exhaustion;
- significant contact area.
Disadvantages of magnetic devices:
- unreliability of fastening in the case of a small contact area with the part;
- incompatibility with workpieces made of non-ferrous metals;
- the need for periodic cleaning;
- demagnetization due to overheating.
It is worth remembering that the magnetic mass clamp for the welding machine heats up when attached to a dirty surface.
Clamp
This is a screw mechanism. Features less frequent use than the two types of ground terminals listed above. Among the advantages of clamps:
- reliable fastening;
- Smooth current transmission due to excellent contact with the workpiece.
The disadvantages of clamps include a complex mechanism and cluttered design.
DIY magnetic holder
Making your own magnetic corner for welding is a great idea for three reasons:
- This is a real cost savings
- This will be a device that is suitable specifically for your technical needs.
- This is a very simple device, which is quite possible to make even without much practical experience.
What you will need:
- a magnet of any shape, but preferably a round one with a thickness of about 15 mm;
- steel sheet 2 mm thick;
- M6 bolts with nuts.
The tips and steps for making a welding angle are as follows:
- This device is best made from steel manually, using a grinder or laser. The main thing is to cut the templates with extremely precise angles on the work plane. There should be two templates. Their size should be larger than the diameter of the magnet. We pay special attention to the size and grinding of the corners - the quality of your square will depend on this. It wouldn't hurt to sand the entire surface well: if rust or any defects remain, the strength of the magnet will decrease.
- The magnet will attract any metal debris in the form of sawdust or shavings. You can get rid of this with the help of a spacer - a special part made of steel, which should be slightly smaller around the perimeter than the steel corner itself. Such a spacer will add additional rigidity to the holder, which will not hurt you. A special through hole is made in it.
- A magnet can be of different shapes. He is placed inside. Under no circumstances should it protrude beyond the edges of the steel plates. To fix it, you need to make four holes: one in the middle and the other three at the edges.
- The final stage of assembly is the careful folding of the layers of our “sandwich”, which can be fixed either with glue or metal rivets. The most reliable way would be M6 bolts. Nuts should be placed not only on the ends of the bolts, but also between the layers. The tails of the bolts protruding onto the nuts must be cut off with a grinder.