These designs are similar to both cool motorcycles and their “big brothers”, but longer. You can buy them in a store or make a bicycle with your own hands.
{ ArticleToC: enabled=yes }
From motorcycles they took a long frame and fork, and a large steering wheel. Thanks to the unique design, the center of gravity was shifted, making the vehicle more rolling. Thanks to this, the chopper can easily ride even on bumpy asphalt.
Harley-Davidson CVO Breakout
The new product of the legendary American brand, more than anyone else guilty of romanticizing the image of a motorcyclist on a sparkling chrome cruiser, blows away both the teapot and the experienced biker.
The wonderfully beautiful chopper pleases with its restrained design and slender lines. And whoever you are - a manager dressed in a business suit or a bearded fan of Russian rock - you will look equally cool at Breakout. Surprisingly, this Harley is perfect for a beginner, although physically developed, rider who wants to buy a motorcycle for a long time. In terms of comfort and handling, the 322 kg bike will give a head start to its lighter 900 cc rivals. Of course, a student shouldn’t joke with a 1690 cm3 engine, but if you’re willing to pay as much as €21,214, it means you’re already old enough and won’t be a fool behind the wheel. This motorcycle will allow you to joke with yourself only after three seasons, when its potential will be fully revealed to you.
In the meantime, start getting to know Breakout. Try it in an empty parking lot and you’ll immediately understand that the motorcycle is very friendly: it doesn’t try to jump out from under you when you open the gas too harshly, and it doesn’t kick up its rear when you ineptly apply front braking. So feel free to go to the city, where motorists will honk at you in admiration, and women of all ages and social status will throw unambiguous glances in your direction, and maybe even their bras. You'll get used to driving quickly, unless, of course, you immediately start cranking up the engine and finish the season at Sklif.
The powerful V-Twin is wonderful - it handles spectacular launches, overtaking at high speeds and idling equally well. The only drawback is the quietly farting exhaust, which can be cured by installing a direct-flow muffler.
Whole stuffed pike
If you know fishermen, ask them to bring a whole one to decorate the table with a masterpiece. But if you don’t know anyone, you can buy frozen fish in a store or market so that after tasting the dishes you can feel like royalty. Stuffed pike will require dexterity and ability to use a knife.
You will need:
- medium-sized pike;
- 120 gr. bread crumb;
- egg;
- bulb;
- mayonnaise, salt and pepper.
Stuffed and baked pike in the oven will turn out excellent if you follow the instructions.
- Preparing fish for stuffing
. You need to remove the “skin” from the thawed carcass. We start the work with a whole fish, do not rip open the belly, do not cut off the fins, wash it and remove the scales. We make an incision near the head, without separating it completely, and begin to remove the skin using small cuts like a stocking. When you remove the “skin” of the pike to the tail, cut the ridge. The fish skin is ready for stuffing. For more information on how to remove the stocking skin, see the video below the recipe. - Let's prepare the filling
. You need to separate the pike fillet from the bones, and then you can proceed as desired. In the recipe, I suggest adding boiled carrots, onions and bread soaked in milk to minced pike minced through a meat grinder. You can add herbs, spices, salt and pepper. Combine with a raw egg and mix the minced meat. - Stuffing fish
. When the skin and filling are ready, proceed to filling the skin-stocking with minced meat. Fill it loosely so as not to tear the thin shell. When the process is completed, secure the edge of the fish with a thread and attach the head. Lubricate the stuffed pike with mayonnaise and wrap it in foil. - Cooking
. Place the stuffed fish in the oven and bake at 185-190° for about an hour.
You will need:
- medium-sized pike;
- milk;
- 120 gr. wheat bread;
- egg;
- medium carrots and beets;
- spices, peppercorns and bay leaves;
- lemon.
How to cook pike:
- Cooking fish
. Differs from removing the skin-stocking in the previous recipe. After cleaning and washing the carcass, you can cut off the head and tail. We make cuts on the belly side of the carcass - 3-4 centimeters thick, without cutting all the way through the back. We remove the entrails through the holes and use a knife to cut off the meat from the inside of the skin and wash the fish again. - Let's prepare the filling
. We clean the fillet from the bones, grind it in a blender with onions, carrots and bread soaked in milk. Add the egg and mix the minced meat. Salt and pepper the filling. - Stuffing
. Place the finished filling in the pike pieces and insert lemon slices into the slits. - Cooking
. Place the root vegetables cut into circles in a deep baking tray, add spices, bay leaf and peppercorns. Place the stuffed fish on top and fill with water until the vegetables are hidden. Place the dish in the oven for 1 hour at 185-190°. - Submission
. When the fish is cooked, place it on a plate and decorate it with vegetables. You can serve.
Top 10 best choppers
The rating was compiled by determining the best choppers based on the factors of functionality, cost, and popularity.
Vagabond chopper
The remarkable design and streamlined shape of the Vagabond made it popular among motorcyclists, which was also facilitated by the price of 6.5 thousand dollars, which buyers of average solvency can afford.
Harley Davidson V Rod Muscle
Harley Davidson motorcycles are magnificent creations, all stylish, durable, prestigious. The Model V Rod Muscle with a 1250cc engine and 5-speed gearbox is a shining example of this brand. With a body made of steel and aluminum, it is easy to control and very maneuverable when turning. The cost of 1.5 million rubles is justified by the quality of the bike.
Devil's advocate chopper
Devil's advocate is not very popular, but it is very practical, stylish, cheap, and a good option for the budget-conscious buyer. A 6-speed gearbox and wide tires are the design features of the bike.
Anti-Venom
The chopper has an old-fashioned design that is attractive with its stylishness. It features an old assembly method, wheel rims, and a gas tank. Excellent work by Paul Teutul, Jr.
Yamaha Raider S
A motorcycle that attracts anyone with its beautiful 1854 cc engine, which instantly accelerates in any gear. A sophisticated chassis and monoshock are combined with a large fork offset and a 21-inch thin front wheel. The large saddle and soft suspension make the ride comfortable, and the brakes are effective. The bike weighs about 700 pounds and costs approximately $18,000.
Yamaha Stryker
Another Yamaha chopper ranks fifth in the ranking of the best in its class. Mechanics and electronics work amazingly well, the 1304 cc engine allows you to reach high speeds, and the bike has a cool design.
Honda's mechanics have created a superbly designed bike, equipped with electronics, fast and light.
Yamaha Roadster BMS
A very expensive model - half a million dollars, but worth all the money spent on it. The bike's creator, Sam Nehme, plated it in gold, creating a luxurious style.
Honda Fury ABS
Brilliant polishing and LED headlights immediately attract attention to the Honda chopper. A comfortable seat, a 5-speed gearbox, and a 1312 cc engine put this model in second place in terms of speed, power and comfort.
Harley's Dyna Wide Glide
The undisputed leader among choppers is the Dyna Wide Glide from Harley, recognized as the best model of the century. The most powerful engine, excellent steering wheel, 6-speed gearbox develop simply enormous speed, and the bike is very obedient when cornering.
Which chopper to choose: expensive or economical, exclusive or traditional, more powerful or very simple and reliable - it’s up to you to decide. What would you prefer: the latest top model or a popular, but possibly used product? The main thing is that your bike serves you well, is a reliable friend, an assistant in different life situations.
Brake system
Instructions
First of all, draw a picture of your future masterpiece. You don't need to have the skills of an artist to do this. A sketch of the future moped helps the master decide on the design and technical features of the creation. Then create a technical sketch to determine the parts that will be needed. Then purchase all the necessary parts. At this stage you will have to spend money, since many parts cannot be made: engine, gearbox, wheels, frame pipes.
Assembly of a moped begins with the frame. It’s easier to take ready-made parts and elements from the frames of other mopeds and mini-motorcycles. Your entire frame will have to be made on a special one from pipes. However, do not use seamed water pipes - they are not strong enough. It is better to use pipe elements from motorcycles. Use a blowtorch to bend them, and a welding machine to weld them. Don't forget to reinforce the frame with spacers and brackets.
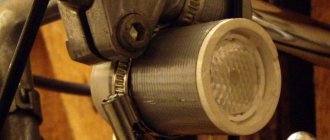
Weld the front fork to the frame through the bushing. You can also bend it yourself from pipes or remake a ready-made one to your liking. For a simple moped, a bicycle fork will do. For a chopper, you will have to work on the fork yourself.
It is better not to take a rear fork from a bicycle, since a moped has higher speeds and greater mass, therefore the loads will be high. Ready-made ones from mopeds or motorcycles are recommended. When making a swingarm rear suspension, try to install the swingarm as firmly as possible on the frame and cylinder. When using a classic suspension with two shock absorbers, the latter can be taken from any domestic light-class motorcycle.
The next step is installing the engine and gearbox into the frame. Think about its mounting in advance and cut the brackets from a steel sheet. Screw the brackets with bolts and nuts to the engine and tie the engine to the frame with wire. Then “tack” the brackets by welding, remove the engine and finally weld the brackets.
Best articles: Bicycle hub from A to Z
The final step is to install the wheels. If the rear wheel is a bicycle one, it will have to be modified by welding a new sprocket. Install the fuel tank and power system onto the frame. The fuel tank is up to the owner's taste, and the power system must match the engine, although it can be upgraded.
Electrical equipment must be moped or motorcycle type and include all lighting devices required by law: headlight, tail light, turn signals. After this, small parts will remain: the saddle, controls, additional equipment.
Yamaha XVS950A Midnight Star
This motorcycle is noticeably inferior to the first two devices in terms of appearance, but as a first cruiser it is one hundred percent suitable, which becomes clear from the moment of landing. Japanese engineers relied on convenience and installed a simple and very comfortable seat on the bike, which you won’t swear even after 300 kilometers of driving along the highway, and the comfortable spread of the steering handles allows you to easily dive through city traffic jams without knocking over the mirrors of passing cars.
The modern almost liter V-twin is seriously stifled by exhaust emissions neutralization systems, but this is only to your advantage. The motorcycle does not pull away from a standstill, and the engine’s potential is revealed only at medium speeds. After 60 km/h, Midnight Star accelerates perfectly, making it possible for safe overtaking on the highway and quite dynamic driving in the city, but it “deflates” only after 140 km/h. But you didn’t intend to accelerate to such speeds, did you? At the same time, the engine sounds quite decent, and replacing the standard exhaust will add noble low overtones to it.
It’s funny that the aura of Harley-Davidson legend still haunts Yamaha, and the Japanese design the engines for their cruisers according to the classic “Harley” design, that is, so that the V-twin beats and vibrates in the motorcycle frame, like a real heart .
And this is in an era when most manufacturers are racking their brains on how to make a perfectly balanced motor that is as invisible as possible to the rider! You will understand what these vibrations give you when you put the Midnight Star on the step to warm up: the motorcycle simply “crawls” to the side, which will definitely become a reason for jokes among your friends.
Learning to corner on the Midnight Star is a pleasure: the bike happily rolls on its side until the pegs hit the asphalt, without falling over or trying to “break.” The suspension works at 200%: a good kick can only be obtained from very serious potholes, and the Midnight Star eats up ordinary bumps without problems.
The only thing is to be more careful with braking: the 278-kilogram motorcycle is equipped with some very weak brakes, as if they were carried over to the Midnight Star from a motocross bike. This can be treated by replacing the standard calipers with more serious ones - plus 10,000 to the original 467,000 rubles.
Countersteering
Countersteering is the only correct way to control a bike in a curved motion. It uses the force resulting from centripetal and gravity, and the gyroscopic effect created by the wheels.
The essence of counter-steering: when making a turn, we push away from ourselves the steering wheel towards which we are turning. And vice versa: by pulling the steering wheel towards us in the direction of the turn, we will change the direction of the turn.
The principle of counter-steering is used to maintain balance at low speeds, when the gyroscopic effect does not provide sufficient stabilization. In these cases, we instinctively turn the steering wheel in the direction of a likely fall. As a result, the two-wheeled friend deviates in the opposite direction, and balance is maintained.
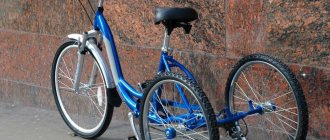
DIY chopper bike
Like everything original, the price of a chopper bike is quite high. But a DIY chopper-style bike will cost much less.
In order to turn an ordinary bicycle into a bike chopper, you need to change the frame design and the front fork. Work can begin if you have:
- An ordinary bicycle that they decided to improve;
- Welding machine;
- Steel pipes for fork and frame;
- Sheet steel with a thickness of 1.2 mm to 1.5 mm;
- Long bicycle chain, it can be obtained by connecting two for a regular bicycle;
- Bulgarian;
- Dropouts;
- Fasteners (bolts, nuts, washers).
It is advisable to follow the sequence of work stages. Briefly they can be stated as follows:
- Remove the steering wheel and determine the length of the fork.
- To make a fork, two steel pipes of the required length are processed with a grinding attachment.
- Install a pair of dropouts on two pipes for subsequent mounting of the wheel.
- Make the top of the fork to attach other elements of the bike to. To do this, you need to assemble a bolt, nut and washer, attach the nut to the washer, welding each edge. Then we weld the washer to the fork tube, after placing the washer with the nut down on the upper hole of the fork tube. You need to do the same with the second fork tube.
- Attach the dropouts to the wheels. On the cardboard template, carefully mark two holes for the fork pipes and one for the stem and crown.
- Using a cardboard template, make a base plate from sheet steel, weld it to the crown and stem and two fork tubes.
Make a top plate from a steel sheet, mark the centers of the two fork pipes and the stem bolt, drill holes with a diameter slightly larger than the diameter of the bolt. Secure the top plate with bolts. In order to extend the frame, you need to cut it and insert pieces of pipe. Where to cut and how much to extend is up to the bike owner to decide. In order for the weld to be of high quality, the pipe for the inserts must be taken with a slightly smaller or slightly larger diameter than the diameter of the pipes of the donor bicycle frame. This is done so that the pipes fit into each other. Only a qualified, experienced welder can weld pipes of the same diameter and ensure a correct, strong seam. Some actions may be added here if the frame is not simply lengthened, but its design is changed. The frame is strengthened by adding another pipe between the carriage and the upper frame pipes. The saddle is made of boards, plywood, foam, leather. Its appearance and design are a figment of the imagination of every cyclist. The requirements for a saddle are strength and comfort for the owner. The handlebar is installed after first deciding whether to install the old one, assemble your own design, or move it from another bicycle. Before installing brakes, you need to evaluate your preferences and financial capabilities. There are plenty of options to choose from. The main thing is that they must ensure safe driving. Finally assemble the unit and take a test ride. Paint the bike.
A chopper bicycle is designed for riding on asphalt and well-packed dirt roads and provides comfortable movement. Thanks to the wide wheels, it is stable and absorbs uneven roads well. Even without an electric drive, it reaches higher speeds than a regular bicycle. A bicycle that looks like a motorcycle is more suitable for lovers of the unusual. Interesting for those who like to improve the world around them.
The procedure for making the steering wheel
Step 10: Handlebar for a Homemade Chopper
There are three ways to install it:
- install the old one. But it may not fit the configuration (ram's horns, for example);
- do it yourself if there are steel pipes left. You can bend it with a pipe bender or cut it and weld it into the desired shape;
- choose one that suits the shape.
But first you need to make or select a donor lock. If one is found, mounting is not difficult.
This is shown in the photo.
Finally, you need to install the fastening clamps on the previously made top plate.
Weld them to the plate.
Also weld the clamp and insert the steering wheel into the mount. The steering wheel mount is adjustable.
Optimal models for beginners
Yamaha
Virago
The chopper with a 400 cc air-cooled V-twin engine, cardan and 2 carburetors is very simple in design and easy to control due to its low weight. This is also facilitated by a low center of gravity, a relatively narrow rear wheel, and a short wheelbase. A reserve tank under the saddle helps lower the center of gravity.
XVS 400 Drag Star
Large 400cc chopper, recommended for tall motorcyclists. Classic components: V-twin, cardan drive, air cooling, 2 carburetors. There is a classic version and a custom one.
Suzuki
Savage
Single-cylinder, air-cooled, the bike is flexible and light in weight. The 400 cc model is chain driven, the 600 cc model is belt driven.
VS400 Intruder
Another popular model from the Japanese manufacturer Suzuki. The model combines good technical characteristics with an inexpensive price. Cardan drive, carburetor power, liquid-cooled M-twin - these are the components of this high-spirited, dynamic bike. A distinctive feature is the high center of gravity for this species.
Honda
Steed
The legendary motorcycle from Honda is phenomenally reliable combined with an affordable price. Engine 2-cylinder, liquid cooling, chain drive. The 400cc version has a 5-speed gearbox, while the 600cc version has a 4-speed gearbox. The advantages of the bike are excellent handling and light weight.
Rebel CMX 250
Lightweight, modest-sized chopper, medium power, but highly reliable. A great option for a female driver.
Shadow 400
In terms of technical characteristics, the motorcycle is close to the Steed model. Equipped with liquid cooling engine, carburetor system, chain. A highly reliable option for beginners and more.
Kawasaki
VN 400 Vulcan
A Japanese 400cc motorcycle will be a good friend for a novice biker. A special feature is its large size, suitable for tall owners.
ZL 400 Eliminator
A hybrid of a sportbike and a chopper with an in-line 4-cylinder engine, liquid cooling, and chain drive. 50 l. With. makes the powerful Eliminator a leader in the 400cc class. To drive such a bike, it is better to have experience.
How to make a homemade wheeled all-terrain vehicle
An example of a drawing of an all-terrain vehicle on low-pressure tires
It makes sense to equip the basic unit with a reduction gearbox. The reason is that gasoline and diesel engines have the best torque performance at a crankshaft speed of approximately 75-85% of the maximum.
All-terrain vehicle frame
An example of a frame-fracture drawing
A frame is created between the front and rear axles. It is better to use profile pipes of rectangular or square cross-section as the basis. They provide greater rigidity than rolled angles, channels and I-beams of the same mass.
The joining of the frame elements of a wheeled all-terrain vehicle can be rigid, then it will be formed in a single-volume format. When using heavy Neva or MTZ walk-behind tractors, this option will be preferable.
As an option, a breakable frame (fracture) is made; this option is used for areas with a complex profile. Here the articulation is performed through the kingpin. The front and rear axles have independent suspension from each other. Craftsmen create such all-terrain vehicles based on the Neva and Ugra walk-behind tractors.
Rear axle and suspension of a homemade all-terrain vehicle
To simplify the design, some DIYers use a ready-made rear axle from a passenger car. For example, from the Moskvich-412 car: its low weight allows installation on a light all-terrain vehicle. The suspension is performed on shock absorbers for a smooth ride and reduced vibration.
Other craftsmen make independent suspension on each rear wheel. This approach is implemented on the Ant scooter. When driving, a slight rocking is felt, at the same time the wheels experience less resistance on uneven surfaces, and fuel consumption is noticeably reduced.
The rear axle is connected to the frame with long, hardened bolts. For elastic joints, rubber inserts are used, for example, silent blocks. This improves the performance characteristics of an all-terrain vehicle based on a walk-behind tractor.
Wheels (low pressure chambers)
To move on wet and unstable ground, you can use lugs. They provide high grip. Large-diameter low-pressure chambers perform even better. Pneumatics have minimal ground pressure, and the presence of air contained in the all-terrain vehicle’s chambers will make it possible to create a floating all-terrain vehicle.
For installation on the rear axle, homemade or special wheels for all-terrain vehicles, swamp vehicles and snowmobiles are used. They can be purchased assembled or as separate elements: tire, tube, disc. The wheel is easy to assemble.
- Homemade discs for pneumatics are made by welding ordinary discs and mounting plates using metal tubes. This expansion is necessary in order to adjust the small diameter of the car rim to large cameras and better fix them.
- A large camera is placed on a specially expanded disk - either a proprietary one or from other units (GAZ 53, Ural, Kamaz or another truck, an aviation camera, etc.).
- An air valve is installed in the hole of the disk.
- The wheel is inflated with air.
- The resulting tires are installed on a homemade all-terrain vehicle.
You can increase the cross-country ability of regular wheels on low-pressure chambers by creating an additional tread. For example, additionally secure the cameras with chains, conveyor belts, homemade tracks or another method.
Another option is to cut a patch lug from the tire. The depth of the structure’s hook reaches more than 20-25 mm. Rolling resistance increases, while at the same time the slip coefficient decreases sharply.
Assembling a homemade all-terrain vehicle from a walk-behind tractor
When all the tools, spare parts and components are prepared, you can begin assembly. This is a rough plan for how to assemble a homemade all-terrain vehicle, it all depends on the chosen design.
- A walk-behind tractor is installed on a welded or finished frame.
- The rear axle and, if necessary, the front axle are mounted.
- The seat is placed on the frame.
- If provided in the drawing and diagram, the steering control is installed.
- The protection is attached to the frame; it is made of plastic or metal sheet.
- The future driver should try out the comfort of the seat; if necessary, provide auxiliary devices for adjusting the seat.
- The functionality of the brakes is checked.
- Electrical circuits and lighting fixtures are installed.
After completing the bench tests, they begin the field tests. You need to know how the car behaves in difficult conditions.
Inspection of a used chopper
Choppers are usually in good demand on the market. How to choose a good motorcycle that won’t force you to immediately spend a lot of money on restoring it? When purchasing, be sure to check the condition of the motorcycle, especially if you are purchasing used motorcycles:
- gearbox quality;
- oil condition;
- chain wear;
- compression (should be 0.8–1 MPa);
- no rust on the gas tank;
- no corrosion on the fork;
- carry out a test drive: accelerate the chopper to 100 km/h to check the power system - the engine should run without interruptions, if you hear them - the system is dirty;
- check the wear of the bearings; to do this, you need to hang the rear wheel, then swing the pendulum to the sides - there should be no knocking.
What types of chopper bikes can you find?
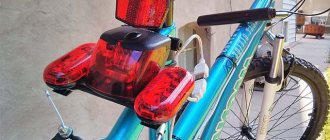
Bicycle choppers differ in several ways. They are divided according to the number of wheels:
- two-wheeled;
- three-wheeled.
Three-wheeled choppers are more popular among children and teenagers. But there are also adults on such a bike. Often a storage basket is mounted above the rear axle.
As a rule, a bicycle chopper is single-speed, but the possibilities expand with the installation of a planetary hub or disc brakes. Then the bike chopper can have up to 14 speeds.
By type of drive there are:
- foot;
- electric.
With the installation of an electric motor on a bicycle chopper, life is transformed:
- you can ride without straining;
- no harmful emissions;
- inexpensive cost of battery charging;
- when the battery is discharged on the road, you can use the pedals;
- works quietly, no smell;
- The electric drive is lightweight and can be installed independently.
Where to weld a motorcycle frame after an accident?
During operation, the motorcycle receives various damages associated with a violation of the frame geometry. In the event of a head-on collision or collision with an obstacle, a crack may appear and further use of the motorbike is prohibited. Many people cannot afford the purchase and installation of a new frame, so the best option is to use the services of our service to restore the integrity and strength characteristics of the supporting structure.
Welding frame yamaha warrior xv 1700
Professional services on favorable terms
In order to eliminate defects that appear in the form of cracks, specialists weld the motorcycle frame. Our employees have undergone special training, confirmed their qualifications and have permission to perform complex repair work. The accumulated experience and knowledge of the process sequence and metal welding technology allows us to guarantee customers high quality welding operations, as well as reliability and safety during further operation of the motorcycle. Modern equipment and tools are used for the work, so all welding operations are performed in a short time.
DIY frame and fork
Since we are talking about the exorbitant price of recreational city “motorbikes,” is there a homemade alternative to such expensive but attractive bikes?
Theoretically, and practically too, you can turn an ordinary two-wheeled horse into a “convertible” in the form of a chopper with your own hands. Distinctive features from a standard bike are a special frame design and a long fork. To make all this we need:
- standard road bike frame;
- two long pipes;
- welding machine;
- Bulgarian;
- nuts, bolts and washers;
- dropouts.
The two pipes are first accurately compared in size. This will be the core of the fork. Then dropouts are welded from the end where the wheel will be attached.
They need to be clearly fixed in advance, preferably closer to the edges of the pipes. This way the wheels will fit better in their sockets. Dropouts can be made from steel plate. The width of the cutout and the size of the wheel mounts themselves will depend on the given dimensions of the bicycle.
Plate with cutout for wheel axle
Using bolts and washers we create the upper mount on the fork. Don't throw away the old part; it can serve well as a sample. Next, a steering wheel pipe is welded between the pipes:
- We take a steel plate and make a hole in it for the pipe.
- We weld the fork pipes on both sides to both ends of the plate.
- The steering cavity is inserted into the hole and welded tightly.
It will look something like this.
The fork is almost ready
How to build a long frame for a chopper with your own hands?
- Cut off the down pipe.
- Remove the pipe joint (place for the old plug).
- Weld new pipes to the upper horizontal and lower pipes.
- Weld the front ends of the pipes to the assembled fork.
The angle of the frame will change, and you will get something like this:
Chopper frame with wheels on
The geometry of the frame may differ from that shown in the picture, it all depends on its original design. In the middle, you can weld an additional vertical pipe, cut to size: the structure will be more rigid and reliable.
The procedure for creating load-bearing elements for a chopper bicycle is quite complicated, and, most importantly, it is impossible to return the frame to its previous state. That is why you should not experiment with it for the sake of curiosity.
Reliable brakes
Step 11: Brake System
If you planned to use wheels from a donor bike, there may not be any problems. If the wheels, for some reason, are not satisfactory, and you want to replace them with more stable ones, for example, you need a different suspension.
When carrying out welding work, be sure to cover the tire with a damp cloth to avoid damaging it.
It is important to calculate exactly where the caliper brake will be located, weld the plate onto the rear triangle seatstays, checking that the mounting hole is located in the center.
Before cooking completely, check the operation of the clamp brake again.
This is what it should look like. The brake lever will work just fine from an old bicycle.
Cruisers and choppers for young cyclists
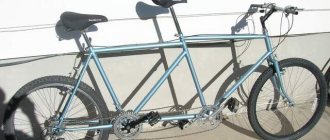
Close neighbors of chop bikes are cruiser bikes. These are city bikes used for cruising, riding on the streets, riding on highways and traveling to the suburbs. Some elements from a bicycle chopper are clearly present in this model: curved frame pipes, high handlebars and wide-profile tires. The stability, cross-country ability and maneuverability of such bikes can easily compete with the performance of an ordinary road bike.
The frame of the cruiser bicycle is made in the style of the 50s of the last century. At that time, these bikes were actively ridden across the American continent and, for the most part, in tourist centers, along embankments and beaches. The unofficial name of this bike is “beach”, in recent years it has been “remembered”, and the model has reappeared on wide sale.
An original and stylish classic cruiser
In addition to adult “bicycle motorcycles,” you can find chopper bicycles for small children on the shelves. This is a comfortable bike that completely replicates the design of an adult. There is no chain drive, the pedals are attached to the front wheel.
The seat is made in the form of a comfortable armchair; footrests can be located under it.
"Relax bike" for the little ones
A long handle is attached to the back, with which parents can roll the child until he can reach the pedals on his own. In addition, the bike is equipped with other accessories: a basket for all sorts of small items, a visor and even a seat belt!
Of course, the price of such bikes will be higher compared to their classic three-wheeled counterparts, but what can you not buy for your beloved child. By the way, about the cost: for adult chopper bicycles it will differ even more from the average.
Advantages
In Russia they have been gaining popularity in recent years.
Additional advantages include the following:
- exquisite appearance;
- unique style;
- high comfort;
- wide tires, allowing you not to feel the unevenness of the surface;
- the possibility of electrification and turning it into a bicycle moto;
- available tuning;
- an unforgettable driving experience.
On the website https://megavel.ru/category/velosipedy-choppery/ you can get acquainted with the models and the price, which cannot be called low. How to be? You can do it yourself, and for reasonable money.
If you strictly follow the instructions below, which use parts from old bicycles and scrap materials, it is quite possible to make a vehicle with your own hands. It will turn out no worse than what the retail chain offers.
An old women's bike from the Wisp Raleigh brand is suitable for making a chopper, which will turn into a wonderful cruiser.
Kawasaki Vulcan 900 Custom. MH selection
Among the relatively budget options for cruisers, this modification of the Vulcan is the most attractive in terms of appearance. There is even a version in an all-black matte finish, which looks great on the road. At the same time, Kawasaki does not provide “chrome” options, so keep in mind that guys with leather “noodles” on the handlebars and fox tails on their helmets will not understand you.
The only thing that spoils the appearance of the bike is the comfortable but wide seat, designed for a remarkable butt. At the same time, the short passenger appendage makes the Vulcan a motorcycle for solo riding - only a very miniature passenger can sit on the “tail”, which is 15 centimeters long. But for you, this is for the better - there will be less temptation (the unspoken motorcycle rule says: first season - no passengers, unless you want to become a killer).
We start the engine, and it becomes clear that there is no need to be tricky with tuning the exhaust system on this “Cava”: a thoroughbred bass roar will be heard by drivers of passing cars, but at the same time it will not wake up the babies when you make your way through the courtyard of a residential building.
The dynamics at the start are very, very impressive, but keep in mind: at medium and high speeds the engine is no longer so vigorous, so it is better not to practice overtaking oncoming traffic at speeds exceeding 100 km/h. However, such speeds are only possible on the highway, and the Vulcan is more of a city bike. Be prepared for the fact that it is quick to brake, which is generally not typical for cruisers. Personally, I sharply squeezed the front brake in front of an eccentric, to put it mildly, who jumped out onto the road, and almost flew over the steering wheel.
By the way, about the steering wheel: Kawasaki engineers perfectly calculated the angle of inclination and the amount of reach of its fork, so the Vulcan 900 Custom probably has no equal in handling in this class. I think even a beginner can easily pass the “eight” test, which usually fills half of the applicants for category “A” licenses. This greatly facilitates movement in traffic jams. A tribute to the chopper style - large and narrow front and wide rear wheels - do not add rolliness in corners. So, with a price of 429,000 rubles, the Kawasaki Vulcan 900 Custom clearly deserves the title of the best cruiser for beginners.
Saddle
It’s cool if you got an original leather saddle, that’s what you’ll ride on. The problem may be a loose attachment to the seatpost, but it can be solved by a simple replacement. Looking for a new saddle? The ideal option for riding around the city is, again, leather (Brooks, for example). The leather is durable, holds its shape well, but at the same time does not greatly compress the blood vessels you know where. It is also better to have an original seatpost: it is a couple of millimeters thinner than modern standard ones, so the new tube will have to be slightly filed with a file (or have a friend use a lathe for a bottle of porter).
Introduction to the chopper bike: features, purpose, convenience
Choppers are city bikes for fast movement on asphalt and well-rolled dirt roads. This bike is larger than a regular bike, thanks to which it can easily stand out in dense traffic.
Other specific features of the choppa bike:
- low frame height;
- reclined high seat;
- high steering wheel;
- wide-profile tires and deep tread;
- rolling;
- built-in two-horned footrest;
- the serious length of the fork, located at an angle: this is what significantly increases the dimensions of the chopper compared to a regular bicycle.
On bikes of this series you will not be able to sit in a half-bent position: the geometry determines the seating position as slightly reclined.
This has a significant advantage: better visibility to the front and easier to adjust the rear view mirror. It is much more comfortable to pedal in a relaxed state; we took this into account by equipping the seat of our brainchild with a comfortable backrest. Three-wheeled modifications are also available, some with a rear rack. This bike is perfect not only for lovers of active walks, but also for business cyclists who often carry luggage.
Elegant chopper with three wheels
Special attention is paid to the appearance of a modern chopper:
- frame: straight in the style of minimalism, curved, carved, “various sizes”;
- colors for every taste;
- accessories, canopies and decor.
The single speed option is more common than the speed system bike. However, a second option also exists: a single drive sprocket and a cassette at the rear. A complete analogue of the transmission of high-speed “road cars” with a straight chain run. A special lock is installed in the middle, which prevents the chain from dangling due to its excessive length.
Chopper star speed system
Step-by-step instruction
Before you disassemble an old motorcycle, you need to decide what you want. To do this, look for as much information as possible (operating principles, photographs, drawings, etc.). It’s not difficult to make a chopper from the Urals with your own hands, but you won’t be able to find the necessary parts and tools in any store. Therefore, decide in advance what kind of design you are going to make. After organizing your workplace, you can start working:
- First of all, it is necessary to create a drawing of the future unit. A visual representation of the motorcycle will help you navigate the correct assembly. It is best to create a drawing in which all dimensions will be indicated. This will help not so much you as specialists who probably do not understand what you want to achieve.
- Next, you need to find masters in the area that will be beyond your strength. For example, not everyone has welding or grinding
. When looking for specialists, you can look at the equipment production plant. For a small fee, workers will make a good, durable device. Explain to them that you want to make a chopper with your own hands; the drawings will help them understand how you imagine the future device. - The basis of a chopper can be any bike. The Soviet motorcycle is ideal not only for its style, but also for the cheap cost of parts. In some cases, you don’t even have to spend money on buying new spare parts. For example, lighting fixtures or carburetor tanks can be removed from old, unusable equipment.
- After determining the work plan, begin disassembling the bike. Sort the parts right away. Place all small and replaceable parts in one place. Clean the parts that will be installed in the motorcycle thoroughly.
- After cleaning the mechanisms, have them painted and chrome-plated. At this time, you can putty large parts yourself, such as the fuel tank, fenders and protective screens.
- Now you need to polish all engine parts. This primarily applies to the axle, crankcase, gearbox and exhaust system.
- If problems are found in the engine, it is necessary to replace all faulty parts, or better yet, overhaul the engine.
- Leather accessories are quite easy to make yourself. It will look stylish and not expensive.
- After the specialists have welded the correct frame for you, and all the parts have been painted and replaced, you can begin assembly.
Very often, inconsistencies arise during the assembly process. In such cases, owners try to get out of the situation with a crowbar and a sledgehammer. As a result, having made a chopper from the Urals with your own hands, the drawings of which will be strikingly different from the real assembly, you will not enjoy your trips.
It's best to leave the work to the professionals. In a short time you will receive a stylish motorcycle that will look like a new foreign chopper.
What a blast from you!
The direct-flow, or direct-flow exhaust system, which many bikers install on their motorcycles instead of the standard muffler, in addition to increasing engine efficiency, makes the engine roar in different ways, but always very loudly. However, ordinary people who care about bikers do not realize that the deafening sound of the exhaust in city traffic plays a vital role for a motorcyclist: it can always be heard in traffic, and the rumble warns drivers in advance about the approach of a bike, which forces them to look again mirrors when changing lanes.
After all, what is scratches and a bent fender or door for a car enthusiast can easily mean death or serious injury for a biker. So we strongly recommend that you install a straight-through exhaust on your cruiser. And in order not to cause a hail of flower pots on your head, try to enter the yard in neutral, and move around it with rare jolts in second gear.