The need to make a bicycle yourself arises in two situations: saving money or the desire to come up with a non-standard model. The creation of a two-wheeled vehicle begins with a drawing. First you need to decide on the design and material. To assemble a bicycle with your own hands, it is important to understand the purpose of each component. Some elements cannot be abandoned - safety will decrease, or the vehicle will not travel more than 2 meters at all. Some components can be assembled from scratch, others are better used off-the-shelf.
Features and device
The three-wheeled bike differs from its usual counterpart in a different frame configuration and the presence of an additional rim. If the model is intended for city or park walks, it is better to make a simple option, without frills or reinforcing elements. Products for driving over rough terrain and transporting goods are equipped with a reinforced frame, transmission, reliable braking system, and their speed modes are also changed.
If the tricycle will be used by one person, the design is adjusted according to anthropometric parameters. For mass use, the most universal modification is chosen.
Advantages of DIY tricycles:
- suitable for use by people of different age categories;
- characterized by increased stability and load-carrying capacity;
- making homemade options does not require significant costs or special skills;
- facilitated landing of the owner due to stable balance;
- possibility of commercial use.
The disadvantages include the increased weight of the unit, bulkiness, and inconvenience of turning at high speed. Consumers indicate that cargo models are only suitable for private homes, since placing them in an apartment is problematic. A homemade version with three wheels must be assembled, carefully following the instructions.
Increased stability and load capacity
For people of different ages
Does not require costs or special skills for manufacturing
Ease of entry for the owner
Saddle from scratch
It is best to make a seat based on an old one. If such goodness is not available, you can look at flea markets. If the search is not successful, then you will have to make do with what you have. There is no need to despair; even from scratch you can make a decent saddle. In this case, you should proceed as follows:
Stencil of the future seat
- We find a photo of the saddle that we would like to get in the end.
- Print it out in full size and cut it out. The result will be a stencil on which further work will be carried out.
- Transfer the stencil to the foam. At this stage, you can make changes to the shape of the future saddle: cut it off somewhere and add it in another place.
- If the workpiece completely suits you and does not need changes, then it can be tightly wrapped in cellophane.
- We dilute epoxy resin and glue fiberglass fabric onto the foam blank in three layers.
- We wait for complete drying and evaluate the seat for softness. If it seems very soft to you, then you need to glue one or two more layers of fiberglass.
- We make a sled from steel wire (you can use aluminum if you need a lighter saddle).
- We glue the lining on top, and then the upholstery material.
The cost of such a saddle will not exceed 500 rubles, even taking into account the purchase of thick aluminum wire and leatherette for upholstery. It is the low cost that is the main advantage of this creation.
Preparatory stage
To create a tricycle with your own hands, you need to purchase a standard analogue with a pair of rims. This may be a foreign or domestic modification. Taking into account the chosen configuration, the aesthetic part of the future transport will be designed. It is necessary to take into account the quality of parts and the possibility of transforming the unit.
Initially, all design diagrams and drawings should be completed. Particular attention is paid to:
- Stability, which requires correctly calculating the placement of the rear wheels.
- Height of the steering column and seat. The parameter is calculated taking into account the characteristics of a particular person.
- Purchase of a rear axle with differential. The element is responsible for comfortable movement and safe driving.
- Adjusting the steering unit. A homemade tricycle should not fall over when turning.
- High-quality brake block, signal horn.
- Smooth movement of the steering wheel and wheels. There should be no creaks or other extraneous sounds.
In the drawings of a tricycle, the most crucial moment is modifying the frame configuration. It will be necessary to strengthen the metal profile using stiffeners. As an option, it is possible to use a design from Ural. The rear axle is cut down and an updated frame made of duralumin pipes is installed. The second part is installed in the lower section, it is used for transporting goods. Wheels are placed on both sides of the axle, and a sprocket is fitted in the center.
Standard velomobile option
Velomobiles, like other types of entertainment and sports transport, can be different in their structure and capabilities.
But, despite this, there is still a standard for the external and functional content of this type of transport. A velomobile, in its usual form, includes:
- A three-wheel design in which the front wheel is slightly larger than the two rear wheels;
- Steering wheel;
- Front frame;
- Connecting elements;
- Sitting.
Naturally, standardity is an opportunity to add color and add notes. After all, if a person converting an ordinary bicycle into a velomobile has taken on such an interesting mission, it means that his imagination is sufficiently developed and will help him make a special design.
A velomobile is not only a means of transportation and a way to pass the time profitably, it is also an opportunity to stand out from the crowd and show that the owner of the vehicle is special. Thanks to creative and unusual solutions, be it decor or a structural part of a velomobile, every craftsman can make the fruit of his efforts especially interesting.
Required materials and tools
To make a three-wheeled trike from a bicycle, you should stock up on the following equipment:
- a pair of chains;
- cables for the brake and speed switching units;
- standard bicycle;
- stainless steel clamps;
- wheels;
- wings;
- brake block;
- basket for transporting cargo;
- steel frame;
- paint and varnish composition.
To create a tricycle with your own hands, you will need a hammer, an angle grinder, a welding inverter, a drill, and a set of keys. After sketching all the drawings and diagrams, you should prepare the specified materials and tools in advance. If you plan to build a spacious luggage compartment, additionally prepare sheets of plywood and a hacksaw. If desired, the unit is equipped with an alarm bell or horn. Comfortable seating is ensured by installing a new seat or installing a special cover.
Some craftsmen place a compact basket at the front of the structure for transporting bags and packages. At the same time, your hands are completely free while riding.
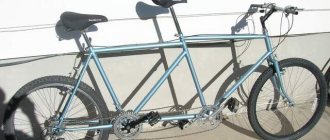
Four-wheeled two-seater velomobile
Four-wheeled velomobiles are less common than three-wheeled ones
Essentially, these are two bicycles united by one frame. The frame is made of steel pipes. Its dimensions depend on the height of the driver. In addition to the frame, major changes are made to the steering. The two front forks are connected using a rod. One of the features worth noting is the double pedal assembly. Each rider has his own. Only the chain length is changed here. The brakes on the rear wheels remain original.
To assemble such a device, we will need:
- two identical bicycles;
- steel pipes with a diameter of 2.5 cm;
- Chipboard, foam rubber and seat upholstery;
- welding machine, grinder, set of tools.
To calculate everything in advance, draw a drawing
Making such a velomobile will take a lot of time. The difficulties are mainly related to the manufacture of the frame. There will be a chance to prove yourself as an engineer and welder. But what a pleasure from the result! Just imagine a trip with your loved one on such a monster. What chance do you have to spend time with your children? You can also involve them in the construction, let them take a break from their smartphones. A pleasant pastime is guaranteed in any case.
Advantages:
- convenience;
- unusual design;
- an opportunity to be alone.
Flaws:
- bulkiness (it won’t be possible to store it on the balcony);
- complex designs.
Manufacturing instructions
Master class on how to make a tricycle step by step:
- The donor model is placed on the platform with the steering wheel down.
- Remove the wheels, remove rust and other defects in visible places.
- Saw off the rear part of the unit with a grinder.
- The differential is fixed using metal clamps.
- The bridge is installed at 90 degrees using the above method.
- The remaining auxiliary elements are secured by welding.
- The wings are mounted, between which a basket of suitable size is welded.
- Install two rear rims in parallel.
- The fasteners of the clamps are tightened.
- One is made from two circuits and then installed.
- Equip the brake unit using disc parts and a switch on the steering wheel.
- They check the build quality and paint the model.
Homemade tricycles may vary in size depending on the user's creative ideas. A proven, fast and reliable method in terms of technology is the use of a UK-65 type rear differential axle. When creating a drawing of a homemade tricycle, you should take into account the costs of consumables.
When creating the modification in question, you will need to take into account the costs of purchasing the necessary parts yourself. In addition to the bridge, you will need a chain, a speed switch, wheels, and a set of sprockets. Also, we must not forget about lubricating and painting sanded and welded surfaces.
What is the reason for such popularity?
Explaining what a bicycle is is stupid, to say the least. After all, every person, even if he did not have a two-wheeled friend in childhood, has at least seen one of these. The advantages of a bicycle as a means of transportation are quite sufficient - you can start with the fact that you will only have to spend money on buying it. All subsequent operations, such as routine repairs, can either be done using scrap materials, or they do not deserve attention at all due to small expenses. For example, replacing tubes or tires is a small thing compared to the same car repair.
Plus, no fuel is required - everything runs on your muscle power. And it’s easier to ride a bicycle; in extreme cases, you can even turn onto the sidewalk - which, for obvious reasons, is unacceptable for a car. Also, as a bonus, you get an increase in health, since constant exercise has a beneficial effect on the general condition of the body. Moreover, there is also a plus in the form of respect from family and colleagues, even if at first it is not visible due to misunderstanding.
The nuances of installing the brake system
After carrying out the above manipulations, the assembly of the equipment can be considered complete. Special attention should be paid to the brake assembly and axle. Only a disc system is suitable for an adult tricycle; a rim analogue cannot be installed correctly. The unit will require additional financial investments to ensure that further operation of the product is safe for the cyclist and others. The kit includes discs, hubs, calipers, and a manual control lever.
No particular difficulties are expected during the installation of the bridge. The unit aggregates with most classic frames. First, all the standard parts of the rear part are dismantled (chain, wheel with fender, trunk, hand brake). A type of UK category bridge is mounted on the rim mounting compartment. The stops are inserted behind the lower pipe of the rear frame part, the axle is threaded through special eyes. The elements are securely tightened, the mating parts are fixed using clamps. At the next stage, an extended chain is installed, made from two standard analogues by removing excess links. For this purpose, the method of grinding off a rivet or installing a new lock is used. Then the speed switch is adjusted.
The future owner of a tricycle, assembled independently, can build the device without significant financial costs, decorating the equipment according to his preferences with an original design. As a result, the user will receive not only a personal exclusive bicycle machine, but also an assistant for transporting food and other items. Experts recommend regularly lubricating rubbing parts, as well as monitoring other structural elements.
Components of a homemade bicycle
Frame
If you have a frame left over from an old, leaky bicycle, great, the main thing is that it is in good condition and free of rust. If there is no frame, it doesn’t matter either; purchase steel, aluminum or titanium narrow pipes.
The basis is a drawing on which all the components of the bicycle are displayed. It is better if the sketch is made in 3D mode on a computer, you can immediately assess the real dimensions of the necessary parts and get an impression of the proportionality of each. Welding remains the preferred method of connecting functional components; if you additionally plan to attach a trunk or rear fender to the frame, provide recesses for the bolts. Holes are also left for bolts for hanging components.
The main thing is that the rust does not have rust
Front fork
It's hard to imagine homemade functioning bicycles without a front fork. If you plan to drive the bike, sliding down the mountain and climbing up, it is better to install a soft shock absorber. You should not mount BMX forks on mountain models - they are too heavy. When making a fork with your own hands, calculate the following parameters:
- fork stroke;
- method of fixing the brakes;
- preferred wheel diameter.
Transmission and brake
Transmission components are selected based on the amount allocated for this part of the bicycle. Experts do not advise assembling a chain with your own hands or creating a speed switch; you’ll just waste your time and you won’t achieve good quality anyway. When you come to the store, choose a classic transmission; the placental format has a number of significant disadvantages.
Brakes for bicycles are divided into rim and disc. If cycling is done in dry weather, rim brake pads are suitable; they are inexpensive and significantly lighten the design. Rim brakes won't withstand extreme travel - use disc brakes. With the latter, riding safety and comfort for the cyclist are ensured.
With disc brakes, cycling is safer and more comfortable.
Saddle and wheels, pedals
The wheels, of course, should be bought ready-made, as well as the saddle. If you prefer a sporty riding style, pay attention to hard and elastic saddles that take into account the anatomical features of the cyclist.
It would seem that it would be easier to choose pedals. Beginners in cycling believe that, apart from the classics, designers have not come up with anything else, but they are mistaken. The modernized devices secure the legs tightly, which allows the feet not to slip, which means there is no need to make unplanned stops. At the same time, the risk of injury on the road increases.
If the riding is acrobatic, experts recommend paying attention to the platforms. Road racing and mountain competitions require contact pedals, and special shoes must also be selected for them.
Racing requires contact pedals and special shoes.
Bicycle handlebar
Experts tell us how to make a bicycle with a comfortable handlebar. It must meet the basic requirements:
- ergonomics;
- reliability;
- strength.
The steering wheel is bent according to a pre-made sketch, but do not forget that it contains important control components that control the activation of the brakes, handles that change speeds, a sound signal, and a headlight. Modern bikes can be equipped with an on-board computer.
The steering wheel is fixed to the stem; it is preferable that the last component be adjustable. To assemble the steering wheel, use durable materials that will not let you down: steel, titanium or carbon.
The handlebar should be made of durable materials such as steel, titanium or carbon.
We make a bicycle trailer from polypropylene pipes
It is very tempting to make a bicycle trailer from polypropylene pipes at home. The pipes are easy to cut and then connect using a special soldering iron. In the absence of the latter, it is possible to use appropriate glue or even fix it using self-tapping screws through pre-drilled holes.
The latter option can also be used as a temporary fastener when assembling the product to minimize possible errors. A polypropylene bicycle cart is relatively inexpensive and lightweight. Its load capacity is quite sufficient as a bicycle trailer. In the example presented, the wheels are attached to metal corners, which are screwed to the pipes from below.
Bicycle cradle on the roads: traffic safety rules
With additional load, the bike becomes more dangerous both for the driver and for other road users. When going out on the road with a trailer, the cyclist must make sure:
- that all fastenings in the trailer are in good working order;
- in the reliability of the connections of the drawbar pipes with each other and with the bicycle;
- in a safe location of the load.
The permitted dimensions of the transported cargo in width are no more than 0.5 m in each direction. It is advisable to screw a reflective element onto the trailer if it is homemade.
One way or another, the additional trolley at the rear worsens the bike's handling, especially on sharp turns. The overall speed of travel with a trailer should be lower than that which the cyclist usually maintains. In other words, the bicycle turns into a slow-moving vehicle.
A bicycle and a trailer behind it can become a serious bait for dogs. All cyclists know firsthand about their partiality for two-wheeled transport, but imagine if they see four such wheels? An animal attack on a bicycle distracts you from driving and can result in an accident. Keeping this in mind, we choose a safe route. It’s a good idea to have some protection with you – a stun gun or pepper spray.
Riding bicycles on sidewalks and pedestrian paths:
Correct 6. Requirements for cyclists
6.6. A cyclist is prohibited from:
c) move on sidewalks and pedestrian paths (except for children under 7 years old on children's bicycles under the supervision of adults);
Wrong 6. Requirements for cyclists
6.6. A cyclist is prohibited from:
c) move on sidewalks and pedestrian paths (except for children under 7 years old on children's bicycles under the supervision of adults);
- Task 8 of 15
One wheel trailer idea for kids
A bicycle trailer for children is often made with two wheels, trying to ensure maximum safety. A single-wheel trailer made according to the tourist design will inevitably tip over on its side if the cyclist falls.
However, such a “humpbacked horse” looks reliable, taking into account the use of a car seat with a side frame, seat belts and leg protection made of a plastic shovel. This cart is probably suitable for teenagers with a helmet on their head and is not suitable for younger children. To assemble the structure it was required:
The pipe should be bent on the machine in accordance with the drawing. Welding work required.
This is what the structure looks like without attachments. It is better to use a factory plug.
The designs of individual units are shown in the photo. Several elements for attaching the seat and floor are welded to the supporting frame. The car cardan is absolutely reliable and provides sufficient mobility of the connection between the bicycle and the cart in two planes. You can evaluate the performance of the product using video.
How to make a towbar for a trailer at home
Regardless of what kind of structure you plan to assemble, the question of choosing a trailer hitch inevitably arises. It should provide mobility in two planes and sufficient reliability, while remaining simple to implement. We have already considered a couple of coupling options; we will evaluate possible others.
Probably the simplest device is a ball with a pipe on top. The cart quickly detaches from the bike and is easy to roll by hand using the curved end of the tube. In this case, there is a danger of uncontrolled release of the coupling while driving.
This type of hitch resembles a tow bar on a truck. A hook with a lock can be taken from an unusable synthetic Chinese cable (which breaks easily when trying to tow a passenger car.) This coupling quickly disconnects, but makes knocking and squeaking noises when moving.
To make a more serious device, welding and plastic bushings will be required. The basis of the design is two cross-welded pipes and two forks, that is, a homemade cardan.
The original idea is to make a bicycle towbar from two furniture supports 60 mm high. The rollers are removed from them, and one element is attached with bolts and nuts to the rear fork of the bicycle.
The second element is attached to the trailer rod with clamps and screws with nuts. The bases of the supports are connected to each other through the holes for the roller axes using a pin with a quick-release cotter pin. The supports rotate around their axes and provide mobility of the connection in two planes.
Moreover, in this example, insurance is provided in case the tow bar becomes disconnected while driving. It is made of a bicycle cable with a carabiner that clings to the bicycle frame.
This bike trailer is based on a shopping cart with wheelchair wheels. Of particular interest is the hitch made from the stabilizer rod joint of a passenger car. The hinge is welded to an oval plate with a hole, which fits onto the wheel axle. Another plate is attached to the hinge on top, which is welded to the pipe. The stroller pipe is put on it, and the connection is secured with a pin and cotter pin. It turns out very reliable, but welding is required. This way you can select the most suitable coupling device for your trailer.