Egg trays are one of the suitable materials for various DIY crafts. There are 3 types of egg cartons: cardboard, plastic and foam. Due to ease of use, standard cardboard trays are most often used for papier-mâché crafts: to create a variety of flowers, animals, and even for decorating rooms.
Original crafts for the home, such as lamps, are created from foam and plastic trays.
Stages of work
- Cut out as many cells from the tray as you need flowers.
- Using scissors, cut the petals so that they are connected.
- Cover the surface with gouache or paint and let dry.
- Pierce the middle of the flower with an awl or large needle, place the stem on the wire and secure.
- Drip glue into the middle and sprinkle semolina on it - this is the middle. Cover it with yellow gouache. Apply varnish or glue on top to secure it and let dry.
You will get a nice bright gatsaniya. A whole bunch of such flowers, placed in a beautiful pot and filled with putty, will delight you for a long time and remind you of warm days in cold times.
Master class papier-mâché flowers
You can make beautiful flowers using glue and egg trays.
For this you will need
:
- 5 egg trays;
- Water;
- Scissors;
- PVA glue;
- White acrylic or gouache;
- Thermal gun;
- Thick wire (will serve as a stem for the flower);
- Paints, brushes.
- Colorless nail coating.
Depending on how many flowers you plan to make, you will need a certain number of pieces of wire. There can be 3, 5, 7, 9, 12 - as many as you like. By the way, for flowers you can make a beautiful vase using the papier-mâché technique.
First of all, you need to stick the composition onto the wire. Moreover, if you plan to make a rose, you must immediately mold a stem with thorns. Leave until completely dry.
Flowers and leaves are made using the sculpting technique. They can be of different sizes, curved shapes or have smooth contours. To understand how to make them, it’s enough to remember how crafts are made from plasticine. The technique is identical.
All parts of the flowers are covered with white. It is better to give preference to gouache or acrylic coatings. Any paint can then be easily applied to them. After drying, the parts are painted in the appropriate colors: green for the stem, red, orange, yellow for the flowers, depending on what type of flowers is chosen.
The buds are attached to the stems with hot glue. Finally, the surfaces are torn with a colorless nail base. You can place butterflies and ladybugs on flowers.
Step by step instructions
- Prepare the tray cells.
- In each of them, cut out 4 rounded petals, and cut on one side.
- Roll one into a bud.
- Take a few petals and carefully attach them to the bud and glue them.
- A few more cells with cut out petals will complement the bud. They must be attached to the flower. The rest can be used for cups and other parts.
- All that remains is to paint the rose in the tone you like and plant it on a wire stem.
What other crafts can be made from an egg tray? Using the excellent qualities of this durable material and its flexibility when coloring, you can make toys for children. Better yet, get them involved too.
We recommend reading:
- Crafts from plasticine: the best master class for children at school or kindergarten. 90 photos of the best ideas for creating plasticine figures
- Felt crafts - the best patterns and templates. Step-by-step instructions and master class for beginners (130 photo ideas)
- DIY crafts from Kinder surprise eggs - 125 photos of exclusive options with step-by-step instructions, master class and video
Crafts with children
Paper egg cartons are great for crafts with kids. You don’t mind throwing them away if things don’t work out. But this activity develops perseverance and stimulates creative imagination.
An interesting option for crafts with young children is a caterpillar (centipede). To make it, you need to cut a row of 5-6 cells from the tray, paint it, decorate it with ribbons and threads. Antennae and paws can be made from chenille wire. A little imagination, bright colors and the toy is ready.
For those who like to draw, you can make a box for crayons. If you color the cells according to the colors of the crayons, you can kill two birds with one stone. There will be a place to store crayons, as well as the ability to sort them by color, while developing logical thinking in children.
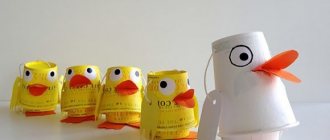
The cell (cone) from the tray serves as the basis for creating various animals, birds and insects. You can make a penguin, a hare, a whale, a turtle, a ladybug, a chicken and much more that your imagination suggests.
Everything ingenious is simple. A tray for a dozen eggs is a ready-made base for a ship. We install the mast, sail and go!
Penguin
- Turn the tray cell over.
- Paint the back of the penguin black and the belly of the penguin white. Cut out the eyes and glue them on (black pupils and whites).
- Prepare the legs and nose, cover the animal blanks with red gouache and attach. Penguin is ready.
Fasten two such cells face to face to form a “barrel”. The result will be a blank for other animal figures. Chickens, cats, pigs, dogs - it’s impossible to count them all.
Papier-mâché crafts made from egg trays are excellent. Animal figurines, masks, vases, fruit models - all these items can have egg trays at their base.
Roses from their trays
You can also make roses. How to make a rose craft from a tray with your own hands? The answer is very simple. To do this you need to prepare:
- egg cartons;
- scissors;
- green corrugated paper;
- paints and brush;
- glue or glue gun.
Step 1. Divide the tray into cells (cones) using scissors. Make four cuts on each piece. The result is a blank of four petals. For one flower you need four of them.
Step 2. Open the cone and process the edges of the petals: give them a rounded shape, cutting off sharp corners. Do this with all the blanks.
Step 3. Make cuts on each part towards the center, this will simplify the process of gluing the flower. Using a wooden stick or the handle of a brush, you can curl the edges of each workpiece.
Step 4. Paint the blanks in any color you like. To add naturalness, the centers of the petals can be painted with a lighter tone. Allow the workpiece to dry.
Step 5. Gently bend the tips of two opposite petals in half and glue them together as if the bud is closed. Glue another pair of petals to this base.
Step 6. Do the same with the second and third workpiece. And we cut the fourth into separate petals and glue them to the resulting bud. The master class on making roses from trays is completed.
Stages of work
- Chop the trays into small pieces and soak them in boiling water. Leave to soak for a day.
- To make everything more homogeneous, knead thoroughly. Children can be involved in this. They will be happy to help.
- Mix this liquid mixture well with a construction mixer. If it is thick, add water. Can be passed through a meat grinder. This is also a good option.
- Now the liquid should be squeezed out through a cloth or simply with your hands. Add PVA glue to the thick mixture until it becomes sticky.
Now everything is ready and you can sculpt what you want.
We recommend reading:
- Crafts made from twine - an overview of original design solutions. More than 100 photos of new products + step-by-step instructions for creating crafts with your own hands
- DIY crafts from candy wrappers: 150 photos of the best ideas from craftswomen. Simple instructions, master class, diagrams and video tutorials on creating crafts from candy wrappers
Crafts flowers - 125 photos of the best ideas from craftswomen. Instructions on how to make it yourself from A to Z. Simple and complex options for crafts + video tutorial
Flowers
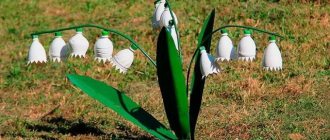
Egg trays are excellent for making flowers: roses, snowdrops, tulips, etc. The decoration turns out wonderful, which can be used to decorate anything. You can also make an incredibly beautiful composition or topiary from them. You only need:
- gouache;
- glue;
- wire;
- beads.
Each flower will require a couple of egg tray cells to cut out. Make one with triangular protrusions along the edges, the second with petals. The number of petals depends on the type of flower being made. Next you need:
- string a bead onto a wire and twist it into a stem, intertwining the two ends;
- glue the prepared cells;
- pierce in the middle and insert the finished stem;
- connect flowers with each other.
You can make a lamp by replacing the wire stem with an LED garland.
You can make an incredible variety of crafts from cardboard containers for eggs, some even use them to decorate the walls of a room or as a glue ceiling, so try to save them, and then it all depends on your imagination! In addition, this material is easy to work with and can be decorated with anything.
Decorative vase
- Cover the vase from bottom to top with the prepared adhesive mass and level it. This should be done in several stages. Allow to dry thoroughly. This will take about a day.
- Unevenness can be smoothed out with sandpaper.
- Decorate and after drying, varnish.
Crafts made from egg cells can become part of your home interior and turn into a necessary thing in everyday life.
Homemade liquid wallpaper
Ready-made liquid wallpaper is expensive, but using cardboard trays you can prepare such a mixture yourself. To do this, the trays are crushed and soaked for several hours. The mixture is constantly stirred by hand or with a construction mixer. Next, glue, antiseptic components and decor are added to the mixture: glitter, thread trimmings.
If necessary, tint with acrylic color. The finished mass settles for 10-15 hours, and before application, dry putty or plaster is added to the composition.
Bedroom lamp
Connect 4 good trays together, make small holes for light. Attach to a metal frame, select a color that matches the design and the lamp is ready.
Online store of lighting products for home and landscape: buy ceiling chandeliers, track lights, curved floor lamps.
Garbage bin for household waste
From several trays you can assemble a cubic or cylindrical trash can for small waste, which can be placed near your desktop. The bottom is cut out of cardboard and the walls of the trays are glued to it. It will be easier to throw away trash if you add a suitable size cardboard box inside the container. The bottom can be cut out of plywood and furniture wheels can be attached to it.
Plant box
You can grow greens and seedlings in cells.
We recommend reading:
- DIY crafts: TOP-200 photos of the best ideas. Schemes, master classes, modern design, new products, instructions with descriptions
- Crafts from plaster - 120 photos of the best ideas for creating original crafts with your own hands. Master class for beginners with examples and video lessons
Crafts from nuts - 120 photos of the best ideas for beautiful crafts. Original design options + step-by-step instructions for beginners
Various decorations
Egg trays are excellent for various decorations at home, cottage, garden, and just about anything. For example, you can make:
- bird feeder: hang the tray with a rope on a tree or other suitable place and pour food into the cells;
- a piggy bank for various little things: coins, jewelry, beads, stones, buttons, shells;
- a charming bouquet of flowers, samples of products can be taken from any sources, colored as desired, stems and leaves made;
- pour soil into the cells and plant seeds - an excellent device for seedlings;
- a decorative box for any things, cover it with your favorite flowers, decorate it with decorative elements, make a lid, the box can be made in a wide variety of shapes;
- a box for a child where you can put small toys, crayons, etc., arranging them in cells.
Souvenir stand
By gluing a picture of an animal to a cell and placing an Easter egg in it, you can give an original souvenir for the Easter holiday.
Organizer for small items
A small egg tray for 6 or 10 eggs is a ready-made basis for the organizer. It can accommodate sewing accessories, accessories or small office supplies. Used as a box with a lid or unfolded to organize space in desk drawers. A pincushion, loops for small tools or pockets are glued to the flat part inside. The outside of the organizer is decorated with clippings, braid and other little things as desired.
Exclusive vases and baskets
Exclusive vases and baskets constructed from trays will be a wonderful gift for a holiday or birthday.
In fact, good owners use such containers for other purposes: they line the ceiling in rooms, insulate houses, mulch the soil and do much more.
The main thing is that there is a desire to create, and tips and ideas can always be heard and found.
Ottomans for the kitchen and more
From several dozen square egg trays you can make a compact seat. You just need to stack them to the required height. To prevent individual layers from shifting, the edges of the improvised pouf are secured with tape, or you can glue each tray when assembling.
To increase the area, the seat is assembled from several cubes from trays. For comfort, the seat is covered with a soft cushion. You can also sew a removable fabric cover that can be washed.
Photos of crafts made from egg trays
Did you like the article?
2+
Cement casting mold
Using egg trays, they create original molds for casting vases from cement mortar. To work, you will need two containers of different diameters. The first one fixes the trays until the mixture hardens, the second one is inserted inside to form a useful volume for planting plants. This could be a bucket, a large flower pot or a box made of thick cardboard.
The walls are lined with trays. Pour the first portion of the solution to form the bottom. A smaller container is placed inside in the center and the gap between the walls is filled with solution. You need to pour in small portions, shaking slightly so that the mixture spreads evenly over all the recesses.
Wonderful cardboard fish
A cardboard tray can be an excellent base for a beautiful and funny fish. Prepare several trays, a glue gun, scissors, whole black pepper and a pencil.
From the entire tray we cut off only one cell, on which we round the corners. For smoother corners, outline with a pen and cut along the contour. You will need about twelve of these cells. The scales are made as follows: take 1 cell and insert it into 2, and do the same with the rest.
We leave one cell for the tail; it must be folded in half and cuts made with scissors. The part for the tail is made from one cell, the sharp ends of which are cut off along the drawn line. And then we place it in the body with scales.
From another cell we will make a dorsal fin; to do this, we need to draw the fin itself with a pen and cut it out. The side fins are made using the same principle: draw and cut. You can use a drawing from the Internet to make them very beautiful and believable.
There is very little left to connect the body of the fish with all its fins, gluing the pea eyes and the image of the mouth.