Home / Ceiling design / Design solutions / How to make an imitation of a brick wall out of cardboard?
Bricks in the interior have always looked good. Especially if the design of the entire room matches a similar finish. Typically, for this design, panels with a pattern and texture of stone are selected, or the existing wall masonry is cleaned. However, both require time and money. There is another, faster and very inexpensive way to give the room an interesting look - an imitation brick wall made of cardboard. Simple and fast.
What is needed for this
Of course, it won’t be possible to make the wall look exactly like real masonry - the materials are not the same. However, the panels are also not always similar to real bricks and are nevertheless popular. Therefore, we will make the most similar design, which will require:
- Cardboard is corrugated, thick, used for boxes and durable packaging.
- PVA glue.
- Brush for applying glue.
- The napkins are of high quality, with a clearly visible texture.
- Heavy wallpaper glue or glue gun with sticks.
- Ruler, pencil and sharp knife - create bricks.
- Varnish to decorate the surface with a finishing layer.
Having prepared the necessary things from the list, you can begin to figure out how to create an imitation brick wall from cardboard.
Ways to imitate brickwork
There are several interpretations of this design solution. The range of finishing materials is quite wide, and the choice mainly depends on financial and physical capabilities.
The least labor-intensive method is gluing panels specifically designed for interior decoration. They are rectangular in shape and made of plastic. The outer side of such a panel is decorated like brick. The finishing work itself does not take much time and effort, and the result is quite acceptable.
But such a wall does not look entirely natural. If you want to achieve greater realism, it is recommended to use ready-made tiles or special wallpaper that imitates brickwork.
If you have limited finances, you can use one of the following methods to recreate the appearance of the wall:
- plaster or putty (during repairs, excess finishing materials usually remain, which can be used);
- cardboard.
Main details
The most important thing in all the work is to make the “right” bricks. They must be the right size. There are many varieties of this material, but most often in masonry you can see the following dimensions: 250 by 120 by 95 millimeters and 228 by 138 by 65. There is also a dimension that is less common: 250 by 120 by 88 millimeters.
In addition to choosing the dimensions, you still have to decide which side the brick will lie in the masonry - this is also done in different ways and you need to choose the option that suits you. Having decided on this, a template is drawn on the cardboard according to which the parts will be cut. When the marking is applied, everything is cut along it and put aside for now. Some of the parts will have to be cut in half to imitate halves of stones.
Frame
It is worth considering step-by-step instructions for creating the most common frame layouts: wall-mounted U-shaped and corner false fireplaces.
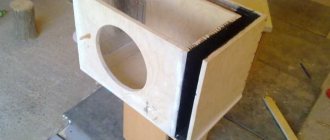
For a wall-mounted fireplace, you will need a wide cardboard box with a height and width of 1 - 1.4 m and a thickness of 0.2 - 0.25 m, for example from a large LCD TV. First of all, fold and cut lines are marked on the cardboard with a pencil. A rectangular symmetrical cutout is made in the center on the front side - this will be the oven portal. The back of the box remains untouched. For greater rigidity, the inner walls of the firebox are glued inside. All sides of the frame can be secured with plastic corners or moldings. The frame is placed on a foam or polyurethane base.
To finish the U-shaped version, it is best to use light white ceiling panels or self-adhesive laminated paper. Foam panels are attached with waterproof polymer glue, which dries in a matter of minutes. Another finishing method is to use water-based paint. In order for it to adhere firmly to the cardboard frame, you can first coat it with a primer or a very thin layer of liquid putty. After this, wait 1 - 1.5 hours for the primer mixture to dry completely and begin painting.
A corner decorative fireplace made from a cardboard box is made in the shape of a prism with a triangular base. The corners of the frame are tightly glued with tape or polymer glue, a hole in the shape of an arch is cut out in the front part, the top can be decorated with a decorative tabletop made of lightweight material, such as PVC or laminated plywood. Inside the firebox, for beauty, you should make false walls from the same cardboard.
The decor of a corner cardboard fireplace can be done in the same ways as the previous option: painting or appliqué. In a niche you can place beautiful souvenirs or a toy fire, the creation of which will be described in the next section.
Texture
The wall still doesn't look like brick at all. This is just cardboard glued to the wall and napkins will be useful to give it the desired texture. PVA glue is applied with a brush on top of the glued cardboard. The napkins need to be thoroughly crumpled in your hands to create many folds. Pressing them tightly onto the cardboard, PVA is coated on top of everything again. Gaps simulating mortar are pressed through with your fingers or the handle of a brush. When the PVA dries, the most creative part remains - coloring.
LiveInternetLiveInternet
Quote from Hugo_Pugo_handicrafts message
Read in full In your quotation book or community!
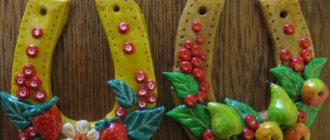
decorating a wall with a paper stone
decorating a wall with a paper stone
master class author Simona7152
further words of the author
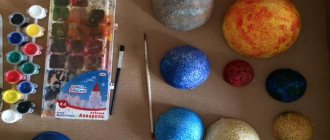
Soak egg cartons (paper) in water, let them sit and soak. Optimally, tear the packages into pieces so that they soak better. The packaging shown in the photo is the best, to my taste, for making paper pulp. More dense pressings are less likely to get wet, but they are still good. Yes, everything is fine, it’s made of porous paper, if you think about it. Toilet paper will be fine, the grain will be finer. But to buy it...and the egg packaging is free. My idea was to make everything from waste material with a minimum of costs and maximum effect. I really wanted to support in every possible way those whose renovation work was unexpectedly delayed or delayed due to finances singing romances. You can let it soak for 1-3 days, or after a few hours, prepare paper pulp. I added 1 drop of aroma oil to the mixture for a pleasant smell. It's not obligatory.
Grind the soaked paper with a blender until smooth. Squeeze out excess moisture from the mixture using a mesh cloth or gauze. The squeezed mass should not be wet, but the consistency is not that of liquid, dense homemade cottage cheese. The mass for making the “stone” was prepared in small portions: Thick PVA (about 70 g and 1 tablespoon of alabaster (gypsum) is poured into the squeezed mass that is obtained (liquid according to the volume of a 1-liter basin, example in the photo) for better hardening and fixing the shape. Alabaster was added to the PVA, mixed thoroughly and only then the squeezed paper pulp was added, then everything was kneaded. Without bothering myself, I kneaded it with a fork. But you can do it with your hands in gloves. Wear gloves, otherwise your hands will turn white from alabaster. Crushed paper pulp (well wrung out), PVA, alabaster, thoroughly kneaded until a homogeneous structure... But I did not achieve the effect of complete homogeneity, realizing that I was doing an imitation of natural, uneven stone.
5.
Take a rectangular box at random, the way you would like the bricks to be and the size you like. First, a plastic bag is placed in the mold to better remove the “brick” from the mold. On the “bricks” the appearance is formed using natural stone. In the first photo, the stones used to make the impressions, for the natural appearance of the “bricks”. When imprinting the structure of the stone, it is worth compacting the mass in the mold. After the brick is made, then carefully pulling the plastic bag, we remove “brick” and it remains on the bag. Then, as soon as the brick has “set”, carefully remove it from the bag and lay it out to dry.
6.
I took a box 6 cm by 15 cm, one of these came to hand, but the “brick” seemed too wide to me, and later I divided the box in half and immediately made 2 “bricks” 3 cm by 15 cm, the thickness of the box was 1.2 cm , such “bricks” came out, with a thickness of 1.2 cm to 1.5 cm. The weight of the finished “brick” is on average 17 grams, very light. Box - cardboard packaging from a gift keychain...
7.
It’s best to place them on a sheet of absorbent paper to dry, since the “bricks” are wet and need to dry.
8.
The bricks dry for at least a day. When dried, they shrink slightly. Then, the dried “bricks” can be stored horizontally, 9.
After complete drying, you can fold it into a stack to save space.
10.
This photo does not clearly reflect the plywood model, the one that was mounted on the wall. I’ve already managed to seal the front part with a construction stapler using cardboard (whatever came to hand) and glue the bricks for the test... for the subject “what will it be??” The plasma wires were hidden in hollowed-out grooves. The wall is rough plastered. Next, I did structural plaster to make the wall uniform. I did the structural plaster... the entire wall with my fingers and patching a piece was not difficult for me, as was the subsequent painting. Easy and pleasant work.
11.
Then I realized that if I pasted over only the layout, then everything would look inharmonious and dull. I began to draw bricks to merge with the door frames. This is where the wet bricks came to the rescue; they bent and easily stuck to PVA. Bent shapes are easily framed with these bricks in a half-dry state. Dried bricks are not plastic, hard and can be sanded. From one basin of mass, 8-9 bricks were obtained. It took a can of PVA (2.4 kg) with a little extra to make and stick on the wall and console. I’ll say something about paint separately. I painted the wall and console with Tikkurilla Eco Joker, silky matte latex. It took 1 liter of paint to paint the console and the lower part of the wall underneath it. I tinted it myself, the color is beige. I tried the Russian water-emulsion and rejected it. NOT THAT! All the material is a complete freebie, so take expensive paint, I only spent a liter. It's worth it. After all, you will work very hard to do something like this. It’s a pity to paint your work with something unknown... I have dogs, so I paid attention to environmental friendliness. What about children? They are doubly deserving of care. Eco-Joker is washable, which is important. You can use Dulux, or anything, as long as it’s good quality and washable. I can easily wipe everything with a damp fiber cloth and nothing gets washed off. Well, gold and silver spray... In my case, I didn’t get natural silver and gold. But this question is not the main one. The main thing is your imagination and then, if I inspired you not to pay attention to your wallet (it’s fat, or suddenly, God forbid, it’s lost weight) but to rely only on yourself and on your desire to create, enjoy and live by inspiration, then everything will work out!
12.
Finally, I’m posting a photo of the cultivated corner. The connection between the wall, decorated with decorative plaster and painted beige, and the white wallpaper was not very good. Better now. I concluded that it is more logical to use the plasticity of wet bricks to decorate the corners. If the angles are not right, then this is the way out. For the sake of experience, I laid several pebbles in a dry state with a seam in the corner (at the bottom of the composition). Well, no... you shouldn’t do this at crooked angles. I did not redo it for clarity. I show everyone who is interested why the corner should be designed without a seam in the corner, and the inner corner should be given a smooth shape, as was done above.
13.
Hugo Pugo
Painting and varnish
The process is more creative than complicated—be sure to use multiple shades of paint. For red bricks, brown, red and black are suitable. For white - just white paint, slightly diluted with black to a grayish tint. The solution turns gray or dark gray. The result will depend on your efforts and the talent of the artist. After the paint has dried, you can coat the surface with varnish.
Portal
Fireplace portal
– the part where wood burning occurs. In the case of imitation using cardboard, there are several ideas on how to make its appearance as realistic as possible and similar to a real fireplace. First, you should install a fake firewood grill inside. Since in this version it is metal, you need to look for lightweight materials that are visually similar to metals. These can be plastic or wooden parts covered with shiny mastic or foil. You can use black paint.
Next, we simulate a flame in the firebox of such an imaginary hearth. There are several ways to create the illusion of a bright, flickering fire. The simplest and safest technique is based on the use of a New Year's garland. First, artificial firewood is made from dry branches. They are covered with cotton wool and foil. Next, a bunch of such firewood is placed in a circle of stones in the niche of the fireplace, and a garland folded into a ball must be inserted into its center. When connected to the network, a mesmerizing flicker is created inside the fireplace, similar to the smoldering of real firewood.
A garland or individual bulbs can be placed in raw salt crystals. They create a beautiful shimmering effect and also have a beneficial effect on the body. Just take into account that the design of the cardboard fireplace can withstand the weight of the salt lamps.
Some people place a flat display on the floor at the base of the firebox, onto which a picture of a live fire is transmitted. This method is beautiful but not practical - use an expensive monitor for only one image. But it is quite suitable for one-time use, for example, on New Year or another holiday.
A simpler and cheaper method of simulating a flame is using a hand-drawn picture, embossing, appliqué or a three-dimensional hologram. This technique can be constantly changed, creating new original images.
I have already started the topic, and again I invite you to my creative workshop to show you how to make a fireplace out of cardboard. This is probably the most popular material that is found in every home. We buy equipment, receive parcels, and you can even easily buy such boxes. How can you use them to create a festive mood for the New Year? Now I’ll show you with a photo video.
Do you throw away egg trays? We found an interesting use for them in budget renovations.
A subscriber to our VKontakte group, N.A. Kolmogorova, shared the history of the renovation and photos before and after.
Brickwork in the interior will probably never lose its relevance. If you think through the design correctly, it will become an original addition to the room and its bright accent. But to make such home decor, you need to buy either the brick itself, or panels that imitate such masonry. Sometimes it is impossible to purchase materials for one reason or another. But there is a solution: you can make beautiful brickwork from egg trays! How to make it? For you - a step-by-step guide to creating such decor.
A few words about egg trays
The trays that are used to transport ordinary chicken eggs are mostly made from paper waste and waste paper sent for recycling. They are quite dense, have a certain shape, and inside the eggs themselves are more or less tightly packed into special cells.
Since such a tray contains only paper, it is absolutely safe, and besides, it can be used by needlewomen and craftsmen to create various objects from papier-mâché. Papier-mâché is a special plastic mass that can be easily given the desired shape, created from paper and glue. You can make anything from it: masks, crafts, figurines, various accessories, and so on. Depending on the type of papier-mâché, you can create objects of varying texture and strength.
An egg tray is a product made of cardboard and paper, ideal for creating papier-mâché
On a note! Most often, papier-mâché is used to make various crafts for school. However, the list of options for using this mass is quite extensive. Papier-mâché is suitable for a variety of projects, from creating jewelry storage boxes to all kinds of stucco molding that decorates the walls of the house.
An egg tray is one of the most affordable materials that is great for creating papier-mâché. But everyone throws them away, except for handicraftswomen. Although in fact it is best to recycle such trays if you do not want to use them in any other way.
On a note! Until the early 70s of the last century, eggs from USSR poultry farms were transported using sawdust and straw. Later, the equipment necessary for the production of egg trays was purchased abroad.
If you like to make things with your own hands, then the egg tray is a real find for you. This is a great option to make something useful in everyday life or just a beautiful thing. In this article we offer you to get acquainted with a master class on creating brickwork from such trays.
To do it or not?
- Making such a fireplace is easy and cheap
. Even if for a short time, for example, on the eve of the holidays. Cardboard boxes are usually found in every home. - No restrictions
. There is no live hearth, that is, an open fire, in such imitations, which means that you do not need to worry about removing smoke or damaging the interior. - Variability
. There can be many manufacturing methods, shapes, and configurations, making it possible to place such a structure in a room of any size. - Decor flexibility
. It’s easy to match it to your existing interior.
Homemade option
Here we need patterns. All the necessary parameters are indicated in the video.
- Cutting out the parts: The video has a detailed diagram of the product.
First. In a rectangle (94 by 92 cm) we cut a hole, 34 cm from the top and 23 cm from the side. The second one. We make a hole in the same rectangle, retreating 18 cm from the side. In the first part we make cuts of approx. 17cm. - You need a rectangle 92 by 94 cm.
- We make cuts in four more parts (94 by 32), not reaching the top by 17 cm.
- In two more parts (34 by 32) we make similar cuts.
- Let's connect. We put on the long parts on the sides, and the short ones in the middle. We glue all the “seams”.
- We connect the first part with the second.
- Glue the wall.
- We make a firebox.
- The fireplace roof should be longer and wider than the structure
- We make bricks and ornaments from cardboard.
- We cover it with a kind of papier-mâché.
- We color and decorate.
Now we have a real miracle at home, with which the holidays will pass in a warm atmosphere of comfort.
Design solutions
- Relief treatment of walls - looks impressive with an asymmetrical arrangement.
- Bricks are a non-standard approach to decorating doorways or walls.
- Stone masonry is almost a classic, appropriate in residential or public spaces.
- Wood is a labor-intensive solution to implement, but, subject to the conditions of implementation, the quality is not inferior to natural material.
- Panel - determines the presence of artistic experience or the banal ability to draw.
The decor made from paper is quick to install.
We provide you with several examples of decoration using this technique.