/Accessories and decor/Decoration/
Baskets and baskets help keep the house tidy and decorate the interior, so you can never have too many of them. Beautiful braids can be bought in the store, but it is much more profitable to learn how to weave them yourself.
- If you have a couple of free evenings and a pile of any paper, then you can weave a basket not only without financial losses, but also in the size, color and shape you need. And weaving baskets with your own hands is a very pleasant and peaceful process that you can do, for example, while watching your favorite movie.
And don’t let it bother you that the baskets are not made of wicker or rattan, because if everything is done correctly, then in appearance homemade baskets made from old papers will not differ from real wickerwork. Of course, they will not be as durable and moisture-resistant, but, nevertheless, they are ideal for storing most things.
For beginner craftswomen, we have prepared a step-by-step master class on weaving such a rectangular basket from kraft paper with leather handles. And at the end of the article you can see several ideas for using baskets of different shapes and sizes.
Selection of knitting yarn
Knitted threads for knitting are divided into 2 types:
- primary,
- secondary.
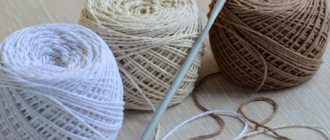
The primary thread is balls of new fabric created during production. The knitted fabric is cut into even strips using a machine. Thanks to this, the yarn remains of uniform thickness along its entire length. Products made from primary material are neat and beautiful. The standard length of such threads in 1 ball is 100 m, width is from 7 to 9 mm.
The color of the yarn is rich, without defects. This allows experienced craftsmen to strictly follow color schemes.
Secondary thread is made from fabric scraps. At garment factories, a lot of cut knitwear remains, which is cut into relatively even strips. The width of the thread in 1 skein can vary from 7 to 10 mm. Since the material has already been used previously, the threads may have holes, machine stitching, pills or knots. Recycled yarn wound into a ball does not have a standard length.
Most often it is sold in large skeins, more than 110 m, or by weight, setting the price per 1 kg. The advantage of recycled yarn is the cost. It is much cheaper than the original one.
In addition, needlewomen have the opportunity to make recycled material themselves by cutting up old knitted T-shirts and T-shirts. These threads are often used by beginning craftsmen for training. When the skill of knitting baskets is honed, you can purchase more expensive and high-quality yarn.
Procedure for making a flower:
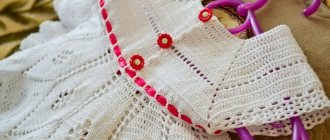
Step 1. Now let's start decorating our Easter basket. I will decorate our Easter basket on both sides with flowers. To do this, cut out 2 circles from cardboard for the base of the flowers and an arbitrary number of petals from corrugated paper. (photo 2.1)
Step 2. Take a cardboard circle and, using PVA glue, carefully glue the flower petals in a circle with a slight overlap. I made two rows of petals. In this case, the petals need to be carefully stretched in the middle so that they take on a three-dimensional appearance. (photo 2.2)
You can make the flower more magnificent if you cut out more petals smaller than the previous ones and also glue them in the middle in two overlapping layers. This creates the base of the flower. Step 3. Cut out 5 circles from red velvet paper. We form an inner flower from them, gluing circles in the middle of the flower slightly overlapping and giving them volume, as in step 2. Gently glue the millet grains in the middle. The flower is ready. (photo 2.3)
Assembly
Glue a flower on each side of the basket. Now you can put sweets or dyes in the basket. (photo 3.1…3.3)
Options for decorating the basket made in step 5. Depending on the purpose of creating the basket, you can cut out your favorite picture of a chicken (suitable for an Easter basket) or any flowers (suitable for a gift basket with sweets for a birthday). Gift baskets for March 8 can be decorated with a beautiful picture of the number 8.
In general, use your imagination! And you will certainly get the most unique basket!
Hook selection
Baskets made from knitted yarn are more convenient to crochet than knitting. It is important to choose the right tool to make your work more convenient. For knitting baskets, hooks from 6 to 8 numbers are most often used. The small size of the tool allows you to knit a dense fabric that will keep its shape.
At first, it will be difficult for beginners to knit tightly; calluses may appear on their fingers, and yarn consumption also increases, but in order for the walls of the basket to hold its contents, it is necessary to maintain thread tension. When choosing a hook, you need to pay attention not only to its size, but also to the material from which the tool is made.
The table describes the advantages and disadvantages of different tools:
| Material | pros | Minuses |
| Metal | Durable, have a Teflon coating that ensures the thread glides | Heavy and cold to the touch |
| Plastic | Beautiful, different colors. Slippery, light | Fragile, can break if knitted too tightly |
| Wooden | Light, slippery, warm to the touch | Sometimes burrs appear on the cut and cling to the thread |
There are combination hooks. Their base is made of metal, and the handles are made of wood or plastic. These instruments are pleasant to hold in your hand, they are light and durable. Each needlewoman chooses a hook to her own taste. Sometimes you need to try several tools before finding the right one.
Photos of knitted baskets in the interior
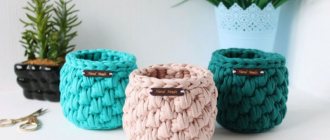
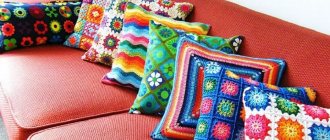
Crocheted baskets will not only decorate the interior, but will also be useful around the house. In the bathroom, you can store cosmetics, cotton pads and swabs in them, and the product, complemented by a lid, will bring even more order to the environment. You can hang a basket with a handle on the toilet door and hide toilet paper inside. And in the nursery, a large basket can easily accommodate your favorite toys.
The photo shows knitted knitted baskets that decorate a shelf in the bathroom.
Crocheted baskets will find their application in the kitchen and living room. You can put flowers in them, keep magazines or books at hand. In addition, thick knitted yarn is easy to knit into a cozy nest for your pet.
The photo shows baskets made of twine that will fit perfectly into a marine or eco-style.
Additional materials and tools
In addition to a hook and yarn, for knitting baskets you may need:
- Scissors - to cut off excess.
- Tapestry needles - needed for sewing threads together or for other purposes.
- Thick cardboard - to give rigidity to the bottom of the basket.
- Centimeter tape - for measurements.
These materials are not always needed, but it is better to have them on hand.
How to calculate knitwear consumption?
You need to calculate the thread consumption in order to know exactly how many skeins will be needed to create 1 basket. Usually everything is indicated on ready-made diagrams: yarn width, hook sizes, color and consumption. But if you want to knit a product of a non-standard size or shape, you will have to do the calculations yourself.
Before studying the algorithm, you need to pay attention to the following facts:
- The thinner the yarn, the higher the consumption.
- Tight knitting uses more threads than loose knitting.
- If you are planning a basket with patterns, then you will need more yarn than a regular one.
There are 2 ways to calculate:
- By yarn weight. To do this, first knit a sample, then you need to weigh it on a kitchen scale and calculate its area. Afterwards, make a pattern for the future product and calculate its area. For designations, you can use the following designations: VO - sample weight, PO - sample area, PI - product area. The calculation formula is as follows: (PI x VO) / PO = mass of yarn for knitting.
- By meter. When knitting a sample, each meter is marked with a knot of bright thread. After finishing knitting. All meters are counted. Calculation formula for the finished product, where DN is the length of the thread: (PI x DN) / PO = number of meters.
Experienced craftsmen recommend, despite the calculations, to buy yarn with a small reserve.
Weaving paper baskets
To make a wicker basket you need to cut many strips of the same width. You can make a craft from thin paper of different colors, or you can intertwine monochromatic parts together, with each strip folded several times to make the tape denser.
First, several strips are laid out vertically on the surface of the table, and then horizontal strips are added, threading them between those lying on the table, acting alternately. First, the strip is threaded from below, and the next one is passed around from above. The other row is done in a checkerboard pattern, that is, the first strip goes on top, and the second on the bottom.
When you get a wicker square, make bends with your fingers and lift the strips up. Weaving continues on the sides. For convenience, you can insert a jar or glass into the middle. When the required height is reached, the strips are bent down at an angle of 90° and glued on the back side with PVA glue.
Choose the option you like and try to make any of the described baskets yourself. Good luck!
Master class for beginners: the simplest basket made of knitted yarn
Crocheting baskets from knitted yarn is easy to learn. The first work should be as simple as possible; a round shape is considered as such. When creating a lightweight product, a beginner learns to maintain proportions, make tight knitting, and also decide on the type of tool. Below is a detailed description of the simplest basket.
Bottom
Knitting starts from the bottom:
- You need to cast on 7 air loops and connect the resulting rope into a circle.
How to crochet the bottom of a basket from knitted yarn. - You can start work by tying the ring through, or you can pull the hook through the resulting loops.
- Then knitting continues with single crochets.
- With each new row you need to gradually add loops. To do this, the hook is pulled out through 1 hole 2 times.
- It is important not to add too often, otherwise the bottom will become uneven with waves.
When the knitted circle reaches the desired diameter. The thread is not broken, but knitting continues.
Walls
This is the next step in creating a cart:
- Knitting continues from the same thread that remained after the bottom was formed.
- You need to knit in the round without increasing or decreasing.
- It is important to ensure even tension on the knitting. If the threads are stretched in different areas, sometimes tighter, sometimes weaker, the product will be uneven.
Work on the walls ends when the walls reach the required height. Now you need to secure the thread with a knot and cut off the excess. The basket can already be considered ready and various items can be stored in it, but many needlewomen prefer to attach handles to the product and equip it with a knitted lid.
Pens
The handles can be tied separately or be part of the walls.
The second option is simpler, since the elements will not need to be sewn:
- The thread does not need to be disconnected at the end of knitting the walls.
- The locations of the handles are marked, in the place where the opening should be, a long arch of air loops is knitted in the next row.
- It is important to count the loops so that the handles are the same.
- The next row is knitted as usual, and moving on to air loops, knitting is carried out around them.
To make the handles thicker, you need to knit 1 or more final rows.
Lid
The lid is knitted in the same way as the bottom:
- You need to start from the middle by casting a chain of 5 air loops.
- Gradually you need to make increases to make the circle more uniform.
- The diameter of the lid must be larger than the diameter of the product. It is necessary to take into account the thickness of the walls of the basket and add another 5 - 7 mm.
When the circle reaches the desired size, you need to shape the edges of the lid. To do this, knit 1-2 rows of single crochets in a circle, without making any increases or decreases.
What is needed for work
The embodiment of a cardboard basket begins with the preparation of materials and tools with which we will realize the idea. There is no need to cook something inaccessible or very expensive. A simple list of office supplies is almost always available in every home. So, to make the craft you are studying, you should prepare:
- a set of colored or white cardboard;
- scissors;
- a simple pencil;
- ruler;
- paper adhesive tape;
- PVA glue.
However, this is only a basic set of tools and materials. Each instruction on how to make a basket out of cardboard requires its own components. We will definitely tell the reader about them.
How to stiffen the finished product?
Crochet baskets from knitted yarn can be made small or large. Larger items are more difficult to shape. High walls may sag slightly and bend to the side.
To make the baskets stronger, you need to follow the following recommendations when knitting:
- For work, choose thick yarn and a small hook.
- It is advisable to knit the walls with patterns, for example, “checkmarks” or “braids” (there is a description below). This knitting will be stronger than simple single crochet stitches.
- You can knit without a pattern, but you will need to weave the yarn into the middle of the rows.
In stores for needlewomen you can purchase a special corset tape. It is usually used for knitting hats with wide brims. This is a flexible and elastic rod made of plastic that can be tied just like yarn. Baskets with ribbon are reliable and strong.
Form
Take the object whose shape you want to give to your product. For us, this is a portable wine box.
To make the inside of the basket look beautiful, it needs to be sealed with colored cardboard. The size should match the size of the bottom.
Coat the bottom of the box thoroughly with glue and attach colored cardboard to it.
Press down. Wait for everything to dry.
Place a “form” on top, inside which we recommend putting something heavy so that it does not move from its place during the following manipulations.
Pressing it against the side walls of the mold, begin to gradually bend the paper tubes.
When you release them, they will not fit tightly in the box. To secure, use kitchen clothespins.
Press the tubes against the wall with them.
Do this around the perimeter of the box.
Instead of clothespins, you can use any other clips. This is not so important.
Or simply use them to clamp those strips that do not fit into the large clamps.
The shape of the future basket is ready. It's time to start working on the walls.
Patterns and descriptions of crocheted baskets for beginners
Baskets made from knitted yarn can be crocheted in different styles, and the products can also be given an unusual shape. Beginners need to become familiar with the basic patterns that will help make their products varied and beautiful. Below are step-by-step descriptions of popular patterns and basket design options.
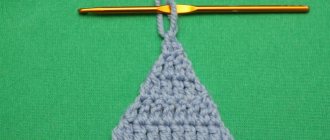
Checkmark Pattern
This knitting method makes the basket stronger. It can be used to create small and medium-sized products. Any color of yarn can be used.
The entire basket is knitted in a similar way so that the density of the product remains unchanged:
- You need to make a chain of 6 air loops and close it in a ring.
- The first line is knitted in single crochet columns. You need to make 9 columns, knitting 1 air loop between them.
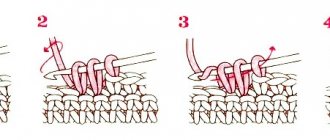
- The second row begins with a double crochet, then insert a hook into the air loop and knit 2 double crochets in one place. It turned out to be 1 tick.
- In the future, the checkboxes should be placed one above the other.
- When making increases, the circle is knitted to the desired diameter, for example, 20 cm.
- The walls need to be knitted in the same pattern, but I do not increase or decrease them.
If the bottom of the basket was 20 cm, then the height of the walls could be 10-15 cm. In such a basket it is convenient to store creams for the dressing table or other cosmetics.
Jacquard technique
This technique allows you to create unusual patterns on the walls of the basket. To select a picture.
You can use patterns not only for knitting, but also for cross stitch, in which 1 square - 1 single crochet of a certain color:
- The bottom of such baskets is knitted in the classical way.
- Moving on to the walls, knit 1-2 rads in single crochet columns, and then determine the location of the pattern.
- To change the color of the thread, the hook is carefully removed from the knitting, leaving loops. A thread of a new color is pulled through them, and the pattern begins to be knitted.
- To ensure that there are no broaches left on the wrong side, you need to weave a loose thread inside the rows.
- When the required number of columns has been made, the thread is again changed to the main color, and the yarn for the design is woven into rows, until the next color row.
For beginners, it is better to start knitting with this pattern on medium-sized baskets, because small patterns are harder to knit. You can use any yarn color, but the classic jacquard colors are: the main color is brown, the pattern is cream or white. You can store various items in such baskets; jacquard baskets look especially beautiful in the kitchen.
Rectangular model
Baskets of this shape are suitable for storing yarn and knitting tools. Average size of the product: bottom width 22 cm, length – 35 cm. Wall height – 18 cm.
The yarn color can be any:
- Cast on a chain of chain stitches, 22 cm long.
- The first row is knitted in single crochet columns. The next rows are knitted in the same way, without increasing or decreasing, unfolding the product.
- When the length of the fabric reaches 35 cm, the thread is not broken, but begins to be tied around the rectangle in a circle.
- The walls are knitted in single crochet columns, maintaining the thread tension.
Finally, the basket can be decorated. It is ready to use.
Square model
Square models are created by analogy with rectangular ones. The width and length of the bottom should be the same. Knitting the walls begins with a circular binding of a square fabric.
Experienced craftsmen recommend not making the sides too high. For a basket with a bottom of 20x20 cm, a height of 7-10 cm is sufficient. Such products are suitable for storing fabrics; you can roll up kitchen towels and place them vertically in the basket.
Round model
As mentioned above, the round shape is the easiest to implement. This is a description of a larger basket than at the beginning. You can store things or children's toys in it. To make the frame more rigid, you will need about 10 m of special tape. Approximate basket size: width – 40 cm, height – 50 cm.
Any yarn color:
- The frame tape should be located not only inside the walls, but also on the bottom. Chains of 10 air loops are connected into a circle. The first row is knitted as usual, and then you need to weave the ribbon, carefully laying it in a spiral.
- Moving on to the walls, the tape is cut and the first row of sides is knitted without it.
- Then weave the ribbon again and continue knitting.
- The very last row is knitted without ribbon.
To make the filled basket easier to move, you can make handles. There is a detailed description above.
Basket-box
It is easier to make a small box made of knitted fabric into a rectangular shape. It is best to use a "swoosh" pattern. Approximate size of the product: width – 10x6 cm, height – 6-7 cm.
Instructions:
- Knitting the bottom and walls is similar to the rectangular model.
- The lid of the box can be separate (described above) or in the form of a chest. To knit option 2, you do not need to break the thread, but knit it to the corner with the length of the wall.
- Knitting continues in the same pattern, making one of the walls longer. It needs to match the width of the box.
- You need to knit a loop in the middle of the edge of the lid.
- When the lid is closed, mark the middle of the loop on the wall of the basket and sew on a button.
It turned out to be a small box with a lid on a button. Which will lean back when opened. You can store various little things in this basket.
Grandmother's Square
Crocheted knitted baskets can be made not only whole, but also assembled from fragments:
- You need to knit a granny square according to the standard pattern of 4 pieces.
- The bottom of the basket should be tight. Therefore, it is knitted similarly with a simple square shape. The size should be identical to the walls, for example, 15x15 cm.
- The blanks are tied together with single crochet columns. First, all the walls are connected to the bottom, and then fastened together.
The upper edges of the walls are tied with single crochets in 1 row. These baskets can be used to store any items except very small ones. Yarn colors can be combined in 1 piece, or all walls can be made different.
Openwork bread bins with sides
Such products can be of any shape. The bottom is knitted in single crochet stitches to make it denser. The wall pattern is made according to the usual patterns for cotton yarn. Experienced craftsmen recommend making openwork baskets small, up to 20 cm wide. Large items may lose their shape due to the openwork pattern.
Candy bowl
Just like bread bins, candy bowls should be small. To make the product more dense, it is recommended to knit in 2 threads. The bottom can be knitted in single crochet columns, and the walls can be knitted with a “tick” pattern.
In order for the candy bowl to be hung, you need to tie the last row with a bright thread, contrasting with the main color, and make a small loop.
Marshmallow
For such baskets, yarn of pastel, delicate colors is used. Usually the size of the “marshmallow” is small, up to 15 cm in width. The baskets are round in shape and are suitable for storing small items. The bottom is knitted in the same way as a standard round model.
Features lie in the walls:
- The first 4 rows are knitted in single crochets.
- The 5th row is knitted in single crochet columns, but the hook is inserted behind both walls of the previous columns.
- Row 6 is also knitted without double crochet, but rows 5 and 6 are knitted at once.
- 7 rads begin to be knitted in a tricky column, and then a loop is pulled out from its jumper.
- The same loop needs to be pulled out from the bottom row and fastened together.
The entire row is knitted in the same way until the end.
Baby basket Kitten
Baskets may not be simple, but may have unusual additional details. To make a kitten, you need to knit a base from gray or white yarn, as described in the simplest basket. The head, paws and tail are knitted separately.
There are several schemes, beginners need to try different options. Additional parts are stuffed with padding polyester and sewn with simple ticks to the base. All that remains is to decorate the product by making button eyes and a mustache. These baskets are suitable for storing small items in a child's room.
Hen
Here, just like in the previous version, the basket is decorated with an additional detail. In the shape of a chicken's head. The tail needs to be knitted on the last row of the basket walls, making 3 arches from air loops.
The chicken's eyes are made of dark beads. The scallop is embroidered with red yarn, and the beak is embroidered with yellow yarn. These baskets are suitable for storing small items and also as candy bowls, so the sizes should be small, up to 15 cm wide.
little fox
The fox basket can be sewn according to the standard pattern for simple round shapes. You need to use orange and white yarn, making a pattern using the jacquard technique. The white triangle should be positioned with a sharp downward angle. Buttons are sewn on the sides for the eyes, and at the bottom of the triangle 1. For the nose. The baby fox's ears are knitted separately and sewn to the edges of the basket.
Heart
This basket has a non-standard shape. It can serve as a beautiful gift for your other half. The average size is 15x20 cm. The bottom of the basket is knitted in columns with 2 yarn overs, starting with a round shape.
In the last row, the circle is shaped into a heart. The corner is knitted from double crochets, and the top of the heart is formed without knitting the row to the end and leaving a gap of 4-5 loops. The walls are knitted with single crochets.
Duckling
The basket is knitted from bright yellow yarn. The base is made round, measuring 10x10 cm. The bottom and walls are knitted with a “tick” pattern. The head and red legs of the duckling are created separately, stuffed with stuffing and sewn to the base.
bear
This option can be assembled by analogy with the duckling, but there is a simple option for beginners. The basket is knitted from brown yarn according to the standard round shape. On the last row, the bear cub's ears are knitted. The semicircular shape is made by increasing and decreasing the number of yarn overs. All that remains is to sew the buttons in place of the eyes and nose.
Basket with bow
Baskets can be decorated with bows made of wide satin ribbon. This decoration looks best on small round items. The easiest way: sew on a ready-made bow.
But you can make special jumpers on the basket, where the tape will go in and tie the edges:
- After the base of the basket is ready, you need to mark the location of the jumpers. The hook is inserted from the wrong side and a row of single crochets is knitted.
- Then they come back and knit a narrow rectangle (2x2.5).
- The lower edge of the jumper is sewn to the base. On a basket with a diameter of 15 cm, you need to make 6 jumpers.
When everything is ready, you need to take a satin ribbon of a shade that matches the yarn and insert it into the jumpers, tying the ends with a beautiful bow.
Baskets made from knitted yarn are easy to learn to knit. It is important to choose the right material, use a comfortable hook and try different knitting techniques. It is better to start with small and medium-sized baskets. When the products are of high quality and beautiful, you can start knitting large patterns.
Bottom of the box
To make the bottom of the box, you first need to decide on its size. Prepare any product in the shape you want your basket to be. It can be any cardboard box, the main thing is that you like its shape and it matches the required dimensions. Measure its bottom. Place the dimensions on cardboard and cut them out (in duplicate). Then take paper straws. On one side, lubricate their edges with glue and glue along the contour of one cut out cardboard at a distance of 1 cm. It is enough to glue only 1 tube at the corners.
To ensure that the product sticks well, place a second piece of cardboard of the same size on top and press it down with something heavy. It could be a book, weights or something else.
Leave for a while for the glue to dry. Then remove the top layer so that only the bottom and tubes remain. Do this carefully, without sudden movements. Otherwise, you can tear off the tubes.