You can knit many beautiful and useful things from knitted yarn. Among the various options, baskets are the most popular. They are used for storage and interior decoration.
There are different ways to knit such products. For those who are starting to work with knitted yarn for the first time, it is important to get acquainted with its features, basket knitting technologies, and patterns that are suitable for work.
Interesting ideas for creativity
The hobby of crocheting helps to transform standard boxes into exclusive items that become a real decoration of the interior.
Products with lace and ribbons look stylish and feminine. They are used to store cosmetics, jewelry, yarn, and also as original gift “packaging”.
Lunch containers tied with yarn look cute. Children and adults enjoy carrying lunches in them.
To make the lids of such boxes easy to open, they are decorated with three-dimensional elements. Knitted pineapples, apples, pears, pumpkins and even radishes are used to decorate food containers.
Square box with a large bouquet of crocheted flowers
A similar master class with step-by-step photos will show how an ordinary dish box turns into a real work of art.
Skilled needlewomen don’t throw anything away! Every unnecessary container becomes a useful and practical item. To work, take 100-150 g of the main color and small balls from the leftovers to knit a bright bouquet.
The box is made with a wicker pattern:
- “Chess” - alternating convex and flat columns.
- “Cells” - knitting three columns of s/n behind the back wall of the base loop.
Make 2 square bottoms for the outer and inner covers. Then the sides are knitted on both sides and two parts of the lid. To prevent the box from being visible through the knitted fabric, it is covered with fabric or regular foil.
All parts of the structure are connected to each other, and the lid is filled with filler to add volume. Creating a flower bouquet.
As an example for needlewomen, here is a pattern for knitting a rose and a leaf. The bud is folded from a long piece around its axis and secured with a needle and working thread.
All flowers are sewn onto a rectangular cover.
Sew a cover for a basket
The last and optional stage of working on the basket is decorating it. You can decorate your wicker craft with a catchy artificial flower, satin ribbons, a bright bow, or sew a cute fabric cover.
Its function is not only to decorate the basket, but also to protect the walls from contamination and make it easier to care for. In addition, you can use it to cover weaving flaws in your first works, giving them an impeccable look.
In this video you will learn how to sew a cover for a round bottom basket.
If you've made a square bottom basket, see how to sew a fabric liner into it. It only requires three measurements and no complex calculations or templates. All the details are in the video.
Step-by-step description with diagram
So, let's start making a cute crochet basket; a detailed diagram and description will be given below. In our case, we will use ribbon yarn of 2 colors.
Craftswomen usually start crocheting round products with an Amigurumi ring. To understand how to make it, look at the picture below.
Knit 8 tbsp in this way. without n.
When the first row is completed, close the connection ring. Art., pull the free end of the thread and slightly tighten the loop.
- 2nd row: we tie the ring in a circle, knitting 2 tbsp in each loop. without n. and starting a row of air. lifting point. Finish the row of connections. Art. As a result, we get 16 tbsp. without n.
- 3rd row: we make increases in every second loop, that is, we knit 1 tbsp in the first loop. without n., in the second - 2 tbsp. without n. and so on. At the beginning of the row, do not forget 1 air. p. for lifting, and we finish the connection. Art. This makes 24 loops.
- 4th row: air. p. lifting, then we make increases only in every third loop - 1 tbsp. without n., 1 tbsp without n., 2 tbsp. without n. We close the row of connections. Art. As a result, we have 32 loops.
- 5th row: in the 5th row we evenly add 8 tbsp. without n. As usual, start a series of air. p., and finish the connection. Art. We get 40 loops.
- Row 6: add another 8 tbsp evenly around the circle. without n. Total 48 loops.
Row 7: from this row we begin to knit the wall of our basket. To obtain a more prominent row of art. without n. We knit only under one loop of the previous one. We don't give raises. We begin a series of air. p., and we finish the connection. Art.
- Row 8: knit st. without n. along the circumference under both loops of the braid in each loop. There is no need to add anything.
- Row 9: knit in the same way as the previous one.
- Row 10: in this row we use yarn of a different color. In our case it is white. Knit around the circumference of st. without n. and finish the connection as usual. Art. We don't give raises.
- Row 11: knit it with white threads. In total, we knitted 2 rows with white yarn.
Row 12: from this row we knit the handles of our basket. The sequence is as follows - we knit 2 air. p., 10 tbsp. from n., 5 air. p., skip 7 loops, 17 st. from n., 5 air. p., skip 7 loops and finish st. s n. to the end of the row, ending the connection. Art.
13th row: 2 air. p. lifting, tie in a circle st. s n. A chain of 5 air. p. we tie 7 tbsp. s n. As a result of painstaking work, we came up with such a cute little thing
At the end of the work, sew up all the loose ends of the yarn.
The basket can be made larger or smaller both in diameter and in height. In our lesson today we presented the simplest crochet basket, the diagram and description are very detailed and understandable.
The finished product can be decorated with various ribbon bows, sew on buttons or beads, glue on rhinestones, and much more. etc. Such a basket will be a very beautiful handmade gift.
Nyura All posts by the author (20)
Basket in Provence style
This basket is perfect for decorating the kitchen and dining table.
To work you will need:
- leg-split;
- high density cardboard;
- kraft paper;
- form;
- glue and double-sided tape;
- scissors;
- pins;
- lace and fabric;
- stripes.
We trace the bottom of the mold and cut out two circles from cardboard.
We glue craft paper to them as shown in the example.
We glue double-sided tape on the wrong side.
Depending on the required height of the basket, we cut pieces of twine. Glue them at a short distance.
Glue the second circle and press firmly.
We take a very long piece of twine and start weaving. To do this, we make a loop around one of the segments.
We twist them in the shape of a figure eight and connect them to the next segment.
Completing the first round, we pass the main thread into the first loop.
We place a mold on the bottom around which we will weave a basket.
We press the rows against each other so that there are no extra gaps.
When the height is already suitable, we make peculiar loops from the ends of the twine.
We wrap them inside and cut them. To make them hold tighter, it is better to lubricate them with glue.
Cut a piece of fabric that will be slightly wider than the basket itself. We fasten the lace with pins along the entire length.
Sew using a sewing machine.
We insert the resulting fabric into the basket and decorate it with a patch.
Making your own baskets is a really fun activity. Moreover, as a result you will receive a beautiful product that will be an excellent decorative item or even a gift.
Have you tried weaving baskets or do you prefer to use ready-made products from stores?
Crochet round boxes for small items
They are easy to use and look organic on a dressing table, and their shape is ideal for storing jewelry and hair accessories.
To make your own box, stock up on:
- round base with lid;
- glue "Moment";
- hook number 2;
- peach and turquoise threads;
- scissors;
- igloo;
- several beads to decorate the center of the flower.
The following types of generally accepted abbreviations are used in the master class:
The bottom for the box is ready! Form the side walls.
Knit 1 row with connecting stitches.
Close it with an additional connecting column and knit a chain loop for lifting.
Continue working Art. b/n.
At 22 p.m. change the color of the yarn and knit several rows with it.
Then return to the main color.
Tie the base walls to the end and finish the work with a connecting column.
Take the hook and pull the tails of the threads to the wrong side.
To form the lid, use the bottom knitting pattern.
Carefully place the canvas on the base and coat with glue.
While the box is drying, smooth out the joints.
For decoration, tie a voluminous rose, leaves or a butterfly.
Rosette diagram.
Video tutorial on how to create a butterfly.
Leaflet:
Photos of knitted baskets in the interior
Crocheted baskets will not only decorate the interior, but will also be useful around the house. In the bathroom, you can store cosmetics, cotton pads and swabs in them, and the product, complemented by a lid, will bring even more order to the environment. You can hang a basket with a handle on the toilet door and hide toilet paper inside. And in the nursery, a large basket can easily accommodate your favorite toys.
The photo shows knitted knitted baskets that decorate a shelf in the bathroom.
Crocheted baskets will find their application in the kitchen and living room. You can put flowers in them, keep magazines or books at hand. In addition, thick knitted yarn is easy to knit into a cozy nest for your pet.
The photo shows baskets made of twine that will fit perfectly into a marine or eco-style.
Photo gallery
A crocheted basket is an attractive and functional interior element that will not only help you conveniently store small items, but will also act as a bright color accent and fill your apartment with coziness.
A basket made of knitted yarn is a particularly useful thing in the house. It can be large for dirty laundry or children's toys, or it can be small with a lid for jewelry or small items. It is convenient to use a basket for small needlework so that everything you need is at hand.
If you have never had similar items in your household, then I assure you, after knitting one basket you will not stop! Because it will immediately find a use, and you will want to knit a dozen more similar things, because... you will find that they are truly indispensable in your home or apartment.
I have knitted one basket and want about five more in different sizes, large and small, so I am making plans to buy new skeins of knitting yarn. You will also need a large size hook - from 7 to 10, depending on the thickness of the yarn and the density of your knitting.
Knitting patterns from knitted yarn
As it turned out, ordinary single crochets and double crochets do not look very good in products knitted with knitted yarn, and because... The purpose of the baskets is not only functional, but also decorative; many different new patterns were invented for them:
- ticks
- fur posts
- slanted lush columns
- crossed columns
- multi-colored patterns, etc.
Simple box for beginners
It is difficult for novice craftswomen to knit a single piece. Therefore, when creating boxes, containers and covers for organizers, they often use granny squares.
Each craftswoman can independently choose a suitable scheme.
The description is simple. Crocheting boxes from granny squares begins by creating 5 or 6 squares. The parts are then joined together using connecting posts.
If the box has a lid, then the square replacing it is attached to the workpiece on one side. Most often, the top of such a part is decorated with a convex decorative element. It will replace the "handle".
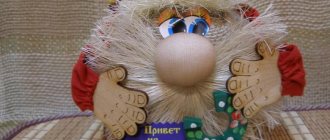
Gnome: holiday bottle case
A charming gnome, knitted in the shape of a bottle, will be an unusual packaging for festive champagne. It’s easy and simple to knit such festive characters as in the photo, the main thing is to show imagination and a good creative spirit.
First, according to the principle of a basket, a round bottom is made, and then high sides, which will become the body of the gnome and packaging for the bottle. The gnome's face and nose are knitted from light yarn, and then a beard and fluffy hairstyle are added from fluffy yarn. All you have to do is knit a tall triangular cap to the height of the bottle, decorate it with small shiny accessories and that’s it, the cheerful “Gnome” bottle case is ready!
Ideas for inspiration
Now that you are familiar with the basics of weaving simple products, we would like to offer you a photo selection of the works of different craftswomen. Here you will find not only an Easter basket made from newspaper tubes for beginner newspaper weaving enthusiasts, but also all sorts of options for all occasions.
Round, oval, rectangular, with unusual bends and handles - look at them, get inspired and don’t be afraid to create your own masterpieces.
And even if your first basket does not turn out the same as in the picture, you will make it yourself, with your own hands. And experience, accuracy and speed of weaving will definitely come with practice. The main thing is to always take on work with a good mood and attitude - and you will succeed!
*when copying an article, please indicate an active link to the source mirpozitiva.ru
Master class on baskets made of knitted yarn
This basket can store various small items: it is strong and spacious. A detailed description for beginners can be found in the video block.
The photo shows a round crocheted interior basket, crocheted with a checkmark pattern.
What you will need:
- Tape knitted yarn of any color to suit the interior.
- Hook No. 9.
- Needle.
- Scissors.
Step-by-step instruction
We will abbreviate “single crochets” by the abbreviation RLS, and the “chain loop” by the abbreviation VP.
- We knit the bottom of the basket. Its basis is an amigurumi ring (detailed video below). We tie the ring 6 RLS and 1 VP.
- We knit 2 sc in each stitch of the previous row, and at the end we create a VP.
- We knit the third row. We pass 1 sc into its first loop, and make 2 sc into the second. We are finishing the VP.
- We knit an increase through 2 loops - 1 sc, 1 sc, increase (we knit 2 sc into one loop of the previous braid). We complete the VP.
- We increase through 3 loops – 1 sc, 1 sc, 1 sc, increase. We are finishing the VP.
- We repeat the previous steps, but after 4 loops and finish with an air loop. The bottom of the basket is ready, let's move on to the sides.
- We pass the hook inside and pull out the loop, as in the photo:
- We make a circle sc.
- We make the sides with single crochets, inserting the hook into the center of the column.
- We finish the last row with connecting loops when the basket reaches the desired height. We hide the tails with a needle.
Necessary materials
- Knitting yarn Biskvit Apple for the box approximately 1 skein
- Brown knitting yarn Biskvit Chocolate for tail approximately 5 m
- Yarn Biskvit green Green for a leaf of approximately 3 m
- Hook No. 8, 10
- Needle with a wide eye.
Hook selection
Baskets made from knitted yarn are more convenient to crochet than knitting
It is important to choose the right tool to make your work more convenient. For knitting baskets, hooks from 6 to 8 numbers are most often used
The small size of the tool allows you to knit a dense fabric that will keep its shape.
At first, it will be difficult for beginners to knit tightly, calluses may appear on their fingers, and yarn consumption also increases, but in order for the walls of the basket to hold its contents, it is necessary to maintain thread tension
When choosing a hook, you need to pay attention not only to its size, but also to the material from which the tool is made
The table describes the advantages and disadvantages of different tools:
| Material | pros | Minuses |
| Metal | Durable, have a Teflon coating that ensures the thread glides | Heavy and cold to the touch |
| Plastic | Beautiful, different colors. Slippery, light | Fragile, can break if knitted too tightly |
| Wooden | Light, slippery, warm to the touch | Sometimes burrs appear on the cut and cling to the thread |
There are combination hooks. Their base is made of metal, and the handles are made of wood or plastic. These instruments are pleasant to hold in your hand, they are light and durable. Each needlewoman chooses a hook to her own taste. Sometimes you need to try several tools before finding the right one.
Which table to choose for a beige set?
A table is an important element of any dining place; many do not even realize how diverse their range is (not only material, but also shape). So, how to combine the set and the shape of the table, without forgetting about the color scheme?
A wooden table will decorate a room of any color
The question of the shape of the table should not limit you - it can be any shape, the only important thing is that it is comfortable. If the room is small, then it is better to take a table made of glass material - it increases the space
With the help of a beige kitchen in the interior, the room will be visually enlarged. To make the whole design complete, you need to choose the right wallpaper and flooring.
Candy bowl with gold ornament
Make a candy bowl as a gift for a close friend on March 8th or a colleague for her birthday. To work, you will need 400 g of red yarn and a crochet hook No. 5, and to create a gold ornament - 1 ball of iridescent rope and a hook No. 2.5.
According to scheme No. 1, 4 parts are made - 2 for the lower part and 2 for the lid. Lay a reinforcing base between the two finished hearts and connect the parts with one row of non-woven columns.
Advice from the author of the box! It is undesirable to make a cardboard base, otherwise the item will not be washable. Use thick plastic folders, cut out a heart from them according to the template and place it between the parts of the box.
The finished lid and bottom are tied around the perimeter with golden thread ("Lace" pattern). If desired, the needlewoman can fill the inside of the box with padding poly for volume.
According to scheme No. 2, a golden heart is made and carefully sewn onto the lid of the box.
A secret from a needlewoman! And the sweets in the box are also not simple; using the proposed patterns, you can surprise your friends and knit such surprise sweets.
Crocheted twine box
Good afternoon, dear friends and all blog readers!
I have never had to make such crafts as boxes before. But my son needed a box for small items. Even adult boys and men have their own secrets and little things that need to find a convenient and beautiful place to store them.
It is quite possible to make similar boxes from boxes with your own hands. This is what we did together. My son converted a cardboard box into a box, and I knitted a cover. The result was such an original and quite cute crochet box.
I'll tell you more about how I knitted it.
DIY box made from a box and twine
Since there was no suitable box on sale, women's versions were becoming more and more common, it was decided to make the box with our own hands.
Although we try to throw away all unnecessary things and boxes and not accumulate junk in the closet, we still found one teapot box at home. It has been slightly modified to open from the wide side rather than the narrow side.
Simply put, the lid was cut from the side of the box, and the entire box around it was taped together for strength and security.
Then my son’s creative fantasies ended, and he asked me to decorate the box. I thought for a long time about what kind of decor for the box I could make with my own hands. Decoupage came to mind, but I don't know this technique. I only know how to knit. I Googled a little, looked at what others were doing and the idea of a crocheted box was born.
I decided to choose twine as the material. I really like the now fashionable twine crafts. For example, you can decorate flower pots with twine.
I advise you to look at how to choose twine, what rugs you can make from it, and practical recommendations for crocheting rugs from twine.
This time I decided to knit a case for a box from twine. I bought a roll of twine and it was just enough. I took a thicker hook (six).
I also needed glue and coffee beans.
Crochet box description
- We start crocheting a box by making a chain of air loops with a length equal to the perimeter of the future box. You need to keep in mind that when knitting this chain will stretch a little. After knitting the first row, I had to unravel everything and pick up the stitches again.
- We close the chain into a large ring and knit with single crochets in a circle upwards without adding loops. I decided not to knit the bottom of the box. But if you wish, you can make it knitted.
- After all sides of the box are knitted (we determine this by fitting), you need to knit the lid.
We determine the width of the lid, measure on one side of the crocheted box with chalk or pins and continue knitting only in this part of it in reverse rows. - We cut off the twine and hide its tip. We reattach the lid in the left corner to tie it around the perimeter in a slow step. I really love this edge trim. This is how I tied the Easter basket.
The box turned out to be quite soft and unstable, to my surprise, unlike the basket with flowers, which I knitted from ordinary wool blend yarn.
But this is not important, since the knitted cover needs to be put on the box out of the box. For strength, I glued it with PVA glue, different sides one at a time, placing a weight (book) on them and leaving it to dry for a day
As a result, the case was knitted in the evening and it took another three days to glue the sides and lid and dry the box.
The crocheted box straightened out and stopped bristling. But this is not its final form yet. I began to think about how to decorate the box.
DIY box decor
Twine goes well with coffee both in color and style. That's why I decorated the box with coffee beans.
https://www.youtube.com/watch?v=Sr8b3uQxnss
For this purpose I used the universal adhesive gel “Moment”. Still, it is more reliable than PVA.
Drop a little glue onto a coffee bean and glue it onto the knitted surface of the box. First, I laid out vertical paths of coffee, and then horizontal ones, while laying the coffee alternately on the left and then on the right.
I placed “leaves” in the corners, and a small flower on the lid of the box.
Although I don’t really like working with glue, the universal “Moment” rolled off my fingers very easily and my hands remained almost clean after work.
By the way, you can also knit flower pots from twine and make a beautiful basket.
Similar document boxes can be used for various small items and handicraft supplies.
I put my two twine crafts in this video:
Author Olga Smirnova
PS I recently tried to make simple topiaries, one of them is made from coffee beans in a stand decorated with twine. It fits so well into the interior next to the box.
From newspaper tubes
Quite a budget option that makes beautiful baskets of any shape and size.
Newspapers can be knitted for free in the mailbox. Or replace them with promotional magazines, which are available in almost every store (where promotions are posted for a month).
Cut newspapers or magazines into strips 15–20 centimeters wide. You can use a whole sheet for the straw. Arm yourself with a knitting needle and glue.
To make paper tubes, it is better to use a long knitting needle No. 3 - 4 (the size is always indicated on each knitting needle).
A hot glue gun is more convenient, although you can use a regular glue stick or PVA.
We wind a lot of tubes as shown in the video. The process itself is simple, after several attempts you will do it automatically. Make sure that the tubes are the same width and length (if possible). Glue the tip.
How to make a tube from newspaper
Some needlewomen paint each tube with a special stain. You don’t have to do this (the newspaper drawing itself turns out to be quite original). Or cover an already finished basket with stain of the desired shade. Colors vary.
Any weaving. From standard to more complex. The bottom can be square, rectangular, round. The bottom is woven flat, then the sticks are bent upward and the weaving continues.
There are several ways. Choose the one you like best:
How to lengthen a tube
When the length of the tube in the weave ends, insert a new tube into it and fasten tightly (you can use glue). That is, a continuous weaving is obtained.
Remember this is paper! Even if you cover the finished basket with a special varnish, the product will still get wet. Therefore, use the basket indoors. For interior or storing things.
Application
Baskets made from paper tubes are widely used in the home and country house. They can be used as:
- Flower pots
- Bread box, candy bowl
- For bath towels
- Like an egg basket
- Like a picnic basket
- For children's toys
- Like a newspaper girl
Crocheted openwork boxes with patterns of floral motifs
For beginners and experienced needlewomen, a lesson with a detailed description.
The first heart-shaped box made from “Iris” cotton yarn. Hook No. 1. The lid and lower part of the box are knitted in straight and reverse rows, and from the 22nd row, piping begins along the edge to create openwork borders. Flowers are knitted according to a small pattern and sewn onto the fillet mesh of the lid.
How to strengthen a box without using a plastic or cardboard base? Craftswomen have invented several methods:
Select a suitable container according to size and stretch the knitted parts onto it. Lubricate the box with a solution of gelatin or thick starch and wait until it dries completely. To fix the craft, use sugar syrup. Soak the knitted fabrics in sweet water and stretch them onto the prepared template. After drying, they acquire the necessary hardness. A knitted product will hold its shape if you use a wooden or wire frame. And starched knitted parts are already attached to it.
Needlewomen choose a method for themselves or use ordinary plastic containers.
Two boxes and a white vase are made using a similar technique. To create such beauty using crochet number 2, 6 square parts are crocheted according to the pattern, which are connected to each other by air arches.
The finished openwork covers are starched and stretched over the prepared bases.
Features of working with knitted yarn
To knit a basket or pouf, it is advisable to use a thick thread. This way the walls will not be subject to deformation and will retain their shape well. If suddenly you have already bought a thin knitted ribbon from which you planned to create a pouf or basket, then you can knit in two threads.
When knitting an item from several parts, it is important to use the same yarn. Otherwise, they will turn out different in size and texture. You also cannot work with knitting needles or crochets of different sizes for the same reason.
Crochet Rectangular Yarn Storage Boxes
Such products must be large. They will contain skeins of thread and various ropes, buttons, beads, and elastic bands. All the craftsman's tools are at hand.
Prepare a cardboard box of the required size. In addition to the base for the future container: PVA glue, brush, thick hook, measuring tape, roll of twine, scissors, coffee beans.
Technique for making the product:
- Measure the perimeter of the cardboard box with a measuring tape.
- Tie a chain chain (length equal to the perimeter of the base).
- Close the chain into a ring.
- Continue knitting the product in a circle st. b/n.
- Proceed to form the lid.
- Mark its future location with pins.
- Then continue knitting in this place using reverse rows.
- When the lid is ready, cut the twine and hide the remaining tip.
- Tie the edges with a crawfish step.
- If desired, make an additional rectangular bottom.
- Place the resulting blank onto a cardboard box.
- Alternately glue all sides of the workpiece to the base.
- After drying, decorate the yarn box with coffee beans or knitted items.
Principles of knitting a jute basket, tips
To create strong baskets that should hold their shape well, a thicker thread of jute is tied with twine. It's called a rope. You need to knit in a circle, tying the rope with single crochets and making increases. When the bottom of the basket is ready, there is no need to make increases. Then you just need to cut the rope, lay it again, and tie it with columns without increments, creating the first rows of the walls of the product. Oval and square-shaped baskets are most often knitted from thin twine, folded into 2-3 threads.
Tips for knitting jute baskets for beginners:
- The thicker the thread, the faster the knitting process.
- Thin threads make baskets with rigid walls, on which a beautiful, relief pattern remains.
- Since jute is much stiffer than any yarn, your hands quickly get tired from working. Beginners need to knit large items intermittently so as not to overwork the muscles of the hands and not to rub calluses on the hook.
- There are jute skeins in which the tip of the thread must be pulled out from the center. If you pull the thread from the side, the twine may begin to separate and become tangled.
Threads are sold in skeins and bobbins, in different lengths. Typically, skeins of thin threads are flat and soft, while balls of thick twine are bulkier and stronger.
Bunny basket
If a needlewoman has a fluffy pet hare and he needs a new home, then the craftswoman can use a new interesting pattern from the popular Japanese magazine Star Crochet.
Soft ribbon yarn was used for knitting, and the side part of the spacious basket is formed by beautiful floral motifs.
A detailed video will show and tell you how to knit a large children's toy basket with a bunny. For a cute accessory you will need 3 skeins of bright yellow knitted yarn, 1 skein of white and half a skein of gray, and for the bunny ears you will need some white plush yarn.
How to calculate knitwear consumption?
You need to calculate the thread consumption in order to know exactly how many skeins will be needed to create 1 basket. Usually everything is indicated on ready-made diagrams: yarn width, hook sizes, color and consumption. But if you want to knit a product of a non-standard size or shape, you will have to do the calculations yourself.
Before studying the algorithm, you need to pay attention to the following facts:
- The thinner the yarn, the higher the consumption.
- Tight knitting uses more threads than loose knitting.
- If you are planning a basket with patterns, then you will need more yarn than a regular one.
There are 2 ways to calculate:
- By yarn weight. To do this, first knit a sample, then you need to weigh it on a kitchen scale and calculate its area. Afterwards, make a pattern for the future product and calculate its area. For designations, you can use the following designations: VO - sample weight, PO - sample area, PI - product area. The calculation formula is as follows: (PI x VO) / PO = mass of yarn for knitting.
- By meter. When knitting a sample, each meter is marked with a knot of bright thread. After finishing knitting. All meters are counted. Calculation formula for the finished product, where DN is the length of the thread: (PI x DN) / PO = number of meters.
Experienced craftsmen recommend, despite the calculations, to buy yarn with a small reserve.
Crochet basket: diagrams and description, video for beginners
A basket for various household items of one size or another, crocheted from cotton, is a great opportunity for a beginning needlewoman to try her hand. It is almost impossible to spoil this thing. Still, you should work carefully, constantly checking the detailed description.
Of course, baskets are different from basket to basket, but it is better for beginning needlewomen to choose simpler models. Moreover, they look no less impressive than complex openwork options; they create an atmosphere of warmth and care at home, a feeling of real comfort.
Try, for example, to start by knitting this charming hand-made set, consisting of 3 round cotton baskets - large, medium and small:
They can be completed very quickly - literally in 2-3 evenings, even for those craftswomen who are just mastering the technique of crocheting. And the result will be impressive.
Materials, tools, knitting density
To create 3 baskets with a diameter of 10, 15 and 20 cm you need to take:
- Thicker natural cotton yarn (with a thread length of only 70 m per 50 grams) - 250 grams of blue and 100 grams of white.
- Crochet hook made of metal or durable plastic No. 7.
As for the density of elm, there are no special recommendations. However, the baskets should still be made more tightly.
Legend
In the field of crocheting - one of the oldest types of applied creativity - there is a whole system of symbols (letter and graphic), with the help of which original designs of products are drawn up and descriptions are written.
It is almost impossible to know all the combinations used, because there are a lot of them, and for many models their own abbreviations and combinations are developed.
However, any novice needlewoman who takes up independent work should become familiar with the basic concepts:
Description of the basic pattern
In order for the set of baskets to turn out correctly and with high quality, you should adhere to the following explanations and recommendations for the implementation of the basic (basic) knots:
- Elm circle pp sc. For each basket, start with a dc of 2 “loose” chs.
- In the first circle, perform all sc in the 2nd ch from the hook.
- Each circle r starts with one additional ch and ends with one ss in the first sc.
- When there is no other decree, in each sc next elm one sc.
Important: the work must be carried out from beginning to end using a thread of 5 additions
Working on large, medium and small baskets
Large basket in rows (elm with blue thread):
- 1 circle p: 6 sc.
- 2nd and 3rd circle rr: 2 sc in each sc. It should be only 24 sc.
- 4th circle r: 2 sc in every 3rd sc. This should make 32 sc.
- 5th circle r: 2 sc in every 4th sc. It should be only 40 sc.
- 6th circle r: sc.
- 7th circle r: 2 sc in every 5th sc. In total you should get 48 sc.
- 8th–11th circle rr: every 5th and 6th sc you need to knit a VM (and for each sc, pull out 1 stitch, and then use a CV to knit all stitches on the hook). There should be 40 sc in total.
- 12th circle r: sc.
Upon completion of work on the product, the thread should be cut, and the end should be securely fastened and hidden.
Medium-sized basket, in rows (to make it you need to use white thread):
- 1st and 2nd circles: elm according to the description for a large basket. There should be 12 sc in total.
- 3rd round: 2 sc in every 2nd sc. There should be 18 sc in total.
- 4th circle r: 2 sc in every 3rd sc. In total there should be 24 sc.
- 5th circle r: 2 sc in every 4th sc. It should be 30 sc.
- 6th circle r: sc only, the hook should be inserted only behind the back walls of the st.
- 7th–11th circle r: sc.
Upon completion of work on this product, the thread should be cut off again, and its end should be securely fastened and hidden.
The smallest basket, in order (do the work again with blue thread):
- 1st–3rd circle pp: elm according to the description for the middle basket. There should be 18 sc in total.
- 4th circle r: sc, insert the hook behind the back walls of the st.
- 5-7th circle pp: sc.
Upon completion of work on the product, the thread should be cut, and the end should be securely fastened and hidden.
Crocheted basket: MK video
If the set of baskets described above is not to your liking and you want to knit a beautiful basket from knitted yarn (which is much easier), you should carefully watch the detailed video master class on making such a thing, posted below:
Family and home are like light and bread
Beautiful and touching poems about family
Family and home are like light and bread
Family and home are like light and bread. The native hearth is earth and sky. They are given to you for salvation, no matter what worries you may be in.
Let life run hastily, Wherever the road leads, In your changing destiny There is no more beautiful gift from God.
They always keep you, No matter how much you travel around the world, Like a guiding star, And there is no shrine more holy than this.
Your family’s warmth and light are the best joy for your soul. And there is no more happiness in the world, And no other happiness is needed.
My family is my abode
My family is my abode. My home, my castle, my peace. Protect Her, Lord Savior, from evil spirits.
Protect us from temptations, And save us from storms and troubles. Save from envy and the evil eye. And, if necessary, give advice.
I owe everything to my family. I don’t know how to thank those with whom I am connected with my soul and heart, and the knot cannot be cut.
In the family, we are all like rods, tied tightly into a broom. Intertwined, so much so that you can’t untwist them. Dangerous. Don't stand in the way.
As long as we are together, for each other, there is no way to break us. In trouble we all stand resilient. We are a clan, we are a tribe, we are a family. Kirill Khamov
***
You can’t go through all the money, And you can’t change all the cars, And You can’t caress all the women, But you’ll only waste time!
Don’t waste yourself in vain, After all, life is one and so beautiful! Dedicate Her to your family - your beloved wife, children!
And you will understand that happiness is a Home in which they are waiting for you with warmth!
Family joy!
Family joy Happy faces! I wish all families to glow with Love!
Let children's laughter sound in families, a kind and joyful holiday for everyone!
Love flourishes all around the Earth!.. Peace to your home and in every family!
Family is my angel!
Family is like an angel in heaven Smiles, happiness, kisses When she is alone, And everyone in the kitchen at the table - Eating my birthday cake My soul pours into the dough, When I bake it for you: My dear husband, My granddaughter Vikulka - You are a blue-eyed princess my You are my children: my Oleg and Igor Who make me happy in my worldly age, My mother and sister Lyuba, Who live far away - are always with me Here is your family - the guarantee of the foundation of life, What will not betray, will not persuade, will not beat The family is like a fortress in our everyday life Protects us and will always save us!
My family
My family was sent to me by fate. She gives me warmth and participation. It contains a son and a daughter, a mother, a husband and me, And a dear granddaughter - my ray of happiness.
I simply cannot live without them! They are with me - the house sparkles with joy. I will always love life because my reward is their great love!
Knitted twine basket
Things made from natural materials look great in the interior. Crocheted baskets made of durable twine give the room a special coziness and color.
The material is inexpensive, wear-resistant and looks great in crafts thanks to its natural color. To knit a twine basket, you will need several skeins of good quality rope, a No. 4-5 hook and thick cardboard to strengthen the bottom.
Work begins with knitting the main rectangle. It consists of two parts, between which cardboard or coarse fabric is laid. The upper part of the bottom is made according to the pattern in straight and reverse rows, and the bottom can be knitted with ordinary non-woven columns for density. Next, the work smoothly moves on to knitting the side part of the basket, which is complemented by two symmetrical handles made of thick rope. The result is truly rustic chic!
Basket made of newspaper tubes
Many people already know how to weave baskets from newspaper tubes, but we propose to do it in an unusual way. For work we will need the following materials:
- newspapers;
- PVA glue;
- glue gun;
- scissors;
- bright paint, decor.
Let's get to work.
| Illustration | Description of action |
| Take a double spread of newspaper, cut it widthwise into 4 parts and wind the tubes obliquely using a thin stick. Glue the edge with PVA to prevent it from unrolling. | |
| Remove the stick and flatten the tube with your fingers and then with scissors. | |
| Take a square object as a base - lip gloss will do - and screw a tube on it, constantly coating the edges with PVA glue. Remove the workpiece from the base and use your hands to shape it into a square. Make blanks from all the tubes in the same way. | |
| To connect the parts together, roll up a few more tubes and cut them into small pieces. Their length should be enough to fasten the square parts together. | |
| Connect the square blanks together with short pieces of tube and coat all joints with glue. For reliability, fasten with a clothespin until the glue dries completely. Prepare the bottom and side parts of the basket in this way. | |
| The side parts of the basket are glued to the base and to each other with a glue gun. | |
| Paint the basket in a shade that matches the interior; in addition, all joints and the top line can be decorated with rhinestones. |
Related article:
Original basket with strawberries
The basket, made of red and green ribbon yarn, resembles a delicious cupcake with delicious strawberries.
To implement the idea, the needlewomen used an original motif from Tunisian knitting. At first glance it is complex, but in fact, the pattern consists of two rows. In the first one, so-called shells are knitted from 5 unfinished stitches, between which Tunisian s/n stitches pass. And in the second row, 5 stitches are knitted together with green thread and a small strawberry with leaves is formed.
Next, the pattern is repeated and the berries are knitted in a checkerboard pattern. Auxiliary knitting needles help to cast on unfinished stitches, which then turn into beautiful strawberries.