On dark autumn evenings you really want comfort and warmth! Make an original candlestick from a jar and autumn leaves - light a romantic flame of love and happiness in your home.
Autumn is a fabulously wonderful time, but the riot of colors does not last long! To preserve the unique colors of autumn and add coziness to your home interior, decorate your home with stylish accessories: fragrant decorative wreaths, panels and garlands of fallen leaves and, of course, cute candlesticks. They can be decorated with rowan branches, dried flowers and leaves, fragrant cinnamon sticks or viburnum beads.
How to make a candlestick with your own hands and invite autumn home? I'm happy to tell you!
You will need:
- jar,
- acrylic paint for glass,
- tassel,
- glass contour,
- maple leaf,
- sticky paper (optional)
- filler (coffee beans, any cereal),
- natural materials - acorns, cones, maple leaves, etc.,
- leg-split,
- candle,
- glue gun.
Create a unique autumn mood by making cute candlesticks with your own hands - and a mysterious atmosphere will stay in your home all evening.
1. Using fall leaves and sticky paper, make a maple leaf template. Glue it to the jar. Make sure that the template leaf fits entirely on the jar.
2. Cover the outside of the can with acrylic paint. Leave until completely dry.
3. Now, using nail scissors or a needle, draw the outline of the leaf so that it peels off easily and evenly from the jar.
4. Carefully remove the template from the surface of the jar.
5. If there is any paint left under the template, wipe it off with a cotton swab using any solvent.
6. Great! Now draw the outline of the leaf and wait until it dries completely.
7. Fill a quarter of the jar with coffee beans or other filling. Place a candle in the center of the jar. It's cool if you have an electronic spark plug - you won't need to change it often.
8. And finally - my favorite - decorate the jar.
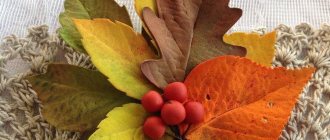
Wrap the neck with a rope and tie a bow. Using a glue gun, attach acorns, as well as artificial or real maple leaves.
This is what a sunny handsome man we have with you. Turn off the lights, light a candle and admire the cozy autumn light on your windowsill.
More interesting ideas for your interior here:
Leaf crafts for kids
While walking in the park, collect fallen autumn leaves with your children. Such beauty just begs to be held in your hands. You can immediately put together animals and birds from different leaves on the spot.
Invite the children to make small boats from walnut halves with a sail from an autumn leaf.
And at home, the collected leaves can be dried, spread between the pages of a book, so that later you can collect the herbarium. I remember from my school years how we collected and dried leaves in the fall.
Children will be happy to make various crafts, let them also contribute to the coziness. And such crafts made from leaves on the theme of autumn will be useful for kindergarten or elementary school.
Applications
The simplest thing is to make crafts from leaves on a sheet of paper, i.e. applications.
You can color the background of the picture and make details in it with leaves.
Or like this hedgehog made of leaves - onto an image of an animal, the contours of which are made with a pencil or paints, glue leaves - needles, wings or some kind of hair.
Owl made of leaves
Just recently I saw this owl in a bag and it amazed me. Amazing craft! An ordinary plastic bag or document file is filled with leaves and eyes, paws, and beak cut out of colored cardboard are glued on.
If you use a file, you need to carefully cut off the perforated strip from it so that a little sticky edge remains. Two corners of a bag filled with leaves are tied with a ribbon to create ears.
Two corners of a bag filled with leaves are tied with a ribbon to create ears.
The edge of the bag is folded and sealed with tape.
The eyes are placed on double-sided tape, and the beak and paws are attached in the same way.
Leaf caterpillar
A charming caterpillar can be molded from plasticine and decorated with a rose twisted from leaves.
As you can see, making crafts from autumn leaves with your own hands is very simple, quick, and how beautifully you can decorate your home!
Fruit bowl
It's time to move on from small, easy children's crafts to crafts suitable for home decoration. For this purpose, you can start working on a fruit vase.
Before work, we collect material:
- glue;
- balloon;
- a tube of Vaseline;
- scissors;
- leaves (maple leaves are better).
Actions in order:
Inflate the balloon to the size that suits you. Coat it with Vaseline over the entire surface, then the leaves will not stick. Fix the ball firmly so that it does not move, for ease of work. Grease the leaves with glue and stick them to the ball. It is advisable to glue the leaves in several layers. Lubricate the last layer with additional glue and dry for 3 days. Carefully pierce the ball and remove its pieces from the craft. All that remains is to place the vase in the prepared place.
Painting Autumn leaves
And finally, you see, the autumn leaves themselves have an amazing shape and color. Place the leaves you like in a photo frame and hang them on the wall.
And if you combine autumn leaves and foil, you can get something incredibly beautiful.
A candlestick made from an ordinary glass jar, decorated with autumn leaves, will always decorate your home.
This is quite easy to do. It is not difficult to work with artificial leaves, but the products also look beautiful with natural leaves. You can use decoupage napkins with leaves.
Everything you need for work:
- Glue for decoupage (for example Mod Podge)
- Sponge brush
- Jar
- Leaves artificial or natural.
The surface of the jar must be perfectly clean, otherwise the leaves will not be able to stick to the jar.
You need to rinse the jar with a degreaser and wipe thoroughly with alcohol. Artificial leaves must be made entirely of fabric. If the leaves are a bit harsh, remember them a little, you can also iron them, the fabric will become softer. If the leaves are natural, they need to be slightly moistened. A thin layer of glue is applied to the jar. We wait until the glue thickens and becomes sticky enough (check with your finger), then glue the leaves onto the jar.
Using a brush, apply glue starting from the center of the sheet, gradually leveling the sheet itself. Apply several layers. Now you have to wait for the glue to dry.
Finally, decorate the neck of the jar with a ribbon and place a candle inside. Such bright products will create comfort and a festive mood in your home.
Autumn is a fabulously wonderful time, but the riot of colors does not last long! To preserve the unique colors of autumn and add coziness to your home interior, decorate your home with stylish accessories: fragrant decorative wreaths, panels and garlands of fallen leaves and, of course, cute candlesticks. They can be decorated with rowan branches, dried flowers and leaves, fragrant cinnamon sticks or viburnum beads.
How to make a candlestick with your own hands and invite autumn home? I'm happy to tell you!
You will need:
- jar,
- acrylic paint for glass,
- tassel,
- glass contour,
- maple leaf,
- sticky paper (optional)
- filler (coffee beans, any cereal),
- natural materials - acorns, cones, maple leaves, etc.,
- leg-split,
- candle,
- glue gun.
Create a unique autumn mood by making cute candlesticks with your own hands - and a mysterious atmosphere will stay in your home all evening.
1. Using fall leaves and sticky paper, make a maple leaf template. Glue it to the jar. Make sure that the template leaf fits entirely on the jar.
2. Cover the outside of the can with acrylic paint. Leave until completely dry.
3. Now, using nail scissors or a needle, draw the outline of the leaf so that it peels off easily and evenly from the jar.
4
Carefully remove the template from the surface of the jar
5. If there is any paint left under the template, wipe it off with a cotton swab using any solvent.
6. Great! Now draw the outline of the leaf and wait until it dries completely.
7. Fill a quarter of the jar with coffee beans or other filling. Place a candle in the center of the jar. It's cool if you have an electronic spark plug - you won't need to change it often.
8. And finally - my favorite - decorate the jar.
Wrap the neck with a rope and tie a bow. Using a glue gun, attach acorns, as well as artificial or real maple leaves.
To create a festive atmosphere it is not at all necessary to spend a lot of effort and money; sometimes you just need to show a little imagination. Today we will tell you how to use natural materials in just 5-10 minutes to make candlesticks that will delight you for many days and even weeks.
To work you will need:
- candle
- an opaque glass, cup or other container larger than a candle
- twigs, dried flowers, leaves
- thick foam sponge
- glue gun or superglue
- scissors and knife
Let's get started!
2. Check the height: when inside, the sponge should be 2-4 cm below the edge of the candlestick.
3. Apply a little glue in the center of the sponge.
4. Glue the candle and wait until the glue hardens. After this, wet the bottom of the sponge with water and place it back in the candle holder.
5. Trim the stems and branches so that they can fit in the candle holder.
6. Place the stems in a damp sponge, placing them around the candle.
7. Done! Don’t forget to add water from time to time, this way the living bouquet will last much longer.
How to do:
- While the golden autumn is in full swing, collect beautiful autumn leaves of different colors, shapes and sizes. Dry them slightly, as when completely dry they will lose color and elasticity, that is, they will simply crumble in your hands.
- Buy a simple candlestick (or use clear, low glasses) and decoupage polish.
- Prepare the candlestick by degreasing its surface. You can wipe it with hand sanitizer or wash it with dish soap.
- Place the leaves on top of the candlestick in any order and cover the top with varnish. If any leaves extend beyond the edges, simply trim them off when the varnish is dry.
- For durability, it is better to coat the candlestick with several layers of varnish. The first coat usually dries within an hour. Then the candlestick can be processed again. The complete drying time depends on the varnish manufacturer. Some dry within 24 hours, some take several days.
Brief information about varnishes for decoupage. If you decide to buy decoupage varnish on the Internet, you will find a huge number of options. There are matte and glossy, water-based, craquelure varnish (it cracks) and many others. I prefer varnishes made by IDEA: they dry quickly and do not leave an unpleasant sticky feeling after drying.
It will be better for your child if you buy a spray varnish: it is much easier to apply to the surface. For adults, varnish in a jar is quite suitable.
If you do everything correctly, you should end up with candlesticks that at least vaguely resemble those shown in the photo.
marthastewart.com
DIY candlestick from a jar
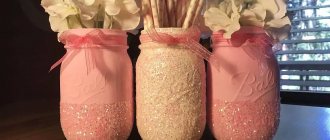
A very simple, but quite elegant and interesting candlestick can be made from a half-liter jar. Any glass jar, such as a mayonnaise jar, will do. Remove the label, place fir branches inside the jar and sprinkle generously with coarse salt. This is a winter version of a candlestick, and our tree seems to be covered with snow. We place a candle in the initiated snowdrift.
We tie a decorative ribbon or braid around the neck of the jar. We take ordinary pine cones, white acrylic paint and a foam sponge. Dip the sponge into the paint and carefully apply it to the bump. We tie two cones with a thread and hang them on the jar. The candlestick is ready!
Top articles: 15 ways to make a beautiful bouquet of sweets with your own hands
Small original things can create and strengthen the feeling of celebration
You can create a beautiful candlestick from an ordinary jar, fruits and herbs.
DIY candlestick with lace
Glass candle holders look magical at night
Watch the video on how to make original candlesticks with your own hands - a master class from Serge Sobakin.
Original do-it-yourself autumn candlestick. Master Class
Autumn is a wonderful golden time when you want to wrap yourself in a warm blanket and drink hot drinks. And you can make your home even more cozy with original autumn candlesticks that you can easily make with your own hands!
Fill your home with comfort and warmth by creating original autumn decor items with your own hands! For example, beautiful candlesticks that can be placed both at home and on the country veranda.
Autumn candlestick from a jar
We will need:
- glass transparent jar,
- bottle cleaning brush,
- wide adhesive tape,
- acetone-based nail polish remover,
- glass paint,
- small plastic bowl
- wide brush or sponge,
- parchment,
- grain or cereal.
Instructions
1.
Wash the glass jar thoroughly with a brush and leave to dry.
2.
Cut out the silhouette of an autumn leaf from wide adhesive tape and carefully glue it to the back of the jar.
3.
Mix 5 ml in a plastic bowl. glass paints (can be bought at any hardware store) and 1.2 ml. acetone. Stir the mixture with a brush or sponge.
4.
Cover the jar with the resulting solution of paint and acetone in several layers.
5.
Once you've painted the outside of the jar, turn it upside down on parchment paper and let it dry overnight.
6.
When the paint on the can is dry, carefully tear off the adhesive tape from its surface.
7.
Pour any grain or cereal into the resulting candlestick up to the level of the leaf and place the candle inside.
8.
The neck of the candlestick can be tied with ribbon or sisal rope.
You can make very beautiful candlesticks from old jars and fallen leaves. They will serve you for a long time, reminding you of walks in the autumn park at any time of the year.
Materials
To make autumn candlesticks with your own hands, prepare in advance:
- fallen leaves in yellow, orange and red colors;
- glass jars;
- decoupage glue;
- candles;
- brush;
- napkins;
- scissors;
- stationery erasers;
- newspapers.
Step 1
. First, collect the leaves. Collect leaves in warm colors. Choose their form at your own discretion. They must be whole and clean.
Step 2
. Use a napkin to wipe any dust off the leaves and place them in newspaper between the sheets to even them out. Close the newspaper and weigh it down with books on top. After a few days, you can use the leaves for further work.
Step 3
. Cut the cuttings of the prepared leaves with scissors.
Step 4
. Remove labels from jars and dry thoroughly.
Step 5
. Dip the brush in decoupage glue and cover the entire outer surface of the jar with it.
Step 6
. Carefully begin laying out the prepared leaves. Pass the top of each leaf with a finger wrapped in a scarf to remove air. Cover the sheet with another layer of decoupage glue. Glue the remaining leaves to the jar in the same way. You can lay some of them overlapping each other, so your candlestick will look more interesting.
A candlestick made from an ordinary glass jar, decorated with autumn leaves, will always decorate your home.
This is quite easy to do. It is not difficult to work with artificial leaves, but the products also look beautiful with natural leaves. You can use decoupage napkins with leaves.
Everything you need for work:
- Glue for decoupage (for example Mod Podge)
- Sponge brush
- Jar
- Leaves artificial or natural.
The surface of the jar must be perfectly clean, otherwise the leaves will not be able to stick to the jar.
You need to rinse the jar with a degreaser and wipe thoroughly with alcohol. Artificial leaves must be made entirely of fabric. If the leaves are a bit harsh, remember them a little, you can also iron them, the fabric will become softer. If the leaves are natural, they need to be slightly moistened. A thin layer of glue is applied to the jar. We wait until the glue thickens and becomes sticky enough (check with your finger), then glue the leaves onto the jar.
Using a brush, apply glue starting from the center of the sheet, gradually leveling the sheet itself. Apply several layers. Now you have to wait for the glue to dry.
Finally, decorate the neck of the jar with a ribbon and place a candle inside. Such bright products will create comfort and a festive mood in your home.
Today it has become very fashionable to decorate your apartments and country houses with interior items that in one way or another reflect the season outside the window. If with winter everything is clear to many, because we all decorate New Year trees, hang Christmas wreaths on the doors and arrange candles. For example, in the fall, not everything is so simple.
The news portal “site” in this article has prepared for you several interesting ideas on how to easily, beautifully, and most importantly not expensively, transform your home, make it cozy and elegant, luxurious and magical in the fall.
How to do:
- While the golden autumn is in full swing, collect beautiful autumn leaves of different colors, shapes and sizes. Dry them slightly, as when completely dry they will lose color and elasticity, that is, they will simply crumble in your hands.
- Buy a simple candlestick (or use clear, low glasses) and decoupage polish.
- Prepare the candlestick by degreasing its surface. You can wipe it with hand sanitizer or wash it with dish soap.
- Place the leaves on top of the candlestick in any order and cover the top with varnish. If any leaves extend beyond the edges, simply trim them off when the varnish is dry.
- For durability, it is better to coat the candlestick with several layers of varnish. The first coat usually dries within an hour. Then the candlestick can be processed again. The complete drying time depends on the varnish manufacturer. Some dry within 24 hours, some take several days.
Brief information about varnishes for decoupage. If you decide to buy decoupage varnish on the Internet, you will find a huge number of options. There are matte and glossy, water-based, craquelure varnish (it cracks) and many others. I prefer varnishes made by IDEA: they dry quickly and do not leave an unpleasant sticky feeling after drying.
It will be better for your child if you buy a spray varnish: it is much easier to apply to the surface. For adults, varnish in a jar is quite suitable.
If you do everything correctly, you should end up with candlesticks that at least vaguely resemble those shown in the photo.
marthastewart.com
Idea 1. Autumn topiary
Topiary is a decorative tree that can be used to decorate a dining table, mantel, or front door area. To make it, you can use natural or artificial materials, for example: leaves, berries on twigs, acorns, cones, chestnuts, flowers, dried citrus slices, as well as felt, sisal, linen and whatever your imagination tells you. In the next slider you can see several examples of such autumn crafts.
- Autumn topiary made of artificial flowers
- The crown of this Halloween topiary is decorated with green split peas.
- Craft from an artificial hydrangea flower
- Crafts made from artificial autumn leaves
- Topiary of pumpkin, autumn leaves and flowers
Next, we present to you a simple master class on making an autumn decorative tree from artificial leaves and berries.
Materials:
- Clay pot;
- Wooden stick or branch;
- Two polystyrene or floral foam balls;
- Materials for decorating the crown;
- Dry moss (you can replace it with sisal);
- Glue gun and several glue sticks;
- Scissors;
- Side cutters or pruning shears;
- Acrylic paints for painting the trunk, ball and pot (optional).
Instructions:
Step 1. Cut a hole in the base ball with a sharp tool for the barrel, about a third of its diameter deep. Place a drop of hot glue into the hole and insert the barrel into it.
Step 2: Insert the second ball into the pot. If the ball does not sit tightly enough in the pot, place newspaper around it. Cut a hole in the ball for the trunk, 2-3 cm deep. Insert the trunk with the crown into the hole and adjust its length. Next, drop glue into the hole of the ball, place the barrel in it and begin to fill the hole with glue, placing small pieces of paper around the barrel. This is necessary so that the hot glue does not deepen the hole too much.
Step 3: Paint the pot the color you want if you don't like the original look. In this project, the pot was painted with spray paint in a dark bronze shade from Rustoleum (sold in construction stores, for example, in Leroy Merlin).
Remember that the design of the pot should be simple and unpretentious so as not to distract attention from the crown. If necessary, paint the barrel and/or balls at this stage.
It is advisable to paint the balls so that the gaps between the decorative details are invisible.
Step 4. While the paint on our blank is drying, sort the decorative parts by type and size. If you use artificial leaves, flowers and berries with a wire base, then when cutting them, leave “stems” about 2 cm long. This is necessary in order not only to glue the parts, but also to stick them into the ball - then they will hold more securely . If the “stems” do not have wire, then it is better to cut the parts “at the root”.
Step 5. Now it's time for the fun part - creating the crown. First, evenly distribute and glue the largest parts onto the ball, then the middle ones. Finally, fill in the gaps with small embellishments.
Step 6. Well, that's all, all that remains is to decorate the ball in the pot with dry moss or sisal, after treating it with glue.
Top articles: 7 things that are high time to be recycled and get paid for it, rather than thrown in the trash
Forged candlesticks
Only a professional blacksmith can make luxurious and unique forged candlesticks on his own. The incredible work of the craftsmen is impressive; all forged candlesticks are unique in their kind, because they are made by hand. Such a candlestick will highlight the excellent taste of the owner of the house. Forged candlesticks look great in a classic and Gothic interior - the photo confirms this. But such a decorative element would be no less appropriate in a modern interior. Each candlestick looks like a work of art.
Stylish forged candlestick
You can create surprisingly delicate and cute things from heavy metal
This candlestick will fill the whole house with warmth and comfort.
An openwork forged candlestick with glass pendants will become a luxurious decoration of the room
Incredibly elegant, stylish forged candlestick that will bring a touch of magic to the interior
Exquisite white forged candlestick is perfect for a classic interior
Themed candlesticks
Christmas wooden cutouts in the shape of snowflakes or deer
Candles are not always created to brighten up everyday work. It's nice to look at the quiet, diffused glow. However, they can also be a necessary attribute of the upcoming holiday.
For the New Year
Paint, glue, satin ribbon will help turn a boring holder into a New Year's character.
There is nothing more inspiring than letting the New Year's spirit into the room. Garlands, tinsel, a large Christmas tree are an integral part of the New Year's bustle. But there is another important element - tangerines.
Citrus can please not only with its taste and aroma, but also with its appearance. Use it to create a unique candlestick:
- cut the peel in half along the perimeter, remove the top part.
- Use a pen to draw markings (pattern, star, herringbone, circle).
- take miniature scissors and cut out the design.
- Decorate along the outline of the images with carnations.
- the second part is the base, place a tablet candle in it.
- Put the orange base back together.
Citrus creates bright lighting + adds a stunning aroma to the room
Similarly, place a burning candle in an apple, pineapple, melon. Fruits can become not only part of dinner, but also an element of table setting.
We use baked goods
Do-it-yourself stained glass gingerbread house
You can also create a fairy-tale world by making your fantasies come true with the help of salt dough. To decorate your future candlestick, you can choose a Christmas house template.
Initially, the kneaded dough is rolled out, from which we will cut the walls and roof of the house. Make several openings on each part - a door and windows. To make it easier to cut out the desired shape, outline templates or available tools - baking molds in the shape of a heart or a snowflake, a shot glass, etc.
Then we begin to glue all the PVA parts along the edges. To make the walls even, the seams on top should also be greased with small sausages of dough - the “patch” should be smoothed with sandpaper. The resulting structure must be dried in the oven at a low temperature - it will become more stable and strong.
When the house is dry, you can start painting: you can decorate it with any paints. Finally, coat with varnish. Sprinkle additional salt on top to add a snowy touch.
You can involve children in the process of cutting and painting - they will certainly enjoy decorating the sculpture.
On Halloween
A wax hand is a great way to scare guests on Halloween.
Western holidays such as Christmas and Halloween are another reason to add a special atmosphere. Costumes of your favorite characters, creepy decorations with cobwebs, bats and, of course, a carved pumpkin are important components of All Hallows' Eve.
Jack-o'-lantern
To create dark lighting, you can also decorate the jars in a Halloween style.
Carving a pumpkin seems simple, but you also need to be careful. Therefore, it is advisable to follow the following points:
- Use a knife to make a hole on top of any size or shape (circle, square, zigzag);
- Use a spoon to remove the contents;
- Mark all the contours with a felt-tip pen - eyes, nose, smile (you can use a stencil);
- make a small depression inside;
- light the flame, close the top.
It is advisable to make the facial features large, since carving a pumpkin is not easy. It has a hard skin.
For a wedding
Wedding lighting suggests more sophistication, tenderness
Handmade candlesticks on a wedding table are elegant. To create them, you can also use upside down glasses and place buds inside the bowl that match the wedding theme:
- in classic versions, use roses, several spruce or artificial branches, leaves, ikebana;
- the emphasis on bed colors is soft flowers in the form of peonies.
Floor lamps are perfect here; they look unusual and cute. Turn the glass over, make a floating candle, and paint wedding motifs on the glass (hints of a suit and wedding dress, bright hearts, gentle doves, etc.).
In general, choose according to the style and mood of the wedding. You can focus on the time of year. Examples of wood and leaves are also suitable for decorating an autumn wedding; more greenery for a summer or spring wedding; white, cold shades, pine needles, pine cones for a winter wedding.
Video master class of a candlestick that looks great in a wedding sideboard.
DIY candlesticks made from glasses
A glass can be used as a candlestick in different ways. The simplest option is to turn the glass over and place a stable candle on the flat base of its stem. Under the bowl of the glass there can be any decorative materials - figurines, plant branches, ikebana, fresh flowers, Christmas tree balls (for New Year's candlesticks). To make the candlestick mobile and fill it with smaller details (beads, pebbles, shells), glue an old CD to the base of the future candlestick. First cover the disk with colored paper or foil - this way you will not only increase the aesthetic properties of the craft, but also eliminate the hole in the middle of the disk.
Mother-of-pearl beads in a glass add elegance and tenderness to the candlestick
You can decorate a whole New Year's landscape in a glass
An equally simple, but incredibly elegant candlestick can be made if you place a candle-tablet in a glass, having previously created in its bowl a composition of fir branches and cinnamon sticks, fresh flowers and leaves, sand and shells. You can glue a rim made of braid, tinsel, or rhinestones along the edge of the glass, and decorate the stem and base in the same way. A candlestick with a floating candle will be incredibly romantic - the same Christmas tree needles, rosehips, beads can be filled with water and a candle-tablet placed on its surface.
The glass can be filled with absolutely any decor that suits the theme of the evening
You can turn a glass with a candle into a kind of table lamp. To do this, you need to make a lampshade from colored paper or cardboard. A lampshade is an ordinary cone with a cut off top. Thanks to this shape, the lampshade does not even need to be fixed to the glass. You can additionally decorate the lamp with braid, paper flowers, appliqués, rhinestones, perforations, tie a ribbon on the leg, wrap it with yarn or narrow strips of paper.
A candlestick made from a glass with a lampshade will be a wonderful decoration for a festive table
Selecting a candlestick according to the size of the candle
The use of natural materials will not lose its relevance.
For each type of candle it is worth choosing a variety of candlesticks. The most popular ones are long church ones, tea ones, and traditional paraffin ones in the form of a cylinder. The shape of each of them is unique, so the same candlestick will not always fit the entire collection of small lights.
Long church
Long candles look attractive in a solid composition
The peculiarity of church types is their elongated shape. Compared to other types, they require fastening at the base. Therefore, candlesticks are made in the form of a platform on which the lamp can stand stably.
Select a holder size so that falling wax does not fall on a table or other surface.
To decorate church candles or create an entire prayer corner, you can use:
- Clay or gypsum. Thanks to the plasticity of the material, it is easy to sculpt angel figures
- Spools for thread. This is the easiest way. You just need to place the candle right in the center
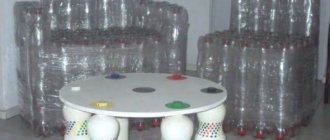
- Available materials. For example, you can make a candlestick from plastic bottles by cutting them in half, connecting the ends, which are closed with a cap.
Volumetric hemp
A wooden cut can be used as a holder.
Hemp models are the simplest, most typical, intended for everyday use. They have a cylindrical shape and are quite wide. Their length can be different - using low and high options you can create interesting installations.
Candlesticks for “stumps” can be created in a variety of ways. These are the easiest candles to decorate because they have a convenient shape. You can either simply add decorative elements at the base or create forged lanterns in which lights will be placed.
Tablet suppositories
An aquarium filled with garden roses
Using tea models is as easy as hemp models: their small size allows them to be placed in any vessel. What makes them unique is their flat shape. Thanks to it you can create a particularly original design:
Roses from autumn leaves
Our favorite fall craft is leaf roses. We use fresh leaves that are still easy to fold and do not tear. We bend the leaf in half.
Fold the sheet in half
Then cut in half again.
Now twice more
Twist to form the middle
We cover this core with the remaining leaves, forming a flower. We fix the “petals” with thread. We will get a neat flower head.
We fix the leaves around the bud
But the most interesting thing will happen after the leaves dry. They will twist in different directions, and the rose will look like a real one!
Rose of leaves
It’s like a fresh bud will bloom before your eyes. The more leaves you use, the more magnificent the flower will be. We twist the numerous stems of the leaves together, forming the stem of a rose.
You can make a bouquet from several flowers, complementing it with large autumn leaves.
You can leave the bouquet in this natural form. Or fill it with color using acrylic paint or gouache.
The leaves can be curled quite tightly, then the buds will be more elastic.
Roses from leaves
Roses from maple leaves
Autumn vase
You can make an original flower vase from a large, smooth pumpkin. To do this, you just need to cut off the top of the pumpkin and remove all the pulp from it. Then place a jar or bucket filled with water inside the pumpkin. And then place a luxurious bouquet of autumn flowers.
Seabed made of leaves and petals
Using autumn leaves, you can create an entire underwater world. To begin, tint a white album sheet with blue paint. You can also take blue paper, but then it will not have the stains characteristic of the water surface.
We tint the sheet with paint
Unfold the sheet in a way that is convenient for you, and cover the bottom part with dried autumn leaves. Use leaves of different shapes and colors to create a beautiful seascape.
Leaves for the seabedAlgae from the parachutite
White birch bark will become a shell.
Bark shell
And from other leaves and dry flower petals you can make fish.
Fish made from petals and leaves
Dry twigs will turn into a variety of algae.
Algae from twigs
This unusual picture can be made from ordinary autumn material!
Autumn painting "sea bottom"
Sea
To obtain a product in a marine style, you need a glass vessel. A candle-tablet is placed at its bottom, which is carefully sprinkled with sand.
Additionally, the products are decorated with beautiful stones and shells. A string is wound around the outside of the container and a bow is tied at the neck.
Popular posts
03.11 How to choose a mattress? It’s difficult to choose even from three mattress models you like.
Today we will figure out what to look for when choosing a mattress for a new bed or to replace an old one.
25.09 How to choose and not regret? We choose a sofa according to the rules! How to choose a sofa that will be convenient and comfortable for each member of your family? What should be the shape, upholstery, are legs and armrests needed? Choosing a sofa is not an easy task, but our tips will allow you to choose comfortable furniture without much time and effort.
10.11 How to choose a bed? A comfortable bed is an essential component of home comfort, so today we will tell you what you should pay attention to when choosing a bed.. 17.11 Everything in order: choosing a new wardrobe What should you pay attention to when choosing a wardrobe for your bedroom? What are the advantages of a hinged wardrobe over a sliding wardrobe? What sizes can be considered optimal? Read about this and much more in our new article!
07.12 5 reasons to choose a bed with a lifting mechanism Why are beds with a lifting mechanism becoming more and more popular from year to year? There are five simple reasons for this!
17.09 How to choose a sofa: features of upholstery materials When choosing sofas, the upholstery material is of considerable importance, because it determines the practical properties of upholstered furniture, its appearance and durability
In order not to get lost in all the variety of choices, today we will talk about the features of the most common upholstery materials.
17.11 Everything in order: choosing a new wardrobe What should you pay attention to when choosing a wardrobe for your bedroom? What are the advantages of a hinged wardrobe over a sliding wardrobe? What sizes can be considered optimal? Read about this and much more in our new article!
07.12 5 reasons to choose a bed with a lifting mechanism Why are beds with a lifting mechanism becoming more and more popular from year to year? There are five simple reasons for this!
17.09 How to choose a sofa: features of upholstery materials When choosing sofas, the upholstery material is of considerable importance, because it determines the practical properties of upholstered furniture, its appearance and durability. In order not to get lost in all the variety of choices, today we will talk about the features of the most common upholstery materials.. 27.05 Keeping up with the times: wall panels Creating a unique kitchen has become even easier! Find out about our new wall panels...
20.04 What types of kitchen layouts are there? Read about the main methods of planning a kitchen, as well as universal recommendations for placing its main elements
21.06 Leather sofa: pros and cons Should you choose a sofa made of genuine leather, or is it better to choose a fabric one? In this article we weighed the pros and cons.
27.05 Keeping up with the times: wall panels Creating a unique kitchen has become even easier! Find out about our new wall panels...
20.04 What types of kitchen layouts are there? Read about the main methods of planning a kitchen, as well as universal recommendations for placing its main elements
21.06 Leather sofa: pros and cons Should you choose a sofa made of genuine leather, or is it better to choose a fabric one? In this article we weighed the pros and cons.
Top articles: Useful invention: how to take your own measurements correctly
30.03 How to properly unpack a mattress in a roll? A rolled mattress is very convenient to transport, but how to unpack it correctly? Follow these simple instructions...
22.03
Today it has become very fashionable to decorate your apartments and country houses with interior items that in one way or another reflect the season outside the window. If with winter everything is clear to many, because we all decorate New Year trees, hang Christmas wreaths on the doors and arrange candles. For example, in the fall, not everything is so simple.
The news portal “site” in this article has prepared for you several interesting ideas on how to easily, beautifully, and most importantly not expensively, transform your home, make it cozy and elegant, luxurious and magical in the fall.
Idea 5. Candlesticks in the shape of autumn leaves made from salt dough
Leaves can be used not only as a decorative or finishing material, but also at the same time as a template and stamp for creating crafts from any modeling mass. Take note of the idea of autumn crafts with children in the form of these cute salt dough leaves. By the way, they are not only beautiful in themselves, but can also perform a practical function, for example, you can store various decorations on them or put candles on them.
Salt dough candlestick
Materials:
- Ingredients for kneading salt dough: ½ cup salt, ½ cup water, 1 cup flour;
- Container for kneading dough;
- Glass bowl;
- Rolling pin;
- Knife;
- Large leaves;
- Vegetable oil;
- Acrylic paints in yellow, red, orange and brown.
Instructions:
Step 1. The first thing to do is go for a walk with the whole family and find at least two beautiful large leaves.
Step 2. Then knead the salt dough. To do this, simply mix all the ingredients and roll out the dough to about 6mm thick (no less), so that it is not too thick, but not too brittle.
Step 3: Place your leaves on the dough and run a rolling pin over it using light pressure.
Step 4: The next step is to cut out the shape around the leaf. Use a sharp knife and, of course, take this part of the work yourself.
Cutting out the shape
Step 5. Remove the leaves. Invert the glass bowl and coat it with a thin layer of vegetable oil.
Step 6
Carefully lift the sheets and place them on the bowls
Place the dough on a bowl coated with oil
Step 7. Place the bowls with the dough in the oven preheated to 250 degrees and leave them to bake for 2-3 hours.
Baking salt dough
Step 8: Remove your pieces from the oven and let them cool in the bowls for about 15 minutes.
Then carefully lift the leaves and leave to cool completely.
Blanks
Step 9. Once the bowls have cooled, start painting. To do this, pour paints of each color into cups and let the children mix them themselves and paint first the inside of the leaves, and then the outside
Crafts made from salt dough are quite fragile, so you need to paint them carefully, without pressing. Wait until the paint dries and, if desired, cover the bowls with a layer of PVA glue
It will give the craft a matte finish and make it a little stronger.
Painting the bowl
Leaf shapes may vary.
Salt dough leaves
By the way, if you don’t want to bother with salt dough, you can replace it with soft plasticine. The photo below shows an example of such a craft.
Autumn craft from plasticine
Room decor with leaves
Just like before the New Year, in the fall you can also decorate the room with garlands, pendants, wreaths, decorate the window, and decorate the curtains.
These leaves on the ceiling remind me of butterfly decor.
For a romantic evening, make candlesticks decorated with autumn leaves.
And if you are having a picnic at the dacha, decorate the cutlery with autumn leaves.
There are also small secrets here, and leaves preserved in beeswax will stick better in these decorations.
It needs to be melted slowly in a water bath.
Then drop the leaves into the melted wax one at a time, take them out and shake to remove excess wax.
We hang them by the cuttings with clothespins on a rope to dry.
If you are not satisfied with the result, the procedure can be repeated, i.e. After complete drying, dip into wax again and dry.
Alternatives from natural materials
Candlesticks can be hung along the garden fence to make cold evenings seem warmer
If you want to add more nature to your apartment, you can add a special theme - forest or sea.
From leaves
These glowing jars will save you from the autumn blues.
Yellow fallen leaves in a candlestick will help preserve memories of a wonderful autumn:
- completely cover the glass jar with decoupage glue;
- Gently apply clean, dried leaves to the surface (you can stir on top);
- in the process, go over each leaf with your finger wrapped in cloth;
- secure a jute rope around the neck
From shells
Gold-painted shells will not let you forget about the sea.
The easiest way to use shells is to make a full-fledged candle out of them. Choose different shapes of large and medium sized shells. We paint the products in any color (gold, silver, bed and white shades are ideal) using one of the suggested methods:
- Aerosol can;
- Acrylic (it is better to take a foam sponge/sponge);
- Thin decorative foil (apply glue to the shell, wrap it in a sheet, remove after 30 minutes);
Next, it remains to install the wick and fill it with a small amount of paraffin.
You can melt the wax of an almost finished candle in a water bath or scrape a little from a whole one. Gradually stir the paraffin until smooth using a wooden spatula.
From the cones
Pine cones can be combined with pine branches, red berries
To create a candlestick, you can use either one whole cone or a collection of them. The second option uses similar techniques that we discussed: we attach different cones and additional decor to the base, leaving room for a candle.
The first one is more interesting - a fairly simple but elegant option. First, scrape off a few flakes from the top with pliers to create a flat surface. Push a metal pin (large needle) inside and place a long candle on it.
The candle can be attached to the pine cone using hot glue, but this design is not strong enough.
Idea 3. Panel of leaves
Next, we present to you an idea for crafts made from autumn leaves. Since this master class does not use hot glue or sharp objects, you can safely involve children in the work, and especially in collecting material.
An idea for an autumn craft made from natural materials that you can make with your children and use for seasonal home decoration
Materials:
- Wooden board or thin plywood;
- Pre-dried leaves (read instructions on how to dry leaves and flowers);
- Thin branch;
- Stain;
- Brush;
- PVA glue;
- Marker;
- Any heavy object as a press.
Instructions:
Step 1. Cut out the wood with a jigsaw and sand the ends with sandpaper.
Step 2. Paint the board with stain and leave to dry.
Step 3. Using a marker, draw a maple leaf on the board by hand, using a template or stencil.
Step 4. Start gluing the pre-dried leaves (see how to dry them at the end of the article) like a fan, trying to place them so that their edges coincide with the outline of the picture. At the same time, you should not glue the leaves completely; let their tops be a little loose so that the panel gains some volume. Place a press of suitable size on each glued leaf for a minute.
Fixing a leaf with a press
Keep in mind that the leaves will not stick immediately, but after the glue dries they will stick well.
Step 5. To make the outlines of the design clearer, trim the leaves in some places. However, try to resort to such correction as little as possible so as not to lose the beauty of natural lines.
Step 6. Now attach the twig to your panel in place of the stem, break off the excess and glue it.
The following selection of photos presents examples of no less original autumn panels.
- Dried leaf covered with gold paint in a frame
- Leaves on glass in frame
- Autumn panel made of dried leaves, reeds and berries
- Autumn herbarium in frames
- Panel on canvas from a frame trimmed with acorn caps
And finally, we suggest watching a video tutorial on how to make an autumn craft with your own hands in the form of a panel of leaves with a frame of acorns.
Candlestick with handle
For the product, take a jar in which canned pineapples were sold. Wet sand is poured into it. You can put the container in the freezer for 2 hours. This must be done so that the sand does not spill out during work.
A candlestick made from a tin can will decorate the interior with your own hands, so choose decor that matches the style of the room. The selected design is applied to the workpiece with a marker.
Using a nail and a hammer, holes are punched in the designated areas. Then remove the sand and wash the container thoroughly.
Crumpled paper is placed in the jar, and aerosol paint is applied to the surface of the candlestick. A handle for the jar is made from wire and attached to the workpiece.
How to skeletonize leaves
This is a special technique for making leaf skeletons. They give crafts a special effect, as they are very light and transparent.
To work, collect fresh leaves, prepare baking soda, egg dyes, a toothbrush, simple paper napkins, and small dishes.
Mix 1 part baking soda and 4 parts water. Dip fresh leaves into the mixture, covering them entirely with the solution. Place the container on the fire, let it boil and leave on low heat.
After half an hour, turn off the heat and remove the leaves, placing them shiny side up on a flat surface.
Gently blot excess moisture with napkins. Using a toothbrush, carefully scrape off the pulp from each leaf (using gentle movements so as not to damage the leaves)