Boys are unpredictable, mischievous and very cheerful people. Their heads are constantly filled with strategies for battles and sieges of fictional fortresses. They know very well what a slingshot and a catapult are. And very often they can build this weapon from scrap material.
But how upset a child’s heart is when a catapult, built with great difficulty, crumbles after the first shot! The child does not yet know how to make a catapult that will be durable and have a firing range. Offer your son help. Making such a tool yourself will not be difficult.
And you know for sure, or can find out, how to make a catapult with your own hands.
Large catapult
Such a weapon is intended for entertainment while relaxing at the dacha or in any other country house. You should not use it at home or in an apartment. And, of course, do not forget about safety precautions. Never leave children unattended with this device!
It is best if you and your child plan how to make a catapult. He will be happy to join in the creative process. And the step-by-step instructions given will tell you how to make a catapult with your own hands.
Where to begin?
- Prepare three planks. For the base, select a board 1.5 m long. The fixed rail is a 0.5 m board. And the movable arm should be 60-65 cm long.
- At a distance of 0.5 m from the rear end of the base, it is necessary to secure the movable lever with a furniture loop.
- Attach a fixed rail to the front end of the base with self-tapping screws. For strength, install a mounting bracket inside.
- Screw a tin can to the top of the moving arm.
- Screw in the special screws. There should be four of them in total. Secure a stretched rope and a rubber band through them.
Have a good time!
Mini catapult
You can never predict with certainty when a catapult will be needed. It can be a great way to keep your child occupied if you have to wait a long time, and children, as a rule, do not like to wait.
With the help of such a weapon you can arrange real competitions between friends. Children will appreciate your efforts.
And if the manufacture of a large catapult requires the preparation of materials and adult male power, then the creation of a mini-version is possible even for a child.
So how to make a mini catapult? For the simplest option, popsicle sticks are perfect. You need 9 of them. Prepare five rubber bands. You can use regular hair bands or money ones. You will also need a plastic bottle cap.
- Connect 7 sticks together. Secure them firmly at both ends with rubber bands.
- Place the remaining two sticks together and secure them carefully on one side. Split the opposite ends and place them on the prepared bundle of seven sticks. Try to push the ligament as deep as possible. Secure this position with two elastic bands for strength in a criss-cross position.
- Glue a plastic bottle cap to the top of the catapult (one of the split sticks). To do this, it is best to use a fairly strong glue, for example “Moment”. You can use liquid nails.
The mini catapult is ready. Have a good time and, of course, win the competition!
Paper catapult
Are you surprised? And have no idea how to make a catapult out of paper? In fact, there are a lot of origami options. The simplest and most accessible is a regular airplane. Everyone loves to launch them, absolutely regardless of age and gender. The main thing during production is to take into account the rules of aerodynamics and choose high-quality paper.
And how you want your airplane to fly higher and fly longer. This is very easy to achieve if you know exactly how to make a catapult.
Attach a rubber band to the base of your paper flyer. It is this simple device and a pencil that will help the plane soar higher than others.
To start this miracle, hook the eraser to the end of the pencil. You pull the airplane back and let go.
Swift flight over long distances is guaranteed.
Pencil catapult
You can make a catapult from almost any item. Even from ordinary pencils, which are always found in the house, you can create excellent throwing weapons. Let's look at how to make a catapult out of pencils.
For such a device you will need ten pencils, fourteen erasers and one bottle cap.
- Create a square out of four pencils - this will be the base of the catapult. Carefully secure the places where they intersect with rubber bands.
- Insert a pencil vertically into each intersection. Secure their position with additional elastic bands.
- Connect the vertical pencils in twos and fasten them together. The catapult stands are ready.
- Add another pencil to the top mounts of the posts, placing it horizontally. Secure the position with rubber bands.
- Place the last pencil on one side of the base (see picture) and secure it carefully. This will be the catapult lever.
- Glue a plastic cover to the free end of the lever.
- Attach the last rubber band to the top horizontal pencil by pulling it under the lever.
The catapult is ready. Best hits to you!
Lego catapult
Original guns are obtained from ordinary Lego construction sets. Very often, many of its parts, from which masterpieces were once built, according to instructions, gather dust unnecessarily in boxes.
And the child asks for more and more construction sets. Is it worth buying them right away? After all, from numerous parts you can independently build wonderful creations that are in no way inferior to those described in store recommendations.
It takes a little time and imagination.
Encourage your child to get out all the unwanted lego pieces. “How to make a catapult?” - ask him. Just don’t leave him alone, help him start the construction process.
You will be surprised how quickly your baby will get involved in creativity. Children have a very developed imagination, but to stimulate it, the child needs a push. Get him interested.
If you yourself have no idea how to make a catapult, where to start, look at the pictures.
Before your eyes, the most amazing and unique masterpiece will be created - the fruit of your child’s imagination, the best catapult in the world! Praise your child and admire his creation. Before you know it, soldiers, towers, and castles will appear near the built catapult, built by a single architect—your child!
Instead of a conclusion
A catapult is a very simple structure. And if the question arises about how to make a catapult with your own hands, don’t worry. The main thing is to determine what materials you will use to create such a weapon. Stock up on all the necessary components for your future masterpiece. And together with your child, begin to conquer the heights of independent creativity.
Source: https://info-4all.ru/semya-i-dom/kak-sdelat-katapultu-svoimi-rukami/
Make a counterweight box
H from a 6 mm thick board
, as well as the front and back
I
walls
and the bottom
J. Additionally, cut out another bottom piece to use as a spacer when assembling the box. Mark, file and sand the corner bevels on the side walls H (Fig. 2).
Now assemble the box
(photos F
and
G ).
(Photo F) Apply glue to the end edges of the bottom J. Using clamps, press the front and back walls I to them, inserting a leveling spacer between them. (Photo G) Now apply glue to the edges of the bottom, back and front walls of the I/J. Using clamps, press the side walls H to them.
2. Mill the outside of the side walls H
chamfers 3 mm wide
(Fig. 2).
K from 13 mm thick material
and drill through holes with a diameter of 6 mm using a drill with a central point. Then make 6mm wide corner bevels. Due to their small size, sand these parts by hand using a sanding block and 100-grit sandpaper.
4. Glue the pads K
to the side walls
H
, aligning them in the center with a 13 mm indentation at the top, and secure with clamps.
How to make a catapult at home - Instructions - step by step
Instructions on how to make a catapult at home.
The catapult is an ancient invention, designed by its existence to instill terror in the inhabitants of fortresses and cities. The burning stones they threw caused panic and destruction for many centuries.
And it can also sow panic among your colleagues and office mates???? To create it, you don’t need complex tools and materials, you just have to walk through the desks of your same colleagues and collect their extra pencils.
Step 1. Materials and tools. How to make a catapult out of pencils
We will need:
- 10 pencils
- at least 14 pieces of rubber bands for money
- piece of twine
- plastic bottle cap
- scissors
Step 2. Tie two pencils with an elastic band
Using an elastic band, we firmly connect the first two pencils of our future catapult.
Step 3. Add a pencil
As shown in the picture above, add another pencil.
Step 4. Making a square - the base of the catapult
By adding another pencil to the bunch we get a square. This square will serve as the base for the catapult.
Step 5. Another pencil
Now add another pencil, securing it as shown in the photo above.
Step 6. Corner design
We add two more pencils, getting this corner design. Bandage everything tightly so that the future catapult does not fall apart during the first shot.
Step 7. Connecting the corners
We connect the corners of our structure to form a rigid frame.
Step 8: Add Twine
We tie a piece of strong rope as shown in the illustration above.
Step 9. Cutting the gum
We cut one elastic band so that we get a flagellum.
Step 10. Tie an elastic band
We tie an elastic band at the top of the protruding structure.
Step 11. Last pencil
We insert the last pencil into the rope, twist it slightly with a pencil.
Step 12. Install the pencil for the catapult lever
Everything can be seen here in the photo.
Step 13. Bring the pencil out
We insert the tip of the pencil between the frame on top and the eraser. We pull it up as much as possible, but so that the other end does not slip out of the rope from below.
Step 14. Prepare the lid
Use scissors to make a hole in the lid the size of a pencil.
Step 15. Assembling the finished catapult with your own hands!
We insert the lid onto our pencil lever, put a projectile (an eraser for paper, for example) and send it on a fast and energetic flight around the office!
I told you how to make a catapult with your own hands, very quickly and easily! It will bring you a lot of fun and joy!
Source: https://steptostep.info/kak-sdelat-katapultu-v-domashnih-usloviyah/
Start by making a platform
1. Cut out sides A
and platform
B
according to the dimensions specified in the “List of Materials”.
Place the platform on 3 mm thick pads and glue the sides to its edges, aligning the ends of the parts (Fig. 1
and
1a).
Make sure the gluing is square and secure the parts with clamps.
C from 13 mm thick material
.
Install a 6 mm thick groove disc into the saw machine. Using an angular (cross) stop with a wooden plate and a stopper, cut grooves 3 mm deep in the support bars at a distance of 25 mm from the ends (Fig. 1),
turning the parts 180° after each pass.
Quick tip!
Check the settings on a test cut.
With two passes with the part turned, even a small inaccuracy doubles, and the required distance between the grooves cannot be obtained. Make test passes on a piece of the same length and change the settings if necessary. Glue, fixing with clamps, the support bars C to the sides of the platform A. Place the outer bars as shown in the photo, and the inner ones at a distance of 51 mm from them.
Lubricate the grooves with glue and glue the bars to the sides of the platform (Fig. 1
and
photo A).
DIY catapult drawings. How to make a catapult at home with a child
A trebuchet was a siege weapon or catapult that was used in medieval England and consisted of a large lever mounted on a cart or stand.
The trebuchet works by having a counterweight counterbalance the mechanism, which sits opposite the projectile, lowering a lever to launch a large stone or other projectile from the sling towards the enemy - somewhat reminiscent of how David used his sling against Goliath.
Trebuchet can be created in any size, but all of them, if built correctly, demonstrate the principle of lever action.
Steps
Part 1
Planning the construction of a catapult
Attach supports to the long base pieces and posts.
Place one of the assembled pieces on its side so that the support covers it on top. Align the support with the bottom of the base, the back of the post and the slope towards the end of the base. Glue the support and secure with nails or screws.
Drill holes in the tops of the posts.
After assembling the frame, you will pass the axle through them, on which the lever will rest.
- Mark the location of the holes at the top at a distance of about 1/10 of the entire length of the stand. You will need a drill bit that is the same diameter or slightly larger than the diameter of the axle.
- Drill a hole in the lever.
Make a main hole 1/4 the length of the arm from one end and additional holes on either side of the main one. (This will allow you to adjust the lever's reference point.)
Attach hooks with holes to the end of the arm.
These hooks will allow you to secure the sling and counterweight respectively.
Assemble the catapult frame.
Attach the 3 cross structures to the base using glue, nails, screws or bolts, depending on the size of the catapult. Fix one of the structures at the ends of the frame, and the third simply above the racks.
Place the lever.
Place the lever between the posts with the long end of the lever toward the short side of the base and secure with the hook facing up. Insert the axle through the hole in the first post, through one of the arm holes, and through the hole in the second post.
Paint and decorate the catapult.
If your catapult is made of wood, painting it will help protect it, especially if you plan to store the catapult outside. You can decorate the supports with historical flags, your family's coat of arms, or the logo of the military historical society you belong to.
- Make a sling.
Take a piece of thick fabric (burlap for a large catapult) and fold it in half. Gather the corners on both sides and tie them with rope, cord or twine to form a bag. Make loops on the free ends of the rope so that you can easily put them on the hook at the throwing end of the lever.
- If you wish, you can fix the sling with a rope on the hook, tying the other end to a loop of thin wire, then the sling will be easier to open when launching a projectile. You can also tie both ends of the rope to a wire loop to make it easier to put the sling on and off the hook.
Catapult
- this is the sister of the slingshot. A formidable and serious throwing weapon. Can a boy do without her in at least one battle? Making a catapult with your own hands is very simple. Invite your little son to make a catapult himself. He'll probably do it.
To make a catapult with your own hands you will need:
- base for the catapult - a wooden plank, block or something similar
- catapult mechanism - clothespin, wooden is better, it is stronger
- catapult shoulder - make it from a popsicle stick
- catapult saddle - any plastic bottle cap
- reliable glue - PVA, liquid nails, super-moment, etc.
Glue the clothespin to the base using reliable glue. Glue a popsicle stick onto a clothespin. Then take the bottle cap and glue it onto the stick so that the tip of the stick protrudes slightly.
THE CATAPULT IS READY.
Now you can shoot and sweep. Pompoms and balls are suitable for this. You can also make shells from beans or peas. The main thing is not to break anything at home. And if you make several catapults, you can arrange a real battle.
Here is another option on how you can make a catapult with your own hands.
Catapult in 2 minutes
- All you need is a chair and an elastic band.
- We put an elastic band on the legs of the inverted chair and ???? the catapult is ready.
- With the help of such a catapult you can launch paper airplanes if you attach a paper clip to them for a hook (look at the photo).
- You can attach a drawn target to the wall and throw suitable small objects at it.
As they say: “Whatever a child enjoys...” With a little imagination, a child can be occupied with an exciting game for more than one hour.
And also, if you repeat the word “CATAPULT”
, it will turn out to be a very funny foreign language and a good exercise for speech development.
To create such a catapult, you will need slats with a square section of half a centimeter, some twine, nails or glue, and a bottle of beer. After all, making such a catapult with beer is more fun, and besides, a bottle cap will not be superfluous.
The basis of the entire structure is the “foundation”. It’s quite simple to do, so this stage doesn’t need any special steps.
The next step is to create a stop and twist the string for the release lever itself. The rope was directly pulled into the stand. The complex method of twisting the twine using wedges was deliberately abandoned. Strength lies in simplicity
Below is a photograph of the same stage, only the front view is shown. Everything still looks a little askew, but that’s not the end...
We attach guides for the lever so that during the “combat move” it does not go to the side, but moves clearly in a straight line. Just before the end!
So that our structure does not fly apart from the first shot, we strengthen the head part. The combat lever hits a small block on the head - this protects the device and improves the firing angle. We attach a wire hook to the lever. We mount the trigger mechanism on the base.
We wrap the head part with twine; this will also provide additional protection and soften the impact of the lever. We use a beer cap as a container for charges.
Well, everything is ready - this is the first side view. The range with small small rocks is approximately 2m.
- Basically the same as the previous picture, only a slightly different look.
The final result. The coat of arms was mounted on the head part - also a beer cap. The catapult was installed on “soft” balsa wood legs.
A little about the history of catapults...
A catapult is a throwing weapon of antiquity, the basis of ancient artillery. To throw a stone or a large arrow into the distance, you must first store up and then suddenly release energy. This can be done in three ways: by stretching the fibers, twisting the tendons and using a counterweight.
The prototype of the catapult was a huge bow - gastraphetus. According to ancient sources, it was invented by Zopyrus of Torent for the ruler of Syracuse, Dionysius I the Elder, in the 5th century. BC e. The warrior placed the gastraphet against the wall and rested his whole body against the arched “butt”, pulling the bowstring.
At the same time, a “dog” moved along a metal groove made in the gastraphet bed, which hooked onto special teeth and was fixed. Once the string was drawn, the string was inserted into it. The string tension in the gastraphet was greater than in a regular bow, and it hit much harder, and the arrow flew much further.
An enlarged version of the gastraphet on a stand, using a collar to tension the bowstring, pierced the metal shield and the wall of the siege tower.
The energy source of torsion catapults is bundles of elastic veins or hair, strengthened between rigid supports and twisted using levers. The power of the catapult depended on the diameter of such a beam.
For example, to throw a cannonball weighing 80 kg, a beam with a diameter of 10-30 cm was needed. Here are reconstructions of a Eutychon arrow thrower and a stone thrower built on this principle.
They were made at the Taman Museum-Reserve in the Rostov Region.
The catapults fired accurately at a distance of 100 to 300 steps. To service one catapult, from 4 to 10 people were required.
Hundreds of catapults were kept in the arsenals of ancient states. They were used during sieges, in field battles, and installed on ships. So the Carthaginians, after their defeat in the war with Rome in the 2nd century. AD About 2000 catapults were delivered. And this is a flamethrower - a catapult that threw vessels with Greek fire (a mixture of tar, sulfur and oil). Reconstruction of the Taman Museum-Reserve
- And finally, the last type of catapult used the energy of a falling counterweight.
You can make this simple ballista model in one evening. The model is functional - it throws projectiles at a distance of up to 5 meters.
The onager is a Roman torsion-type throwing machine.
The literal translation is “wild donkey.” This simplified ballista was nicknamed for the sound when triggered, which resembled the kick of a wild donkey’s hoof. Onager-ballista with a shoulder for throwing small stones or stone cannonballs The lever is activated by a torsion bar made of twisted animal hair Archaeological finds of metal parts of ballistas allows us to attribute its appearance to the third century.
The photo shows a modern reconstruction of the ballista.
Bamboo kebab skewers are surprisingly strong. This is an ideal material for making models. The only disadvantage of bamboo is that it does not stick well.
Therefore, the bamboo parts are fastened with threads, and then the joint is coated with glue. To make the model, I needed skewers, glue, threads, a plastic bottle cap, and a rubber band.
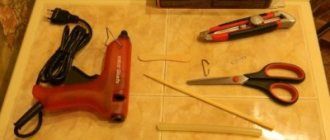
Tools: side cutters and hot glue gun.
In order to make a mini catapult with our own hands we will need
Materials required for making an onager: Threads, spool - 15 rubles. Glue "Titan" - 96 rub. Wooden skewers - 85 rub.
Stationery eraser, thick - free of charge. Lipton tea lid - shareware.
DIY ballista catapult: work progress
We cut the skewers into strips 10 cm long. This can be done with a stationery knife.
- From 4 slats we connect the base of the model.
- We make side crosspieces and screw them to the base.
- We make double cross bars.
- We twist two slats at the ends with threads and saturate the joint with glue.
- Install the cross bars.
The throwing arm is made of two slats. Shoulder length 14 cm, can be made longer.
Glue a plastic bottle cap to the shoulder. For this we use a heat gun. Hot-melt adhesive will reliably connect bamboo and plastic. The spoon is ready. The hot-melt glue dries in a couple of minutes.
Projectiles for throwing can be very different. Table tennis ball, coins, decorative glass balls for aquarium.
In the process of making the model, I made two spoons, 12 and 14 cm long. A catapult with a short spoon threw a projectile of only 2 meters, and with a long spoon - already a meter
We install the spoon and tighten the elastic band, which will be the power element of the ballista. Not a torsion bar, of course, but the ancient Romans didn’t have rubber, and they had to twist their hair.
Loading the ballista. We pull the spoon back and place the shell.
Shot. We release the spoon, and the projectile is carried forward.
To make the model, you can use other available materials. For example, tin. Having made a wooden model, I did not calm down. I bent a tin ballista from scraps of 0.6 mm thick tin. It turned out to be impossible to glue the metal parts, but a riveter was at hand. The structure is assembled with aluminum rivets.
Stand model of a ballista at an exhibition
Source: https://howmaster.ru/provodka/katapulta-svoimi-rukami-chertezhi-kak-sdelat-katapultu-doma-s/
Lever with pads
1. Cut out the blank for lever F
. Make a copy of the lever template and use spray adhesive to attach it to the workpiece. Saw out the lever and sand to the contour line. Delete the template.
Note.
of
5 mm shown on the template after gluing the overlays G. 2. From material 19 mm thick, cut a blank measuring 35x305 mm for lining G
. Make two copies of the trim template and attach them to the piece using spray adhesive. Cut out the overlays and sand them along the contour.
3. Using a drill press, drill into the edges of the pads G
holes with a diameter of 3 and 5 mm in the places indicated on the template.
Clamping the part in a wooden hand vice, mill 3 mm wide chamfers on the pads G in the places indicated on the template.
Quick tip!
To accurately align the parts and the brass rod, you need to carefully drill 5 mm holes.
To ensure the center of the hole in solid maple wood is exactly where you want it, use a center point drill bit instead of a regular twist drill bit. And to ensure that the holes are aligned, make sure that the drilling machine table is set exactly at an angle of 90° to the drilling axis. Now mill 3mm wide chamfers along the indicated edges and ends of the overlays on both sides (photo C).
Remove templates. To safely machine these small parts, hold them in place using a wooden hand vice, and minimize clearances around the cutter by inserting a replacement ring of the correct diameter into the mounting plate. If your router table doesn't have this option, check out the "Pro Tip" below for a simple alternative.
Don't have a plate with replaceable rings? Use an overlay!
There is a simple and quick way to make such an overlay. It will close the gap around the cutter, becoming a gap-free plate, and will provide reliable support for small parts, allowing them to be processed safely. Moreover, it will cost you very little - all you need to make it is a piece of hardboard.
- Cut out a piece of 6-mm hardboard that is large enough so that you can move a wooden hand vice with the part clamped over it without interference.
- Drill a hole in the middle of the piece into which the cutter bearing should fit freely.
- Lowering the cutter slightly, place a piece of hardboard with a hole on its bearing and attach it to the router table using clamps or double-sided tape.
- Turn on the router and raise the bit slightly higher than required to cut the chamfer.
- Lower the cutter to the desired height and chamfer the parts.
4. Places for gluing pads G
marked on the lever
template
F. Glue one pad to the lever and secure it with a clamp. Once the glue has dried, drill a 5mm hole in the arm for the brass rod (Photo D).
Then glue the second trim to the lever, lining up the holes with a brass rod
(photo E).
(Photo D) After gluing one of the pads G to the boom arm F, drill a 5 mm diameter hole in the arm through the hole in the pad. (Photo E) Glue the second trim G on the other side, aligning it with a brass rod inserted into the center hole.
DIY catapult at home: 2 ways
DIY catapult
Which boy doesn't dream of his own catapult? No, not about an ordinary slingshot, but about a real CATAPULT! Even the word itself makes all opponents tremble, let alone the battle...
We invite you to make a real catapult yourself, together with your son. We warn you, these are not flower wrappers; making formidable throwing weapons is serious work for real men! And you need to prepare for it thoroughly.
Method one, thorough
You will need:
- wooden beam, block, block or plank - something that will serve as the basis for the catapult
- clothespin (any one will do, but a wooden one is stronger and more stylish) - the basis of the mechanism of the future design
- an ice cream stick (you’ll have to have a good meal with a couple of popsicles before work, even if you have a spare stick) - it will serve as the arm of the mechanism,
- a cap from a plastic bottle (eggplant) - the saddle of a future catapult,
- glue - the glue should be manly reliable, everything is held on it, super-moment, PVA or something similar will do.
We firmly glue a wooden clothespin to the base board with super glue. We wait until it “sets”, and after that we glue the shoulder part - an ice cream stick - onto the clothespin. Now, we attach the saddle to the shoulder - we install the lid so that the end of the shoulder (stick) protrudes slightly. Let's be patient and wait until the entire glued structure dries well.
Well, the catapult is ready. You will also need shells. They can be made from wads of paper, cotton balls or pompoms. For heavy artillery, peas or beans are suitable, here, as you agree with your grandmother. Just try to avoid losses and not break anything during the battle.
Method two, fast
You will need:
- underwear elastic (aka mechanism)
- chair (aka base).
We turn the chair over and put rubber bands on the legs. The weapon is ready! Take care of the shells - and go into battle!
And if you call a friend and make two catapults, you can arrange a real battle. You can also hang a target on the wall and compete in accuracy. And also... well, real men will always find something to do with themselves.
Source: https://interiorsroom.ru/katapulta-svoimi-rukami/
Completion
1. Drill into arm F
1.5×6 mm guide hole for a screw with a ring head
(Fig. 3).
Then drill a 1.5x10mm hole in the upper end of the arm for a 16mm long hook rod. Screw a screw with a ring and a hook into the holes, leaving a protrusion of 6 mm.
2. To make a sling, take two pieces of cord 220 mm long and a piece of durable fabric or suede measuring 25x90 mm. Using an awl, make holes at the ends of the material in the indicated places. Tie the end of one piece of cord to the hole in the sling and the other end to the ring of the screw at the end of the lever. Then tie a washer with a diameter of 6 mm to one end of the second piece, and also tie the remaining end to the free hole of the sling.
3. Before installing the boom arm with F/G
between the posts
D,
screw 5x20 countersunk screws into the 3mm holes of the trims
G
to a depth of about 13mm
(Fig. 1).
Then insert the assembled
F/G
between the posts by inserting a 5mm diameter brass axle rod through the hole and adding 6mm washers between the pads
G
and the posts
D
.
4. For hanging counterweight box H/I/J/K
fasten eyebolts with a diameter of 6 mm to both plates
using
M6 nuts without tightening them
(Fig. 1).
Then place the eyebolt rings on the screws screwed into the boom arm pads and tighten the fasteners
(photos H
and
I).
(Photo H) Place the eyebolts on the screws in the covers G. Secure the eyebolts with nuts. (Photo I) Drive the screws deeper into the G pads to securely secure the eyebolts. The counterweight, however, should swing easily.
5. Finally, sand all of the catapult parts using up to 220 grit sandpaper and apply the finishing coat of your choice. Can't wait to try out the throwing machine in action? Read the box “How a Catapult Shoots” for tips on how to use this toy effectively and safely. Now it's time to declare war on the enemy!
Catapult
Scientific experiments for children will allow your child to follow in the footsteps of engineers of antiquity and the Middle Ages and imagine themselves under siege of an impregnable fortress. What would a siege be without battering rams and stone-throwing machines? No sooner said than done: we are making a catapult. The laws of ballistics, the principle of leverage and the properties of elasticity: how many physical topics come together in this homemade product!
Prepare the following:
- Wooden spatulas
- Rubber bands for money
- Plastic spoon
- Acrylic paint (as per your choice)
- Pompoms are our cores.
What are we doing
Before assembly, we painted the parts of our throwing mechanism You can do without this step, although in our opinion the aesthetics are just as important as the mechanics.
When working on a homemade product, do not forget to focus on our photos.
You need to connect the ends of two spatulas with an elastic band, install a large stack of planks between the wooden planes and attach it with the same rubber bands to the top section (only to it). We secure the spoon - and science experiments for children can begin!
We put a pompom in the recess of the spoon , hold the mechanism with one hand, and with the other we press our lever to the table surface. We let him go and... shot!
When the first joy of launch is over, changes and modifications can be introduced into the design. What happens if we place the core bed even further away? How to make the mechanism more powerful? If you use a bead instead of a pompom, will it fly further? If we install our lever gun on a hill, will we be able to break the range record?
Even more crafts - each more inventive and original than the other - are waiting for you in a special section of our website. It's craft time! Thank you for your work! Science experiments for kids: hit the target!
Source: https://www.fun-edu.ru/poleznye-materialy/katapulta/
Invention of the catapult[
Diodorus is credited with the invention of the catapult in 399 BC. e. to the Syracusan tyrant Dionysius I, who gathered artisans in Syracuse in Sicily to make him advanced weapons, Dionysius gave the artisans high salaries, generously rewarded them and invited them to the table, and they in return created different types of catapults, made sets of armor, built new powerful types of oars ships. Already in 397 BC. e. Dionysius used arrow throwers from the shore against the ships of Carthage. The new weapon caused considerable losses and had a great psychological effect on the Carthaginians. Plutarch in his “Sayings” cites the exclamation of a contemporary of Alexander the Great, the Spartan king Archidamus, at the sight of a catapult arrow, recently invented in Sicily: “Great Hercules! This is the end of military valor! »
How to make a catapult: simple craft options:
How to diversify a child's leisure time? Offer him something new, still unknown. Remember what toys you played with as a child and think about what would be interesting to the boy. War games, armies, catapults, heavy artillery - all this attracts boys. That’s why we’ll talk about a mini-catapult for games.
A catapult is related to a slingshot. Do you know how to make a catapult in a smaller version? In its real form it is a formidable and serious weapon, in its smaller form it is an interesting toy for children.
Can a boy survive without such a device in battle? Making a toy catapult is simple, but not always within the power of a child.
Here mom, who is truly a craftswoman, will come to the rescue - she will build a dollhouse and help with a catapult.
The idea of joint creativity is a great chance to spend time together and get closer to your child. Encourage your son to build a catapult together and overcome the challenges by guiding him on how to make a catapult step by step.
Toy catapult
For design you will need:
- The base for the catapult is a wooden block or plank.
- Catapult mechanism. A clothespin might work. It is better to take a wooden one, as it is stronger than plastic.
- The shoulder is a wooden or plastic ice cream stick.
- The saddle is a bottle cap.
- PVA glue.
What does the design process look like?
So how to make a catapult? The assembly of the structure consists of three stages:
- First, the clothespin is glued to the base.
- Place a popsicle stick on the clothespin and fasten them together.
- Taking the bottle cap, apply it to the stick, moving 0.3-0.5 mm from the edge, and place it on the glue.
Catapult made from boards at home
How to make a catapult for children's games and which option to choose, read on.
There are many ways to design catapults. Check out another option for outdoor play. Remember that a catapult, even a toy one, cannot be 100% safe for a child, so never leave children alone with such devices.
You can make such a toy in 40-60 minutes, and for construction you will need:
- Fixed door hinge – 1 pc.
- Mounting corner – 1 pc.
- Bolt and screw with eye – 4 pcs.
- Rope or cable for tension - 1.3-1.5 m.
- Tin can – 1 pc.
- Screws or self-tapping screws.
- Planed boards 100x50 mm.
From the tools, prepare a saw, a screwdriver, and drills.
Add racks
D from 13 mm thick material
.
Using a router table, make 3mm wide bevels along the outer edges, as well as along the ends of each post (Fig. 1).
Drill through holes with a diameter of 5 mm for the brass rod in the indicated places.
2. Make four copies of the strut template E
. Cut blanks for struts from a 6 mm thick board and attach templates to them using aerosol glue. Using a jigsaw or band saw, cut out the parts and sand them to the contour line. Remove templates using a cloth dampened with solvent.
3. Apply glue to the long edge of the two struts E
.
Glue them to the D
, aligning them flush with the bottom end and the inside edge (no chamfers). Glue the second pair of struts to another rack.
Glue the assembled braced posts to the sides of platform A, connecting them with brass rod and aligning them in the middle above the middle support bars C.
4. For fastening ready-made racks D/E
to the assembled platform
A/B/C,
take a brass rod 5 mm thick and saw off a piece 108 mm long, which will help align the posts.
Apply a bead of glue along the bottom edge of each brace and post assembly on the inside. Insert the brass rod into the holes in the posts (Photo B).
Glue the braced posts to the sides of the platform, centering them over the pair of middle legs
C
. Once the glue is dry, remove the brass rod.