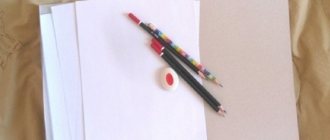
There are several basic ways to draw an airplane. You can draw the simplest airplane with a pencil and felt-tip pen. This option is optimal for young children.
You can use gouache and watercolor paints, add various environmental elements to the aircraft, and draw individual design details.
How to make a bird repeller for berries?
It is necessary to make a stuffed animal from two round pieces of foam, glue on huge bright eyes, make wings as in the diagram, and hang it on a high pole above fruit trees and bushes. It will sway in the wind and float, but no one will touch your berries. You can make several of them.
Interesting materials:
What happens if you get a new tattoo wet? What happens if you pour sugar into the engine? What happens if you don’t show up to the employment center? What happens if you don't join the army until you're 27? What happens if you don't take out mortgage insurance? What happens if you don’t pay the fine from the cameras? What happens if you don't wash the meat? What happens if you don't repay the loan? What happens if you don’t sign an employment contract? What happens if you don’t close your sick leave in 2022?
Which material to choose
What the screw will be made of should be chosen depending on its further purpose. For example, solid bars are ideal for making propellers intended for powerful engines (about 15-30 hp)
If you consider yourself an experienced craftsman, then an aircraft plywood blank with a large number of layers is suitable for you. But amateurs should not start with it, because this specimen is very fragile and can form uneven surfaces.
Toy plane
You need to start drawing with a light sketch, which will then be colored with colored pencils.
Progress
- First you need to draw two semi-ovals with a curve downwards. Both figures should be depicted opposite each other. The left figure is twice the size of the right. These are the future wings of the aircraft. The bases of the ovals should be slightly wider than the tips of the wings.
- In this step you need to draw the body of the airliner. It will be a long oval with different widths. The wide side will be at the front of the plane, and the narrow side will be at the rear.
- You need to depict the cockpit - it will be located in the front of the airliner. It is also depicted in the form of a semi-oval. Inside you need to draw a pilot with a helmet, goggles and headphones.
- In front you need to finish drawing the nose of the airliner - this semi-oval should be smaller than the body of the aircraft.
- On the front part you need to draw a vertical line.
- The wings also need to be marked with vertical lines.
- A simple drawing is ready. You can add clouds and sun.
Flight training
Although an aerochute or parachute (the so-called parachute with a motor) is safe and easy to operate, you need to take a training course before flying. Some danger still arises during landing and takeoff, although in general the paraglider is the most forgiving aircraft; accidents with it are extremely rare. Most often, paralets are sold by various air clubs. Each buyer undergoes training from them. Also, such clubs often provide the opportunity to try out an aerochute on your own or with an instructor in order to decide whether to purchase it. The training period is also quite short - usually, in order to take off on your own, you will need literally a couple of days of study. Thus, having decided to buy an aerochute, you can take off in the air in just one week.
How to draw a WWII fighter
In this lesson we will draw the British Supermarine Spitfire, the best fighter of the Second World War. This aircraft was used for front-line combat from the start of the conflict in September 1939 until its end in August 1945.
Step 1
Let's start drawing our fighter with its basic outlines.
Step 2
Now you need to carefully draw the blanks for the other parts of the plane's tail. You can use a ruler for this.
Step 3
The most important and difficult stage of drawing a fighter aircraft is to draw the main outline of the nose and tail.
Step 4
Now you need to add the wings and draw two small flaps on the sides of the tail. All World War II planes were powered by internal combustion engines, so you can also draw a propeller. Then work on the remaining details.
Step 5
At this stage we erase all unnecessary lines from the drawing and add the finishing touches to the fighter.
Step 6
Now we will paint the fighter jet in a military style. If you want, you can draw the pilot in the cockpit, blue sky and clouds.
Tail and propeller
Step-by-step drawing does not end with the wings; you need to depict the figure as full. Drawing a tail is not difficult; it is usually directed upwards. When teaching children how to draw, tell them why an airplane needs a tail and what function it performs in flight. This will help you remember the names of the parts and reproduce them more easily in the future.
Difficulties may arise in drawing a propeller; it is a slightly more complex geometric figure. It can be depicted as two elongated drops.
Some airplane models do not have a propeller on the front, so if drawing one is difficult, you can do without it.
We make sure to draw the cockpit and viewing windows so that the plane takes on its final appearance.
Passenger airliner
You can try to depict a passenger aircraft using Boeing as an example.
Progress
- Learning to draw this type of aircraft is not difficult. As in the previous case, you need to start with an oblong oval. This is the future body of an airliner. The aircraft body must be divided into two, drawing a line on each side. Below you need to add another oval and another one - the future cabin.
- At the back you need to draw the tail of the Boeing.
- Next, you need to identify the engines.
- Above the just designated engine you need to draw a wing. In order not to miss all the details of the aircraft, it is better to look for a photo or picture to fully represent the work.
- Complete the portholes and doors.
- Color the resulting drawing in suitable colors.
Airplane in flight
Such an interesting picture as an airplane in flight can be given to your dad on February 23rd. The liner image diagram is as follows:
- Drawing must begin with a sketch. On a piece of paper you need to sketch out the shape of a whale. On the right side it should be slightly smaller than on the left.
- On the right side you need to finish drawing the tail.
- You need to draw two wings on both sides.
- In front you need to mark the cockpit, on the sides of the airliner - circles. These will be portholes.
- Complete the picture with clouds, clouds or birds.
- At the end you can paint the plane in different colors. The work is ready.
Prop Balance
The already made screw needs to be balanced. That is, to ensure that the weight of the blades matches. Otherwise, when the screw rotates, shaking will occur, leading to serious consequences - all the most important components of your device will be destroyed.
But in practice, it is not uncommon for skilled craftsmen who do not wonder how to make a propeller to find that the weight of the blades varies. And this is even if all the manufacturing nuances are observed! There are many explanations for this: different specific gravity of the various components of the bar from which the screw is made, different layer densities and many other reasons.
But there is a way out of this situation. It is necessary to adjust the propeller blades according to the weight. True, there is one “but” here.
Drawing an airplane with gouache
It will be more difficult for children to draw an airplane with gouache than with pencils, so the little ones will need the help of their parents.
To create a drawing you will need:
- drawing sheet, preferably blue;
- white pencil;
- gouache paints;
- brushes;
- mixing palette;
- water.
Drawing technique:
- If you took blue paper, you can immediately draw the outline of the plane with a white pencil. A regular sheet must first be colored blue, blue or purple. The entire sheet will imitate the sky.
- Draw a large elongated oval with a white pencil. Add a tail in the shape of a half oval. Draw 2 wings in a similar way.
- Draw thin wings extending to the sides of the tail.
- Show the cockpit in front.
- In the middle, add several portholes in the shape of circles.
- Form cloud outlines around the airliner.
- Mix white and black gouache on a palette to get a light gray color. Paint the entire fuselage with the prepared mixture. There is no need to paint the windows and the cabin; they remain blue.
- Add more white to get a lighter shade of gray. Use this paint to paint the wings, including the tail wings.
- Using a thick brush, paint the clouds with white gouache.
- Using a medium brush, mix blue and white. We paint the cabin with this color.
- Paint the portholes with bright blue paint. Use a thin brush.
- Red can be used to add stripes on the wings for decoration. Using a small brush and blue gouache we draw contours on the cabin. You can create highlights on the windows and cockpit using spots of white gouache.
Instructions
So, how to make a propeller with your own hands? The process of creating a propeller looks like this:
- First you need to work on the templates, namely: 1 template for the top, 1 for the sides and 12 templates for the blade in profile.
- Plane the screw blank according to the dimensions on all four sides and draw the axis lines and contours of the side view template.
- Remove excess wood. First you do this with a hatchet, and then with a plane and rasp.
- Now place the blade template on the workpiece and secure it with a nail in the center of the sleeve for a while, then trace it with a pencil.
- Rotate the template 180° and trace the second blade. Excess wood can be removed using a fine-tooth saw. This work should be done carefully and not in a hurry.
- Remove the wood without haste, making small and short cuts.
- The screw must be brought to readiness using a plane and rasp and checked in the slipway.
- In order to make a slipway, you need to look for a board that is the same length as the screw size, and also allows its thickness to make transverse cuts of 2 cm in order to install templates. To make the central rod of the slipway you will need solid wood. And its diameter should be the same as the diameter of the hole in the screw hub. The rod should be glued to the surface of the slipway at an angle of 90°.
- Put the propeller on and see how much wood needs to be cut to get the blades to fit the profile templates.
- Once the bottom surface of the screw begins to match the templates, you can begin finishing the top surface. This operation is very important, since the quality of the resulting screw is based on it.
For beginners, it is not uncommon for the blades to not match in size. For example, one turned out thinner than the other. But to make the correct propeller, you will have to achieve equal size by reducing the thickness of the other blade. Otherwise the propeller will not have balance. Small mistakes can be easily corrected. For example, stick small pieces of fiberglass or smear with small sawdust mixed with epoxy resin.
What do we do first?
The first step is to mark the outline. To teach children, it is better to use simple forms that they can repeat. The pattern may look like a small fish or an elongated oval with a sharp and slightly rounded one side. You need to decide whether the plane will be drawn from the side or whether you want to depict a top view.
This will be the body from which we will draw the rest of the details. Next we draw wings for it. For convenience, we use a ruler, so in addition children can be taught drawing skills and make the lines more beautiful.
Without a ruler, you can draw a more oval body. The plane will not be as real as in life, but for small children it can be depicted as more fun, like in cartoons.