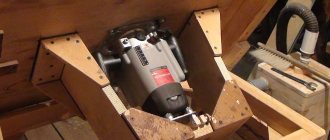
Do-it-yourself frill made of satin ribbons: tips for making
Many clothing decorations that were popular many years ago are being reborn in modern fashion.
One of these things is the forgotten jabot. This accessory can literally transform a strict office outfit, giving it originality and freshness. It is easy to build using a minimum of materials, with a little imagination and spending a couple of free evenings. Even a novice craftswoman is quite capable of coping with this process.
To see this, let's take a closer look at the entire process. We will tell you how to make a frill from satin ribbons with your own hands.
Selection rules
What rules should you follow when choosing a school tie for girls:
- Choose a style. An accessory for a school must be designed in a strict style that complies with the rules of the educational institution. For a holiday, you can choose more relaxed models with an abundance of decor.
- Assess the quality of the material. If you purchase a tie rather than make it yourself, you should carefully evaluate its quality. The edges of the ribbons should not “crumble”, and the decor should be carefully attached.
- Take into account the child's opinion. It is important that the girl likes the accessory herself. Representatives of the fair sex have a sense of style on a subconscious level from an early age, so they are able to independently evaluate a thing.
To save money on your purchase, you can make your own accessory. A handmade product will fully comply with the wishes and requests of its future owner.
Materials and tools
Jabot is one of the varieties of the tie we are used to. Before you start creating it, you need to prepare the necessary materials and tools.
To create it you will need to prepare the following
- Satin stripes of various widths. The color can be either monochromatic or contrasting, depending on your idea.
- Felt in the same color as the main color;
- Fastening . As a basis, you can use it to create a clothespin.
- Source of open fire : candle or lighter.
- Ruler, scissors, pins for temporary fixation;
- Glue or glue gun.
- Decorative elements : cameo, beads, rhinestones, sequins.
Reference! Instead of an open fire, you can use a wood burning device or even a regular soldering iron.
DIY kanzashi frill tie
How new things appear in creativity
Each of us changes as we go through life. Our attitude towards things changes. We see and feel more sides where we previously saw only one side. This opens up new horizons for us in creativity.
When creating a thing with our own hands, we try to see and emphasize in it what was previously barely noticeable. To do this, we use different techniques, accessories and fabrics that help us see the product differently every time.
This happened with the frill collar, the origin of which I told in one of the posts.
How to make a frill from satin ribbons
The process of creating this unusual thing is quite simple. To verify this, I propose to consider the creation of an object using a specific example.
To implement it, you will need a satin strip 5 cm wide of dark blue color in sufficient quantity, a cameo (you can use a large rhinestone), black narrow lace and a satin ribbon for the base.
Completing of the work
- Cut four pieces of varying lengths from the navy blue ribbon. Each subsequent cut when gathering should be larger than the previous one.
- Fold the main ribbon into a bow-base.
- Attach the smallest tier to the main bow.
Reference! Instead of PVA and a glue gun, you can use Moment-gel.
- Next, attach the shuttlecocks incrementally to each other.
- Glue the resulting blank to the main tape.
- Attach the central element.
Tips and tricks
- Hairstyles with ribbon are great for special occasions, business meetings and romantic walks. The versatility of this styling has led to enormous popularity in a short period of time. It is very important to choose the right color, shape and length of the fabric bandage.
- Weaving with ribbon retains its chic look even the next day. This type of styling can be used from one to four days. By building such a masterpiece, you can significantly save time on morning preparations for several days.
- something new from your own hair every time
- master weaving with accessories quite quickly without the help of professionals.
- Before styling, the hair should be washed and dried. Only after this can you begin the process of creating a hairstyle.
- Braids with ribbons are especially relevant in winter , since wearing hats does not cause significant styling defects.
- It is recommended to choose thin headbands with bright colors that perfectly match the outfit.
- Using a fabric bandage as a headband, you can pass it both under and above the bangs.
Ribbon jabot
- In the master class “Do-It-Yourself Jabot from Ribbons and Lace” I will show you how to make a fashion accessory yourself.
- Photo 1. For work we will need such materials and tools.
- Photo 2. Cut 6 strips of lace.
- Photo 3. From a satin ribbon 5 cm wide, cut 2 strips of 12 cm each, 4 strips of 13 cm each, 1 strip 15 cm long.
- Photo 4. Cut a strip of tape 15 cm long on one side into a semicircle, and treat the cut area with fire. We have received the base for the frill - we will glue the lace onto it.
- Photo 5. We sequentially assemble a bow from pieces of satin ribbon. We glue the parts together.
- Photo 6-7. We make small folds on the strips of lace and collect them on a thread.
- Photo 8-9. Glue the largest ruffle along the edge of the frill base.
To read the rest of the article, go to the next page below
Stages of work
All work on making an accessory can be divided into several stages:
- To begin with, you should measure a piece of satin ribbon for the base with a length of 25 cm. Next, additional parts are cut from the same ribbon: 3 x 10 cm and 2 x 15 cm.
- All ribbons should have their ends singed to prevent the fabric from fraying. You can also carefully hem the edges using a sewing machine.
- You should make a tail from the main tape by bending it in half and fastening it in the fold area with a glue gun. Additional parts should be bent from the edges to the middle and fixed in the same way.
- A circle with a diameter of 1.5-2 cm is cut out of felt. A pin is fixed on it so that its free edges allow it to be attached to clothing. Thanks to this, there is no need to think about how to tie a tie from a satin ribbon. The product is easily attached with a pin.
- The main tape is attached to the free part of the felt base using glue. 2 additional parts 15 cm long are attached to it crosswise in the same way. The remaining 3 parts are attached in the middle.
- Finally, a bead or other decor is attached to the center. This completes the work on decoration using the kanzashi technique. All that remains is to put on the accessory when going out.
In the photo you can see what a similar brooch-tie made from ribbons will look like.
Creating a brooch-jabot “Amazing”
By popular demand, I want to share with you how I create frill brooches. Today my object was the “Amazing” brooch for a high school student and just a lady
We will need: grosgrain ribbon in 2 colors - white and black 5.4 cm wide, satin polka dot ribbon 4 cm wide, satin with a pattern 2.5 cm wide, scissors, thread, needle, lighter, cabochon, felt , metal brooch base, Moment glue or glue gun.
Cut four pieces of equal length. I applied a satin ribbon 4 cm wide. with polka dots on a grosgrain ribbon 5 cm wide.
Sew in the middle:
DIY brooch-jabot made of satin ribbons
We make a butterfly blank from identical pieces of two colors of grosgrain ribbon:
The blanks are a bow and a ribbon sewn in the middle. In the future we will superimpose them on each other. Can be sewn or glued.
We assemble our bow without gathering it. Cover with 2.5 cm tape with a pattern in the middle:
We glue our blanks. Align.
From a 4 cm ribbon we make Kanzashi petals with 2 folds. I will need 9 petals.
We prepare 3 pieces for the frill. We sew them together.
Let's create a composition. I find it easier to work with hot glue. But, whoever is more comfortable!
The reverse side (not yet beautiful - and this, for now, is permissible)
Glue the felt base. We attach the base for the brooch. If there is glue sticking out somewhere, it is better to remove it with tweezers while it is hot. It will be more difficult to do this later.
You can sew or glue twisted/biased tape along the edge of the felt. But you can do without it. The view couldn't be any worse!
In fact, I don't think this master class is very holistic. I never measure lengths in cm - I do it the way I see the work. More precisely, until I imagine what I want to get, I won’t undertake it. Otherwise it will be nonsense.
I really hope that each of you will find something useful for yourself in my simple master class! Perhaps it will somehow simplify the task of creating such products. If you have any questions, I will gladly try to answer!
I apologize for the quality of the photo, if somewhere it is not very good - I took it at night.
Everyone who liked my first master class at the Masters Fair, add to My Circle so as not to miss new master classes!
Thank you everyone for your attention!
Let the creative powers know no bounds in your hands!
Hairstyles made of threads
Floss is well suited for knitted dolls, for example, crocheted. They are assembled using the sewing method. The process is quite painstaking, but it's worth it. The first stitch is made, then the threads are equalized in length and the second is placed parallel to the first. It turns out two hairs.
So you need to fill all the necessary space or make do with only knots around the edge. If you make a thick hairstyle from threads, it can be braided and combed. Don’t forget that such a wonderful product can easily be made using the amigurumi technique.
Jabot. Master Class
Jabot. Master Class
Good afternoon, our dear readers! Today we would like to introduce you to the step-by-step process of sewing a frill from ribbons, which you can decorate at your discretion.
To make a frill we need:
- tape 5 cm and 2.5 cm wide;
- threads of white and any other color;
- pins and decoration.
Jabot step by step:
The first piece is one and a half meters of tape 2.5 cm wide. We cut the ends obliquely and melt them.
The second piece of tape is 2.5 cm wide. and length 21 cm. We melt the sections.
Take a 5 cm tape. And cut 1 piece 26 cm long. and 2 pieces of 23 cm, fold in half and melt.
We mark the middle and get started.
We pin the first two sections with a length of 23 cm.
Then 26 cm. in the center.
We baste, sew and remove the pins.
Take a tape 2.5 cm wide. in pieces: 1 pc. — 20 cm, 2 pcs. — 1 9cm, 2 pcs. — 17 cm, 2 pcs. – 15 cm, fold in half and melt.
Take 1 pc. 20 cm and place it in the center.
Then 19 cm. And we pin it next to each other on both sides, BUT check the length!!
We baste and remove the pins.
We take 2.5 wide tape and make segments: 2 pcs. — 15cm, 2 pcs. – 14 cm, 2 pcs. – 13 cm, 2 pcs. – 12 cm, fold in half and melt the sections.
We pin it as in the photo.
We baste and remove the pins.
Take pieces 5 cm long. Width 2.5 cm.
Fold in half and melt the cuts.
We baste and remove the pins.
This is already a face, we take a tape that is 1.5 meters, look for the center and attach it to the center of our work. We take a sewing machine and stitch the edges of the tape at the top and bottom.
This is the back part, we clean it of threads that we no longer need.
And then ladies, let your imagination play.
Try another color...
This is what I got (I attached everything with hot glue).
Frill brooch made from 1 meter of grosgrain ribbon
I hope everything is clear. Good luck everyone!
MK author: Alena Filipeva
Braids for little ones
The main requirement is ease of execution, so that any mother can quickly create a beautiful hairstyle for her fashionista daughter.
Two braids for a girl
The most ordinary paired braids can be turned into a festive option. Weave in the “snake” or “dragon” style from the frontal or parietal zone, as well as in the usual way. Let's consider weaving a ribbon into paired braids of three strands.
Interesting ideas for little ones in a selection with photos:
One braid “in the field warrior”
Two braids are good, but one braided beauty can also win hearts.
A short master class with an unusual idea that is easy to implement.
Tender heart for Valentine's Day
Everything ingenious is simple. A master class for beginners with a romantic idea for a little fashionista for the holiday.
Crown for the princess
Every mini lady dreams of becoming the queen's daughter and receiving the symbol of the monarchy on her beautiful head. Some cute ideas in the photo:
Kanzashi on tape
A spectacular hairstyle will suit both a girl at a party in kindergarten or school, and a girl of any age. It looks festive and romantic; this braid is especially suitable for a photo shoot or a special event.
To create such a hairstyle you will need flowers with a ribbon, which are called kanzashi. It is advisable to choose an accessory with a hairpin.
The process of creating a spectacular braid with kanzashi hair decoration is that the flowers are attached at equal distances from each other. For example, if three decorative elements are involved, then they should be at the root, in the middle, and the last one at the end. The braid is made using a simple three-strand method with a ribbon.
Christmas mistletoe
Brooch-jabot “Canon”
Decorating clothes with frill trim is distinguished by sophistication and elegance. But modern fashion trends allow you to wear neat frill brooches instead of large and fluffy collars.
To create such a frill brooch you will need: - a light green ribbon 0.7 cm wide. - blank for a brooch. - glue gun. - green satin ribbon 2 cm wide. - scissors.
Description of work. Cut three long strips from light green ribbon to create the base of the brooch. All segments must reach 16 cm.
Then we take each tape separately and glue the edges together, aligning them in the middle of the part. We also glue all three segments together.
Collar for school Kanzashi Part 1 Master class DIY Collar Kanzashi Part 1
We receive such blanks. Now we collect a bow from them, placing one on top of the other, crossing them in the center.
We put the resulting part aside and begin to create blanks for the main bow. We prepare 6 identical pieces of green tape, each 8.5 cm long. Then carefully singe the cuts on all the pieces. And using a glue gun we connect the two edges of each piece together, creating loops from them.
Now we attach these parts on top of the light green bow, aligning them, but retreating 2-3 mm from the edges.
We attach the loops on the second side of the bow in the same way.
We get this double bow. Next, cut out two strips of light green ribbon, each 5 cm long.
We singe their sections and glue them together into two loops. Then we attach these parts to the prepared bow, but placing them strictly diagonally and along the center.
We put the created bow aside and prepare a voluminous tail for it. To do this, cut 4 pieces 7 cm long from the green ribbon and burn the edges. We form loops from the three, and leave the last strip as a straight piece. Then we cut 10 strips from a light green ribbon, each 6 cm long. We also singe all the existing sections and glue them into a loop shape. Now we place a piece of green ribbon vertically, it will serve as the basis for the tail of the brooch and glue 3 light green loops on the lower cut, folding them like a fan.
Next, we attach one green loop along the base strip. We take two light loops and cover with them the place where the previous part was glued, directing them in different directions.
It remains to gradually attach the last two green blanks, covering their sections with details from light green ribbons.
Then we complete the created row of green blanks with an attached loop of light green ribbon.
We get this tail for the brooch. We attach the previously set aside double bow to it. And in the center of the bow we glue a button wrapped in ribbon.
We unfold the part with the wrong side up and glue the steel brooch blank.
Roses from satin ribbons: making roses from satin ribbons using different techniques
Star made of satin ribbon. how to make a star from satin ribbon for a Christmas tree?
What can be made from satin ribbons: creative crafts from satin ribbons
DIY satin ribbon brooch: various techniques.
How to make leaves from satin ribbon? step-by-step production of a simple sheet, a rose sheet, a corrugated sheet and a large sheet.
How to make topiary from satin ribbons? materials and tools. step-by-step algorithm. subtleties of manufacturing parts.
How to beautifully tie a bow from a satin ribbon: a lush bow from a thin satin ribbon.
DIY satin ribbon boxes, instructions
DIY bow tie made from satin ribbon. step by step instructions on how to make a classic butterfly for girls.
Snowflakes made of satin ribbons: DIY voluminous snowflakes using the kanzashi technique
DIY satin ribbon headband: how to cover and decorate
DIY satin ribbon pig: step-by-step master class
DIY satin ribbon crown: tools and materials, master class
Embroidery with satin ribbons: patterns for beginners, master class
Tape for hemming trousers with an iron: what is this tape called? how to glue it correctly. step-by-step instructions on how to hem trousers using adhesive tape.
How to make a frill tie from satin ribbons with your own hands step by step with photos
For work we will need the following materials and tools : - white satin ribbon 2.5 cm wide; — satin ribbon 1cm wide with polka dots/any color; - felt circle with a diameter of 4 cm; - fastening; - middle; - lighter (candle); - ruler; - scissors; - tweezers, clamp; - thermal gun.
Labor safety rules when working with scissors:
1. Scissors should have blunt, rounded ends. 2. Work with well-adjusted and sharpened tools. 3. Place the scissors with the rings towards you and the closed blades away from you. 4. Do not leave cutting tools open. 5. Watch the movements of the blades while cutting. 6. Pass the scissors rings forward, holding them by the closed ends. 7. Do not play with cutting instruments, do not bring them to your face. 8. When working with scissors, do not walk around the office. Work at a desk. 9. Use these tools only for their intended purpose.
Labor safety rules when working with candles, matches, and lighters:
1. Remove loose hair. 2. Do not lean low over the flame of a candle or match. 3. The candle should be in a glass or tin container. 4. Do not throw burnt matches into the trash can, but put them in glass or tin containers.
Labor safety rules when working with a heat gun:
1. Do not leave unattended. 2. When working, place the heat gun on the stand, and not lay it on its side. 3. Work only with a serviceable tool. 4. Do not touch the tip of the gun or handle the hot glue. 5. When finished, turn off.
The frill consists of two parts. Let's start with the top one - an imitation bow. Take three pieces of white satin ribbon 2.5 cm wide and 18 cm long.
What else is needed
To implement unusual ideas, you will need the following:
- elastic bands;
- styling mousse;
- varnish;
- curlers (optional);
- tape products of different lengths;
- headband;
- comb.
You don't have to be a professional to achieve great results. It will be enough to show your imagination and start creating. Show patience, desire and confidence. Thin, lush, light and dark curls will be easy for you.
A little history
Bows appeared in ancient times. In Ancient Greece and Rome, respectable matrons decorated their hairstyles with them. However, bows came into fashion during the time of Louis XV, thanks to his favorite Madame de Pompadour. A bow can be seen in almost all portraits of the king's official mistress.
True, in fairness, it should be noted that bows were also in use under the Sun King Louis XIV, but then they acted as an original form of jewelry.
DIY school set (bows and frill tie) made from ribbons.
In the 20th century, recognized as a style icon, actress Audrey Hepburn loved to decorate herself with the most exquisite bows. So, as you can see, the bow has been and remains one of the most popular elements of decorating a person’s toilet.
Hair ornament
When preparing the little girl for school, stocking up on the necessary school supplies, uniform, shoes, knee socks, parents do not forget about one more decoration - a bow. It makes sense to make a school bow from satin ribbons with your own hands, because... purchasing the materials needed for the job will cost five times less than purchasing a finished product.
Materials
To work, you will need to buy three types of tapes:
- white satin, with a width of five centimeters and a length of one meter forty;
- red (dark blue, blue, green, etc.) three centimeters wide and half as long as the first;
- narrow (one centimeter) lurex, ten centimeters long.
Well, such things as a ruler, pins, a lighter, threads and a needle, and a hair tie can be found in any home.
Preparation of blanks
First, the white tape is cut into pieces of ten, 11.5 and thirteen centimeters (each piece is four pieces).
The red ribbon is cut into three pieces of 22 centimeters each. The lurex piece remains unchanged.
Step-by-step instruction
We start with a tape of 13 centimeters:
- We take two pieces, fold them at right angles, and then put one on top of the other.
- We carry out a similar operation with segments of 11.5 centimeters.
- We perform the same actions with ten-meter segments.
- We place the blanks one on top of the other, equal at a right angle, and the upper and lower parts are shaped like a Christmas tree.
- We secure the blanks with a pin.
- The corners of the bottom row are bent, turned back and secured with a pin.
- The same operation is carried out with the top row of the workpiece and as a result we get a figure similar to a square.
- Using a ruler, measure two and a half centimeters from the lower right angle and draw a line with a pencil.
- Using a double thread, we make a basting along the drawn line, trying to keep the stitches symmetrical.
- We take out the pins, but don’t touch the thread!
- Stepping back from the stitches a few millimeters, we cut off the excess material.
- We bring a lighter to the cut and melt the edge so that the tape does not crumble.
- We tighten the thread tightly and get a workpiece in the form of a bud.
- With the remaining pieces of white tape, we carry out the operations described and get a second bud.
- We sew the buds together and the white part of the bow is ready.
What to do with bangs
The advantage of a hair band is its versatility. Use your imagination and every day you will look new. It’s a big mistake to think that this thing doesn’t look good with bangs. If your hair is thick and straight, press it down with a narrow elastic band, or cover the top half with a wide fabric base.
And if you are tired of it, hide it under an elastic textile strip with a spectacular decor or an interesting print.
It is advisable to complement monochromatic types with one more detail in the image. For example, match a silver item with a dress strap with a matching buckle. Try combining the red knitwear option with the same handbag, gloves or glasses frames. But colored models require calm in the design of other accessories.
Weaving a ribbon into a braid
Tie a beautiful knot
Beautifully style long bangs
The trend is for bangs twisted into a braid, pulled back and secured with bobby pins. The main mass is slightly relaxed to form a small tubercle and a thin iron or plastic hoop with a voluminous appliqué is put on.
Greek style bows look better without bangs. But in a hippie, boho or vintage look, it is acceptable to be elongated and loose.
Colored ribbon
First, we singe the edges of the tape. Then:
- Fold the pieces in half, marking the middle.
- We bend the edges of the tapes towards the center of the workpiece and fasten them with pins.
- We place two blanks side by side, and the third on top of them in the center.
- We take out the pins and use double thread to make a basting with large stitches.
- We tighten the thread, getting a colored bow.
- We put a white bow on the colored one and fasten them with thread.
- Attach a hair tie to the bow.
- Cover the junction of the two colors and the elastic with lurex.
- We sew up the edges of the silver ribbon.
The two-color bow is ready. If desired, you can decorate it with rhinestones, beads or some unusually shaped button.
If the description of the steps for making the decoration is not sufficient for the job, you should find instructions on the Internet with step-by-step photographs of making a ribbon bow with your own hands.
Decorative items
Miniature bows are perfect for the role of elastic bands, barrettes or other hair decorations. Similar products can be woven into braids or used to decorate postcards with congratulations for some significant event.
DIY JABO from Ribbons | Kulikova Anastasia
To create an original souvenir, you will need two pieces of thin satin ribbon up to 15 centimeters long.
The manufacturing work will take place in only five stages.
- A bend is made at a distance of 5-6 centimeters from the edge of the tape.
- The tape is folded at a right angle so that its end points down.
- The same operation is performed with the second end.
- The second blank is made according to the same principle, only if in the first tape the bottom edge was bent first, then here you should start from the top.
- Both blanks are stitched and secured to a hair elastic.
A miniature decoration for a gift box, postcard or hairpin is ready.
Finery
You can make small voluminous bows from satin ribbon. To make one thing you will need four pieces 10-12 centimeters long.
And here the work progress consists of just a few steps:
- The segment is folded in half.
- The edges bend down, forming a kind of house with a triangular roof.
- The triangle is folded down and secured with a pin.
- The sides are brought to the center of the workpiece.
- The resulting workpiece in the form of a rose is secured with threads.
- The same actions are carried out with the three remaining segments.
All that remains is to connect all four “buds” together and the voluminous trinket is ready.
Linen curls
Flax is the cheapest, but quite good raw material, which is easy to get everywhere. You can paint it if desired. You need to dilute 200 ml of bleach in water and soak the flax in it. If you need a natural shade, leave it on for about 15 minutes, for complete lightening it takes up to 2-3 hours, then you can paint it.
After this, rinse with clean water and apply hair or fabric conditioner. You straighten it and hang it to dry; at the end you need to comb it with a brush.
The longer you comb, the finer the strands will become. Flax hair is well suited for a Waldorf toy.
Classic version
To create a traditional bow you will need:
- wide satin ribbon;
- translucent tape twice as narrow as the first, but in the same color scheme;
- lighter or candle;
- lace and artificial flowers, threads;
- beads and beads, etc.
Satin ribbons tend to “scatter” along the cut line, so they need to be set on fire.
Progress
Creating a classic bow requires just a few simple steps:
- you need to cut three pieces 20-22 centimeters long and three more 18-20 centimeters long;
- a narrow tape is superimposed on a wider one;
- “secure” the edges of the workpiece with a lighter;
- two long fragments are folded in half and rewound with thread in the center, thus making a double bow;
- similar actions are carried out with shorter pieces of tape;
- a smaller bow is placed on top of the larger one;
- both workpieces are secured with threads.
Decorative elements - lace, beads and beads - are attached to the center and edges of a handmade item made from satin ribbons.
Why atlas?
The weaving of silk thread in fabric determines the structure of the material, its shine and smoothness. A special feature of the satin is the rare extension of the transverse thread onto the base, which provides a special structure to the material, creating a smooth surface.
Satin easily breaks down into individual fibers that retain their structure and shine.
Hair from satin ribbons for dolls can be created in any color and texture. Satin is made from threads of different thicknesses, so the volume of hair can be changed not only by the number of strands, but also by choosing the type of ribbon. Making hair from silk fabric for a toy is not difficult; in addition, the length of its hair can easily be varied. Natural and synthetic fibers have thermal memory, so you can create curly locks by heat treating a satin ribbon.
Contrast bow
The combination of white and black is a classic option for any decorative decoration. The traditional headdress for girls is no exception.
For production you will need:
- white tape;
- ribbon with black stripes or polka dots;
- black lace;
- scissors;
- rhinestones or beads.
Stages of work
- Stage No. 1. The variegated ribbon is cut into three pieces about 25 centimeters long.
- Stage No. 2. The white base is cut into shorter pieces - approximately a couple of centimeters less than the first.
- Stage No. 3. The simplest bow-loop is formed from ribbons and stitched in the center.
- Stage No. 4. A piece of black lace is sewn onto one of the white bows.
- Stage No. 5. The two remaining white bows are placed crosswise on top of each other.
- Stage No. 6. The colorful bows are folded like a snowflake and also secured in the center.
All that remains is to connect both blanks and a contrasting decoration can take its place on the girl’s head.
We use yarn
It's not often that you come across a hairstyle made from yarn. It is usually used for a tilde doll or a bigfoot doll. The method is a little similar to the previous one. First, mark the lines along which we will work. We will sew the strands with a reverse stitch.
To do this, insert a needle at the base and bring it out 3 millimeters behind to form a ring of thread into which 4 pieces of yarn are inserted. Make sure that they are the same length on both sides. So we fill it to the end.