The “third hand” device is an indispensable assistant for many craftsmen and home craftsmen.
The device will be useful for those who are engaged in model making - for example, when carrying out work on assembling a model of a building or a model of equipment. Also, such a clamp will be indispensable in the process of soldering radio components.
Thanks to the presence of movable and adjustable design elements, the “third hand” clamp allows you to securely fix various small parts in almost any position.
The “arms” themselves (usually at least two of them) that hold the part can be flexible or hinged. Alligator clips are used as clips.
Desktop clamps with a magnetic base are very convenient to use (provided that the surface of the desktop is metal). Devices with a heavy stand are also common.
In today’s article, we’ll look at several design options for universal table clamps, and tell you how to make a third arm for soldering with your own hands - in a garage or home workshop.
Please note: for the convenience of soldering and assembly work, the device can additionally be equipped with a magnifying glass, backlight and a “pocket” or holder for an electric soldering iron.
Installation of other accessories is also possible. If electrical equipment is used, a power supply will be required.
We make a third hand with two existing ones.
As a continuation of the laminate design, we will make a device that is often called the “Third Hand”. First, let's see what our smaller brothers offer us. Option 1:
There is too little flexibility for my applications.
Option 2:
There is enough flexibility, but how reliable these elements are and how much force they can withstand, I don’t know, and they cost so much that I don’t want to check them. Well, I wanted the base to be flat and have a larger area.
So I decided to do it myself. This is the option we got:
The base is my favorite piece of laminate. Flexible tentacles are made from this stuff:
The clips are regular alligator clips. I thought for a long time about how to attach them so that on one side they fit tightly, on the other they could be replaced when they break. First I tried this option:
These are contacts from the following terminal blocks (AAA battery in the background):
But the result turned out to be so-so. When the crocodile rotated slightly, the clamp loosened and the crocodile began to dangle. Yes, and it looked too massive.
The next option was:
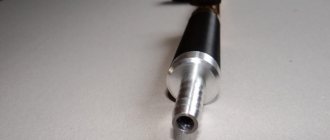
Here the tube that comes with the crocodile is pressed onto it. From the point of view of use, the option turned out to be very good. And it fits tightly, and can be rotated without loss of tightness, and can be removed. But this option has a couple of significant disadvantages. These tubes are not sold with all crocodiles. But an even bigger drawback is that the size must very accurately match what is needed. A little more of the tube and it dangles, a little less and you won’t be able to tighten it.
So I thought further and tried this option:
Here are ordinary polymer threads, wound with force on a crocodile and secured with glue (the threads are secured with glue so that they do not unwind, not the crocodile). Despite some, at first glance, collective farm appearance, it looks quite decent. But most importantly, the result when using this option is excellent. It rotates without loosening and can be removed easily. When replacing the crocodile, winding a new portion of thread takes a couple of minutes. And everyone has threads. Well, the cost of such a solution is close to zero. Therefore, I secured the rest of the crocodiles in the same way.
I secured the tentacles at the base with regular cyanoacrylate. A hole is drilled, tentacles are inserted there and a couple of drops of cyanoacrylate are inserted there, and that’s it.
In general, I planned to have more tentacles around the perimeter of the base, but for now four are enough.
Well, at the end there is a photo, as is customary, with a board hanging in the air for some reason:
PS. When I wrote the review, I found these other options:
But they cost even more than the ones I mentioned at the beginning of the review. When I made my version, I didn't see them. Either they appeared recently, or I was looking poorly. In general, this is almost my option, only here the attachment of the tentacles is organized even more flexibly - they are on magnets and can be rearranged to any place. The truth is how these magnets hold is still a question, however, they can be replaced. So those who have little time and a lot of money can search and buy such options. For those who have the opposite, they can repeat my version.
That's all, thank you everyone.
Homemade third hand. Third hand for DIY soldering. Materials and tools
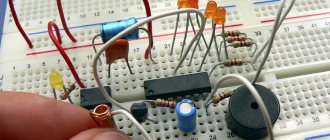
Any radio amateur is well aware that when doing radio installation, as a rule, two hands are not enough. You hold a soldering iron in one hand, tweezers in the other, and to properly hold the board you also need a third hand.
Of course, you can solder without tweezers, but this is risky, the tweezers serve as a heat sink, and without them you can easily overheat the radio component.
In the simplest case, a holder - a “third hand” for holding small circuit boards - is simply an alligator clip on some base.
To hold small parts, the industry specially produces a similar design.
A crossbar with two alligator clips is hinged to a small cast iron base.
Thanks to the hinges, the structure can be configured in a variety of configurations.
And for working with small parts, the “third hand” holder has a magnifying glass.
The design is really very useful when working with small printed circuit boards, wires, individual radio elements, etc. If you don’t have it yet, I definitely recommend buying it.
Useful soldering tool - third hand
Anyone who is seriously involved in soldering circuit boards and electronics once thinks about purchasing additional useful devices. With their help, you can provide truly comfortable working conditions and facilitate many operations. These include a tripod, magnifying glass, tweezers and other tools.
Homemade and purchased options
Many soldering specialists face a lack of a third hand. You can hold a soldering iron in one hand, and in the other hand the element that needs to be soldered, but the board itself remains unfixed, which causes certain difficulties when working.
A simple device can solve this problem - a third arm for soldering (it can also be called a tripod or holder). The presence of this device allows you to make the microcircuit absolutely motionless.
3 hand can be made independently from unnecessary things that are stored in the garage or storage room. And here there can be different options - it all depends only on the imagination and specific needs of the master.
In addition, there are many instructions and articles on this topic. It is better to make such a device as a third hand from non-flammable materials, although some consider it quite normal to use wooden and plastic elements.
In any case, the third hand must have a strong, stable base made of metal, a flexible vertically located elongated part that can change orientation in space (this is necessary to fix the clamp in a certain place), as well as the alligator clip itself of a suitable size.
If you don’t want to bother with this yourself, then you can order a board holder for soldering in an online store or on the radio market. Commercially available “third-hand” devices are, for the most part, not expensive, but they are very convenient.
- A shop tripod for high-quality soldering can easily withstand high temperatures of hundreds of degrees and allows you to ensure amazing stability of the assembled structure.
- In addition, many store accessories may include a backlit magnifying glass (the backlight runs on standard batteries), clamps of different formats, and so on.
The magnifying glass in such holders can be fixed in a convenient position and adjusted both vertically and horizontally. When soldering circuit boards, having a magnifying glass in the “third hand” holder allows you to see the smallest areas and avoid mistakes.
Magnifiers, microscopes and glasses for soldering circuit boards
- When choosing a tripod with a magnifying glass, you should definitely pay attention to how much magnification it can create.
- For some work with SMD boards, a twofold magnification is enough (and such tripods are actually found in large quantities); for other work, much more powerful lenses may be needed.
- Indicators such as the number and diameter of eyepieces are also important (and it is not a fact that large-diameter glass is better - lenses that are too bulky can interfere with the soldering process).
Professionals may also be interested in expensive microscopes for soldering microcircuits. They are used to detect tiny cracks in motherboards.
Current microscopes for SMD boards are quite compact, portable and light in weight. They have a small eyepiece, which is located at a considerable distance from the soldering area.
As a rule, in addition to everything, they are equipped with manual focus, a stepless zoom system, backlight and other interesting functions - this is very advanced equipment compared to a conventional third-hand tripod.
The webcam and USB cable included with some microscopes greatly facilitates working with microcircuits. With their help, videos and photographs are taken and then transferred directly to the computer.
With the help of special software, such a microscope can also be used to measure distances, perimeters, diameters and angles of objects with micrometer accuracy.
It should also be said about such a device as soldering glasses with a magnification of up to 20 times. Glasses (usually binocular type) should be placed on the head as usual.
Third hand soldering clamp. Help for the radio amateur
Design
Several varieties of this device are produced, which differ in the number of auxiliary clamps (from two to four), as well as the presence of additional components that facilitate the work of the electrician. Let's look at the design of a third-hand soldering clamp with a magnifying glass. It includes:
- Cast aluminum or cast iron bed.
- Bracket with ball joint (all parts are adjustable both in height and in angle of rotation).
- Support axis.
- At least two alligator clips, which are mounted on the support axis consoles.
- An additional bracket for mounting a magnifying glass.
- A magnifying glass that, depending on the manufacturer, has a magnification of 2.5 to 5 times.
All parts of the device are made of anodized aluminum, although for soldering complex circuits with increased dimensions, the “third hand” for soldering can also be steel.
The “third hand” soldering holder is installed on a flat surface of the solder’s workbench. In this case, the dimensions of the soldered microcircuit are determined by the maximum distance between the axes of the clamps.
In a number of designs, an additional bracket for attaching a magnifying glass can be secured in the same way as alligator clips; this is more convenient because the magnifying glass can be placed anywhere.
However, the console mount also has its advantage: in this case, the axis of the bracket will not interfere with the clamping of the board itself.
The flat spring for fastening the magnifying glass allows, if necessary, to replace the magnifying glass with another one that has the same diameter.
The principle of working with the holder
One of the clamps is intended for attaching a soldering iron, and the second can accommodate solder, additional lighting or a circuit board. The frame is made heavy and massive enough so that oversized boards do not lead to the holder for third-hand soldering being tipped over.
Using hinged clamps, the user sets the required distance between them, inclination and height of location. After this, the placement of the magnifying glass is adjusted - the lens can be rotated 360°.
The holder for the soldering iron can also be used to store it between solderings: this is convenient because it prevents accidental burning of the surface of the desktop.
The third-hand soldering clamp can be effectively used in jewelry making, reading documents printed with small pins, deciphering maps, modeling and other purposes.
That is why all the working parts of the device in question have an anti-corrosion coating.
The quality of the soldering itself will also increase: the user does not touch the elements of the printed circuit board or electrical circuit with his hands, and, therefore, the likelihood of oxidation of the solder joints is reduced.
How to choose?
To effectively use a “third hand” for soldering, you should decide on the following parameters:
- The largest distance between the alligator clips: they should be 40...50 mm larger than the dimensions of the soldered circuit.
- Axle length - if the dimensions are large enough, you can also install an exhaust fan hose or a pneumatic blower there to remove solder residues.
- The material from which the device is made is steel, which is more wear-resistant, more suitable for intensive work.
- Optical capabilities of a magnifying glass.
- Completeness of clamps: a number of manufacturers of holders for third-hand soldering offer various configurations of alligators, which increases the ease of use of the device. In particular, the manufacturer Factory Sealed NIB includes a curved tip, an inclined tip and one tweezers with a cross-shaped tip in the main set.
- Stability of the base: if it is equipped with rubber feet, then possible sliding of the device on the table surface will be minimal.
- Clamp material: for “delicate” electronics, they can be made from silicone compositions.
The price of a complete device - a third-hand soldering clamp with a magnifying glass - ranges from 300 to 440 rubles. Designs with a built-in LED illuminator will cost 1500...1600 rubles.
Source: https://proinstrumentinfo.ru/tretya-ruka-dlya-pajki-zazhim-derzhatel-s-lupoj/
Third hand device for soldering wires
When you have to work a lot with a soldering iron (connecting electrical wires together), then for greater convenience you can use a simple “third hand” device for soldering wires.
To make this homemade product you will need a piece of metal strip about 15 cm long, two pieces of tube 20 cm long and two bolts with nuts.
The first step is to weld two metal tubes along the edges of the metal strip. It is not necessary to completely scald - just grab it on both sides. But this is at your discretion.
Main stages of work
At the next stage, you will need to weld the nuts into which the bolts are screwed to the ends of the tubes. Weld seams must be cleaned with a flap wheel.
Next, you will need a pair of clothespin clips, in which you need to drill one hole for the bolts. The clamps are then attached to the metal tubes.
After this, all that remains is to weld a piece of pipe on one side of the metal strip, onto which a coil of solder will be put, and on the other, a piece of an angle or plate. Thus, the homemade product can be secured in a bench vice.
You can watch the video on our website for details on how to make a “third hand” device for soldering wires. Write in x what do you think about this homemade product?
Rate this post
Source: https://sdelairukami.ru/prisposoblenie-tretya-ruka-dlya-pajki-provodov/