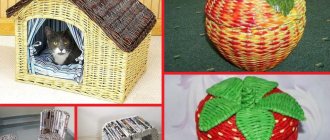
A candy bowl is a very useful kitchen decoration that is practical for those who love order. With their appearance, there will be fewer open bags with all kinds of sweets and candy wrappers on the tables. They will also fit various fruits, kitchen decoration will attract attention to them, and children will not be left without the necessary vitamins, which is very important. In addition, you can make such a useful thing yourself from scrap materials. For example, you can use old newspapers that no one needs anymore. They will serve well not only as printed materials, but as material for a candy dish made from newspaper tubes, which will be not only durable, but also spacious. This master class will tell you how to make it yourself.
Candy bowl
Good afternoon.
You can make anything from scrap materials. Especially plastic ones. From ordinary bottles you can make a beautiful and original candy bowl with your own hands, which will be useful around the house. For production we will need: - One bottle of 5 liters. — One bottle of 1.5 liters. - Knife. - Scissors. - Newspapers. — Paper napkins. - Clayster. - Brush. - Paints. - Varnish. First we will need to take a 5 liter bottle and cut off the neck of it to the desired height and remove the cap from it. We won't need it. You determine the height yourself. This will be the candy bowl. From a 1.5 liter bottle you will also need to cut off the neck of a small height. This will be the leg. The height is also at your discretion.
Now insert the neck of the leg into the neck of the bowl. One neck fits perfectly into the other and stays there well, but for better fixation you can coat the joint with glue.
Now let’s take a newspaper and tear it into small pieces. We will dip these pieces into paste and cover the candy bowl with them inside and out.
Let's take paper napkins and make flower petals. To do this, tear off a piece from the napkin, soak it in the paste and form a petal. Then press the petal firmly against the outside of the candy dish. The paste should be liquid, so the petals will stick better. In this way we make the required number of petals.
Now we roll a small ball out of a napkin. It also needs to be soaked in paste. In the middle of the flower, make a small depression with your finger and insert a ball into it. This will be the core of the flower.
You can make a stem for a flower. To do this, roll a sausage from a piece of napkin soaked with paste and press it to the vase.
Thus, we make as many colors as you wish. I made 11 pieces. Leave the candy bowl to dry.
After drying, we arm ourselves with paints of different colors and a brush. You can color it however you want. I painted the leg light brown. This will be an imitation of a flower vase. The bowl was painted green inside and out.
Then I painted the flowers. If you are good at drawing, then you can also draw flowers inside the vase. When the paint dries, coat the craft with varnish.
Source
Making a candy bowl
To make a candy bowl you will need:
- newspapers;
- knitting needles (1.5-2);
- PVA glue;
- acrylic lacquer;
- the shape in which we will braid (a salad bowl will also work);
- stationery knife;
- scissors;
- dense bristled brush.
Stage 1. Prepare the tubes from which we will weave a cup. To do this, lay the newspaper on a flat surface and cut it along the fold. After this, fold the sheet so that a strip of 7-8 cm is formed and cut it off.
After this, take the knitting needle and place it on a strip of paper at a slight angle (20-30 degrees). While twisting the tube, hold the newspaper with your left hand so that it is as close to the knitting needle as possible. Try to wind the paper tightly onto the knitting needle so that it does not fall apart later.
When the tube is twisted, it must be secured. To do this, apply a drop of glue to the remaining small corner of the newspaper and press it to the end.
The finished tube should come out tight, and one end will be slightly wider than the other - don’t worry, this will be needed to build the tubes on top of each other. Now you need to repeat this another 40-50 times. At least this many tubes will be needed to create a candy bowl.
Stage 2. Now the finished tubes need to be painted. The easiest way to do this is with a water-based stain. Its palette is varied, which will give you the opportunity to choose your favorite color; in addition, it is odorless and stains paper well. Take a small pack of straws and dip it into the paint bottle. After that, take it out, turn it over to the other side and repeat the procedure. Now you need to let the tubes dry.
Also remember that to give them elasticity you need to leave them slightly damp, this will make it easier to weave. If you haven’t caught this moment, you can moisten them with a spray bottle, but the ends (4-5 cm) should remain dry.
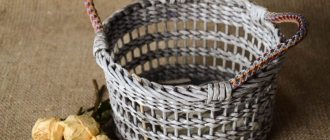
Step 3: Be patient as this is where the weaving of the bowl begins. Let's start from the bottom.
Related article: DIY turban with brooch: master class with diagrams and video
Take the tubes and arrange them crosswise, as shown in the photo below. To prevent them from moving apart, glue them a little. In what follows, we will call the tubes struts.
Take the next tube and, bending it in half, put it like a loop on four posts at once.
Press it into the center of the base. So, you have two working tubes with which you will braid the saucer for the candy dish. For convenience, one of them can be marked with a rubber band, which will serve as a guide for the end of the row. Take the bottom tube, bring them forward and place them on top of the four posts. After this, stretch the upper working tube over the lower one and run it under the four racks. This method of weaving is called a straight rope with two tubes.
Continue circular weaving up to 2-3 rows. Watch the working tubes carefully, because first the lower tube is always brought forward and placed on the racks, and only after that can the upper tube be placed on top crosswise and placed behind the racks. If you do not follow this rule, the drawing of the candy bowl will go astray.
If you run out of straw, extend it. Take the next tube and insert the narrow tip into its wide end. Don't forget to add some PVA glue there, this is necessary for a tighter connection.
After 2-3 rows, start separating the racks in twos and continue braiding them in the same way.
Braid a few more rows until there is about three cm between the posts. After this, you can separate the double posts and thus form a “sun”. It is important to ensure that the distance between them is approximately the same.
Weave the saucer to the desired size and finish weaving. To do this, cut off the working tubes, leaving the ends 1.5 cm and hiding them in the weave using a knitting needle. To close the edge of the weaving, flatten the first post, bend it next to the second, leaving a 2 cm tip. The excess is cut off. After this, hide the end of the tube in the weave next to the second post. We perform a similar procedure with subsequent racks. You can help yourself with the help of a knitting needle: move the weave apart so that you can more freely hide the tip of the stand into it. Thus we got a closed edge:
Related article: Beaded Christmas tree: master class on weaving a New Year's accessory
Stage 4. We move on to weaving the bowl itself. Prepare stands for it: take a tube, bend it in half and insert it through the bottom in the shape of a P. Make sure that between each saucer stand there is a cup stand.
Next, bend one tube in half, put it on the stand and start weaving in the same pattern as the saucer, with one difference being that the stands are now in a vertical position.
After completing two rows, insert a shape (for example, a salad bowl), secure it with clothespins (this is necessary so that it does not slip and the pattern remains even). Instead of clothespins, you can also place something heavy in the mold. Continue weaving, pressing the tubes to the form.
Watch the distance between the posts. If it approaches three cm, you will have to insert additional tubes, because otherwise the cup will be loose and its shape will be unstable.
This is quite simple to do: use a knitting needle to spread the weaving and insert one tube next to each stand. After this, the shape returns to its place, and you weave further according to the same pattern.
Continue weaving the cup to the desired height. After completing the weaving, close the edge as you did before. Cut the working tubes and hide them in the weave, the posts are flattened and the ends are hidden next to the adjacent posts.
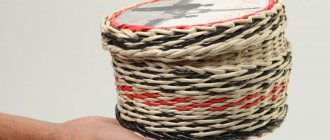
The result should be the following:
Stage 5. All that remains is to weave a handle for the cup.
To do this, take two newspaper tubes and, leaving the tails 2-3 cm, glue the tail of the third to one tube. Place two straws in parallel at the same distance as between the posts in the cup. After that, start braiding them in a figure eight using the third tube. During the process, the tubes may become pulled together; to avoid this, insert knitting needles next to them. Finish the handle, and glue the working tube or hide the weaving inside. We take out the knitting needles.
Related article: Detailed instructions for making a hanger
The next step is to attach the handle to the cup. To do this, insert the knitting needle into the weave next to the stand. This is necessary in order to expand the space for the handle. Insert the tails of the pen into the resulting hole, having previously lubricated them with a drop of PVA.
Stage 6. Let's make the cup stronger. To do this you need to prime it. Dilute the PVA with water in a 1:1 ratio and carefully coat the cup inside and out using a bristle brush.
When the bowl dries completely, it will be similar in strength to wood. However, you need to check if there are any uneven places in the product. If they are not noticed immediately, it will be impossible to correct them after drying. To correct unevenness, simply smooth it out with your hands while shaping the handle.
If you think the cup is already strong, you can skip the primer.
Stage 7. Varnishing. To give the cup additional strength and protection from moisture, the product is varnished. Moreover, varnishing gives a beautiful gloss and brightness to the color. It is better to use acrylic varnish for this, since it dries quickly and does not have an unpleasant odor, which allows you not to move from the room during varnishing. Cover the cup with a brush in two layers (remember to let each layer dry).
Now your product is ready to become a reliable container for sweets and various fruits - it is durable enough and can withstand any mountain of sweets. You can also decorate the candy bowl as you wish. For example, like this:
If the cup seems too complicated to you to create, then you can make a simpler candy bowl. Its creation will not take much patience and time, but despite this, it is just as beautiful and will be able to surprise guests. The following video explains how to create such an openwork candy bowl:
Shelf for sweets
We offer a step-by-step master class on making a shelf for sweets from old plates. We will tell you how to properly make a hole in fragile glass and give you some useful tips. This lesson will clearly show you how to make a beautiful and useful kitchen accessory with your own hands from unnecessary dishes.
Fans of the fairy tale “Alice in Wonderland” will definitely love this master class - this is exactly the dish the Mad Hatter had. By the way, you can use the bookcase not only for sweets. It is very convenient to place fruits, canapés or some snacks on several levels, and pour sauce into a cup. Cleaning the glass shelf will be easy: if necessary, it unwinds to the base, and you will have the usual plates and cup in your hands.
A good idea is to replace the cup with an old teapot. If you serve sweets on the shelf, you can stick beautifully twisted napkins or a bouquet of flowers into the teapot. Despite the fact that we will also drill a hole in the kettle, it can be filled with water by first placing a small container in it.
What do we need?
- three plates of different sizes
- cup or small teapot
- rod for a shelf (available in any hardware department)
- drill and bit
- plasticine
- stationery tape
- wooden block
DIY New Year's decor ideas or what can be made from pine cones?
Discussion: 6 comments
- Julia:
11/19/2012 at 7:37 pmGood idea! I have already made a screen for my battery from twigs based on the idea from your site, now I’ll try a vase, otherwise there are still some branches left.
Answer
- Andrey:
11/21/2012 at 1:38 am
The idea is interesting and, above all, for its simplicity and originality. Only the wire against the background of natural wood looks slightly out of place. It is clear that in this case it is the strength element of the structure. But if you camouflage it, for example, with a braided cord made of natural material (linen, sisal, suede, dratva,...), then the purity of the genre will only benefit.
Answer
admin:
11/21/2012 at 6:16 pm
Good advice, thanks!
Answer
12/14/2013 at 4:20 pm
Dear Vladimir, your site is wonderful: I got here and couldn’t tear myself away for a long time). Your photos show a combination of creativity and skill, interesting ideas! Inspiring! I really wanted to try something simple to do myself. Please advise what is the easiest way for a person without any experience to start and what is the minimum set of tools required? Of greater interest are pieces of furniture, such as a chaise longue or a table, since we recently moved to a private house and have not yet acquired anything like that, but there are a lot of boards drying under the canopy, inherited from the previous owners of the house. But perhaps you need something simpler first? What do you advise?
Answer
- admin:
12/16/2013 at 8:58 am
Dear Natalya, do what you need, let’s say there is nothing to sit on, make a simple stool, strength and inspiration come from need, and choose the simplest design, the tools that are in every home will help you, good luck!
Answer
03/18/2014 at 8:08 pm
Great thing! I'll try to make one like this tomorrow!
Answer
Simple ways to make a candy bowl from threads with your own hands
Hello, dear needlewomen! Can't wait to do what you love again? I would like to add warmth and comfort to the apartment, and of course, with my own hands, to put my soul and heart into it.
But what to do if you've already run out of ideas? No problem! This article is especially for you. Today I will tell you how to make a candy bowl from threads with your own hands.
There are several options to do it. One is simpler and doesn’t require a lot of hassle, while the other, on the contrary, will require some tinkering.
Varnishing crafts
If you wish, you can transform our craft by covering it with varnish; for this you can use either transparent varnish or stained to match the desired color of the wood, in this case it depends on your taste. Read how best to varnish a craft. Try to choose a quality varnish. Varnish with a special brush, take your time. Try not to leave any visible streaks of bubbles or lint from the brush.
You can download a drawing for a crafts candy bowl made of plywood on our website at the following link: Konfetnitsa.pdf (4323 Downloads)
Ball method
- threads, both woolen and ordinary cotton threads are suitable;
- PVA glue;
- balloon (it’s better to take a couple).
The first step is to decide what size your candy bowl will be. You can consult with your family members, I’m sure they will help you with the sizes! And, based on the given parameters, we inflate the balloon.
In this master class, our candy bowl is made from glue. Why do we need him? Actually, precisely in order to create the desired shape.
We take the threads you have chosen and begin to dip them in PVA.
If the glue is too thick, you should dilute it with water.
There are different options for how to soak them in glue. I offer you several to choose from, so you can use whichever one is most convenient for you:
- Cut the yarn into pieces (from 1-2 meters) and put them completely in PVA.
- Or make a hole in a bottle of glue and pull a thread through it.
Next, we wrap the ball with already impregnated thread; the more chaotic and disorderly you do this, the more interesting the result will be.
Once you think there are enough threads, you need to leave the ball alone and wait until the threads dry.
Then we pop the ball, take it out and decorate the resulting product if desired. Ready!
Yarn decoration
You can also make a small vase for candy using cardboard, yarn and toothpicks.
Cut out the bottom shape from thick cardboard. For greater strength, you can cut out two parts and glue them together. Decorate the bottom using colored paper or scrapbooking paper. Now let's glue the toothpicks. First, we make small holes with a needle at a distance of 1 cm from each other, and then drip glue into the hole and insert a toothpick.
After this, we move on to creating the walls of the vase from yarn. Wrap the toothpicks with thread. You can take either wool yarn or regular thick threads or jute.
When the entire vase is wrapped, glue beads or beads onto each toothpick; the lower part can be glued with tape so that the cardboard is not visible.
The vase is ready!
Method with toothpicks
- thick cardboard (any box will do);
- wooden skewers;
- instant glue (hot glue or any other glue will also work, but keep in mind that it must glue the skewers to the cardboard);
- wool yarn or twine;
- decorations to suit your taste.
First we need to create the base of our candy basket. To do this, we draw and cut out the shape we need from cardboard.
It is worth noting that the shape can be any: circle, square or even star.
But be prepared for the fact that the more complex the form, the harder it will be for you to work.
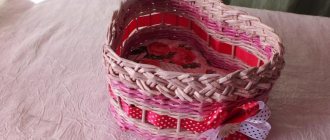
I chose the heart shape.
After this, we cut off the sharp ends of the sticks and attach them to the cardboard base with glue. To be safe, we retreat 1 centimeter from the edge.
For the final step you need yarn and oh-so-lots of patience.
It is necessary to braid the future candy bowl with fiber. And this must be done in zigzags so that everything holds well. You can weave beads in the process.
Next, decorate as desired and you’re done!
In these simple ways we made a beautiful decorative element, practical tableware and just a beautiful thing.
She will definitely delight you and your loved ones.
Well, in turn, I will certainly try to make a candy bowl from threads with my own hands, decorating it in the style of suite design.
And I will definitely show you how this will work out in the end in one of the following articles.
Don't miss the exit.
I hope that the article was useful to you and you will share it with your friends on social networks by clicking on the buttons below.
I always look forward to feedback in the comments.
Thank you all for your attention, and see you next article.
Source
Modular origami - basket
Origami is a recently popular technique of folding various paper figures. This ancient art was born in China in the early Middle Ages. In those days, only people from the upper classes knew origami. The technique became widespread in Western countries after the end of World War II. Nowadays, both adults and children enjoy doing origami.
This art perfectly develops logic and attention. There are several types of it - flat and volumetric
Both of these types are interesting in their own way. We suggest trying your hand at three-dimensional origami. The figure is usually assembled from a large number of modules, that is, identical elements that were folded in advance. So, let's make a modular origami “Basket”.
How to make a basket from modules - preparatory stage
Immediately before assembling the origami basket, you should start making many modules. They come in different types, but the most commonly used is the so-called triangular module. A4 size office paper is suitable. The sheet needs to be cut into 16 identical rectangles.
- We fold the rectangle in half, first across, then unfolding it lengthwise.
Then bend the bottom corners of the rectangle up.
We open the workpiece. After this, we bend the parts sticking out from the bottom upward. We unfold the workpiece to the other side. We bend the corners of the folded parts inward.
All that remains is to bend the resulting workpiece in half.
It has pockets on the sides, where the same modules are then inserted. Due to this, a three-dimensional origami figure is assembled from modules - a basket.
For our future craft, we need to make 494 blue triangular modules and 168 pink triangular modules. This process, of course, is labor-intensive and requires patience.
Modular origami “Basket” – master class
When all the necessary modules have been completed, you can begin making the basket. The assembly diagram for a modular origami basket is as follows:
- We assemble a chain of blue modules. We insert one corner of two modules into both pockets of one module.
Then the module pocket is attached to the free side corners of the upper modules.
In a similar way, the entire chain of two rows is assembled, each of which should contain 32 modules.
Then you need to close the circle.
Next, we build eight rows of the future basket from triangular modules. Each requires 32 blue modules.
In the next row you need to use pink modules. The total number of modules is 32, but every two blue modules alternate with two pink ones.
The next row is laid out as follows: the pockets of one pink module are placed on the two central corners of two pink modules. We do the same with blue modules. As a result, we have a series of 16 modules.
After this, we put on two blue modules, and then one more blue module.
We build new elements in the form of an arch: we string six blue modules with one pocket on top of each other. Then we fasten the upper elements together. We perform these actions around the entire circle of the basket. After this, we lay out a new continuous row of pink modules.
We need to make a stand for the basket. It consists of 1 row of blue modules and 2 rows of pink modules. In each such row you need to use 27 elements.
All that remains is to make a handle for the basket. It is composed by alternating 1 pink module with 2 blue ones.
A total of 79 rows need to be made. Having bent the handle in an arc, we attach it.
The origami paper basket made from modules is ready!
You can also make a beautiful vase and candy bowl from the modules.
DIY candy bowl
In many homes, it is customary to treat guests to sweets with tea or coffee.
Beautiful bright candies in multi-colored shiny candy wrappers look quite ridiculous in plastic bowls or ordinary plates, so for this case you need to have a beautiful candy bowl on hand. Stores sell finished products made from different materials - glass, plastic, wood or wicker. But a homemade candy dish will not only help you serve sweets effectively, but will also demonstrate your creative talent and imagination. There are many options for homemade candy bowls, so anyone can make such a product, regardless of their skills or talent. In this article we offer several simple options for candy bowls made from different materials, mostly from improvised materials.
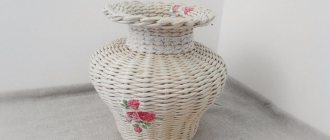
DIY candy vase made from paper and newspaper tubes
You can make all sorts of things with your own hands: toys, bags, lampshades for lamps, decorative elements to decorate your apartment and much more.
It’s great if something you make yourself is not only beautiful, but also useful in everyday life. Such a craft is a candy vase; it is very easy to make with your own hands. It can be either a small vase that constantly stands on the table or a large interesting vase that decorates the holiday table. You decide. There are many ways to make such vases, we have selected the most interesting of them.
Candy bowl made of wooden knots
This spectacular, but at the same time completely uncomplicated container for candies is made in literally a matter of minutes. You can use it in your home or give it to a friend or relative for their birthday. The material for it is wooden knots and trimmings of different diameters. You can use any wood (preferably with a beautiful texture, for example, pine), so finding material for this candy dish will not be difficult. To further highlight the texture of the wood, you can also use stains and varnishes.
To begin with, the knots must be cleared of bark and dried thoroughly. For the base of the candy dish we will need flat wooden circles of different sizes, and at the base of the product we will place higher columns as the walls of the dish. To process knots and rounds, it is good to use a sanding machine, but you can get by with sanding paper and patience. The workpieces are sanded and cleaned with sanding paper, and then cut into parts of the required thickness. Then you need to process the sections again. If desired, you can paint the blanks with stain or varnish, but this is not necessary, since the candy bowl is not intended for storing wet products.
Candy bowl made of threads
You can also make an unusual, spectacular candy bowl from ordinary threads and a balloon. As a result of simple manipulations, you get a surprisingly airy and weightless container for sweets. To work, we will need an inflatable ball of the required size, PVA glue and threads of any color and thickness (you can even take thin twine). You can also use threads of different colors - this will only make the candy bowl more beautiful.
- In a deep container, lightly dilute PVA glue with water. You also need to inflate a round (or any other) shaped ball to the desired size. It is carefully tied with thread so that it does not come down. Place a thread in a container with glue and thoroughly moisten it in the solution on all sides.
- Then this thread is laid out on the balloon in any order. You can lay out any pattern, for example straight lines or, on the contrary, loops and bends, or simply lay out the threads as it turns out.
- The thread must be laid in several layers to ensure that the product is durable and holds the shape and weight of the candies well.
- The threads are placed on half of the ball to form a hemisphere. When all the threads are laid, the ball is hung to allow the structure to dry. At high temperatures the ball will dry faster.
- When the structure is dry, it can be separated from the ball. To do this, the ball is pierced with a pin or the upper part, rewound with thread, is cut off with scissors. After this, the threads separate well.
- The finished candy dish can be further strengthened by coating its walls again with an adhesive solution. You can also, if desired, paint it with spray paint or glue beads or rhinestones to it.
Elegant bouquet of poppies
Beauty can and should be created with your own hands. With the help of simple manipulations, ordinary sweets can easily be transformed into a luxurious bouquet of poppies.
To work you will need:
- 7 truffle-shaped candies;
- corrugated paper;
- wide and narrow polypropylene tapes;
- decorative mesh;
- scissors and nippers;
- floral wire;
- wooden skewer;
- tape;
- decorative greenery;
- lush bow.
Divide each piece of wire into 4 equal parts. Cut the thin ribbon into strips 25 cm long.
Cut out 7 rectangles from corrugated paper with sides approximately 18*12cm.
From each rectangle, cut out a trapezoid as in the photo.
Place the trapezoid on the rectangle and place the candy in the middle. Roll the paper into a tight roll.
Insert the wire into the roll from the side of the base of the candy without piercing it. Wrap the paper around the wire and secure with tape.
Tie a ribbon around the roll near the top of the candy.
Flatten the edges of the paper to form poppy petals.
Prepare 6 more flowers in the same way.
Attach the resulting poppies to a wooden skewer with tape. Add greenery in random order between the flowers.
Wrap the flower blank in net and tie a lush bow.
Candy bowl made from glasses and plates
Quite often in everyday life there are scattered glasses and plates from different sets. Dishes tend to break, and often only one or two glasses or plates remain out of a whole set. There is no need to throw away such dishes, because they can also be turned into a candy bowl. To make it you will need a suitable plate and glass or wine glass, spray paint and silicone sealant.
- The dishes are washed and wiped dry. It is necessary to select such elements of the candy dish so that they suit each other as much as possible.
- Cover the work surface with paper, place the plate upside down and place the glass on it with the stem upside down. There is no need to glue anything.
- Next, we cover the blanks with a layer of matte spray paint, which is the basis for glossy colored paint. The dishes are left to dry for 10 minutes, and then glossy aerosol paint is sprayed in two or three thin layers. To dry completely, the workpieces are left for several hours.
Source