The ancient Slavs were close to nature and worshiped its powerful forces. Dolls made from threads were produced back in Ancient Rus'. Every house had a thread doll. They were distributed to guests, passed on as inheritance and placed at the head of the bed to protect the baby's sleep.
Solve your life problems. Change your destiny!
Ask the Universe for whatever you want: ⭐ Love ⭐ Money ⭐ Career ⭐ and more
To learn more
A doll made of threads as a talisman in Rus'
These woolen dolls were a powerful amulet against adversity and trouble. Rags made from threads in Russia have been a powerful talisman for their owners throughout their lives. They brought happiness to a man or his family. He protected from evil spirits and evil spirits, brought wealth and prosperity. The doll was made by the mother's hands for the baby at birth and placed in the cradle.
Fun fact: originally only women could make amulets. During this process, men were forbidden to be around. When making the dolls, only natural materials were used, made in a good mood. According to the Slavs, only a woman, the creator of consolation, could put her soul into making amulets. If a girl skillfully made a doll, she could be abandoned. The craft of making amulets and dolls has been passed down from generation to generation. Each family was carefully guarded.
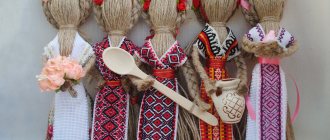
This is what a motanka doll looks like
What does a thread reel doll look like?
The doll is a figurine made entirely of thread. The faceless doll looks like a children's toy, but is endowed with great magical powers. When rituals and spells were performed, they were aimed at activating the amulet. And the doll itself is made according to special rules that cannot be broken. The doll was deliberately not given facial features so that evil spirits would not penetrate it. Since ancient times in Rus', red thread was mainly used to make it. The color red symbolizes energy, fullness of life, strength, love and family. The craftsmen used other colors, but scarlet was always present in the details of the toy. To tie a knot, the doll's legs and arms are held together with threads.
The appearance of the doll may vary. It depends on which threads are chosen to execute it. Charms can be of completely different sizes. A small doll for one person is usually a little more than ten centimeters. This is because it can be easily slipped into a purse or pocket, so its protective power also works outside the home. Family dolls can be much larger—three times larger. The large amulet is also decorated with various pieces of fabric and all kinds of ribbons.
Beregina with patchwork elements
Dry felting
We became familiar with the necessary tools. Now let's look at felting methods, starting with dry felting. It should be noted that this principle of felting appeared much later than wet felting, however, now it is very popular.
Megamaster.info draws your attention to the fact that making toys from wool using dry felting will be a difficult process for beginners, and children should not be trusted with such work. If you are distracted, you can get injured, because the needles severely tear the skin.
It is better to use L-shaped needles. They are easy to purchase in craft stores. Consider the principle of dry felting:
- Separate the desired part of the wool from the general tape. We rub it between our palms. Thus, the fibers will begin to tangle. We wrap the material into a cylinder; this should be done as tightly as possible.
- We take the needle and plunge it deeply into the material. We need to compact the material inside. To do this, simply carefully turn the needle. This way, the wool will fall evenly. The ball will become dense, and its surface will gradually straighten out.
- If the needle becomes difficult to pass inside, replace it with a thinner one. When the ball stops deforming when pressed, this means that felting can be stopped. And in order to get relief shapes on it, simply process the same place in the same way.
That's the whole principle of dry felting.
Master class doll amulet made of threads with your own hands
Many are sincerely surprised to learn about the existence of such amulets and wonder how to make a doll from ordinary threads. This seems strange and incomprehensible, because in our imagination dolls look completely different. However, the process is not complicated and real. Even a three-year-old child can do this. You just need to learn the rules of execution and follow the instructions in a certain way. These rules cannot be neglected, since they were not created in a vacuum.
Of course, we modern people may find this stupid. However, the ancient ancestors took this process seriously and strictly followed it. Each stage of work has its own logical meaning. They made a doll only in a good mood and for an important event. For example, when a child is born, or when sadness or illness comes home. A special amulet was used for all events. Nowadays, the purpose of dolls has changed. Grandmothers and mothers make the same dolls, but children use them only for games.
Any woman can make an amulet, even without the proper experience. The main thing is to believe that he has a certain power and use it for good. And bring it as a gift only with bright thoughts and motives.
Motanka Tenchka
Materials to complete the work
You will need to prepare:
Money amulet “Venetian magnet”
The personal patron of prosperity and wealth has already helped thousands of people get rich: ⭐ 98% of the owners have improved their financial well-being.
⭐ 3543 owners of the amulet opened their own business. ⭐ More than 5,000 people bought luxury homes or cars. To learn more
- You can use yarn for knitting, but if you use wool or similar fabric, the doll will be sloppy and shaggy, and you should not use yarn that is too smooth, as the knots will likely unravel.
- Red thread or yarn for knitting.
- Ribbons for decoration (they can be in different colors).
- Crochet.
- Scissors.
- Base (template) for winding.
Required materials.
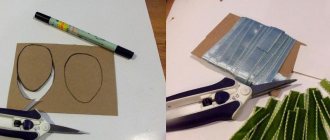
To prepare the template, you can use thick paper or cardboard.
Twisty hands will need a template. This should be a little more than half of the total doll. Depending on your wishes, and we have daughters, you choose the size of the toy.
Manufacturing stages
A bobbin doll in its production does not require sharp objects:
- The entire process is carried out with bare hands. At this point you should be in a good mood and well-being. What is needed is absolute silence, no talking, music or watching TV.
- The woman must be purified before performing it. Dress in new clothes, wash, comb your hair.
- Take the amulet in one fell.
- Dolly absorbs all negative energy. Therefore they are charged with good thoughts. Read prayers and spells.
Let's go make dolls with our own hands and thread. The whole process consists of five steps. Provide instructions Step by step:
- It is necessary to divide the skein of thread into three parts. The first should be five centimeters wide. Another three centimeters each. These will be used to make braids and shoulders.
- Start braiding. Then tie a braid of red thread towards the end.
- Then run the thread through the warp to attach it to the head.
- Form in the trunk. Place the yarn in half and tie it a short distance from the beginning. Thus the head. Then sew the braid.
- Then his hands. Pass the thread through the hole in the middle of the body. Tie on both sides, lining and shaping his arms. In general, the amulet is ready. All that remains is to trim the edges. Now you can use it for good purposes.
Stages of making bereginya
What does thread color mean?
It is important in the formation of an amulet not only the material, but also the color. Our ancestors were convinced that each color has its own destiny. Using this knowledge, they formed an image of their future amulet. Each color has its own destiny. Once you catch this, you will have no problem finding what you need to do. Each color is a carrier of personal information.
- Green is a symbol of greenery and nature. All shades of green have a positive effect on the nervous system, improving health and mood. Green is also the color of healing.
- Red is a traditional symbol of love and wealth. As such, the red doll must be able to attract powerful creative energy from its owner. Protective function of the red wing. He will leave evil, corruption and the evil eye.
- Yellow is the personnel of the sun. The sun has been worshiped by our ancestors since ancient times. Yellow symbolizes wealth and prosperity. Energy, the birth of life. The more flowers used to make a doll, the more blessings it can bring to its owner, the more you can protect it from harm.
Dolls boys and girls
Complete doll felting techniques and needle selection
To make a doll using the dry felting method, you will need to prepare not only wool, but also special needles, which are classified by thickness, type of section, and number of teeth. The thickness of the product is the main parameter, and if felting is carried out for the first time, then it is desirable to have 3 types of needles.
Namely, thin, thick and medium.
A thick needle is used at the beginning of making a doll, and is required to form the initial shape of the object. Using a needle of medium thickness, shapes and lines are created.
A crown-type needle is used when attaching decor to toys.
The cross-section of needles for felting can be different:
- Triangular;
- crown;
- Star-shaped.
There are a number of additional sections: cylinder and twisted, but they are rarely used and only by professionals. A triangular needle is the most common, and it is used as the main one for dry felting. The serrations on this needle are distributed over the entire surface of the tool, which makes it easy to carry out work and significantly speeds up the manufacturing process.
A star needle is an equally important tool, but it is used in the final processing of a product, for example, for polishing the surface of a doll or for pressing parts. A crown-type needle is covered with teeth only at the tip, and therefore it cannot deform the toy being made.
How to charge and activate
To work like a real doll amulet, you need to perform a special ritual by loading the appropriate energy.
Let's look at the rules that should be followed step by step.
Loosen the doll in your hands directly. In any case, do not place the thread on the table, it has a negative effect on its energy. The flow should have a spiral shape. The spiral is similar to a circle and brings positive energy. The required number of threads may not even be. The thread should be wound in accordance with the movement of the Sun. In order not to strain the strength of the doll, you should not cut it. Just wind it through. The attachment point should be in the navel. This is a symbol of the birth of new life, strength, family, fertility.
The doll's request must stop with every knot. It will remain in the doll’s memory so that it will direct all its energy in the desired direction. You need to come up with a name for the doll, light candles and place it on the table. Say the name of the doll and read the spell. You can choose your own words. In this case, your main goal must be expressed and imprinted in your mind. This way you activate the amulet and its energy. The dummy, of course, is not the only one, but, perhaps, one of the pleasant helpers in achieving your goals.
Pocket pendants
Wool Watercolor Basics
Paintings “painted” with wool are in no way inferior in their aesthetic qualities to real paintings. The secret of wool watercolor is quite simple: very thin fluffy combed wool is laid out in separate strands in layers. First, the master creates the background, and then works on the drawing and small details.
- The wool is not fixed to the substrate in any way, so the finished painting must be immediately framed under glass.
- Having a sketch and stencil worked out to the smallest detail is a guarantee of beautiful and neat work.
- When “painting”, apply the stencil to the objects being depicted and press lightly so as not to make a mistake in the proportions.
- Make all elements a little smaller than intended: under the glass they will be flattened and acquire the desired size.
- Lay out the wool so that the strands extend beyond the edges of the backing. The frame will press the excess, and you can remove it without damaging the painting.
- To create watercolor transitions, lay out layers of thin, sparse, almost translucent strands of wool. The more layers, the more expressive and brighter the drawing will be.
When working in wool watercolor technique, be careful with your hands. They must be clean and dry. Remember that this painting cannot be washed or ironed! In addition, wool watercolors are sensitive to high humidity: the image may become deformed.
Wool paintings, master class
How to handle the amulet
The following must be taken into account:
- The doll will become a faithful life partner. If you treat her tenderly, she will become a faithful assistant, maintaining her health, mental strength and well-being.
- The doll should not fall into the wrong hands. This is only allowed to the closest relatives.
- It is necessary to establish a dialogue with her. This applies not only to requests, but also to gratitude.
- A doll, like people, needs rest. That's why you need to put them back in the closet, drawer or shelf from time to time. This is quite easy to determine by how it feels.
- The doll does not live forever; it also needs a certain amount of time. You can also say how you feel. In that case, give it to the elements.
- If something happened to her, she took the blow you inflicted on her. In this case, she too must be exposed to the elements.
- Under no circumstances should you wash it.
- They should not be thrown away with other waste.
- If she was executed, she should be released in peace and thanked for her service.
If the doll is lost, thank it for its faithful service.
Felting wool slippers for beginners
So now we’ll make felting slippers using the wet technique, this way you can make toys and absolutely everything, the main thing is to know the technique, and its description is below.
What you need to felt wool slippers:
- Wool
- Templates
- Soap solution
- mosquito net
- Cellophane gloves
- Synthetic fabric (tulle)
- Bamboo mat
- Ruler
- Nail scissors
- Scissors
- Bubble film
- Towel
- Massager
- Homemade block
- A piece of skin
- Threads
- Needles
- Apply a thin first layer of wool evenly onto the template. There should be long edges on the sides, for convenience the wool should be folded. We lay out the second layer in the middle of the template, and do the same with the second future slippers.
- For convenience, we put on cellophane gloves, start rubbing, put a mosquito net on top, pour warm water through it, and then rub the wool intensively with soap. We hold the mesh with our hands and periodically lift it so that it does not stick to the workpiece.
- Turn over and carefully bend the wool without wrinkles. We carry out the same procedure with other slippers. Then, from the bend side, we evenly lay out a new layer of wool on two slippers and also rub it in with a mosquito net, and on the other side we bend the edges. We lay out the second layer, not on the fold side of the previous one, and rub it in with a mosquito net. Next, using tulle, we wrap the workpiece in it and, using gentle but strong movements, rub the slippers on all sides. Then we rub the top and bottom of the slipper through the mosquito net. Next, we roll one by one through tulle and a mosquito net until it becomes difficult to tear the wool off the workpiece.
- Afterwards we make a small, technical cut, retreat from the edge 6 cm, 3 cm in length. Use nail scissors to make a hole. After this, we take out the template, steam the slippers with warm water so that the wool fibers are better bonded.
- Then we wrap the slippers in a towel and bubble wrap, fasten them on the sides with rubber bands, and begin rolling our “candy” over the towel 25-30 times. We wrap it in the opposite direction, press lightly, since the workpiece is still poorly deboned. Next, we dip the slippers in water and begin to rub them with soap on the outside and inside.
- The cutout is enlarged and then we rub it intensively on all sides, outside and inside. Then we rub it on the bubble wrap and form the nose and heel of the slipper. Next, dip the slippers in water to smooth them out, wring them out, roll them into a bamboo mat, then into a towel, and roll them 50 times. Turn the slipper over and repeat the procedure. Then smooth it out using bubble wrap and a massager. Then we insert a homemade last inside, give it the shape of a leg, then trace it on a piece of leather with a slipper handle and cut it out.
- Then use an overcast stitch to sew the insole to the slipper. Let’s start decorating the slipper, mark the location of the flower, then carefully use a needle number 38 “star” to attach the leaves, which we made in advance using the wet felting technique. Everything you need can be bought at a sewing store or you can purchase a felting kit. Next, we attach the roses, the petals of which are made from two felting techniques. We sew the cutout with an overcast stitch.