Articles
All photos from the article
Modern materials and technologies have replaced traditional wood from many industries, but in some cases it remains indispensable. If you need antique-style utensils for a bathhouse or a country house, then you can’t do without wood. We will tell you how to make a wooden bucket with your own hands.
You can make a wooden bucket yourself.
DIY wooden bucket: materials and tools. Making a bucket
Modern materials and technologies have replaced traditional wood from many industries, but in some cases it remains indispensable. If you need antique-style utensils for a bathhouse or a country house, then you can’t do without wood. We will tell you how to make a wooden bucket with your own hands.
You can make a wooden bucket yourself.
Bucket made of wood
Purpose
It is impossible to create a traditional rural setting without wooden utensils.
Many readers will be surprised: who in our time could be interested in the technology of making wooden buckets? In any supermarket you can easily find inexpensive products made of plastic or metal, which are lighter, stronger and more convenient than antediluvian vessels made of boards.
In addition, modern models are much cheaper than their older brothers, which can be easily seen by looking at the prices in the bath accessories department. However, if you are afraid of the price of the finished product, you can easily make it yourself.
Flower pots are often stylized as antique.
However, let's return to the main question. The fact is that everything antique acquires value as a kind of props when it is necessary to create a certain atmosphere and surroundings. This fate also befell wooden utensils.
So, let's list the most typical areas of use of antique-style wooden utensils:
- Restaurants, cafes and clubs, the interior of which is designed in the style of old hunting lodges, taverns or taverns;
- Hotels and holiday homes, the style of which corresponds to family estates, estates or castles of yesteryear;
- Baths and saunas, made in traditional interior solutions. This is perhaps the most extensive area, and you can hardly find a Russian bathhouse without a wooden bucket or font;
- Many owners of private log houses like to decorate their premises in the style of ancient Russian chambers;
- Finally, all kinds of thematic events, reconstructions of past events, filming of films, videos, advertising and various programs may also require appropriate props.
Not a single Russian-style bathhouse is complete without antique dishes.
Important! It should be remembered that props can be purely decorative and not fulfill their functional purposes. If you want to use the cookware for its intended purpose, you should do it conscientiously according to all the rules.
Materials and tools
Wooden sauna buckets are made from high-quality lumber.
Article on the topic: Why is a wooden house cold?
To make a wooden bucket with your own hands, you can use raw materials of various species. Considering that large volumes are not required, you don’t have to worry too much about the cost of the array, because you don’t need a lot of boards to produce one or two vessels.
In addition, you should buy a strip of hot-rolled steel with a thickness of 2 mm. The length should be enough for two girths with an overlap of 80 - 100 mm. The width of the strip is chosen according to the tastes of the master, but usually it is 30 - 50 mm.
You will also need a pair of bolts with nuts with a diameter of 8 - 12 mm and a length of about 100 mm to tighten the hoops around the board staves.
Clamps can be optimized by welding.
If we talk about breeds, then when choosing, you should be guided by the table:
| Wood species | Properties and Features |
| Oak | The service life in water is over 35 years, at first it can give a bitter taste and color the liquid brown. The most durable and durable raw materials |
| Larch | The service life in water exceeds 25 years; it does not affect the taste and color of water. Larch is the most durable and moisture-resistant coniferous wood from which the support pillars of Venetian houses are built. |
| Elm | Can last in underwater conditions for about 20 years, but is afraid of rotting in air |
| Alder | Durability in contact with water approximately corresponds to that of elm, does not stain water and does not affect the taste, rots in air |
| Birch | Can last in water for 10 – 12 years, does not affect the quality of the liquid, is afraid of rotting |
| Willow | The least durable material, its service life is on average up to 8 years in contact with water. At the same time, it does not affect the characteristics of water and is not afraid of rotting. |
Tools you will need:
- circular saw for slicing;
- jigsaw;
- manual frezer ;
- mallet;
- two clamps;
- vice;
- plane;
- hacksaw;
- file;
- sandpaper and pencil.
Use high-quality lumber without knots or other defects.
Important! For a high-quality result, you should buy a radial cut oak board of the first grade, 10 mm thick and 50 - 60 mm wide.
Aluminum
From the middle of the 20th century. and to this day, aluminum utensils, including buckets, have reliably gained their position in the world market, despite the fact that serious wars have been waged against aluminum utensils. Aluminum was accused of increased toxicity. Although it, like chromium, copper and tin, reacts with oxygen and covers the dishes with a protective film. The older the aluminum cookware, the more reliable the protective layer, especially if you do not rub it with abrasive agents.
Note! A person can receive 50 mg of free metal per day without harm to health. When water is heated in an aluminum bucket, no more than 3 mg of aluminum is released.
In general, aluminum cookware is light, durable and looks aesthetically pleasing. Why you should buy aluminum buckets:
- low cost of the product;
- excellent thermal conductivity;
- corrosion resistance;
- easy to clean.
Note! Aluminum buckets should not be used to transport acids and alkalis.
Aluminum buckets are widely used in the dairy industry, and not only them, but also tanks for transporting milk from the farm to the milk processing plants. Aluminum buckets are available in volumes of 5, 7, 10, 12 and 15 liters. The most popular is a 10 liter aluminum bucket.
Making a bucket
The photo shows the process of making the vessel.
So, if you have not yet changed your mind about working with your hands, then here are a few instructions for you on how to make a wooden bucket:
- From the boards we assemble a square shield, the side of which is equal to the diameter of the bottom. We connect them with glue dowels and compress them with clamps until dry. Then use a jigsaw for wood to cut out a circle;
We cut out a circle from a board panel.
- On both sides along the edge of the bottom we chamfer to a depth of 2.5 - 3 mm;
We remove the chamfer from the edge of the bottom.
- We cut the required number of boards (depending on the size of the vessel), clean and sand the cut area. At a distance of 3 - 4 cm from the edge on one side of each board we make a rectangular groove 4 mm deep and 1 cm wide;
Article on the topic: How to insulate windows in a wooden house
The bottom will be inserted into the groove.
- We profile the ends of the boards for a round groove and a round tenon, as shown in the photograph;
- On the front side of each board we make two grooves into which a strip of steel hoops will fit. We cut the strip so that when it is wrapped around its ends almost touch, and then we bend it 2 cm from each end at 90˚ and make holes in these ears slightly larger than the diameter of the bolts;
We make clamps from steel strip.
- Place the boards on the bottom, gently tapping them with a mallet. We insert the last board from above and hammer it into the general row with a mallet. For convenience, the boards can be tied together with twine;
We assemble the walls from boards.
- We put on the hoops and tighten them first with an adjustable wrench and then with nuts. We make sure that the boards lie level.
We tighten the products with clamps.
Important! After assembly, the bucket must be lowered into water so that the wood swells and all the cracks close.
What is needed for a “Russian shower”?
The improved “Russian shower” attracts with its ease of use and design simplicity. Surely, the craftsmen examining the finished cooperage product had thoughts about applying their own efforts. Without a doubt, it’s easier and easier to buy, but it’s much more interesting to tinker with making it yourself. The process is extremely exciting, and the result can be boasted to your guests. And a considerable amount is saved, because high-quality models of dousing buckets are quite expensive.
We found out that to assemble an extreme shower with our own hands we will need:
- wooden container with a capacity of 10 to 40 liters;
- brackets capable of supporting the weight of a water container;
- preferred type float valve;
- metal rod - a piece of smooth reinforcement grade A3. The diameter of this rod can be from 8 to 14 cm, because the size depends on the calculated weight of the dousing device filled with water;
- ball valve;
- a piece of flexible hose.
You can purchase the entire list in a store and, by drilling three technological holes in a wooden bucket to install a metal axis and a float, you can quickly and easily make a dousing device. You can buy only that part of the mini-shower parts, which is pointless to do with your own hands. The home craftsman has economic justification for showing skill in making brackets and containers. So we will discuss folk methods of their production.
DIY wooden bucket
Hello DIY lovers, this time we will look at how to make a bucket out of wood with your own hands. This homemade product will be useful for those who have a bathhouse or simply for those who like such things. Of course, in comparison with modern plastic or metal buckets, this wooden bucket is heavy and not durable, but how does it look! You can also ferment cucumbers, tomatoes, apples, and so on in such a bucket. The author used fairly modern tools for manufacturing, so the assembly process turned out to be quite simple. If the homemade product interests you, I suggest you study the project in more detail!
Materials and tools used by the author:
List of materials:
- boards; — iron plates for rims; — screws with nuts; - thick wire (for the handle); - wood glue.
Bucket making process:
Step one. Cutting materials
Let's start looking for the necessary materials, we will need boards of the same thickness, the author used different trims. To get all the boards of the same thickness, the author ran them through a surface planer.
Step three. Bucket assembly
To assemble the bucket, we need to do some calculations, and then cut the boards at the right angle into the desired shape. The point is that after assembling the bucket, all joints have minimal gaps, only this will ensure the seal of the bucket.
We make grooves in the blanks for the bottom, and now the bucket can be assembled. For this we need masking or other adhesive tape. We simply assemble the bucket first flat on the table, gluing the boards together with tape, and then lift it, roll it up and have a finished bucket.
At the end, all that remains is to glue the bottom, here we will need carpenter's or similar glue; to increase the strength and tightness of the connection, we add small sawdust to the glue. We tighten the bucket and let the glue dry.
Step four. Headbands
We make rims for the bucket; they will hold the boards and also compress them, eliminating gaps at the joints. Here we will need iron plates, and we will bend them by cold forging. We take a hammer and hit one edge of the plate; it immediately begins to twist due to uneven internal stresses. Thus, we get the rims of the required sizes, and weld the ends.
Article on the topic: How to make a floor in a bathroom in a wooden house using tiles on plywood
We carefully press the made rims onto the bucket, now we have it strong and airtight, and when water gets into it and the wood expands, the structure will become even more airtight and strong.
Features of using a dousing bucket in a bathhouse
The list of bath pleasures is incredibly wide. A place of honor among them is occupied by the process of cooling a hot body in a cold body of water, a snowdrift or under an invigorating dousing bucket. All these procedures not only provide physical pleasure and intense sensations, but also provide invaluable benefits to the body: they accelerate blood circulation, tone the skin, and cleanse it of toxins. In a word, they strengthen and rejuvenate the body.
It’s good if there are objects with cold water for immersion in or near your bathhouse. Otherwise, we recommend that you make a dousing bucket and enjoy all the delights of the original Russian bathhouse.
The shower bucket for a bath is a modernized, improved version of a wooden bucket, movably mounted on the wall of the washing room. This is a kind of container of significant size that instantly throws cold water onto the head of a visitor who pulls a cord or chain. Due to its functional purpose and similarity of shape, such a device has acquired several more popular names. For example, a waterfall bucket for a bath or an upside-down bucket.
Design of a shower bucket for a bath
Regardless of what material was used to create the pouring mechanism, its design will always be the same. A bucket for pouring into a bath consists of the following components:
- Brackets for securing the vessel to the wall;
Wooden or other container for water;
Systems for monitoring the level of water supplied from the water supply;
- Rope, with which the bucket is tipped over if necessary.
In fact, the design is both ingenious and simple. Even a novice master can create one. There are many design options, among which making a bucket from wood is considered the most problematic. The finished product will require special care, but at the same time it will look more aesthetically pleasing than all other options.
Some inconveniences of a wooden bucket are associated with the need to fill it with water in advance. The bucket must swell, otherwise cold water will simply seep through the cracks. However, you cannot regularly leave the container filled. Over time, the wood will become covered with mucus, and the water will become cloudy and begin to stink. A solution to the problem can be a plastic insert mounted in a wooden vessel. It will help to avoid unwanted hassle of caring for the system, while leaving the appearance of the structure completely presentable.
Article on the topic: How to build a two-story wooden house
Organizational aspects
To start production, you must follow the plan for creating and launching an enterprise:
- Select an organizational form. Can produce buckets. To register, you must contact the tax service, pay a state fee (800 rubles), present a passport and an application filled out in form P21001. In it indicate the OKVED activity code: 25.92 - Group “Production of containers from light metals”.
- Choose a tax system. For a novice entrepreneur, the best option is to choose a simplified system.
- Rent a room. When searching, you should take into account the dimensions of the equipment.
- Contact Rospotrebnadzor to notify about the start of activities. You should also obtain clarification from the SES regarding the organization of work on site, and install a fire alarm system in accordance with the requirements of the fire service. In particular, to ensure the safety and health of employees, the Machine Shop Sanitation Code (5160-89) must be followed.
- Equip the room. In addition to the main production facilities, it is necessary to purchase office equipment, furniture for office staff, organize a rest area for workers, and, if necessary, make repairs. In general, the cost of preparing for production, excluding the acquisition of a production line, will be about 180 thousand rubles.
- Purchase of raw materials. The process involves concluding contracts with suppliers. You can purchase steel sheets and zinc for melting, but it will be easier to purchase galvanized sheets for the production of buckets. Monthly costs for purchasing raw materials will be about 190 thousand rubles.
- Hire workers. At first, you will need to involve 3 workers, an accountant, and a production and sales manager. Salary costs, taking into account deductions, will amount to about 200 thousand rubles.
- Advertise the product. Information about the start of production should be published in print media and radio. The sales market for products is construction supermarkets and points selling household goods, farms, construction organizations.
When calculating fixed costs, you should take into account the costs of taxes, payment of utility bills, and the purchase of materials for maintaining equipment. In total, the amount will be about 430 thousand rubles. Profit—290 thousand rubles; The payback period for opening production is about 1 year.
Costs can be significantly reduced if you look for used equipment on popular Internet sites (Avito, Yula).
With a responsible approach to setting up production and a preliminary search for a sales market, you can achieve a stable profit after 2-3 months of work.
Requirements for installing a dousing bucket in a bathhouse
If the size of the dousing bucket can be chosen personally by the owner of the bathhouse (large and tall or small and wide), then its location must certainly meet special requirements. In most cases, the upside-down bucket is installed in the washing room: water is supplied there and the drainage system is set up. Although the presence of running water is not at all a prerequisite for the functioning of the “Russian shower”. Water can be brought to the container using a flexible hose or simply poured manually while standing on a bench.
Sometimes a dousing bucket is installed directly on the street near the bathhouse. This option allows you to collect and use healthy rainwater for good purposes. But it is worth remembering that drainage on the street is no less necessary than inside.
The most difficult stage of installing a bucket in a bathhouse is correctly determining the required height. For people of average height, the recommended height is 2 or 2.2 m. For tall owners, it is worth setting the mark at 2.6–2.8 m. In any case, a person should be placed under the dousing bucket with their arms extended to the top. Do not forget that the vessel will turn over. Therefore, it is worth adding the height of the bucket itself to the planned mark.
Galvanized
These buckets are an indispensable household tool. They serve:
Manufacturers produce galvanized buckets with a volume of 15 l, 12 l, 9 l, 7 l and 5 l. There is another variety - a 12-liter zinc bucket with a spout for use as a milk bowl on farms. It is made from galvanized sheet metal using special modern equipment, thanks to which:
- the buckets have only one seam, treated with a special sealing paste before stitching, which makes it airtight;
- handles are made of special reinforced wire;
- Strong steel rivets are used to attach the handles, which makes the bucket reliable when carrying heavy loads.
Bath bucket with plastic liner
You can make a doused bucket in the most primitive way, accessible even to people who have not previously had anything to do with wood. To do this, it is not necessary to become familiar with the basics of cooperage and learn to use special tools.
A couple of simple steps will help you quickly make a wooden container that costs a lot of money on the market:
- To begin, select an ordinary plastic bucket of the most successful color. For example, white or azure blue. Water in such a container will look very advantageous.
Next, remove the handle and any other parts present from the bucket. You don't need them at all. Don’t rush to throw them away; perhaps they will come in handy in the future.
Prepare 25–30 not too wide sanded wooden planks. Their exact quantity depends directly on the size of the plastic bucket.
Using super-resistant glue, attach the strips to the outer walls of the plastic container, imitating a wooden bucket. Coat the joints with transparent silicone.
The wooden dousing bucket with a plastic liner is ready. Externally it is difficult to distinguish it from natural, but internally it meets all the requirements.
Here's a bucket for mixing bait
It holds its shape well, but folds, it is smooth and very durable and allows you to mix the required amount of fishing bait.
If desired, you can also make a hinged lid for it, for example, to carry your catch in a car. And there are other methods to protect bait from rain or sun.
Anton Turishchev - Specially for the Samodelki FISH website, Ukraine, Slavyansk
- DIY fish dryer
- Catching live bait with a homemade trap
Wooden sauna bucket
This method of creating a wooden bucket will be more to the taste of those who have previously dealt with the processing and use of wood. For a high-quality pouring device, you will need a piece of iron strip for two rims (about 3-5 cm wide) and a board of the 1st grade 1 cm thick. As a result, we will get a 10 liter bucket with a height of 40 cm.
The manufacturing process is a little more complicated than in the previous method, but the result is correspondingly much better and more aesthetically pleasing:
Article on the topic: How to properly make a sauna in the basement
Prepare a template for the bottom parts and rivets (side strips).
Cut the existing board into pieces that match the stave pattern. Treat them thoroughly with a plane and sherhebel.
Bring each detail to a state similar to the template. That is, carefully cut off the excess, giving the rivets a slightly trapezoidal shape.
Mark the outside of each stave. Cut the ends at an angle of 3 degrees so that when connecting the planks together, you get a circle.
Also, on each rivet, make a 4 mm indentation at a distance of 4 cm from the bottom edge. This recess is necessary to install the bottom of the container.
Do your first fitting. Gather all the parts into a pile, holding them with metal wire. Number all rivets. Determine the size of the bottom part.
Using the template, cut out the piece for the bottom. Cut off the top and bottom of the ends, forming a circle, so that the diameter is 1 cm less than the originally measured one.
Measure to excess and cut a piece of metal strip for the bottom rim. Use a hammer to give it the desired rounded shape. Make holes at both ends and rivet them (with wire in fives).
Make two tight clamps from pieces of metal strips.
Attach two opposite rivets to the rim, securing them with clamps. Next, insert all the other parts, trimming them as necessary. Thus, completely fill the entire clearing on one and the other half of the bucket.
Place the workpiece in its natural position and install the bottom piece.
Measure the top circumference of the bucket and make a second rim at a distance of 10 cm from the top.
Equipment for the production of galvanized buckets
The production line includes several types of equipment. To facilitate the production process, as well as the “joining” of equipment, individual assembly of the production line is used. The operator is only required to load the raw materials, and all actions for the further production of galvanized buckets are performed by the machine according to a given algorithm.
The cost of the production line is from 6 million rubles.
To save money, you can purchase the following types of equipment yourself.
Metal cutting machines
They are used for cutting metal sheets. The cutting is done automatically. The material is fed to the saw frame thanks to a hydraulic feed cylinder. In automatic mode, the sheet is clamped, the saw frame is lowered and raised, and the vice is opened.
An example of such an installation is the GH-4250 (Blv) machine. Cost - from 600 thousand rubles.
Stamping press
With its help, the walls and bottom are cut out of a sheet of iron. The equipment is large, weighing about 9-10 tons, so delivery requires careful organization.
An example of such a press is JH21-110t (Durmark). The dimensions of the unit are: 1.85mX1.49mX3.06 m. This must be taken into account when calculating the minimum size of the rented premises. Stamping is carried out under a pressure of 110 tons. In 1 min. the press makes 40-60 moves. You can order equipment for 2.1 million rubles.
There are other presses that differ in size and impact force. For example, the JH21-200T (Durmark) unit weighs 17 tons and presses with a force of 20 tons. Moreover, its price will be from 3.5 million rubles.
A press designed for leveling the walls of a bucket, processing the edges
Bending presses are large-sized equipment that bends sheets into a product of the desired shape.
The operating principle is based on the synchronized action of power hydraulic cylinders. The pressure force may vary. For example, in the MetalMaster HPJ-2580 vertical press brake it is 80 tons. The design is a system of powerful hydraulic cylinders; steel plates are used as a press. Thanks to the automation of the system for setting up the operation of the unit, it is easy and safe to operate. The cost is from 1 million rubles.
Serving machine
The device allows you to apply a relief image – “zigs” – to metal. When choosing, you should pay attention to such a parameter as the location of the shafts. Rollers are put on them to create a certain relief. In this case, the part is fixed with screws, and a roller acts on it under pressure. On the reverse side, shafts are pressed onto the steel, which rotate in the opposite direction relative to the roller. The result is a depressed relief. If after the first exposure it is not clear enough, the procedure is repeated. As a result, the cylinder corrugates.
An example of such equipment is Stalex ETB-12 - an electromechanical beading machine, the cost of which starts from 118 thousand rubles.
Folding machine
The unit allows you to connect (roll) a lock joint to seal a workpiece with a round cross-section. The part is affected by 2 rotating rollers. The rolling roller starts moving when the unit is turned on. The control is handled by the operator.
An example of such equipment is the electromechanical folding machine FPM-1300, the cost of which is about 110 thousand rubles.
Rolling equipment
The units are designed for bending rods. Without a machine it will not be possible to make handles for buckets. The device is equipped with shafts with electric drives.
The cost of mechanical equipment is from 120 thousand rubles.
Edge bending machine
It forms “ribs” to stiffen the bucket, allowing the product to be more durable and not deform under the influence of load.
To make the edge hard, a special paste is applied to it.
In total, the cost of the equipment will be from 4.048 million rubles, and this is when choosing the most budget-friendly type of machine. It is advisable to involve an experienced specialist in the production automation process.
Cost and profit calculations will help determine whether it is worth launching a line for the production of galvanized buckets.
On average, the production line produces about 4,800 buckets per month. Since the manufacturer is not interested in retail trade, the wholesale price is used for calculation. On average it is 150 rubles. per bucket with a capacity of 10 liters. As a result, the expected income will be 720 thousand rubles. per month.
Supplying water to a dousing bucket in a bathhouse
A factory-made drenching bucket is usually sold already equipped with a water level control system. In most cases, the principle of its operation is identical to the system in the cistern. In fact, the system for supplying water to the dousing bucket is as simple as the design of the mechanism itself. The pipe is brought into the room at the height of the container. The crane cuts in at a level of one and a half meters from the floor.
A rubber, plastic hose or stainless steel braided tube is connected to the pipe itself. A water level control system (if available) is connected to its second edge. In most cases, it is similar to the mechanisms installed in toilet flush tanks. This completes the simple process of supplying water and connecting the dousing bucket.
The technology for making a wooden bucket for a bath is presented in the video:
Outdoor washbasin for a summer residence: main types of purchased models
A garden washbasin or country sink should combine ease of use and affordable cost. When choosing a purchased model, you need to pay attention to the following parameters:
- the street model should fit harmoniously into the overall decor and the entire concept of the summer cottage;
- for frequent outdoor use, it is best to choose a wall-mounted washbasin with a large water tank;
- for rare, periodic use, it is advisable to give preference to small-volume washbasins, which will prevent water stagnation.
An outdoor washbasin can be portable or portable and stationary.
Such a device is usually located in the working area of a personal plot and can be represented not only by a primitive hanging tank, but also by a device with an increased level of comfort:
- a washbasin without a cabinet
or a so-called pour-over street washstand. This is the simplest design, represented by a capacity of three to five liters. Water is poured into the tank from above. The tank is closed by a lid, and a tap is located in the lower part or a special outlet float is installed. For drainage, a bucket or drainage layer on the ground is used. The best option is a durable plastic model. The most modern type is a plastic hanging tank with lids and a magnetic release; - A special feature of the plastic model on a stand
is the ability to attach it to a metal stand. You can firmly install such a device on the ground by pressing your foot on the bottom crossbar. Some models are characterized by the presence of such an additional element as a sink with water discharge directly onto the ground with a built-in drainage layer represented by fine crushed stone or gravel. The device can be installed between ridges or flower beds, as well as anywhere in the garden.
How to make a wooden bucket with your own hands
How to make a wooden bucket with your own hands in the form of a small cylinder, we will consider in this article.
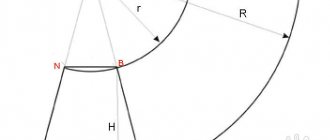
The figure shows a sectional view of the bucket design:
1.
Stacked bottom.
2.
Typesetting board.
3.
Metal hoop.
4.
Eyelet for attaching the handle.
5.
Handle.
SET BOTTOM
It is assembled using glue from boards and slats. Boards measuring 20 x 45 x 225 (mm), in which we mill grooves measuring 5 x 7.5 (mm) in the center of the side surfaces. Planks measuring 5 x 15 x 225 (mm). We compress the assembled shield with clamps and wait until the glue dries completely.
Article on the topic: How to make a fence from a picket fence
Using a jigsaw, cut a circle from the assembled shield. The end of the bottom is ground around the circumference to size 10 (mm), as shown in the drawing.
LAYING BOARD
Let's make it from a wooden plank with a cross-section size of 20 x 45 (mm), grind the side edges at an angle of 10° with an inclination to the center of the bucket. We end all the planks at the same size 350 (mm) and mill a groove from the bottom 4 (mm) deep and 12 (mm) wide. We will make chamfers on the sharp corners of the end faces.
The number of strips in the example under consideration is 18 pieces. Let's calculate the angle of inclination of the side faces: 360 / 18 / 2 = 10° The angle is an integer; there will be no problems with setting up the processing equipment.
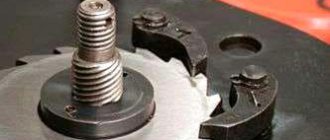
METAL HOOP
We will make it from hot-rolled tool strip 3 x 30 GOST 4405-75. Drill holes for M5 threads along the edges of the strip. Screw the corners and insert the tightening screw as shown in the figure.
Using a nut, compress the edges of the strip to the required size and weld them. Unscrew the screws and remove the device. Finish the seam and smooth it with an abrasive wheel.
Before welding, we prepare a one-sided joint with beveled edges of the following dimensions:
• joint width 2 (mm) • joint depth 1 (mm) • joint edge angle 60°.
HANDLE EYE
We will make it in the form of a loop from highly alloyed corrosion-resistant wire Ø 5 (mm) GOST 18143-72.
We will make it from the same wire as the ear.
Assembly order
, or how to make a wooden bucket with your own hands:
1.
Let's assemble all the planks around the bottom so that the bottom fits into the grooves of the planks.
2.
Compress the assembled structure with twine.
3.
Squeeze and weld the hoops.
4.
We will weld ears to the upper hoop for attaching the handle.
5.
Insert a pen into the ears.
6.
Let's lower the product into the water.
After some time, the wooden boards will swell and all the cracks will disappear.
Bucket for a bath: we can do without a font
Rolling around in a snowdrift, diving into an ice hole and being doused with ice water is a classic and ancient pastime of a real Russian bathhouse. However, nowadays there are bathhouses literally at every step, and not every one of them is located on the banks of a river, a forest lake, or, at worst, a city pond. Why is there a lake there? Not every bathhouse even has a swimming pool or plunge pool. Left without a breathtaking procedure? Whatever the case! A bucket for a bath and a desire are the key to the fact that any, even the most unprepossessing washroom can be equipped with its own waterfall, albeit not the Niagara waterfall, in size, but very close to it in feel.
Simple, like everything ingenious
A dousing device for a bath, for all its simplicity and, to some experienced eyes, outright primitiveness, is an extremely effective bathing tool. If, while diving into an ice hole, a person plunges into it with his feet, then throwing a bucket of ice water over himself, instantaneous cooling occurs in the opposite direction. However, in most cases the sensations turn out to be close in intensity of passions and a fountain of emotions. A very sharp change in ambient temperature and a sharp cooling of the surface of the body is a very serious shock to the body. How's the classic doing? “Everything that doesn’t kill us makes us stronger.” This procedure, according to some ardent admirers, has the following positive qualities:
- Perfectly trains the cardiovascular system. For such a procedure, as for any branded product, they came up with a bright and catchy name - “gymnastics for blood vessels.”
- Increases the tone and turgor of the skin, making it strong and elastic. Of course, cold, as an active irritant, initiates increased blood microcirculation and supply of skin with nutrients and oxygen.
- Metabolism increases, pressure in the main vessels increases for a short time, and the pulse increases. Any physiological activity forces the body to shed ballast and activate hidden reserves.
- As a result, the overall resistance of the body at the immune level increases.
- Finally, this procedure is very invigorating, and in this process, it is unlikely to find serious competitors.
Article on the topic: How to clean a wooden floor in a bathhouse
There are, however, some disadvantages. And the opponents of this action also have a full sleeve of trump cards, read, arguments:
- This is a state of shock for the body, and any shock, including temperature shock of different signs, is a difficult test for the heart and blood vessels. If everything is not in order in this regard, you should be careful.
- The human head, and especially the parietal part of the skull, is one of the most vulnerable locations of the body as a whole. Therefore, when dousing, you should not forget about this.
- A dousing bucket for a bath, if a large amount of water is incorrectly consumed, can provoke the manifestation of cervical radiculitis syndrome, caused by inflammatory processes in the root part of the nerve endings, due to a sharp temperature change or injuries of a purely mechanical nature, from an involuntary sudden movement of the head.
In any case, living is harmful, but moderation and balance in approaches to any bath procedures are a sign of high culture.
Briefly about the device
A bucket for dousing in a bathhouse is a wooden container assembled using metal, preferably stainless, hoops from individual elements - rivets, tightly fitted to each other or connected through a tongue-and-groove pattern, minimizing or completely eliminating the flow of water.
Important! Due to the loss of cooperage culture, some bath buckets have a polymer insert. To put it simply, we have a plastic bucket in a wooden case. Rough? But, on the other hand, it doesn’t leak.
In general, the issue of drying out of solid wood structures is very acute. The container should always be filled with water. In modern conditions, this is solved by supplying tap water or water from a well pump into a bath bucket and equipping it with an automatic filling system, with a level cut-off using a float, as in a toilet cistern. Reliable and practical. The main condition is that there is always a positive temperature inside the bathhouse during the cold season, preventing the water from freezing both in the bucket and in the supply system.
If this is not possible, and sometimes there is simply no water supply system, then the pouring bucket for the bathhouse is filled manually as the water is consumed from it. And the problem of drying out is solved by pre-soaking. 3 - 4 hours before the procedure, the container is filled to the top with hot water so that the swollen wood fills the gaps and the leaks are eliminated.
A word from Experienced! The leak problem that constantly plagues a wooden bath bucket can be eliminated in a more radical way. It involves waxing. Dry the sauna bucket thoroughly so that the defects are clearly visible. First, beeswax is melted in a water bath, to 3 parts of which 1 part of linseed oil is added and mixed thoroughly for 5 - 7 minutes, without reducing the temperature. We described similar recipes when we talked about impregnations for bath shelves. The method is similar, but the weight of the components and the principle of application are still different. Next, the waterfall bucket for the bath is heated with a hair dryer and all cracks are carefully sealed with a natural bristle brush. After the surface has cooled and the wax has set, the tightening hoops are carefully pushed down with the nose of a hammer until the wax is squeezed out of the cracks. Subsequently, the bucket in the bathhouse, which was stored without water, is pre-sedated with hoops so that the wax appears and filled with water. The foundation will serve as a reliable hydraulic lock.
It is worth noting that a sauna bucket in itself is not self-sufficient. For the system to work, it must be equipped with a tipper and a supporting frame. The supporting frame, as a rigid structure, is fixedly attached to the wall, at a height sufficient for a tall person to stand under it, on the other hand, to ensure the free movement of the bucket, preventing it from getting caught on the ceiling. As a rule, this distance is approximately 2150 - 2200 mm from the floor level. The rolling mechanism itself can be very diverse, from bearings to torsion bars. The only condition is clear movement in all spatial positions, the impossibility of failure and the availability of quick dismantling for scheduled maintenance of the tank. A shower bucket for a bath, as a rule, has a capacity of 10 to 30 liters, so the fastening and suspension system must be designed to exceed the safety margin by 4 times.
Article on the topic: How to make a square gazebo out of wood
Which wood to choose
This question is especially relevant when you are going to make a bucket for pouring into a bathhouse with your own hands. The choice is between very good material and satisfactory one. According to our good tradition, let's start with the good:
- Oak - has high strength, splits perfectly along the grain, which is very convenient for making staves. The high content of tannins gives the water a light color and a spicy aroma, this is especially pronounced immediately after production; over time, this property naturally fades. Its wood is very resistant to water and is less susceptible to deformation and fungal attack;
- Ash is similar in its properties to oak, including its unique texture and pattern;
- Alder - it is also worth considering it as a worthy option if you make a dousing device for a bathhouse with your own hands. To some extent, it splits less well along the grain and is less resistant to twisting during the drying cycle. It is obvious that alder wood is inferior to oak wood in both color and texture;
- Larch is among the leaders in resistance to the harmful effects of water. It is not without reason that bridge supports and pile structures were built on larch trees. Moderately resinous, difficult to process. Quite often there are through knots - nails, which are very undesirable in the production of cooperage products.
Products made from linden, birch, pine, and spruce can satisfy the needs of constructing products such as wooden buckets for a bath to one degree or another. If such raw materials exist, then they can be used.
Attention! In the lengthy discussions of some Internet “experts” one can find recommendations regarding the use of bog oak and bog larch wood. I would like to emphasize that stained wood is obtained from long-term exposure of tree trunks in an oxygen-free environment, completely immersed in water. At the same time, such wood is very rare, very expensive and extremely difficult to process even with modern tools. There is no need to talk about products available on the free market for reasonable money made from such wood. Is it just about banal imitations - the main purpose of which is low-grade marketing hype and making money.
Material for fittings
Responsible manufacturers widely use stainless steel when assembling a product such as a tipping bucket for a bath. Stainless steel for baths is used by many and for good reason. The presence of metal elements under the influence not only of the humid environment of the washing compartment, but also of the direct action of water places special demands on corrosion resistance. Hoops, chains, axles, supporting frames made of corrosion-resistant material will last much longer. And this is obvious.
Article on the topic: What is the job of a garage mechanic?
A few words about chains and ropes. They, in fact, operate the dousing bucket for the sauna. The strength and degree of tension allows you to regulate not only the speed of overturning the water flow, but also its volume. On the question of what is more practical, a chain or a rope, the opinions of the bathhouse community are divided. Some passionately argue that the chain is reliable, brutal and colorful, others convince that rope made of flax fibers works no worse in a humid environment, and that it itself is softer and lighter. It may not look so stern and masculine, but it costs several times less.
If you make it yourself
It is possible to make a dousing bucket for a bathhouse with your own hands, but it is not easy. Naturally, this formulation of the question concerns a classic wooden bucket, made in the best traditions of quality and reliability. And if there are no problems with the supporting frame, the hanging and tipping system, standard metalworking techniques are used here for assembling metal structures, then there may be a hitch with the manufacture of the wooden container itself.
A pouring device for a bathhouse with a wooden container can be made in the form of a simple cylinder with a straight riveting and equal diameters of the neck and bottom, or in the more practical form of a jug, where the riveting is also straight, but the diameter of the neck is smaller than the diameter of the bottom.
By the way! This design allows for more dosed dousing, but at the same time requires greater effort on the chain or rope. Do you want the effort to be reduced? Make the neck wider than the bottom.
The most difficult thing is the manufacture of individual elements - rivets, design of the chimney and assembly of the structure, with adjustment to the location. In production conditions, manual labor is replaced by milling processing based on numerical control. This solves a lot of problems, from complex radius cutting to the design of a tongue-and-groove system with a given mating angle. In the conditions of home handicraft production you need:
Article on the topic: Who eats a wooden house
- Jigsaw;
- Hand-held milling cutter with a device for radius milling and a set of cutters, with a shank mounted in a collet chuck;
- Electric drill or screwdriver;
- Welding inverter for tension welding of tie hoops.
The sequence of work is as follows:
- In a calibrated board 20x50x250 mm, in the center of the side surface along the entire length, we use a cylindrical cutter to make a 5x8 mm groove.
- We produce planks 5×15×250 mm. they will play the role of a double-sided tenon, which will fit into the reciprocal grooves of the boards.
- We assemble the shield, carefully gluing the joints with polyvinyl acetate glue. We tighten the shield with clamps and leave it under tension until the glue completely polymerizes and gains the necessary bonding strength.
- On the plane of the shield we mark a circle according to the estimated area of the bottom.
- Using a jigsaw, cut out a circle along the contour. For this operation, it is convenient to use a blade for figured cutting, which has a smaller tooth size and pitch, as well as a smaller width relative to a standard cutting blade.
- The edge of the circle is processed with a profiling cutter to a thickness of 10 - 12 mm.
- We make a typesetting strip for the walls of the bucket. Its dimensions should be within 20×50 mm and a length that determines the height of the bucket. The side of each plank should be cut at an angle of 10 degrees, directed inward. Trimming can be done with the side edge of a cylindrical cutter, having previously given the angle to the workpiece using substrates of the required thickness.
- At the bottom of the planks we mill a 5x11 mm groove at the same distance from the edge, approximately 25 mm
- We collect all the planks around the bottom, stuffing them “pull” onto its edge. You can temporarily unfasten the set using twine.
- From a metal strip 30x2.5 mm we tie the set from below, determining the length. Let's cut it off. At the edges of the future hoop, we drill two holes on each and screw two corners with a hole in the shoulder in the middle, into which a tightening bolt is inserted. We bring the edges together end-to-end and weld. We repeat the operation for the middle ring and the top one.
- We weld or screw metal ears on the top ring.
- We place the hoops on the bucket, tapping them evenly with the nose of the hammer, avoiding distortions.
- We process chamfers on sharp edges.
- Check the bucket for leaks. If necessary, wax or soak.
- We fasten the bucket on a suspension, equipping it with the necessary fittings to fit the location.
Considering the prices for industrially made buckets, especially if you have wooden blanks, the necessary tools and desire, then it’s definitely worth a try.