It is no coincidence that the mesmerizing sakura is a national treasure of Japan. A tree with delicate flowers is a unique symbol of the east. She brings health, prosperity, peace and love to the family.
An inflorescence of 5 petals represents happiness and complete harmony. According to the traditions of this country, faint pink shades certainly predominate in the decoration of homes, indicating the cordiality and warm feelings of the owners towards their guests.
Many people are interested in how to make a sakura tree from beads on their own. It is always placed in plain sight in the house so that you can admire its beauty and charm. It will certainly delight those present with the talent of the master who created it. There are 2 methods of weaving a plant - from individual flowers or with thick, spreading branches.
Both compositions look charming and worthy of admiration. The second, more luxurious option, is made using loops. You can involve children in the process, who will be fascinated by working with sequins and beads.
Leaves
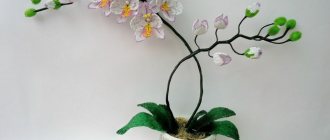
You will need to cut a 70cm piece of wire to create a 15cm sakura.
Mix all three types of beads - white, pink and soft green, so that it is convenient for you to remove one bead after another, for example in a bowl.
Measure a couple of tens of centimeters of wire to make a loop. Place beads on the other end. Each time - five colors: first pink, then white, green in the middle, and again pink and white.
Painting and decor
This is the most creative stage, where you can realize your full potential.
Decorate the stand as you wish or use our tips:
- use acrylic paint to make a green clearing at the foot of the sakura;
- when pouring plaster, leave space for the lake, paint it blue and cover it with stones;
- using the French weaving technique, make a large sakura flower and decorate the stand with it;
- the pot can be filled with coffee beans or glass stones;
- using decorative figures, create a whole “world” around the tree;
- spread “moment-crystal” glue on the stand and sprinkle pink beads (there will be an effect of fallen flowers);
- decorate with artificial grass;
- using epoxy resin you can achieve the effect of a transparent, clean lake;
- decorate with mother-of-pearl beads.
Branches
Keep making leaves like this. To make one branch, you will need about 15 of these, but in the whole tree there will be 60 of them.
What is required for production
To make a small tree in the Japanese style, you will need to go to a craft store and purchase a number of necessary little things. There is something in the sewing box - thread or yarn.
To work you will need:
- small green beads (200 grams);
- wire 0.3 mm green for the crown (2 reels of 50 meters each);
- thick wire for the barrel;
- clay tray or bonsai stand;
- clear varnish;
- paints (acrylic or gouache);
- light threads or yarn (preferably light green);
- gypsum;
- bandage (can be prepared with plaster);
- alabaster;
- PVA glue;
- scissors and nippers;
- two brushes.
One brush will paint the tree trunk. And the second time it will all be varnished.
Large branches
Collect 14 of the above branches into one large bunch. Tie the wire of these bundles in a spiral and secure with tape. Wrap a thread of a color suitable for the branches over the tape.
Connect the bundles into a whole tree. The resulting trunk must be covered with thread, preferably of a lighter color, so that the threads from the bunches themselves are visible.
Benefits of a beaded tree
A real evergreen bonsai is quite expensive and you need to have the skills to care for it. Pruning and watering is a whole science that requires scrupulousness. If you don't take care of the plant, it may die. Therefore, a charming evergreen miniature beaded tree will be a good alternative in such a situation. It will delight its owners upon returning from a long business trip or vacation. You won’t need to ask your friends to water the plant regularly and worry about its fate.
Main trunk
Cut off the bottom of the resulting trunk. Place what you get in a beautiful pot or any other vessel and fill it with a hardening substance, such as gypsum. You can sprinkle the resulting “ground” with beads of the same color as the leaves of the tree. So you have made a beautiful sakura!
As you can see, it’s really nothing complicated. You can come up with, add or change details yourself - this is a vast field for creativity.
Design options
With 16 species and 400 varieties of sakura, there are plenty of opportunities for crafters to bring their ideas to life. Some come up with their own unique image, others take ready-made works as a basis.
These can be single trees with small flowers, branches or entire landscape compositions. You can experiment with shades as you like, since, in addition to pink, sakura often comes in white, red, crimson, yellow, green and multi-colored.
Sakura medallion
The third sakura is different from the other two. It is suitable both if you are just starting to create, and if you have already gained experience.
You will need:
- Large beads of various colors, 10 g;
- 1 g pink beads;
- 4 g beige beads;
- Pink flower-shaped sequins, 3 g;
- Wire, 30 cm, monofilament, bead needle and scissors.
Tools and materials Time: 120 hours • Difficulty: 5/10
for tree No. 1
- 30 g of pink beads with a diameter of 3 mm;
- 30 g of white beads with a diameter of 3 mm;
- copper wire with a cross section of 2 mm, 3 mm.
for tree No. 2
- copper wire for beading;
- glass matte beads in white, pink and soft green shades;
- scotch;
- wire cutters;
- beige threads;
- scissors.
for wood No. 3
- pink beads – 1 g;
- brown beads – 4 g;
- concave sequins “Flower”, pink mother-of-pearl color – 3 g.;
- large multi-colored beads – 10 g;
- wire – 30 cm;
- monofilament or thin fishing line;
- bead needle;
- scissors.
How would you like to add a little Japanese flavor to your interior? And what could be better than sakura made of beads. This flowering tree will decorate your home all year round!
Beads are an almost universal material for needlework, from which you can make many interesting things, from costume jewelry to stylish interior decorations.
In our master class we will look at three ways to weave sakura from beads with our own hands. Both options are easy to make, but tree diagram number 2 is more suitable for beginners.
Cherry blossoms are fleeting, but a tree made from beads with your own hands will delight you all year round. And if we consider this product as a gift to dear people, then it simply will not have a price.
Sakura No. 1 - step-by-step description
When starting to weave sakura from beads, follow the tips in the diagram below. To enlarge it, just click on the photo.
Scheme for assembling sakura from beads
Step 1: make branches
The diagram shows in detail all the stages of creating branches from beads. But if you still have questions, let’s look at the diagram of how sakura is made from beads in more detail.
Let's look at the diagram together
To create the top of the branch you will need a piece of wire. Its length should correspond to triple the length of the future tree. Do not forget that the wire will be bent, twisted and wrapped many times, so do not spare it and then the product will turn out more attractive.
After we have decided on the sizes, we begin to string the beads onto the wire, 3 pieces each for the three upper branches. Constantly count the number of turns of wire, the equal length of the branches will depend on this. Then move on to the side branches. One of them should contain five beads, the other only three. The next two branches are executed exactly the opposite, i.e. leaves with five beads are located on the other side of the branch. The final row contains leaves of three beads.
After all the leaves are in place, we proceed to carefully twist the entire branch as a whole. We simply leave the remaining long end of the wire untouched. It will be useful for the formation of two, larger branches of the tree.
We make two more branches with leaves. Then we connect them into a single, thicker tree branch. There should be five such branches. We, in turn, collect them into a common branch, which will later form the trunk of the sakura.
To create a lush tree you need to make 70-100 branches. Attach all the resulting branches to the trunk. Wrap the middle ends of the wire well with the remaining ends of the upper branches. Try to place the turns of wire as close to each other as possible. These steps will make it easier to cover the tree trunk with any of the materials you choose.
After forming the tree table, be sure to make sure that there are enough remaining ends of wire to secure the entire tree to the base. Very often, needlewomen do not think about this stage and make mistakes that lead to the opening of already processed and painted trunks. After all, insufficient length of the “roots” leads to the constant falling of the product.
The tree trunk can be wrapped with brown wire or thread, or you can use masking tape, which is then painted brown.
You can make the barrel from papier-mâché, and then paint it in your favorite or suitable color. Tree trunks molded from pliable materials such as plasticine, mastic or gypsum also look great.
Step 2: make the base
Well, our flowering tree is ready. “Plant” it in a pot (vase) with plaster, plasticine or other hardening material. Decorate the “ground” with whatever you like on top. These can be beads of various diameters, pebbles, etc.
Instead of a pot, you can use beautiful stands, both wooden and handmade. It is only necessary to firmly fix the tree on the surface and hide the places of fixation. The Sakura bead tree will be a great decoration for your home!
By the way, if you use beads of a different color in your work, you can create different trees. For example, take brown, gold and some green beads and get an autumn tree.
We hope that the master class with step-by-step photos will help you create a magnificent interior decoration with your own hands.
The basis
Cut a piece of 30 cm from the wire, preferably thick. Fold the piece into a ring and string large beads on it, alternating colors as you like. This will be the base, the frame of the sakura, no less bright than the tree itself.
Twist the ends of the wire into a spiral and bend them into a loop. Cover what remains with beads, both for aesthetics and for safety (so as not to get scratched).
Weaving flowers
For each flower you will need 43 centimeters of thin wire. String glass beads onto one part of this length, make a loop out of six pieces and another one above it. Twist the wire at the base.
Weave 4 petals like this. Connect so that each one fits slightly onto the next one.
For the core, cut a piece 40 cm long. Place one white bead on it. Twist the two ends eight turns. On the same segment you should get ten stamens the same as the first one. Roll them up tightly.
Insert the resulting bundle between the petals and secure at the base.
A combination of two tones of pink will look interesting. You can weave 70 inflorescences from dark and 50 from light. Form clusters of five flowers, while twisting the wire completely. There should be 24 branches.
Tree
String 8 small beads onto a single long thread. Next, you need to re-thread the thread through the same beads in a checkerboard pattern and string new ones: thread the thread into the 5th - string the 9th, thread into the 3rd - string the 10th, thread into the 1st - string the 11th and immediately turn 12, and then turn back, continue in the same spirit.
You should get a dense mosaic in many rows. A tree trunk will come out of this. This may seem a bit complicated to you. When making a sakura tree from beads, a diagram can be useful. But believe me, this is not such a difficult principle.
Having made the trunk of sufficient width, begin to make thick branches. They are made in the same way, but you need an indent - one bead to the side from the base.
Attach the branch to the trunk and sew. Make hidden knots, because it won’t look good if they are visible.
Assembling an oriental beauty
In this tree of happiness, a trunk is immediately formed. To do this, take a wire 40 cm long and screw the 2 upper branches to it. Wrap with masking tape.
The next row has four middle ones. Add another wire and also cover it with tape.
Place a thick wire a little lower and tie several lower branches. And wrap it with tape again.
- Paper toys - diagrams, ideas and options for making various toys with your own hands (110 photos)
Dymkovo toy - modern collections, their creation and features of making Dymkovo toys (115 photos and videos)
Knitting openwork patterns - diagrams and step-by-step master class on how to knit an openwork pattern quickly and easily (95 photos + video)
Take a pot, install the structure and fill it with solution. Bend the trunk and coat it with a mixture of alabaster, glue and water.
After the mixture has dried, paint it and varnish it. Arrange the branches to your liking.
Advice! The branches can be arranged in the shape of a heart, and each side can be decorated with a different color.
Branches
Having created a thick base of the branch, move on to thin continuations. Lead them from the thick corners. For each you will need only one row of beads. Sew these branches with a ring base
Important: the thread must be passed twice not only through thick branches, but also through thin ones - this is necessary for strength.
Repeat the procedure, making symmetrically another thick branch on the side and a third in the middle, also continuing them with thin ones.
Decoration
Twist a nest out of wires, and mold eggs out of plasticine. Having placed them in the nest, glue the birds on top. Secure the structure in the center of the branch. Cover the rhizome with sisal and attach it with glue.
Second option
This simple method describes step by step weaving a decorative oriental symbol of love.
Preparatory stage
Before starting work, prepare the necessary materials:
Decorations for the New Year: decor ideas and options for decorating a house and apartment for New Year's celebrations (135 photos)- Window decoration - simple ideas and step-by-step descriptions of do-it-yourself window decoration (110 photos and videos)
Diaper cake - a step-by-step description of creating a diaper cake. 115 photos and videos of creating a gift
- purple beads;
- alabaster;
- masking tape;
- gouache mixed with PVA glue;
- 35 meters of thin wire;
- bowl;
- stones;
- hairpins
Flowers
This stage is the easiest. Including the joy of the approaching result and the fact that your tree becomes more beautiful before your eyes.
Sew flowers on both sides of the “coin”. Not only because the parties are equal, but also because then the sakura will look deeper and more natural. If there are areas of the tree that you are unhappy with, this is a good opportunity to hide them.
The beaded sakura tree is ready! Decorate your room with it, give it to someone or carry it with you, on your clothes or bag.
Story
Sakura symbolizes the frailty of life and the transience of existence. This is a family of roses, a subfamily of plums. Most trees serve a decorative function, but there are also fruit-bearing ones. The fruits are small and very sour, but due to their rarity they are extremely expensive. When the flower fully blooms, it remains that way for only a week. But it all depends on weather conditions; if there is strong wind and rain, then flowering will be significantly reduced.
Hanam holiday
Sakura blossoming in Japan is celebrated at the state level; it is a big day that leaves no one indifferent. Khanam is translated as “contemplation of flowers.” The main events take place in the main park of Shinjuku, and not only politicians, but also members of the imperial family take part. The park is especially beautiful in the evening, when the flowering plants are illuminated, creating a magical shimmering effect. People come to this holiday not only to relax, but also to find new business partners, strengthen contacts or conduct negotiations.