Corrugated paper applique
To cut out paper you need to prepare the following materials:
* PVA glue;
* brushes;
* corrugated sheets of different shades;
* scissors;
* printed template with a lilac pattern to facilitate the process;
* felt-tip pens or paints.
Step-by-step master class on how to make this lilac applique:
— It is better to use small scissors for cutting.
— First of all, the sheets are cut into small square pieces. There is no need to sort it by color.
— Pour some glue into a separate container.
— Using a brush, apply a little pva to the flower template.
— Screw the square tightly onto the handle of the brush. Press the bottom of the tube against the glue on the blank sheet.
- We wind each piece in the same way. Try to press the tubes as tightly as possible to each other, this will help make the application fluffy and voluminous. Paper lilacs will be a beautiful gift.
— Use felt-tip pens or paints to decorate a branch of lilac.
A beautiful and original application is ready! Such a sprig of lilac in a bouquet will delight you for a long time.
Preparation of materials and tools for manufacturing
The lilac branch will be made using two techniques at once - trimming for flowers and paper art for leaves. To work you will need:
- thick paper napkins in green, white, pink and different shades of lilac;
- glue stick;
- cardboard (piece for cutting plus background backing);
- scissors;
- ruler;
- wooden skewer or pen rod;
- simple pencil.
Note! For gluing, you should use a dry glue stick, since PVA or silicate glue will excessively wet thin napkins, making them unsuitable for use.
Lilac made of colored paper
For the craft you will need:
* double-sided colored sheets of green and lilac;
* thin soft wire;
* scissors;
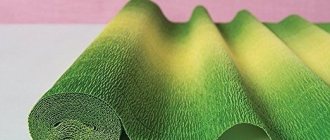
* corrugated paper;
*glue stick.
Step-by-step master class on how to make lilacs from corrugated paper:
— Let's start creating crafts with twigs. To do this, you need to cut out lilac strips, the thickness of which should not exceed 5cm;
— We fold the strips in half 6 times and use scissors to make as many small cuts as possible along the length of the piece.
— We unfold the strips, use scissors, ironing the thin fringe, and twist the paper.
— We wrap the wire tightly with green corrugated paper. We fix the edges with glue. Leave until dry.
— Starting from the edge of the branch, we begin to wind a strip of lilac paper, gradually going down. As a result, you will get a beautiful, lush branch of lilac. The edges of the paper are also fixed with glue.
— We connect the branches into a small bouquet, wrapping them with a green stripe.
— The number of branches is limited only by your desire; the more there are, the more magnificent the finished bouquet will be.
— Cut out leaves from green colored paper. Using glue, attach them to the stems of the flowers.
It is better to make a bouquet from several branches, so it will be very bright and unusual.
Step-by-step master class
Anyone can make lilacs with their own hands; it is advisable to know how to work with foamiran, but even a beginner can master this process.
Materials
For lilacs, experts recommend using light colors of foamiran; it is easier to tint them with any shades. Lilacs come in different colors, it is recommended to consider the following recommendations:
for white lilacs, a light lemon tone is suitable; marshmallow lemon-milk material will also make a luxurious bunch;
boiling white tones of lilac are not found in nature, a light yellowish undertone is present in any variety;
a white bunch can be tinted with yellowish or greenish shades;
for pink branches you should use shades of light rose, pink peony, marshmallow rose, marshmallow purple;
The simplest lilac craft
This craft option can be easily done by preschool children with virtually no adult help.
To do this you will need the following materials:
* colored paper of green, pink, purple colors, if desired, can be replaced with multi-colored paper napkins;
* PVA glue;
* sheet of white paper;
* brush;
* a simple pencil to draw lilacs.
Step-by-step instructions on how to make such a simple craft:
— On a white sheet of paper, using a simple pencil, draw the approximate boundaries of the future lilac flower.
— Colored paper or napkins are torn into small pieces, from which small lumps then roll.
— Using a brush, glue is applied to the surface of the base sheet, colored lumps are pressed onto the glue. Try to glue the paper without gaps, so the finished flower will turn out more beautiful.
— Fill the entire surface marked for the flower with colored pieces.
— We cut out the stems from the green one and glue them to the base.
An easy craft made from colored paper is ready.
Description
Foamiran lilac is an incredibly delicate and realistic composition that pleases the eye and attracts lovers of needlework. Before you start making flowers from this material, you need to take into account its features. Foamiran is also called plastic artistic suede or rubber. Among its advantages are the following:
availability, can be purchased in any specialized stores;
aesthetics and artistry.
From foamiran you can create complex flower arrangements, which include lilac branches . If you master the technique of making lilacs, you can try to make a spectacular interior decoration, brooch, or hairpin. It must be borne in mind that a realistic ensemble will require quite a lot of time, patience and materials. However, if you become interested in foamiran products, you will find all of them useful
Photo examples of lilac crafts
Bud assembly techniques
There are several methods for assembling a paper inflorescence. Possible options for how to make a flower:
- Overlaying layers on top of each other. The petals are cut out in advance from crepe of a certain color. Assembly is carried out by gluing or stitching individual parts in a circle.
- Twisting paper strips. This technique is used for inflorescences with an abundance of elements: lilac, hyacinths, lavender. A great way to make voluminous paper flowers.
- Rolling a long strip of crepe into a single bud. A strip of corrugated paper is pre-stitched with a middle seam, and as the thread is removed, the workpiece acquires its original folding.
- Assembling a bud from individual modules. Pre-prepared petals are laid in one layer (for example, to create tulips).
Collecting a bouquet
Beaded flowers: weaving techniques, step-by-step production of roses, forget-me-nots, lilacs, description, photo
One inflorescence is taken, four more are screwed to it at a distance of a couple of centimeters below the central blank.
Apply glue and wrap the resulting twig with threads.
Next, below the first additional row, we screw in four more inflorescences. We wrap it again with dark green threads.
The last step will be attaching the bouquet to the knitting needle. This is necessary to ensure that the entire structure holds as tightly as possible. We hide the knitting needle by winding threads around it.
Making leaves
Let's look at what advice is given in the master class on making lilacs from beads. The design of leaves for a flower is very similar to the work of making inflorescences.
Step-by-step instruction
We string three green beads onto a wire (approximately forty centimeters long).
- We pass the right end of the wire through the first two beads in the opposite direction, tighten the loop so that the green base is located in the center of the workpiece.
- Add three more beads to the right side and tighten the loop.
- We form the fourth row in the same way, having first strung 4 beads on the wire.
- The fifth, sixth and seventh rows are designed in exactly the same way. Each row has the same number of beads as its serial number.
- To decorate the next rows, a different number of beads is used - for the eighth - six, for the ninth - five, for the 10th - three, and for the 11th - one.
In this way, half of the future leaf is formed.
Making the second half of the leaf begins with drawing and securing another piece of wire through the top of the workpiece.
Then the same operations are carried out as when decorating the first half, but in reverse order. As a result, we get an elegant emerald leaf.
After weaving the required number of leaves, we twist them together to form a twig. The best option is five to six leaves on a branch.
All that remains is to connect a bouquet of lilacs and a twig with leaves.
Leaflets
Painting panel drawing embroidery my “lilac fairy” embroidery with ribbons ribbons
In order to make lilac leaves from beads, you need the following:
- Take a quarter meter long wire and weave nine rows in a parallel manner according to the diagram shown;
- Then the second half of the leaf is woven to the first;
- Twenty-five centimeters from the wire are skipped in the first and second rows, then weaving continues. For the first row you will only need one bead;
- The working tip, located near the sheet, must be pulled between the next two rows;
- For the last rows, the proposed scheme is again applied;
- By connecting the ends at the wire, the weaving is completed by threading one bead through the center.
- 3 pieces are collected from the sides, not forgetting that the ends should be closed together, and exactly ten beads should be put on them;
- The beads added last should be pressed tightly against the figure at the beginning.
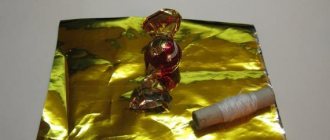
Sweet bouquet with candies
Drawing in mixed media “rowan sprig” (senior group)
To decorate a candy bouquet you will need a fairly wide bud and a strong base. To work you need to prepare:
- Multi-colored crepe.
- Felt pillow.
- Wooden skewers.
- Glue.
Instructions on how to make a bouquet of sweets:
- Choose the shape of the inflorescence to decorate the buds.
- Cut out parts from corrugated paper for further assembly.
- Assemble the bud by sewing the petals to a felt pad.
- You need to attach a surprise candy to the base pillow itself (you can use a small amount of glue).
- Form a stem from wooden skewers.
All that remains is to pack the bouquet with a sweet surprise in illustrated paper and then tie it with a satin ribbon.