This tutorial will show you how to create your own zoom lens using simple components.
This lens will be able to change shape, and therefore focal length, depending on the amount of liquid inside it. It will also have a soft surface that we can press on to distort whatever we see through the lens! Warning: It took me several attempts to make a lens that didn't leak. I hope this guide works the first time, but if it doesn't, please comment! Also, the photos in this tutorial were taken over several different attempts, so they may not exactly represent what you end up with. Finally, this tutorial uses laser cutting and solvent acrylic welding, so always use proper safety precautions when working with hazardous or unknown substances and tools!
Ice Lens
If you are in a cold area and don't have a bottle or materials at hand, you can make a simple optical lens using ice. To do this, fill a bag with water and place it in a cold place (preferably in the freezer). As it hardens, give the lens a flattened shape. After the water in the bag turns into ice, the lens can be used.
If you want to make 3D glasses yourself, read about it in the article How to make 3D glasses.
Sources:
- tetyamotya.ru
- www.kakprosto.ru
- elhow.ru
Manufacturing
- Make a pattern of your lens out of paper. To do this, draw a circle of the required diameter on a piece of paper and cut it out.
- Draw two circles on the top convex part of the bottle and cut them out too.
- Glue the two halves together with plasticine or clay so that the edges fit tightly to each other.
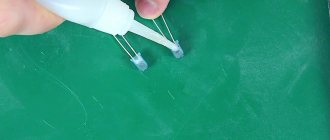
- Fill the cavity of the lens with water so that there are no bubbles. To do this, insert tubes into the connecting element (clay, plasticine) on both sides. Immerse one tube in water and bring the other out to extract air from the lens cavity.
- Once the entire lens is filled with water, remove the tubes and seal the holes. The lens is now ready for use for its intended purpose.
You can also use an ordinary syringe instead of tubes and use it to fill the lens with water. In this case, insert the syringe needle on one side and gradually fill the lens with water, and on the opposite side you need to make a hole for air.
[custom_ads_shortcode1]
Ice Lens
If you are in a cold area and don't have a bottle or materials at hand, you can make a simple optical lens using ice. To do this, fill a bag with water and place it in a cold place (preferably in the freezer). As it hardens, give the lens a flattened shape. After the water in the bag turns into ice, the lens can be used.
Eyeglass lenses are a good material for a quality telescope. Before you buy a good telescope, you can make it yourself using inexpensive and affordable means. If you or your child want to get interested in astronomical observations, then building a homemade telescope will help you study both the theory of optical devices and the practice of observation. Despite the fact that a refracting telescope built from spectacle glasses will not show you much in the sky, the experience and knowledge gained will be priceless. Afterwards, if you are interested in telescope construction, you can build a more advanced reflecting telescope, for example Newton’s system (see other sections of our website).
There are three types of optical telescopes: refractors (a lens system as a lens), reflectors (lens - mirror), and catadioptric (mirror-lens). All modern largest telescopes are reflectors, their advantage is the absence of chromatism and the possible large size of the lens, because the larger the diameter of the lens (its aperture), the higher its resolution, and the more light is collected, and therefore the fainter astronomical objects are visible through the telescope , the higher their contrast, and the greater the magnifications can be applied. Refractors are used where high precision and contrast are required or in small telescopes. And now about the simplest refractor, with a magnification of up to 50 times, with which you can see: the largest craters and mountains of the Moon, Saturn with its rings (like a ball with a ring, not a “dumpling”!), bright satellites and the disk of Jupiter, some stars invisible to the naked eye.
Any telescope consists of a lens and an eyepiece; the lens builds a magnified image of the object that is viewed, then through the eyepiece. The distance between the lens and the eyepiece is equal to the sum of their focal lengths (F), and the magnification of the telescope is equal to Fob./Fok. In my case it is approximately 1000/23 = 43 times, i.e. 1.72D with an aperture of 25 mm. 1 – eyepiece; 2 – main pipe; 3 – focusing tube; 4 – diaphragm; 5 – tape that secures the lens to the third tube, which can be easily removed, for example, to replace the diaphragm; 6 – lens. As a lens, let’s take a blank lens for glasses (can be bought at any “Optics”) with a power of 1 diopter, which corresponds to a focal length of 1 m. Eyepiece - I used the same achromatic coated gluing as for the microscope, I think for such a simple device - this is a good option. As a body, I used three tubes made of thick paper, the first about a meter, the second ~20 cm. The short one is inserted into the long one.
Lens - the lens is attached to the third tube with the convex side facing outwards, immediately behind it a disk is installed - a diaphragm with a hole in the center with a diameter of 25-30 mm - this is necessary, because a single lens, and even a meniscus, is a very bad lens and for obtaining of tolerable quality, you have to sacrifice its diameter. The eyepiece is in the first tube. Focusing is done by changing the distance between the lens and the eyepiece, moving the second tube in or out, focusing conveniently on the Moon. The lens and eyepiece must be parallel to each other and their centers must be strictly on the same line; the diameter of the tube can be taken, for example, 10 mm larger than the diameter of the aperture hole. In general, when making a case, everyone is free to do as they wish. A few notes: – do not install another lens after the first one in the lens, as advised on some sites – this will only cause light loss and deterioration in quality; – also do not install the diaphragm deep in the pipe - this is not necessary; – it’s worth experimenting with the diameter of the diaphragm opening and choosing the optimal one;
– you can also take a lens of 0.5 diopters (focal length 2 m) – this will increase the aperture opening and increase the magnification, but the length of the tube will become 2 meters, which may be inconvenient. A single lens is suitable for the lens, the focal length of which is F = 0.5-1 m (1-2 diopters). It's not difficult to get; it is sold in an optical store that sells glasses lenses. Such a lens has a whole bunch of aberrations: chromaticism, spherical aberration. Their influence can be reduced by using lens aperture, that is, reducing the entrance aperture to 20 mm. What's the easiest way to do this? Cut a ring out of cardboard equal to the diameter of the pipe and cut the same entrance hole (20 mm) inside, and then place it in front of the lens almost close to the lens.
It is even possible to assemble a lens from two lenses in which the chromatic aberration that appears as a result of light dispersion will be partially corrected. To eliminate it, take 2 lenses of different shapes and materials - collecting and diverging - with different dispersion coefficients. A simple option: buy 2 spectacle lenses made of polycarbonate and glass. In a glass lens the dispersion coefficient will be 58-59, and in polycarbonate it will be 32-42. the ratio is approximately 2:3, then we take the focal lengths of the lenses with the same ratio, say +3 and -2 diopters. We add these values and get a lens with a focal length of +1 diopter. We fold the lenses tightly; the collective should be the first to the lens. If it is a single lens, then it should have the convex side facing the object. How to make a telescope without an eyepiece?! The eyepiece is the second important part of the telescope; we would be nowhere without it. It is made from a magnifying glass with a focal distance of 4 cm. Although for the eyepiece it is better to use 2 plano-convex lenses (Ramsden eyepiece), setting them at a distance of 0.7f. The ideal option is to get the eyepiece from ready-made instruments (microscope, binoculars). How to determine the magnification size of a telescope? Divide the focal length of the lens (for example, F=100cm) by the focal length of the eyepiece (for example, f=5cm), you get 20 times the magnification of the telescope. Then we need 2 tubes. Insert the lens into one, and the eyepiece into the other; Then we insert the first tube into the second. Which tubes should I use? You can make them yourself. Take a sheet of whatman paper or wallpaper, but be sure to have a thick sheet. Roll the tube to fit the diameter of the lens. Then you fold another sheet of thick paper and place the eyepiece (!) tightly into it. Then insert these tubes tightly into each other. If a gap appears, wrap the inner tube in several layers of paper until the gap disappears. Now your telescope is ready. How to make a telescope for astronomical observations? You simply blacken the inside of each pipe. Since we are making a telescope for the first time, we will use a simple method of blackening. Just paint the inside of the pipes with black paint. The effect of the first telescope created independently will be stunning. Surprise your family with your design skills! Often the geometric center of the lens does not coincide with the optical center, so if you have the opportunity to have the lens sharpened by a specialist, do not neglect it. But in any case, an unground spectacle lens blank will do. The diameter of the lens is not of great importance for our telescope. Because spectacle lenses are highly susceptible to various aberrations, especially the edges of the lens, then we will aperture the lens with a diaphragm of about 30 mm in diameter. But to observe different objects in the sky, the aperture diameter is selected empirically and can vary from 10 mm to 30 mm. The next thing to consider is the contact lens manufacturing processes. In the modern world, there are three main methods for producing these simple devices.
The oldest method currently used is centrifugal formation. A liquid polymer is injected into a mold spinning at high speeds, where it is instantly exposed to ultraviolet radiation and high temperature, resulting in fairly rapid hardening of the material. Next, the prepared contact lens is removed from the mold and saturated with water, this stage is also called hydration. Afterwards it is polished, tinted and thoroughly chemically cleaned.
There is also a method for making lenses called turning - it is used in the manufacture of soft and hard, more often called hard, contact lenses. To do this, workpieces are used from a pre-polymerized substance, after which they are processed on a lathe. Then these lenses are carefully polished, saturated with water, chemically cleaned from all foreign impurities, and tinted. The final stage of the process is sterilization, where the lens is heated to 121°-124° C. After which the contact lenses should be packaged and labeled.
Another popular method for producing contact lenses is casting. It is the least labor-intensive of the above methods. All that is required is a metal matrix form; it should be taken into account that for each type of lens, with certain parameters, it is individual. Thousands of plastic copies are cast using this matrix. The lower part of each mold is filled with liquid polymer, the upper part of the mold is inserted on top, this acts as a kind of press. In the space between the two halves of the form, our lens is obtained. Next, the contact lens is saturated with water, then polished, cleansed, tinted, sterilized, and packaged, as in all previously discussed cases.
It should be noted that there are also combined manufacturing technologies that are often used in the production of lenses. The most common example of a combined method is Reversible Process III. Its essence is based on the fact that the back part of the lens is formed by turning, and the front part is obtained by centrifugal molding.
There are quite a few similar techniques. Each manufacturer focuses on efficiency, speed and ease of production, and has the right to choose any of the listed technologies, introducing their own subtleties and wishes, inventing new and new methods. Progress does not stand still, we can be absolutely sure that in the near future, the production of contact lenses will reach a new level, making our vision ideal, our gaze natural and beautiful, and us - more successful and more self-confident.
You will need.
- - window glass;
- – tubular drill;
- – coarse abrasive;
- - Metal sheet;
- – plasticine;
- – balsam.
Instructions Place a sheet of glass on a flat board and secure it with three wooden planks so that they form an equilateral triangle. Nail the ends of the planks to the table. Insert a tubular drill into the formed triangle. Drill through the glass using coarse sandpaper. Wet the drilling area generously with water so that the abrasive gradually falls into the recess.
To prevent chips from forming when the drill comes out of the glass, a sheet of metal 3 mm thick is glued to the back side of the glass with hot resin. To prevent water from spreading on the glass, make a low plasticine side. When cutting, rotate the drill bit vigorously from side to side.
Make a step grinder from bronze, brass or other metal. Grind the lens on a turntable, having previously secured the workpiece in a special mandrel. Pre-grind the convex lens using an emery wheel. Start sanding with M40 micropowder.
Having smoothed out the unevenness after stripping, change the powder to M20, and after 20 minutes - to M10. After sanding, polish the product. Form a polishing pad from the hardest resin. While polishing, let the resin cool every 3 minutes and form a polishing pad on the lens to polish the flat side of the lens.
Glue achromatic lenses with Canada balsam or balsam. Place the pieces of balm in a test tube and place it in a metal mug with water. When the water boils, the balm is ready for use.
Place a board a few millimeters thick on the burner, turned on low. Place the lenses on it and heat them to 70˚C. Place a drop of balm on the concave surface of one lens, place it on the second lens and squeeze them tightly.
When the balm spreads over the surface to be glued, let the lenses cool. Remove excess balm with a knife, wipe the lens with turpentine, wash with soap and wipe with alcohol. Before the alcohol dries, rinse it with water. Place the finished lens in the frame.
Please note: After polishing, the optical and geometric axes of the lens may not coincide. Therefore, it is necessary to round it up. To do this, install a mandrel on a vertical spindle, glue a lens onto it with resin and rotate the spindle, while observing the reflections of the lamp on its surfaces. If the lens axes do not coincide, then the highlights will shift relative to each other when rotated. Move the lens in different directions across the axis and observe the glare. The lens will center itself when the highlights become stationary. After this, sand the resulting asymmetrical protrusion.
Helpful advice: The tubular drill should be of minimal weight with a wall thickness of 2 mm. The height of the drill should be 3 millimeters greater than the thickness of the glass, and the diameter of the shank should be the maximum for a given machine chuck. If the crunch of glass becomes quieter when drilling, this means that you need to add water and abrasive.
Sources:
- How to make eyepiece lenses or Barlow lenses
- how to make your own telescope
How to make a lens?
If you don’t have a lens at hand at the right time, don’t be upset, as you can make one yourself very quickly. To do this, you need to study the recommendations on how to make a lens with your own hands.
[custom_ads_shortcode2]
Application of Fresnel Lens
Today, the Fresnel lens has found wide application in many fields.
For example, they are used in large lighthouses, projection televisions, navigation lights, railway lens traffic lights and semaphore lights. And due to its low weight, the Fresnel lens is also used in lighting devices that need to be moved during operation.
And when placed on the rear window of a car in the form of a thin film, it significantly reduces the “dead” zone behind the car, as seen in the rearview mirror. An ultra-flat, lightweight magnifying glass is created based on the Fresnel Lens. It is her help that people with low vision resort to when reading texts in small print.
In addition, similar lenses are used in infrared motion sensors and lens antennas.
There are a couple more promising areas in which the Fresnel Lens can be used. Its use is presumably possible in the construction of space telescopes of gigantic diameters. It is also likely to be used as a solar energy concentrator for solar panels.
Sources: How to make a lens?
If you don’t have a lens at hand at the right time, don’t be upset, as you can make one yourself very quickly. To do this, you need to study the recommendations on how to make a lens with your own hands.
[custom_ads_shortcode2]