Making a web from threads
Decorating your home for Halloween can be quite a task, and you may have to sacrifice the style of your favorite apartment for store-bought items. Chinese trinkets fill your space so unsightly and can overwhelm you with the abundance of black and orange colors.
This year, skip the store-bought souvenirs and make your own Halloween decorations. Not only is it fun, but you'll also save money!
So put aside the huge artificial white clouds of “spider” webs, hanging which you can hardly wash your hands later! We will teach you how to quickly and easily make a web from threads that are lying around your house. And if there are no threads, you can unravel an old sweater and sock.
Animal patterns for downloading
Don't limit the flight of your imagination. We have selected patterns for a variety of toys for you. Download them, print them and create. With a little effort, you can create a whole zoo at home with your own hands.
Pattern of a cat and a cat:
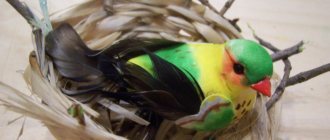
Natalia Kostikova's bunny:
Little Frog:
Are you weak?!
Hairy spider. Master Class. I want to show the result of my work. The idea with the spider interested me, I was interested in trying my hand at it.
We will need: wire, an old mink hat, instant glue, a stationery knife, wire cutters, I have pliers, padding polyester, cardboard, 2 beads.
We cut the wire into 4 pieces of 16 cm, 4 pieces of 12 cm, and 4 pieces of 4 cm (2 for the jaw and 2 for the connection between the back and the head). These are our paws and jaws.
We cut strips of 1 cm wide from the skin with a stationery knife, making sure that the cut goes in the direction of the growth of the pile, cutting only the skin along a ruler so as not to damage the fur.
We coat the strips with glue and glue the wire into it. We simply bend the fur in half and glue it together, as we do with all wire blanks. The paws are ready.
We make 2 templates on cardboard (I got these dimensions) and transfer them to the fur. Do not forget that the pile lies on the back from neck to back, and on the head - from neck to mouth. I cut 2 back parts and 1 head part from fur and 1 head part from leather. We fold the blanks with the fur inside and sew them over the edge, leaving the neck unsewn, making sure that the fur is all tucked in one direction.
Turn it through the neck. Here I have a head blank, with skin on the side of the abdomen.
Head on top.
We fill it with padding polyester not very tightly and sew it up with a hidden seam.
We fold the back parts with the fur inward, making sure that the pile is directed in one direction.
We sew it in the same way as the head, leaving a hole on the neck, turn it inside out, stuff it with padding polyester, and sew up the hole.
We connect the head and back. I inserted 2 pieces of wire into the seam, first into the back, glued it with hot glue, and then into the head and glued it too, and then stitched it together to be safe.
This is from the abdominal side. The wire was inserted so that a bend could be made between the head and the back.
We lay out the paws - long at the edges, short in the center.
We try on the body and legs, do not forget that the legs are attached to the head, the back remains free. I first sewed the paws to the leather side of the head, created a bend, and then spread the fur further and glued it with hot glue.
Sew on the bead eyes. Actually, spiders have 8 eyes, but they are small, mine has 2 large ones, because the small ones will not be visible in the lint of the mink.
And the result was such a handsome man, it took half an old mink hat. If you measure it diagonally, it measures approximately 30 cm.
And here he is perched on the windshield of a car.
Well, once again in my palm, it’s a pity to even give it away! I'll probably make the same one for myself. True, there is an idea to try using khanorik fur.
I hope you liked my MK. Try making yourself the same beauty! By the way, I made it in just 3 hours.
Such an unusual and not everyone’s favorite type of insect, like a spider, is a rather unusual decoration and decorative element. You can make such an accessory using a wide variety of interesting techniques and materials. In our article we will talk about the most popular techniques for creating a decorative spider quickly and step by step with your own hands.
Master class: web of threads
- Yarn (threads from any material, all kinds of colors)
- Scissors (ordinary stationery, for cutting or even manicure)
- Tape (use tape that won't damage your wallpaper and can be easily removed, such as masking tape)
Tools for thread web
Operating procedure:
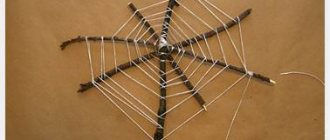
- To start, cut 3-4 long strands (or more) and secure them to the wall with tape (or nail them to the wall). Place them so that they all intersect in the middle.
- Secure all the long pieces of thread in the middle with a small piece of yarn and tie them together. It is advisable to cut off unnecessary long ends.
Scheme and procedure for collecting webs from threads
- Then take a long piece of yarn and begin to gradually form a web. Tie one end of the yarn to one of the long pieces of thread and do the same with each of the long pieces.
How to properly fasten and “tie” knots on a web
- On each long strand, tie a large piece of thread to the strand (using a simple knot).
- Continue moving from one long strand to the next, twisting and tying, until you gradually reach the very first strand you started with.
Trim any excess yarn ends. Each knot should be sliding so that you can easily move it up or down the thread.
The easiest way to secure it to the wall is with masking tape.
Repeat this step, using increasingly longer pieces of thread to form increasingly larger rings on your web. You can make these rings at a very short distance from each other, or, conversely, further away - it all depends on your mood and aesthetic need.
Only when you have finished weaving all the rings on the web will your spider web be ready!
Select the size and shape of your future web in accordance with the features of your wall, the location of bookshelves or windows.
You can weave a web, combining a variety of colors and sizes - compact white or huge black.
To further lift your spirits, you can weave a web from some bright, juicy threads! Don't forget to add small faux spiders to enhance the spooky effect!
Master class: Spider web from a bag
If there are no threads in the house, then there will always be garbage bags. They make great decor. Fold the bag into a triangle and draw cutting lines with white chalk, as shown in the diagram. We cut it out and that’s it - the web is ready. Cheap and fast.
Scheme for cutting cobwebs from a bag
We fasten the bag with tape on the sides so that it does not slip and cut along the contour with sharp scissors
The original web is ready - you can attach it to the wall using masking tape.
You will also look at beautiful photos and examples of how you can transform a room in an original and stylish way with the help of cobwebs for Halloween. Elementary, but not so common.
The most realistic spider web
Do you want to really scare your Halloween guests or tease your neighbors with your skills? Try to create a truly scary and realistic composition for the holiday.
Such a web is suitable both for the facade of a house and for decorating a small apartment inside.
A gauze web is a win-win option. Firstly, the material is accessible and will definitely be available to everyone. Secondly, working with it is easy and simple.
To create a lighter, airier version, you will have to tinker. It is necessary to stretch each thread of gauze. But the effect exceeds expectations.
Even your workplace can be decorated this way.
The second option is easier and faster - hang the gauze, stretch it slightly or tear it. The effect of realism will be less, so it is worth placing spiders and corresponding attributes on the canvas.
A web made from threads or ropes will look great. Wool yarn will do. If the threads are thin, then the white cobweb will look faded and unprofitable; it is better to use black.
Stretch six long threads crosswise in the place where you decided to install the composition, secure the ends with pins, nails, and masking tape. Closer to the center, attach a thread of the same color to any ray using a knot.
Moving in a spiral, secure parts of the web, making the distance between levels increasingly greater depending on the distance from the center. And at the end, secure with a strong knot.
The web is ready! It will look especially beautiful hanging on the corners. All that remains is to attach spiders and other decor to it.
How to make a spider web with your own hands (master classes)
Clothesline web
- Clothesline;
- Metal pins.
First, we screw the metal pins. Next, stretch the vertical rope, and then the horizontal one.
Then we start weaving the web. We retreat about 10 cm from the center and braid the crossed cords, tying knots along the way. So it is necessary to create the desired number of rows of web. In some places, if the rope does not slip, knots need not be tied, but simply wrapped around the main rope.
The spider entwined the object...
If you want to wrap lamps, interior details, or an entire closet in cobwebs, you will need a couple of spools of fine thread. Wrap it randomly around an existing item. You can allow it to sag, or you can form a tight cocoon. This technique will look interesting with white or gray threads. If you wish, you can paint the web yourself in a dirty-dusty color. To do this, you need to soak the thread in a solution of black paint, dry it, and then start winding. To give rigidity to the web, you can make it from threads soaked in PVA glue. But remember that such decor can stain the base. It is ideal for decorating disposable tableware and bottles for the table.
What is needed to make a web?
Depending on which manufacturing method is chosen, different tools and materials may be required.
- Yarn of the desired shade (in most cases, white or black threads are used) is a mandatory component.
- Scissors.
- PVA glue.
- Masking tape.
- Black paint.
- A piece of plywood.
Advice! Before starting work, you need to decide on the place where the web should be located. This will help you choose the appropriate method for its manufacture.
Three ways to make a web from threads
You can make such a decorative element in various ways. For example, you can use one of the options below.
Method number 1 - on the wall
For the first method you need to prepare:
- yarn of the selected color;
- sharp scissors;
- masking tape.
Execution technique
- It is necessary to cut 3-4 long threads (or more) and fix them on the wall using tape. They should be placed so that the threads intersect in the center .
- Fix all long fragments of thread in the middle using a small piece of yarn and tie them. It is recommended to trim off the excess.
- Then you should take a long piece of yarn and begin gradually forming a web . To do this, you need to tie one end of the yarn to one of the long pieces of thread attached to the wall. And repeat this action for each long segment.
- On each long strand, you need to tie a large piece of thread to the strand, forming a simple knot.
- In this way , you should move from one thread to another, twisting and tying, until you approach the very first strand with which the process began. Each knot must be made sliding so that it can be moved if necessary.
Advice! To form large rings on the web, you need to use the longest pieces of thread possible.
You can weave a multi-colored product in this way, using threads of different colors at the same time.
Method number 2 - using glue
For the second method, you need to prepare the following materials:
- white yarn for knitting;
- scissors;
- deep container;
- PVA glue;
- a piece of film or a plastic board.
Execution technique
- The yarn must be cut into pieces of the desired length .
- Pour glue into the prepared container and dilute it a little with water. Pieces of yarn need to be dipped in glue and wait a little so that they can be fully saturated with it.
- Now we need to form a web. To do this, you need to lay out the threads in the shape of a snowflake on the film or on a board, and then lay out circles on top of it.
- Then you need to carefully form bends with your fingers and leave the product until completely dry.
- This process can be speeded up a little by placing the web on the battery .
- When the product has dried, it must be carefully separated from the board or film.
The magic of the web
The web is the thinnest translucent thread produced by spiders for hunting insects. A small bird or bat can get entangled in a fairly strong, multi-layered “mesh”, but the spider itself does not stick to it. Cobwebs can often be seen in autumn forests - this time often coincides with the celebration of Halloween.
The cobweb as a symbol denotes the fragility of human existence, the long journey of the soul, as well as the networks placed by the Devil in the form of a spider along its path. In another version, the spider is a weaver-fate, weaving her destiny for every living creature.
We weave from threads and ropes
A web of sewing or knitting threads, ropes, twine can be easily made with your own hands, for this you need:
- a large piece of plywood or fiberboard;
- black wool threads;
- hammer;
- nails with large heads;
- black acrylic paint;
- brush.
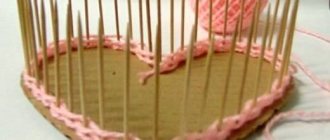
- a nail is driven into the center of the plywood, another 15-18 pieces are driven around the perimeter;
- the threads are folded in half, stretched between the middle and the edges;
- then 7-10 cm is removed from the center, depending on the size of the structure, another nail is driven in near each “ray”;
- a double thread is pulled over the hammered nails;
- then two or four more such circles are made, spaced about 10 cm from each other;
- nail heads are painted with black paint;
- When the work is finished, you can put a giant spider from a toy store on the web.
To make a free-hanging web, six to ten nails are driven into any suitable place, onto which nylon threads or rope are pulled. A long thread is tied to one of them, which is tied in turn around each of the warp threads. When a circle is formed, the thread is cut and several more circles are made. Spiders, plastic, seemingly severed fingers, skeletons, etc. are glued onto the finished structure. As an option, you can weave not each circle separately, but with one thread in a spiral, to the very edge.
A selection of thematic videos for the article
At the end of the article, we invite you to watch several videos on the topic described above. We hope that after watching the proposed video materials you will not have any questions on this topic. The demonstrated material will help you learn how to create unusual accessories in the shape of a spider. Enjoy watching and exploring!
An exciting master class will help you turn a fluffy pipe cleaner into a decorative element.
A homemade spider made from chenille wire is suitable for interior decoration and children's games. You can decorate curtains or a picture frame, lampshade or vase with a cute spider. It is believed that spiders bring happiness and prosperity to the house. Kids will love this soft toy, because the insect can bend its legs and is difficult to break and spoil. The craft is designed for adults and children.
A simple set of materials and tools
To make a spider from fluffy wire, prepare a simple kit:
- black chenille wire (4 pcs.);
- red chenille (1 pc.);
- scissors;
- felt-tip pen.
Flexible fluffy sticks are pleasant to work with and are ideal for making spiders. If you have never heard of chenille, we recommend you learn about this type of needlework and the features of creating crafts.
Step-by-step manufacturing technique
Take a piece of black chenille and a marker to help create the body of the spider. Clamp one end of the wire.
Hold it with your fingers and with your other hand begin to tightly wind the fluffy material around the tool.
Press the rolled chenille on both sides and carefully remove it from the felt-tip pen.
For the spider's legs, take two black pieces.
Fold in half.
Cut in half along the fold.
Once again, fold all four pieces in half at the same time.
The fold will mark where you need to make two turns to secure it.
Spread all the spider's legs in different directions.
Cut 2 cm from the red wire.
Grasp the spring by the two side spirals. Press them together.
Thread a piece of red chenille through the hole of the two rings. Bring the two ends together and twist twice. Cut off the excess part with scissors.
Scroll the red part inward.
Place the spiral with the red spot in the middle. Attach two rings to its sides.
Press the last ring.
Attach the wire to the center of the product between the paws. Leave about 1 cm at the top. Scroll the bottom part to the back and let it come out between two pairs of right paws.
Bring the end opposite horizontally, moving to the background. On the bottom side of the craft, return the wire to the starting point.
Cut a piece of material.
Secure the end of the new chenille wire under the first leg on the left side of the spider. Go to the right. Scroll twice and move to the lower part of the body, where you should scroll the material between the last two paws.
On the back side, twist the two ends twice and remove the excess length.
Thread the remaining piece through the hole.
Place this part at the bottom of the torso. Scroll the top on the right side between the first paw and the horn.
Bring it down and place the wire between the red spot. Bend it up and move it to the second horn. Secure it there. Do the same with the other end.
Bend the spider's legs upward.
Bend the lower ends of the paws again by 1 cm, and remove the excess length with scissors.
A funny spider made of chenille wire is ready - you will make such a handsome one with your own hands, following our master class!
Be sure to check out ours to prevent boredom from settling in your home! We are waiting for you on the “Women’s Hobbies” website tomorrow.
A toy spider can become a child’s favorite toy: a boy’s “best friend” or a stylish decoration for a fashionista. A man-made product can have a very different look: funny, scary, realistic or exquisite. A web can also be woven from wire, on which the spider is located.
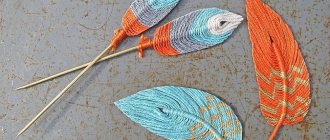
Yarn web
A knitted web, with minimal skills, can be easily crocheted according to the pattern - on the pages of fashion magazines on needlework there are step-by-step master classes, here is one of them.
First, seven or eight chain stitches are knitted, a circle is made from them, which is closed with a half-column. The second row is three chain stitches for lifting, plus nineteen double crochets, the last one is a connecting one. From the last loop, after closing the row, five chain loops are knitted, a stitch is knitted through one loop of the previous row, then two chain loops alternate with stitches until the end of the row. In each next row there are more and more air loops, and the stitches are knitted only above the stitches of the previous rows.
Gauze web
This kind of decoration is done if you want to decorate a large space - a room, various pieces of furniture, separate corners, walls. To do this, cut a piece of gauze to the required length, stretch it from side to side until you get something similar to a cobweb. Afterwards it is fixed in a suitable place.
If you want to make an old, dusty web, dilute a little black ink or gouache in warm water, soak the product in it, dry it, hang it, decorate it with sparkles, spiders, and plastic bones.
The spider web lamp looks interesting - gauze is stretched over the old frame of a multi-armed, multi-tiered chandelier and decorated with sparkles and spiders. To avoid fire, the fabric should not touch the light bulb.
Halloween Witch Craft
It will probably be difficult to imagine this event without such a heroine as the witch. You can also make such a not-at-all evil witch from colored paper. The body is a triangle, and the broom is a tree branch.
The option is worse.