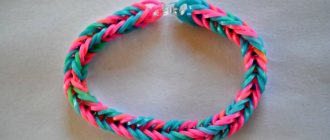
For beginners, weaving rubber bands on a slingshot can become a real new hobby and passion. Not only children, but also adults enjoy doing rubber weaving. To make interesting and original crafts from rubber bands, it is enough to purchase a special slingshot for weaving, a hook, and a lot of multi-colored rubber bands. Depending on your ideas and imagination, you may need 20-100 rubber bands for the job.
Using crafts made from rubber bands, you can beautifully decorate keys or a gift for a loved one.
Rainbow Loom elastic band dress
Two Englishwomen, Catherine Burnard and Helen Wright, were very lucky. They became the first wearers of dresses made from Rainbow Loom elastic bands. To create such a masterpiece it took 20,000 Rainbow Loom rubber bands and 48 hours of handmade work. Such painstaking and diligent handwork was worth it! After all, this masterpiece was sold at auction for 300,000 euros.
Architect Margarita Mileva creates unique masterpieces from rubber bands. This dress weighs 10 kg. It’s hard not to call such handmade work a work of art.
Craft options
Professional craftsmen have come up with a large number of ways to make clothes for a doll out of rubber bands. All of them are easy to understand and do not require large time or financial costs. The work process uses a minimum amount of materials that can be easily found in stores in your city. All this allows not only wealthy people to engage in this type of needlework, but also creativity lovers with little financial resources.
Dress for a doll
The basis of any doll's wardrobe is the dress. It makes her more attractive. To work on this garment, you only need a crochet hook and sets of elastic bands in two different colors (green and red). It is important to choose contrasting shades to give the finished dress a more beautiful appearance.
Gifts, surprises, souvenirs
Crafts for girls can be relevant not only for girls. For example, for his sister’s birthday or for a guest from out of town, a boy can prepare a gift or souvenir with his own hands. It’s good if the donor knows the interests of the recipient well - this will help to choose the topic, form and technique of work.
Having decided on them, it’s easy to find the necessary templates and step-by-step instructions explaining how to make a craft for girls. In any case, the efforts will be appreciated, and the results will be pleasant, whether it be a knitted scarf, a bracelet made of beads and shells, a flower panel or applique, or a homemade doll.
But no matter who the author belongs to, no matter who fills their leisure time with needlework, crafts by girls and for girls are always distinguished by special notes of romanticism and sentimentality, softness and warmth, accuracy and detailed elaboration
Their main feature is attention to detail, their advantage is an aura of tenderness and comfort. Everything that future guardians of the family hearth learn from childhood.
How to weave clothes for a doll from rubber bands
Previously, girls enjoyed sewing clothes for their dolls from various unnecessary fabrics. But besides this, there is another great way to create beautiful clothes for a doll yourself - weaving from elastic bands.
This master class will show you how to weave clothes of different colors for a Barbie or Monster High doll with your own hands from small elastic bands.
How to weave clothes for a doll from rubber bands in a master class
Methods of weaving from elastic bands:
- On hook
- On fingers
- On the fork
- On the machine
- On a slingshot
The choice of weaving method depends on how advanced you are in the skill of weaving from rubber bands, as well as on the complexity of the future product. If there is no base in the form of a machine or a slingshot, it can be made from forks, or you can do without it altogether and use one hook. For beginners, a loom is best, but professionals can weave clothes without a loom, even using a slingshot.
First, let's make stockings for the doll: 1) Take one elastic band and put it on the hook, twisting it five times. 2) We carry the next elastic band through all the loops and put its second edge on the hook. 3) Take another elastic band and pull it through two loops. This creates a new loop.
4) We will continue weaving right away on the doll so that the stockings fit well. We wrap the braid around the doll's leg and pull the hook through the first five loops. We put one elastic band on the finger and bring it through these loops and through the loops on the hook. 5) We drag another elastic band from the finger through the loops in the first of the three parts of the braid.
There will be one loop left on the hook.6) Place another iris on your finger and place the hook under the next braid, pulling the elastic through all the loops. As a result, there is again one loop on the hook. In the same way we weave an elastic band into the third braid.7) Repeating these steps, make the stocking the desired length.
 When the desired length is reached, the stocking is straightened and secured with a fixing clasp.
- This product will look much brighter and more interesting, but it will also be a little more difficult to make.
For production we will need:
• Machine. • Multi-colored elastic bands. • Hook.
The central part of the machine can be detached since we only need the outer columns. So, we follow the detailed algorithm:
1) We will weave the dress from the bottom up. We twist the first pair of irises and put them on two pins. We do the same with the second and third ones at some distance. 2) We repeat similar actions on the opposite side of the machine. 3) Next, we put elastic bands between the pins that do not yet have them. We throw loops on both sides. 4) We throw a pair of irises in a figure eight from one row to another on both sides. Using a hook, we throw all the lower loops from the outside to the inside. 5) After removing the loops, we again throw a pair of irises onto the columns, but this time without twisting. And again we throw the elastic bands of the bottom row inward. 6) Next we throw two pairs of irises onto the central pins without twisting. After this, we hook two elastic bands along the edges from row to row. We hook the bottom elastic bands.7) The next row will be a different color. We throw a pair of untwisted elastic bands onto the pins of the first row and both sides and, just as before, remove the bottom row with a hook.8) Repeating these steps, make as many rows as you need to make the dress the right length. To narrow the dress at the top, move the outer elastic bands closer to the center.9) When the dress reaches the length and shape you want, remove all the loops from the loom and gather them on the hook. You need to pull the braid through them and secure it with a special fastener.
As you can see, elastic bands are an excellent material for weaving clothes. Elastic bands make wonderful dresses for dolls, but you don’t have to limit yourself to just dresses. There are a huge number of patterns for weaving a wide variety of clothes from trousers and shorts to jackets and blouses. Your imagination plays an important role in weaving, since it is still a creative activity, and it requires a sense of taste and beauty. Don’t be discouraged if you don’t immediately produce beautiful products; skill comes with time. If you do this for a long time and persistently, you can learn to weave real works of art. In addition, this activity is very interesting and exciting, and doll clothes made in this way will definitely please your child if he likes to play with dolls.
- You can watch the full video lesson, which tells and shows how to weave clothes for dolls from rubber bands:
We weave an outfit for a doll on a machine
Clothes made from elastic bands are made faster and look brighter and more attractive than regular fabric dresses.
You will need:
- multi-colored rubber bands;
- hook;
- machine.
Place the machine in front of you and put on the irises in a circle, twisting them in a figure eight. Add another layer without twisting.
From each column, remove a couple of lower parts and throw it to the center. Without twisting, put another row on the machine.
Drop the bottom pairs towards the center. Without changing the pattern of actions, weave 8 rows, using rubber bands of a new color in each. Remove 2 pieces from the side protruding column. And move them to the adjacent ledge.
Insert the hook into the pair you just put on and hook the bottom 2. Transfer to the next peg. Continue weaving in a circle until a pair of rubber bands are placed on the first post. Remove the back row from the tabs. Pull 4 rubber bands onto the nearest one.
Bring the bottom ones to the center of the weave. Put on 4 pieces again. Repeat steps 13 and 14 4 more times. After this, move the elastic band from the last column to the adjacent one. Insert the hook into the iris you just put on, pull out the bottom pair and slide it onto the next protrusion.
Weave according to this pattern until the end. Then pass the hook through all the elastic bands on the column. Use it to hook a new pair and pull it through, as in the photo. Throw the loose loop over the working tool.
Take 1 more pair, hold it with your fingers and pull it through the workpiece on the hook. We put the loose loops on the hook and repeat the steps 3 times. We leave the last loop on the finger. After this, we insert the working tool into the weaving corner. We cling to it the iris held by our fingers.
We pass through the loops. Tighten the knot.
Ready!
Three ways to stretch sandals at home
Please note that all three are only suitable for stretching leather sandals at home. Stretching faux leather sandals requires a different approach
Let's start with the cheapest and simplest. For it, you only need what you already have in the house - warm water and socks:
- Wet your socks and wring them out well. The socks should be wet, but not so wet that they are dripping.
- Wear leather sandals and do something active, like cleaning. You can't sit. Otherwise, within an hour you will develop unpleasant swelling of your feet.
- Walk until your socks are dry or your feet feel freer.
- Take off your shoes and wait for the shoes to dry.
This method of stretching leather sandals at home requires patience and more patience. But it's cheap and simple. If you don’t have the patience and the money for a good stretcher, you can make your life much easier.
Buy Collonil, Salton, Salamander or Tarrago shoe stretching spray or balm at a shoe store. Use as directed, but be sure to wear a pair after applying the stretcher. If you just apply the product to your skin and expect it to stretch on its own, nothing will happen. Put on your shoes and go to the store, for a walk, to the park.
There is another method for stretching leather sandals at home, but it is more suitable for closed-toe shoes. It also helps to break in patent leather sandals and models that are tight in the instep. You will need plastic bags, water and a freezer:
- Fill the bag with water, but do not tie it.
- Place the bag in the shoe so that the water fills the narrow areas that need stretching.
- If there is not enough liquid, add it, and then tie the bag.
- Place the sandals with bags in the freezer and leave for several hours.
- When the water turns into ice, take it out. Let the ice melt a little, after which you can carefully remove the bag from the shoes.
Try on a pair. Still pressing? Try the wet socks option or use a stretching method with a special spray.
The benefits of weaving for a child
Weaving is a fairly ancient technique used in needlework to make various figures.
You can work with silicone irises from about 5 years of age. Making colorful shoes from rubber bands is not only a fun process for a girl, but also useful for her development:
- Development of fine motor skills of the hands. Silicone is pleasant to the touch and easy to work with, which will be interesting for children.
- Improving aesthetic perception. The wide range of colors of the material allows you to combine colors in different combinations.
- Speech production. Oddly enough, but it is weaving that allows you to develop speech. The fact is that the motor center of the brain, which is responsible for hand motor skills, is located close to the center of speech. Therefore, children with speech problems are recommended to play more often, as well as make crafts from small objects.
Plasticine fairy tales
This plastic material can be used both for making figurines and for creating paintings.
Having mastered simple techniques - kneading, rolling a sausage and a ball, flattening and smearing - you can sculpt a princess in a ball gown, decorated with ruffles and lace (thin sausages are flattened and carefully smeared using a stack, a wooden skewer or a toothpick), with a hairstyle (styling is simulated by laying in a spiral “sausages”) or loose hair (a ball flattened to a flat state, pressed to the head), decorated with a crown, diadem or flower.
Having become familiar with drawing techniques, it is easy to make a horse, pony, or unicorn. By combining skills and abilities, you can sculpt a cat, a bunny, a dog or a dish with fruit, a basket of vegetables and much more.
The basis for plasticine paintings can be thick cardboard, fiberboard or glass. On opaque bases you can create both flat and three-dimensional still lifes, landscapes, and subject pictures.
Glass allows you to create a 2-3-layer picture that imitates a diorama. This effect can be enhanced by deepening the frame, moving away the background - a painted or stucco background on the base.
Using plasticine, you can decorate cans of coffee or baby food, turning them into beautiful vases or organizers, complementing their design with beads, chains, buttons and other improvised materials.
Sticky ornaments and plasticine decorations on tin cans and plastic containers will transform them, turning them into fairy-tale boxes and chests.