Every girl had her favorite toys as a child. A special place was usually given to dolls. They made houses for them, sewed various outfits, and created accessories.
Making crafts for dolls with your own hands allows you not only to save on toys, but also to develop creative thinking. To make doll furniture, clothes and accessories you will need available materials that can be found in any home and a little imagination.
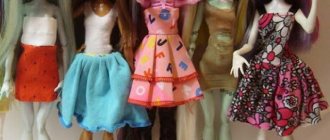
The fastest option for sewing new clothes for dolls
Take the basic necessary measurements for a simple dress:
- chest girth;
- length of the bodice area to the waist, skirt.
This information will come in handy at any time if we want to model something for a toy. You will also need a Velcro fastener.
Let's make a pattern for Barbie - a couple of rectangles for the top and bottom zones. Finish the edges, place the bodice on the body, and gather the skirt into gathers and sew to the bottom. At the end of the work, add straps and Velcro - it will be more convenient to fasten.
Household items
You can also come up with different options for toy products and household items. For example, mold fruits and vegetables from hardening soft plasticine. Make boxes of washing powder or oatmeal from thin cardboard and advertising clippings from magazines.
What would a house be without cleaning equipment? We invite you to try making a broom for Barbie's house.
The manufacturing technique is extremely simple:
- Take an old toothbrush and use pliers to separate the bristled head from the handle.
- Now sand the cut area to avoid damaging children's hands.
- Next, using a glue gun, attach a thin stick to the back of the cleaning head.
Voila, the broom for Barbie's house is ready!
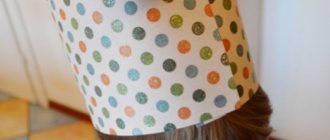
Brand new skirt
Sewing skirts is much easier than a multi-story magnificent structure. In addition to the simple design, you can easily vary the pomp and length of the skirts, add varied decor, belts, and appliqués.
It is enough to measure your waist circumference and length. Cut out two oblong elements - for the main fabric and for the belt. Hem the skirt piece on three sides, gather it into a pleat, and sew on a belt (you should use braid).
At the end, all that remains is to attach the Velcro fastener. Alternative: replace the belt and clasp with a braid that stretches and allows you to put the item of clothing on your body.
How to make a dining table?
Thanks to the ideas of needlewomen who are figuring out how to make a room for Barbie without resorting to crazy spending, we can replicate some elements of the house ourselves.
For example, wooden popsicle sticks can be used to make a huge amount of furniture for your dolls. In addition, the wood lends itself well to painting. This means that nothing will stop you from painting your furniture white or pink.
Let's look at how to make a table for Barbie out of sticks. So, first, prepare: dry and clean sticks, a glue gun, wire cutters and sandpaper.
1. Place six sticks close to each other. This will be the tabletop of the future table. Now alternately apply a strip of glue to the side of the stick and glue it to the adjacent one. In this way, glue all the sticks to each other.
2. Take four sticks and use wire cutters to cut off the rounded ends. Do the same with the rest. And lightly file the ends with sandpaper to avoid splinters.
3. Now take four more and cut off the roundness from them. Or just use sandpaper.
4. Take two sticks with cut ends and stack them on top of each other. Then insert sticks between them like legs. Glue them together this way and glue them to the tabletop. Make exactly the same table legs on the other side.
5. Paint the resulting table with paint or varnish if desired.
Using your imagination, you can come up with other furniture for dolls made in this simple way.
Doll clothes from unnecessary things
If you have unnecessary items from children's and adult wardrobes stored in your home, try using them as supplies for clothes for Barbie dolls. If the girl is quite large in size, and the clothes are small, from a baby, then most likely there is no need to alter or cut anything. And if the sizes are large, then for medium or miniature toy children it is only necessary to sew it up a little, trim it and process the edges.
Tip: choose items that have ready-made trims, embellishments, details and interesting fasteners, and knitted ones have elastic bands and elastic elements. This approach will reduce the amount of work, and the new items will look very attractive.
What is suitable for crafts?
Depending on the desired result, there are many ways to make mini furniture and accessories. You can use a variety of available tools that everyone can find at home:
- Old CDs.
- Carton boxes.
- Foam sponges and more.
If the upcoming work requires a large number of details, it is better to create a sketch or drawing of the future work in advance.
Making a set: hat and dress
You can go further and create entire sets - jewelry, shoes, underwear.
Let's consider a simple category - let's sew a matching set of headdress and dress in the same color scheme for Barbie. Stock:
Note!
- Do-it-yourself owl - how to sew an owl, an owlet, an owl silhouette from fabric. Simple ways to create crafts
- Autumn crafts for the autumn holiday from leaves, fesalis, plasticine, vegetables - come up with a creative name, create masterpieces
- What craft materials to use for creativity: non-traditional, foamed, soft or natural pieces made by yourself
- shreds of appropriate volume and shade;
- scissors;
- sewing machine thread;
- centimeter;
- tailor's pencil;
- Velcro fastener;
- sewing machine.
Let's get started:
Let's take measurements of the chest from the front and back - they differ, but do not exceed 8 cm. You should also measure the length of the neckline, shoulder and to the highest point of the chest (at the darts).
We take simple but beautiful material. For a figure, a piece of 16 x 16 cm is enough. Fold the flap into 4 layers, set aside 1 cm from the center, 0.5 cm from the bottom. You will also need 4 cm for the sleeves. Mark a distance of 5 cm horizontally from the fold - this is our width chest (+1 cm per seam).
Make a pattern along the lines of the Barbie dress. First, open the canvas and fold it vertically. For a cutout in the throat area, it is better to create a deeper armhole, this will simplify the process. When you have unfolded the entire cut, carefully cut a couple of pieces on the back.
Preparing the pattern
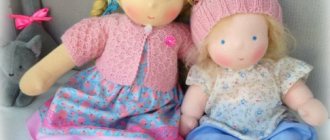
Unfortunately, when purchasing a doll, only one or two sets of clothes come with it. But this is not a problem, because you can sew dresses for dolls yourself, using old things from different materials.
To make the skirt more flowy, the fabric should be silk or chiffon, and for a full skirt that holds its shape, it is best to use thick fabric.
To make a bodice, you need to take a piece measuring 7 by 15 centimeters, for a skirt - 13 by 30 centimeters. For the straps, you can use the same fabric or take ribbons. Two pieces of fabric need to be processed with a zigzag, the edges of the fabric are processed with fine stitching on a machine. Don't forget to prepare the Velcro that will be located at the back.
Sewing process
The seam should be applied in a zigzag pattern from the edges of the sleeve. Bend the fabric from the back 1 cm, sew Velcro there. There is no need to sew any more stitching on the edging; just attach one more piece of Velcro to the reverse side. As a result, our work is simply and neatly fastened.
Fold the front and back, sew a seam no more than 1 cm wide. The lower part expands during processing.
Perform the first fitting on the doll. Put the blouse on inside out, mark the locations of the darts, and stitch them. Since the back is shorter than the front, trim the excess with a 5mm margin for finishing the edges.
We finish sewing the skirt. For it, reserve a square of 10 x 35 cm, process the cut with a decorative seam. In this case, it is better to loosen the top thread so that a couple of decorative stitches of 2-3 mm each can be placed there. Pull the thread for a neat gather.
Recommendation: tie all the threads into knots so that nothing comes unraveled or untied.
If you did everything correctly, the top and bottom of the model will be equal in length. You don’t have to sew the skirt and bodice and leave them separate, although according to the classics, they need to be connected. Connect both parts and sew with a 5mm seam. All folds should be distributed evenly; it is important to insure yourself with extra fitting.
Materials for work
A very important step in sewing doll clothes is the correct selection of fabrics.
For sewing miniatures, it is best to use thin and natural fabrics: linen, wool, cotton or silk. The main feature of these materials is that they are easy to cut, the edges do not fray when cut, the seams are thin and easy to iron.
Doll
If you need lining fabric, then you should also take natural material. If you use viscose or synthetic fabric, you will need to prevent fraying; after cutting, the edges should be treated with a special spray. After this product dries, the fabric becomes soft again and regains its original properties.
Textile
Additional materials
Also for sewing you will need the following:
- Sewing machine;
- Scissors, awl;
- Ruler;
- Sewing threads and pins;
- Selected fabric;
- Iron.
Materials
Headdress
- For a doll's hat, we measure the head - usually the diameter does not exceed 10 cm. You will need a little - only about 4 x 12 cm.
- Sew the edge, make a hoop by joining the joints - this will require a needle.
- Fold the piece in half so that the “face” faces up.
- Trace along the contours, leaving a seam allowance of no more than 0.3 cm. Do not move the details.
- Cut out the fields from a 13x13 cm square piece, fold it in four, then place a solid circle in the center. Mark and cut out the center piece.
- Place the bottom to the top so that it is easy to sew on. Leave a tail for the side seam.
- Sew all the places on the machine with a zigzag along the edge, making sure that there are no shifts, folds or excess. It is more important to outline everything well, then sew it properly, than to alter it.
Our cute example of hat craftsmanship is ready - all that remains is to dress up the fashion model and take her out for a walk to the envy of everyone.
Emergency cases
Almost everyone is ready to go visit, but their beloved Barbie is left without new clothes. Do not panic! Just a piece of paper, holes for the armholes (put the doll on the selected piece of paper and mark the locations for the armholes), a belt. In such cases, it is better to take fabric such as knitwear, felt, suede and leatherette, so as not to waste time on processing (these types are resistant to “shedding”).
Note!
How to knit sleeves with knitting needles: photos of stylish styles, instructions, diagrams, patterns for beginners
Knitted overalls for newborns (130 photos) - DIY knitting methods + detailed patterns for beginners
- How to knit a shirtfront with knitting needles: TOP-110 photos + master class for beginners, simple patterns with detailed descriptions
It’s easy to sew beautiful trousers this way, spending just a few minutes. Place the doll on the fabric, trace the “pants”, cut out, sew. Decorate the top with a belt.
DIY accessories
What additional things can be done for dolls? In addition to new types of clothes, our little fashionistas probably need mini things for dolls that will help organize their lives. For example:
Hangers made from paper clips. Take pliers, straighten out large paper clips and form them into “hangers” that can be hung on a string or crossbar. Now the entire mini-wardrobe of doll outfits will be in order.
Jewelry box. Beautiful necklaces, belts or bracelets can be stored in a nightstand or box made from several matchboxes glued together. On top you can paste them with multi-colored magazine clippings. A more reliable approach is plastic miniature boxes of jelly beans or chewing gum.
Hanger for caps and hats. Take a strong wire and a stand for a Christmas tree or pyramid, and use pliers to wind the pieces of wire onto the trunk. Twist the ends into a spiral or concentric circles (they should not injure the child). You can hang any hats on these improvised “branches”; you always have a choice of all the available items before your eyes.Earrings
To make earrings, you can use
- Beads, beads strung on wire,
- Ordinary pins with balls, or you can make them from a chain.
Hand-made jewelry is often presented by craftswomen in their photos of crafts for dolls. Beaded hairpins, brooches and necklaces, as well as handbags, clutches, straps and other fashion accessories decorated with stones and beads evoke admiration.
Clothes for Barbie: photo examples of incredible masterpieces for a doll
In fact, the possibilities of a creator are unlimited. Literally everything in the house can be used. Inspect unnecessary toys, furnishings, and pieces of fabric especially carefully. Involve your child in the work. Your daughter will probably want to become a real little fashion designer - don’t hold back her imagination, provoke ideas, any manifestations of creativity.
These qualities will definitely come in handy in the future, because design skills are simply invaluable at any age. Don’t be embarrassed if your first attempts are a bit lumpy—practice and experience make all the difference, and besides, this is not for evaluation, but for fun.
We hope that this small master class will help you awaken your imagination and beautifully dress up your favorite toys for a walk or for a holiday. Barbie clothes are a real gift for girls!
Please repost
0
Plasticine fantasies
- Plasticine is an excellent material for creativity and creating minimalistic, precise objects.
- Girls enthusiastically make crafts from plasticine for dolls.
- Using modern types of plastic masses, clay, dough, you can create various clothes for dolls.
- After hardening, its properties are in no way different from clothes made from traditional materials.
- Shoes and handbags, jewelry and gadgets, all this can be made from plasticine as closely as possible to the real thing.
Food made from plasticine turns out bright and appetizing. With its help, you can set the table for the doll and her guests, serving various dishes, make dishes, a vase of flowers and many other useful things. What else to do for a doll world made of plasticine, your imagination will tell you.
Knitted wardrobe
Using a hook or knitting needles, you can significantly diversify a doll's wardrobe: shawls, scarves, knitted items, jewelry, decorative elements. Such clothes have their pros and cons.
On the one hand, it is durable. A child will not be able to accidentally spoil the finished product, so it is suitable for any age. These clothes are washable, so don't be afraid to get them dirty. You can use threads of different thicknesses and textures to create winter or summer outfits.
Different techniques and knitting patterns allow you to create various jewelry and outfits with a variety of patterns. Everything is limited only by imagination and the availability of threads. And you can either buy new threads or unravel old sweaters.
Among the disadvantages of this idea: the activity is quite complex, so it is difficult to attract children to do it. It takes a lot of time to make a product. The outfits are very small, so it takes a lot of effort and skill to make them using knitting needles or crochet.
Paper wardrobe
Paper and cardboard are quite actively used in the process of making clothes for dolls. To avoid mistakes and damaged scraps of fabric, paper patterns are first made, but these are not all the options for using paper when sewing doll outfits.
It can also be used directly as a sewing material. But the most suitable material for this undertaking will be corrugated or felt. They can be used for sewing and have good elasticity.
However, such clothes will be extremely impractical to use for fabric dolls. And the child will have difficulty putting it on the doll.
When making clothes from corrugated paper, you can do without a paper pattern, because the material itself is a paper pattern. Therefore, corrugation greatly simplifies the sewing process, eliminating the need to make an additional pattern. But when working with felt, it is advisable to use a paper pattern first.
The disadvantage of a paper wardrobe is that it is not suitable for small children. Paper clothes tear quickly, so they are best used for older children who play carefully.
Car decor
When the main and most difficult part of the work is completed, you can start decorating the car. As mentioned above, you will need rhinestones for decoration. But you can also use braid, sequins, beautiful flat buttons, original stickers, etc.
Apply a thin line of the future pattern with a glue gun. It can be either smooth with curls or geometric.
Glue pink circles of smaller diameter in the center of the wheels and also decorate them with rhinestones.
This is just a little that you can do for Barbie with your own hands with minimal time and money.