Making a housing for a power amplifier with your own hands
Today we'll talk about how you can make a housing for your DIY power amplifier project. A beautiful and neat body is the face of any project. They greet you by their clothes! The body is a known headache for DIYers. Let's look at some methods for building a do-it-yourself audio power amplifier housing.
Content
- From old equipment
- Sheet metal
- Sheet metal with flexible
- Plywood
- Enclosures for electronic equipment
- Purchased
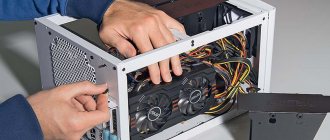
From old equipment
In particular: VCRs, satellite receivers, DVD players, etc. What was on hand (in the closet) and approximately fits in size. Convenient because the box is already there. We throw away the “offal”, although you can leave low-current power for auxiliary consumers. The appearance of the case can be refreshed with paint or vinyl film. The front and back panels can be cut from metal or plastic, for example by an advertising agency or metal cutting organization. And put it in the trim on the existing case.
The housings of Soviet amplifiers should not be excluded from attention. They used excessively thick metal. For example, you can place a powerful amplifier in the Odyssey U-010 case, which I once did, and put my front panel on top of the old one with screws.
What can I say, I managed to make small amplifiers in CD-rom cases (which have long since been consigned to the dustbin of history). With proper attention it turns out quite well.
Sheet metal
The idea of making a body from sheet parts is on the surface.
Now almost every city has laser or waterjet cutting services for sheet metal. We cut the walls and body sheets to the required size and assemble the box.
The main constructive question in this case is how to connect the sheets together. To connect the body sheets into a box you can use:
- Corners
- Purchased radiators with holes
- Milled racks
- Wooden sides with driven nuts
- Profiles
Let's go through each option.
Before starting work on the body, having the required internal dimensions in mind, you definitely need a sketch/drawing/three-dimensional model of the future body, so as not to make a mistake in the dimensions.
Corners
The frame is assembled from aluminum corners and sheathed with body sheets. It’s quite easy and affordable to do it yourself - there are many examples on the Internet.
Radiators
There are radiator profiles on sale that have threaded holes on all sides. For example 246*84*25 mm with holes.
Assembling the case - the base is radiators, all sheet panels are screwed to them.
In this case, the sheets were made of carbon steel, and were painted with powder paint, which, as it turned out, looks great, is scratch-resistant and is not at all expensive.
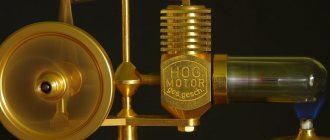
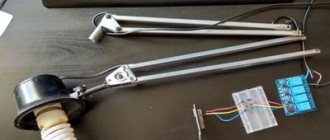
Milled racks
Available if you have machines: turning and milling. I made a cylinder from aluminum with a quarter recess (angle 90 degrees), there were threaded holes cut for fastening sheets inside the body.
This housing is assembled in the title picture of the topic. It is assembled from stainless steel sheets, chemically cleaned, sanded and coated with matte varnish.
Wooden sides
It is both beautiful and can be used not only for decorative purposes, but also as a load-bearing part of the body. For wood on the sides, you can use cutting boards (beech, oak). They are quite smooth and look good under varnish. Drive-in nuts or furniture threaded fittings can be used to hold the body panels in place.
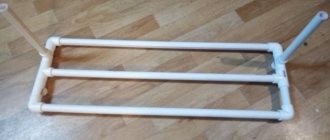
Profiles
Construction stores in large cities now offer a large selection of aluminum profiles of various shapes.
The side walls of the housing can also be profiles (channels):
And this DIY case is a combination of three methods:
- Front and rear panels - aluminum profile (channel)
- Wooden sides (beech, cutting board) ensure assembly
- Sheet top and bottom panel of the case
The manufacturing process of such a case can be seen in the video:
Sheet metal with flexible
Available to those who work in factories or, again, for money. There is a subtlety: you need to be able to design sheet metal products in 3D or use someone else’s models.
I made a DIY clone of an interesting Chinese amplifier (P01) from two flexible parts. His review is here.
My clone of the Chinese case looks a little more brutal:
By the way, inside there is an ICE125ASX2 from ICEpower® and volume control and an input selector on the PGA2311.
Bending can be simpler - with one bend, to which the body sheets are mounted:
Plywood
An option for cabinetmakers and simply for those who are comfortable with a jigsaw and a hand router.
Sheets of plywood placed crosswise look unusual under varnish. The front and back panels are aluminum. Such a case, of course, is for an amplifier that does not require good convective cooling, for example, for high-efficiency class D amplifiers.
Enclosures for electronic equipment
There are interesting composite options - metal and plastic. Radio stores in your city may have a suitable option.
For a solid look to the case, again, you can put your front panel in an overlay.
Purchased
And, of course, an online purchase option. When the hands, of course, are golden, but do not grow from the shoulders. But at least you pay for the order with your own hands.
I made a selection of interesting housing options for diy projects from Aliexpress:
Selection of cases from Aliexpress
Thank you for your attention. Creative success and successful designs!
Stage 2. Bending sheet metal housings on CNC machines
The flat blanks are made, now they need to be shaped - using a few bends to fold them into the future body. One plane turns into walls, often complex, with U-shaped and Z-shaped bends.
It is important that the bending, again, is carried out on a machine not with manual control - the operator may have a bad day and the body will turn out crooked - but with computer numerical control (CNC).
The force with which the machine punch must press on the workpiece is calculated, the shape of the matrix into which it must press the metal is calculated, all these numbers are entered into the machine - and voila. The metal jaws of the machine converge with enormous force, transforming flat workpieces into three-dimensional body shapes - time after time, exactly according to instructions , without underbends, kinks or other jambs.
In this case, the bend can be either simple straight - 90 degrees , or obtuse, acute - in short, the way it should be in your case.
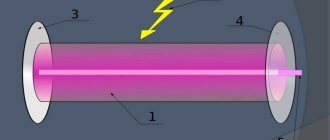
Grounding for detector receiver and interference suppression.
In a city apartment, it is problematic to make a normal grounding for the detector receiver . Even if the grounding is done with a separate wire and buried under your window. The apartment building is literally “gushing” with interference for “every taste.” From Wi-Fi to mobile phone chargers. Not to mention powerful switching power supplies for PCs, TVs, etc. etc. All this interference is perfectly detected by the detector receiver and an impenetrable frenzied roar penetrates the headphones. Especially during the day and evening. The interference weakens slightly only late at night or in the morning.
But there is a way out!
Experimentally, I found that if the ground wire of the detector receiver is connected even to a battery, but through a 3.9 kOhm resistor (see diagram), the interference completely disappears. Mystic…
Perhaps the resistance value needs to be selected for each specific case separately, but 3.9 kOhm works great for me. With the use of this resistor, the headphones have a clear reception with a barely noticeable, distant background in the background, which does not interfere at all.
At the dacha, there is almost no interference. And with grounding everything is simple - an iron pipe about a meter and a half is driven into the ground - classic.
Stage 6-A. Powder painting of instrument housings
Most instrument housings are made of black steel, which, naturally, must be somehow protected from corrosion . A simple, effective and beautiful option is polymer powder painting.
An even layer of polymer powder is sprayed onto the almost finished body, hanging in a special chamber; it is held on the body by the forces of static electricity. Then all this is sent to the oven, where the powder melts and turns into a single polymer layer of the desired color and texture .
Fasteners with threads are protected by special silicone elements inserted into nuts and bushings, placed on studs and grounding petals. Don't worry about them, there will be no paint on the threads.
The choice of colors is wide, the entire RAL palette . The choice of texture is also wide, although the total number of options is, for obvious reasons, smaller. But, by and large, customers generally prefer three options - either glossy, matte , or moiré.
Antenna for detector receiver.
For a medium-wave detector receiver, you need an antenna with 40 meters of wire located horizontally and as high as possible from the ground. As an option - in the form of the letter “G”. Such an antenna can be made from any material - insulated or non-insulated wire or wire, rope or cable. Alternatively, you can use television, telephone, or computer network UTP cables for the antenna.
But living in a high-rise building, there is naturally no way to deploy such a luxurious antenna. Therefore, I lower a wire 8 meters long from the window. It dangles freely and receives several powerful radio stations at night.
At the dacha, as an antenna, I stretched 40 meters of cable in a plastic tube between tall trees on insulators. This cable is used for pulling high ventilation pipes, antenna masts and hanging cables for supply to the house. Sold in hardware and construction stores. Thanks to the plastic tube, the cable is perfectly insulated and is quite suitable for the antenna of the detector receiver.
Step 5: Install Fasteners into Sheet Metal Enclosures
Hardware installed in the body during its production is a cunning and valuable move from the point of view of the economics of your production . The fact is that pressing, drawing or welding of fasteners greatly saves assemblers’ working time in the end. And, although the assemblers are not the most qualified personnel, and the cost of their labor is not so high, in the end this little money adds up to serious amounts. And pre-installed fasteners provide good savings . In addition, the installation hardware is beautiful and durable . Both of these factors are also important, although in terms of severity they pale in comparison with savings.
Stage 3. Metalworking of sheet housings for equipment
This stage combines a whole range of metalworking types. Strictly speaking, they are not necessary when creating cases, like cutting or bending. Plumbing may or may not be necessary . What types of metalworking are most often used in the manufacture of cases?
Cleaning cuts
It is not always necessary - the edges of a good laser cut are generally clean right away and do not require additional processing. But sometimes - especially when using thicker metal - they still leave a flash on them. In such cases, you need to get rid of it.
Countersink
When countersinking, holes for fasteners are drilled to fit a cone from the input side . countersunk screws in them , screwing them flush - so that they do not protrude above the main surface of the metal when screwed in. This is perhaps the most commonly used type of metalworking in our case production practice.
Threading
At the moment, this stage of case production is mostly a thing of the past - faster, cheaper and with the same level of quality, you can make a hole a little wider and press a nut with the required thread into it . And that's it - you don't need to cut anything.
However, some customers still prefer to order thread cutting in the metal of the case itself. This is especially common among manufacturers in the defense sector - where the final customer is quite conservative and requires compliance with old GOSTs and design codes , created at a time when more modern metalworking methods were simply not widespread. This is, in principle, not a problem. If it is not the installation fasteners that are important, but rather the thread cutting, we are ready to fulfill such an order .
Stage 6-B. Galvanic coating of instrument housings
Another option for protection against corrosion is the application of a thin layer of non-corrosion metal . Mainly zinc. .
This method of protection has to be chosen when the device body, according to the technical specifications, must remain unpainted - this is common in medical equipment - but at the same time will not be subject to careless mechanical stress during use. The latter is important because scratched galvanization loses its protection ; at the point where the zinc layer is broken, corrosion begins with furious force.
Detector radio reception - what can now be received on a detector receiver.
Despite the total reduction in AM broadcasting, and in our country in particular, a detector receiver can still receive several radio stations. So, from two to five in the morning on the detector receiver in the apartment I receive Vesti FM, Radio Romania and a local old organ grinder who lives in my area and operates on the 1750 kHz band. At the dacha, with my medium-wave antenna, on the detector receiver I receive the stations “Vesti FM”, “Radio Romania”, some Ukrainian medium-wave and Polish long-wave radio stations, the Chinese and a couple of some “Vahkhal - bakhkhal - makhkhal”. In general, the detector receiver as a phenomenon is still quite viable!