We talked about how to independently calculate a wind generator in one of our previous materials. Today we will present to your attention models of wind turbines built by users of our portal. We will also share useful tips that will help you assemble the installation and avoid mistakes. Building a wind generator with your own hands is a difficult task. Not every (even experienced) practitioner can cope with its solution accurately. However, any error detected in time can be corrected. That's what the master needs his head and hands for.
The article addresses the following questions:
- From what materials and according to what drawings can wind generator blades be made?
- Assembly procedure for the axial generator.
- Is it worth converting a car generator to a wind turbine and how to do it correctly.
- How to protect a wind generator from a storm.
- At what height should the wind generator be installed?
Manufacturing of blades
If you do not yet have experience in making screws for your home wind turbine yourself, we recommend that you do not look for complex solutions, but use a simple method that has proven its effectiveness in practice. It involves making blades from ordinary PVC sewer pipes. This method is simple, accessible and cheap.
Mikhail26 FORUMHOUSE user
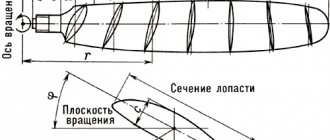
Now about the blades: I made them from a 160-gauge red sewer pipe with a foamed inner layer. I did it according to the calculation shown in the photo.
The “red” pipe was not mentioned by the user by chance. It is this material that holds its shape better, is resistant to temperature changes and lasts longer (compared to gray PVC pipes).
Most often, pipes with a diameter of 160 to 200 mm are used in home wind energy. This is where you should start your experiments.
The shape and configuration of the blades are parameters that depend on the diameter of the pipe from which they are made, on the diameter of the wind wheel, on the speed of the rotor and other design characteristics. In order not to bother yourself with aerodynamic calculations, you can use a ready-made table, which its author posted in the corresponding topic on our portal. It will allow you to determine the geometry of the blades by substituting your own values (pipe diameter, propeller speed, etc.) into the calculation table.
Mikhail26
I got used to sawing with a jigsaw. It turns out really quickly and efficiently. Note: be sure to place a large free stroke of the file on the jigsaw so that the file does not bite or break.
How to choose and make a model of a wind pump for water with your own hands
It is recommended to construct the work in the following sequence:
- The optimal size of the blades is calculated, after which the required number of parts is cut out of a 1 mm thick metal sheet.
- Spokes for the blades are made. To do this, take metal tubes of the required length with a diameter of about 12 mm.
- In the hub on which the blades are mounted, the required number of holes - sockets - are made on a lathe. The spokes are inserted into the hub sockets and secured with bolts.
- The blades are fixed to the supporting spokes using the riveting method.
- To make a wind turbine stabilizer, a sheet of duralumin about 5 mm thick is used. Its rigidity can be increased using a wire frame. The stabilizer is attached to the windmill using an aluminum tube with a diameter of about 32 mm.
- To assemble the wind generator gearbox, sheet steel 5 mm thick is used. A body part is cut out of it and welded. As gears, you can use similar parts from old Soviet cars, which are suitable in size for the finished body. To fill the space between the bottom and gears of the gearbox, a mixture of lithol and neutral oil is prepared so that the finished composition has a fluid, mushy state.
- Pipes with a diameter of 10 cm with a flange connection are used as a mast for a wind turbine.
- A special pump box is made for the pump design. To work, you will need metal sheets with a thickness of at least 2 mm, from which parts of suitable size are cut out and welded into a single structure. A conventional model of a household hand pump, the cylinder diameter of which is 76-80 mm, is installed inside. If it needs to be made to work in a horizontal position, the standard valves are replaced with rubber parts of the same size.
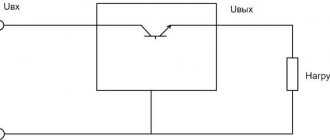
Axial generator design
When choosing between a three-phase or single-phase generator, it is better to opt for the first option. A three-phase current source is less susceptible to vibrations arising from uneven loads, and allows you to obtain constant power at the same rotor speed.
BOB691774 FORUMHOUSE user
Single-phase generators should not be wound: it has been tested and proven in practice for a long time. Only on three phases can you get decent generators.
The design parameters of the generator, which we discussed in our previous material, are determined by the current electricity needs. And in order for them to correspond in practice to the amount of power generated, the design of the axial generator must meet certain requirements:
- The thickness of all disks (rotor and stator) must be equal to the thickness of the magnets.
- The optimal ratio of coils and magnets is 3:4 (for every 3 coils - 4 magnets). For 9 coils - 12 magnets (6 for each rotor disk), for 12 coils - 16 magnets, and so on.
- The optimal distance between two adjacent magnets located on the same disk is equal to the width of these magnets.
Increasing the distance between two adjacent magnets will result in uneven power generation. You can reduce this distance, but it is still better to maintain the optimal parameters.
Aleksei2011 FORUMHOUSE user
It is a mistake to make the distance between magnets equal to half the width of the magnet. One person was right when he said that the distance should be no less than the width of the magnet.
If you don’t delve into the boring theory, then the scheme for overlapping the coils of an axial generator with permanent magnets in practice should look like this.
At each moment of time, identical poles of magnets similarly overlap the windings of the coils of a particular phase.
Alexei2011
This is how it is in real life: everything matches the picture almost 100%, only the coils differ quite a bit in shape.
Let's look at the assembly sequence of an axial generator using the example of a device assembled by user Aleksei2011.
Alexei2011
This time I'm making a disk axial generator. Disc diameter – 220 mm, magnets – 50*30*10 mm. Total – 16 magnets (8 pieces on disks). The coils were wound with wire Ø1.06 mm, 75 turns each. Reels – 12 pieces.
The result of a wind turbine: efficiency calculation
Test tests of the wind generator at different wind speeds showed the following results:
- at a wind speed of 5 m/s we get 60 rpm - 7 V and 2.3 A = 16 W;
- at a wind speed of 10.6 m/s we get about 120 rpm - 13 V and 3.4 A = 44 W;
- at a speed of 15.3 m/s approximately 180 rpm - 15 V and 5.1 A = 76.5 W;
- at a wind speed of 18 m/s we get 240 rpm - 18 V and 9 A = 162 W.
Basically, the windmill produces 16–45 W, since winds of more than 15 m/s are rare. However, if you install a high-speed propeller, then you can get better results.
Stator manufacturing
As you can see in the photo, the coils have a shape similar to an elongated drop of water. This is done so that the direction of movement of the magnets is perpendicular to the long side sections of the coil (this is where the maximum EMF is induced).
If round magnets are used, the inner diameter of the coil should approximately match the diameter of the magnet. If square magnets are used, the configuration of the coil turns must be constructed in such a way that the magnets overlap the straight sections of the turns. Installing longer magnets does not make much sense, because the maximum EMF values occur only in those sections of the conductor that are located perpendicular to the direction of movement of the magnetic field.
Stator manufacturing begins with winding the coils. The easiest way to wind coils is using a pre-prepared template. Templates range from small hand tools to miniature homemade machines.
The coils of each individual phase are connected to each other in series: the end of the first coil is connected to the beginning of the fourth, the end of the fourth to the beginning of the seventh, etc.
Let us recall that when connecting the phases according to the “star” circuit, the ends of the windings (phases) of the device are connected into one common unit, which will be the neutral of the generator. In this case, three free wires (the beginning of each phase) are connected to a three-phase diode bridge.
When all the coils are assembled into a single circuit, you can prepare a mold for filling the stator. After this, we immerse the entire electrical part into the mold and fill it with epoxy resin.
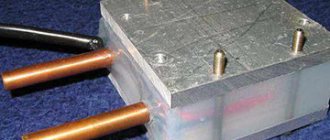
Alexei2011
Next I post a photo of the finished stator. Filled with regular epoxy resin. I put fiberglass on the bottom and top. The outer diameter of the stator is 280 mm, the inner hole is 70 mm.
Maintenance of a vertical device
In order for a vertical wind generator to work efficiently, accurately and as efficiently as possible, all moving parts of the structure must be lubricated. This procedure is carried out at least 2 times during the entire calendar year.
At the same time, during maintenance, nuts that have become loose as a result of operation are tightened, electrical connections are strengthened, mechanical components are checked for corrosion, loose tension cables are tightened and the blades are carefully inspected for rupture or damage.
In winter, vertical installations require special care. During periods of frost, the blades become covered with a crust of ice and it must be cleaned in a timely manner so that the torque speed is maintained at the proper level.
Parts are painted as needed and once a year a complete inspection of the entire structure is carried out to identify faults. Such care ensures the correct operation of the wind turbine and extends its service life.
Manufacturing a rotor for an axial shaft
Most often, homemade axial generators are made on the basis of a car hub and brake discs compatible with it (you can use homemade metal discs, as Aleksei2011 did). The scheme will be as follows.
In this case, the stator diameter is larger than the rotor diameter. This allows the stator to be attached to the wind generator frame using metal pins.
Alexei2011
There are studs for fastening the M6 stator (3 pieces). This is for generator testing only. Subsequently there will be 6 of them (M8). I think that for a generator of such power this will be quite enough.
In some cases, the stator disk is attached to a fixed axis of the generator. This approach makes it possible to make the design of the generator smaller, but the operating principles of the device do not change.
Opposite magnets must be directed towards each other with opposite poles: if on the first disk the magnet faces the generator stator with its south pole “S”, then the opposite magnet located on the second disk must face the stator with its “N” pole. In this case, magnets located nearby on the same disk must also be oriented in different directions.
The strength of the magnetic field created by neodymium magnets is quite strong. Therefore, the distance between the stator disks and the generator rotor should be adjusted using a pin-threaded connection.
This is a design option in which the rotor diameter is larger than the stator diameter. The stator in this case is attached to the fixed axis of the device.
Also, to adjust the distance between the disks, you can use spacer bushings (or washers), which are installed on the stationary axis of the generator.
The distance between the magnets and the stator should be minimal (1...2 mm). You can glue magnets to generator disks with ordinary superglue. It is best to stick magnets using a pre-prepared template (for example, made from plywood).
This is what preliminary tests of the generator performed by user Aleksei2011 using a screwdriver showed: at 310 rpm, 42 volts were removed from the device (star connection). One phase produces 22 volts. The calculated resistance of one phase is 0.95 Ohm. After connecting the battery, the screwdriver was able to spin the generator up to 170 rpm, and the charging current was 3.1A.
After lengthy experiments, which were associated with the modernization of the working propeller and other smaller-scale improvements, the generator demonstrated its maximum performance.
Alexei2011
Finally, the wind came to us, and I recorded the maximum power of the windmill: the wind intensified, and gusts at times reached 12 - 14 m/s. The maximum recorded power is 476 Watts. With a wind of 10 m/s, the windmill produces approximately 300 watts.
How to make a spit for a barbecue, what are the differences between a manual and an electric one?
Skewers are an essential attribute for preparing kebabs. But they can be successfully replaced by one skewer. At the same time, you don’t have to buy it; anyone can make it with their own hands.
What is a spit for?
A skewer is a long pin/rod that ends with a handle on one side and a sharp point on the other. Equipped with clamps to hold meat on it.
Initially used for cooking whole animal carcasses over fire: pig, lamb, bull or their large parts. But you can also see quails on a spit, legs and a row of bacon, strung one after another.
On a note! The thickness of the skewer is selected depending on the weight of the meat you will cook.
Experts advise choosing a skewer diameter of 10 mm for small pieces of meat. If you plan to regularly fry uncut carcasses, you should count on 12-16 mm of thickness.
Round or square in cross section?
- The meat can slide off the round axis of the spit, and there is a risk of undercooking. But it is easier to turn the spit and secure the meat product on it.
- Square rods will ensure that the carcass is firmly secured, but you will need to work hard to thread the piece onto the rod and rotate it during the cooking process.
- The flat shape of the base is good for medium and small pieces when the thickness of the skewer is no more than 10 mm. The meat is securely attached to such rods and does not fall down.
Conclusion
The skewer, as an alternative to skewers, is an interesting option for those who are bored with regular kebab. You can do it yourself. The main thing is to focus on the choice of metal, shape and reliable drive - for automatic rotation.
How to make a spit for a barbecue, what are the differences between a manual and an electric one? Link to main publication
Wind power plant from a car generator
A popular solution among people who practice making wind turbines with their own hands is to remake a car generator for alternative needs. Despite all the attractiveness of such an idea, it should be noted that a car generator in the form in which it is installed on a vehicle engine is quite problematic to use as part of a wind power plant. Let's figure out why:
- Firstly, the winding of the coils of a standard automobile generator consists of only 5...7 turns. Therefore, in order for such a generator to begin charging the battery, its rotor must be spun to approximately 1200 rpm.
- Secondly, magnetic induction in a standard car generator occurs due to the excitation coil, which is built into the rotor of the device. In order for such a generator to operate without connecting to an additional power source, it must be equipped with permanent magnets (preferably neodymium) and certain adjustments must be made to the stator winding.
Mikhail26
A converted autogenerator (with magnets) has the right to life. I have two of these now. In a wind of 8 m/s with two-meter propellers they give an honest 300 watts each.
Converting a car generator to a wind turbine requires some skill. Therefore, it is advisable to start it with experience in rewinding asynchronous motors or generators with a standard cylindrical stator (both of them, if desired, can be converted into an alternative power plant). Remaking a car generator has its own nuances. It will be much easier to understand them if we turn to the experience of users who have achieved certain success in this area.
Advantages and principle of operation of wind turbines
A modern vertical generator is one of the alternative energy options for the home. The unit is capable of converting gusts of wind into an energy resource. For correct operation, it does not require additional devices that determine the direction of the wind.
A rotary wind generator is very easy to make with your own hands. Of course, he won’t be able to completely take on the responsibility of providing energy to a large private cottage, but he will do an excellent job of lighting outbuildings, garden paths and local areas.
The vertical type device operates at a low height. Its maintenance does not require various devices to ensure safe high-altitude repair and maintenance work.
A minimum of moving parts makes the wind turbine more reliable and operationally stable. The optimal profile of the blades and the original shape of the rotor provide the unit with a high level of efficiency, regardless of which direction the wind is blowing at any given moment.
Small household models consist of three or more light blades, instantly catch the weakest gust and begin to rotate as soon as the wind force exceeds 1.5 m/s. Thanks to this ability, their efficiency often exceeds that of larger installations requiring higher winds.
The generator operates absolutely silently, does not disturb owners and neighbors, does not create harmful emissions into the atmosphere and reliably serves for many years, carefully supplying energy to living quarters.
A vertical wind generator operates on the principle of magnetic levitation. As turbines rotate, impulse and lift forces are generated, as well as actual braking forces. The first two cause the blades of the unit to rotate. This action activates the rotor and it creates a magnetic field that produces electricity.
A wind turbine with a vertical axis of rotation is inferior in efficiency to its horizontal counterparts. But it makes no claims to the territorial location and works fully in almost any place convenient for homeowners
The device functions completely independently and does not require the owner’s intervention in the process.
Cable twist protection
As you know, the wind does not have a constant direction. And if your wind generator rotates around its axis like a weather vane, then without additional protective measures the cable running from the wind generator to other elements of the system will quickly twist and become unusable within a few days. We bring to your attention several ways to protect yourself from such troubles.
Method one: detachable connection
The simplest, but completely impractical method of protection is to install a detachable cable connection. The connector allows you to untangle a twisted cable manually, disconnecting the wind generator from the system.
w00w00 FORUMHOUSE user
I know that some people put something like a plug with a socket at the bottom. The cable got twisted and I unplugged it from the outlet. Then he unscrewed it and stuck the plug back in. And the mast does not need to be lowered, and current collectors are not needed. I read this on a forum on homemade windmills. Judging by the author's words, everything works and the cable does not twist too often.
Method two: using a rigid cable
Some users advise connecting thick, elastic and rigid cables (for example, welding cables) to the generator. The method, at first glance, is unreliable, but has the right to life.
user343 FORUMHOUSE user
I found it on one site: our method of protection is to use a welding cable with a hard rubber coating. The problem of twisted wires in the design of small wind turbines is greatly overestimated, and welding cable #4...#6 has special qualities: hard rubber prevents the cable from twisting and prevents the windmill from turning in the same direction.
Method three: installing slip rings
In our opinion, only installing special slip rings will help to completely protect the cable from twisting. This is exactly the method of protection that user Mikhail 26 implemented in the design of his wind generator.
Additional electrical equipment
As mentioned above, an integral part of a wind power plant is a battery that supplies power to consumers. when choosing it, you need to remember that the greater its capacity, the longer it will be able to maintain voltage in the network, but at the same time the longer it will charge. The approximate operating time can be defined as the time during which half the battery capacity is exhausted (after which the voltage drop will become noticeable, in addition, deep discharge reduces the life of lead-acid batteries).
Example: So, a battery with a capacity of 65 Ah can conditionally supply 30-35 ampere-hours of energy to the load. Is it a lot or a little? An ordinary 60-watt lighting lamp will require, taking into account the presence of an inverter that converts 12 V DC into 220 V AC and has its own efficiency within 70%, a current of 7 amperes - this is a little more than four hours of operation. Our windmill with a conventional power of 90 watts, even in the best case, with constant strong wind, will take at least five hours to restore wasted energy. As you can see, when using a wind generator solely as an autonomous source of energy, electricity in your home will only be available for a few hours a day.
The second node of the power supply system is the inverter. In our case, you can use both a ready-made automotive one and one removed from an uninterruptible power supply. In any case, it is important not to overload it with current consumption, given that its actual operating power is 1.2-1.5 times less than the indicated maximum power.
As you can see, the attractiveness of using free energy is subject to numerous restrictions, and even the only effective option in central Russia - a wind generator - is unable to provide long-term autonomy.
But at the same time, this idea is not bad both as a source of emergency power supply and, especially, as a design task - the pleasure of creating a wind generator with your own hands can be many times greater than its power.
Wind turbine protection from storms
We are talking about protecting the device from hurricanes and strong gusts of wind. In practice, this is implemented in two ways:
- Limiting the speed of the wind wheel using an electromagnetic brake.
- By moving the plane of rotation of the propeller away from the direct influence of the wind flow.
The first method is based on connecting a ballast electrical load to a wind generator. We have already talked about it in one of the previous articles.
The second method involves installing a folding tail, which allows you to direct the propeller towards the wind flow at nominal wind strength, and during a storm, on the contrary, to move the propeller out of the wind.
Protection by folding the tail occurs according to the following scheme.
- In calm weather, the tail is positioned slightly at an angle (down and to the side).
- At rated wind speed, the tail straightens and the propeller becomes parallel to the air flow.
- When the wind speed exceeds the nominal value (for example, 10 m/s), the wind pressure on the propeller becomes greater than the force created by the weight of the tail. At this moment the tail begins to fold and the propeller moves out of the wind.
- When the wind speed reaches critical values, the plane of rotation of the propeller becomes perpendicular to the wind flow.
When the wind weakens, the tail, under its own weight, returns to its original position and turns the propeller towards the wind. In order for the tail to return to its original position without additional springs, a rotating mechanism with an inclined pin (hinge) is used, which is installed on the tail rotation axis.
The tail rotation axis is set at an angle: 20° relative to the vertical axis and 45° relative to the horizontal axis.
In order for the mechanism to perform its main function, the axis of the mast must be at a certain distance from the axis of rotation of the turbine (optimally 10 cm).
To prevent the tail from folding and falling under the propeller during sharp gusts of wind, limiters must be welded on both sides of the mechanism.
An Excel table with ready-made formulas will help you calculate the tail dimensions and their dependence on other parameters of the wind turbine. In it, the area of variable values is indicated in yellow.
The optimal tail area is 15%...20% of the wind wheel area.
We present to your attention the most common option for mechanical protection of a wind generator. In one form or another, it is successfully used in practice by users of our portal.
WatchCat User FORUMHOUSE
During a storm, you need to slow down the propeller by moving it out of the wind. For example, when the wind is too strong, my windmill tips over with its propeller facing up. Not the best option, because returning to the working position is accompanied by a noticeable blow. But in ten years the windmill did not break down.
DIY wind pump for water: an effective solution to the water supply problem
Date of publication: July 19, 2019
The life of summer residents is greatly complicated by the lack of country water supply. Watering the plot, cooking, solving other household issues - all this requires a significant amount of water, which is very difficult to carry from the nearest water pump. The solution to the problem is to drill a well for subsequent water intake using a submersible pump. The device will receive electricity for operation from a centralized power grid. If the quality of the power supply on the site leaves much to be desired, a home craftsman can easily design and install an ordinary windmill on the site on his own. Moving due to the force of the wind, it will ensure the operation of the pump, and clean water will flow steadily from the well into the house.
What should the skewer be like?
Modern requirements:
- resistant to prolonged heating;
- reliable - it is good to fix the carcass so that it does not move relative to the rod, does not scroll during rotation, and does not fall from it;
- safe - when cooking, do not release harmful substances into food, do not tip over;
- convenient when frying over coals, as well as removing the finished dish from the fire;
- durable - should not bend, burn out, or rust during operation.
These requirements are ensured by stainless steel rods. They are durable and do not corrode from marinade, juices, or fire.
What is it needed for
A carcass on a spit over a fire is something out of a children's fairy tale. Very appetizing, brutal and with deep historical roots. After all, what is a spit? This is a horizontal rod of meat, often with the carcass or part thereof rotating over a fire or coals. Clamps are provided to prevent the meat from scrolling.
During regular frying over a fire, for example, on skewers, juices and fat flow down and are lost for the future dish. The spit rotates, and the rotation speed is such that most of the juices fall onto the piece, as if wound up, forming a tasty crust.
Rotation makes it easy to coat the meat with sauce. This way you can achieve a fairly thick crust with lots of flavor from the marinade, spices and smoke. And the meat will remain juicy. This cannot be achieved without a skewer.
Process Tool
When choosing the strongest and most durable material, such as metal, you need to worry about personal protective equipment; gloves, safety glasses and long sleeves will be essential.
When cutting workpieces with a power tool, it is better to securely fasten the pieces of metal in a vice; small elements should be adjusted with special scissors so that the product looks neat. Screwdrivers, keys, tape measure, square and marker are prepared in advance so that when you start implementing your plans, you will be less distracted from the process.
Attachment point
The fastening unit is made from a corner purchased at a hardware store. The corner is attached to the fixed part with two long screws. The mounting features depend on the specific design of the VCR head.
Corner
The corner has been modified
Corner installed