Manual planter for seedlings: drawings, dimensions, photos, videos.
Planting seedlings manually is a tedious process; you have to bend down every time to lower the sprout into the hole, and this is primarily a load on your back and in this mode you quickly get tired. But a hand-made homemade seedling planter will greatly simplify the entire process of planting; in this article we will look at how to make a seedling planter. The design of the planter is extremely simple; making it will not be difficult.
With a planter you can make planting holes in the soil and replant seedlings with a lump of earth; the planter is great for planting seedlings: cabbage, peppers, tomatoes, strawberries and other plants.
Homemade seedling planter
Dear visitors of the site “ Samodelkin Friend ”, from the material presented you will learn how to independently make a planter for planting seedlings of a simple and reliable design from scrap metal. A video review of the structure is attached. Planting seedlings is a labor-intensive task and you have to bend your back to plant a seedling in the ground, and then you suffer from back pain for a long time. To avoid this, a planter of a fairly simple design was invented, consisting of a 50 x 50 mm guide pipe, a spring-loaded “beak” and a lever with a drawstring or cable .
The device is stuck into the ground along the embedment depth limiter, then the operator presses the handle, thereby opening the beak, due to which the planting hole expands, and a seedling is fed from the top along the bell, then the device simply rises up, and the seedlings remain in the ground for further growth.
And so, let's look at the process of planting seedlings using a planter, as well as a detailed video report reviewing the structure and its structure.
Source
What equipment is useful for planting seedlings?
A device for planting seedlings of tomatoes and other crops (planter, planting cone) is used by gardeners in their plots, as well as by farmers and large agricultural companies. Depending on the area being processed, the type of planter is selected. On large areas (in field conditions), seedlings are planted using mechanized two- and four-row planters; in personal gardens and garden plots, manual devices are used. We will look at how to choose the right hand tool for planting seedlings or make it yourself.
Types of landing devices
There are several types of devices for planting tomato seedlings in open ground, a greenhouse or a greenhouse:
For planting a small number of seedlings in small beds, the simplest device is suitable - a planting cone. With its help, you can easily make many holes of the required depth in the garden bed. This is an inexpensive device, and you can make it yourself.
A manual transplanter or an automated device is suitable for planting cassette seedlings in large household plots or farms. Their cost is much higher than a landing cone, and you won’t be able to make such a device yourself. The high cost is explained by a more complex design; in addition, such planters have undeniable advantages: when planting seedlings, there is no need to bend down, and productivity increases by 9-15 times.
How to make an instrument
Making a landing cone with your own hands is not as difficult as it seems. To do this, you will have to take two small scoops, thick wire or a small sheet of iron and screws.
The manufacturing technique is simple and unpretentious:
- Carefully trim the ends of the scoops.
- Connect the lower bases to each other, forming a cylinder, and secure with wire or other convenient material (for example, a piece of iron and screws).
The most primitive device is ready. Of course, this is not such a convenient model, which is sold in gardening stores. Its main advantage is that it is much cheaper.
Landing cone design
A planting cone is the simplest planter. It consists of two parts - a cone-shaped working part and a handle. Since the planter must make holes even in hard soil, the working part must be made of high-quality metal. As a rule, carbon steel or stainless steel is used to produce such tools.
The working part (cone) is pointed on one side and has a measuring scale on it, which is very convenient for determining the depth of the planter depending on the type of seedling.
When purchasing, pay attention to the following parameters:
Handles can be plastic or wooden. Plastic ones are more practical, since wood can dry out over time and injure the palm. Cones with a sliding mechanism are more convenient when removing soil from a hole and filling in seedlings.
When making a purchase, be sure to ask how long the warranty covers. Manufacturers of high-quality garden equipment assume a warranty of at least three years.
Attachments for a screwdriver or drill
If you want to save time when planting bulbs, give preference to special attachments for a drill or screwdriver, with which you can very quickly make the required number of holes. It is best to use the tool on loamy or sandy loam soils, since heavy clay soil will be difficult to drill.
A short video clearly demonstrates how the hole-making attachment works.
The mechanism for working with the nozzle is very simple: insert it instead of a drill into a drill or screwdriver, place it perpendicular to the surface of the soil, turn it on and, applying slight pressure, begin to plunge it into the soil.
Some attachments work like a regular drill, making holes and scattering soil around.
Others can make a hole and remove the soil from it. After planting, the soil can be poured into the hole by switching the rotation mode.
Drill attachments come in different sizes depending on what kind of bulbs you want to plant.
Almost all devices for planting bulbs are best suited for making holes in a previously prepared bed. Before planting bulbs, do not forget to apply the necessary fertilizers and dig the bed.
www.ogorod.ru
Features of an automated device for planting seedlings
Many gardeners will like a tool for quickly planting seedlings with partial automation. It consists of two main parts - a detachable (expanding) cone and a guide pipe. The pipe can be made of steel or plastic, and the cone can only be made of carbon steel.
The planter is equipped with a limit stop: this allows you to adjust the planting depth. Such a device can be used in a greenhouse, greenhouse and for planting seedlings of tomatoes, peppers and other vegetable crops in open ground or under film mulch.
Transplantation using such a tool occurs as follows.
When purchasing, you need to pay attention to the diameter of the guide pipe and cone and its compliance with the standard size of the cassettes used.
What equipment is useful for planting seedlings?
A device for planting seedlings of tomatoes and other crops (planter, planting cone) is used by gardeners in their plots, as well as by farmers and large agricultural companies. Depending on the area being processed, the type of planter is selected. On large areas (in field conditions), seedlings are planted using mechanized two- and four-row planters; in personal gardens and garden plots, manual devices are used. We will look at how to choose the right hand tool for planting seedlings or make it yourself.
Types of landing devices
There are several types of devices for planting tomato seedlings in open ground, a greenhouse or a greenhouse:
For planting a small number of seedlings in small beds, the simplest device is suitable - a planting cone. With its help, you can easily make many holes of the required depth in the garden bed. This is an inexpensive device, and you can make it yourself.
A manual transplanter or an automated device is suitable for planting cassette seedlings in large household plots or farms. Their cost is much higher than a landing cone, and you won’t be able to make such a device yourself. The high cost is explained by a more complex design; in addition, such planters have undeniable advantages: when planting seedlings, there is no need to bend down, and productivity increases by 9-15 times.
Landing cone design
A planting cone is the simplest planter. It consists of two parts - a cone-shaped working part and a handle. Since the planter must make holes even in hard soil, the working part must be made of high-quality metal. As a rule, carbon steel or stainless steel is used to produce such tools.
The working part (cone) is pointed on one side and has a measuring scale on it, which is very convenient for determining the depth of the planter depending on the type of seedling.
When purchasing, pay attention to the following parameters:
Handles can be plastic or wooden. Plastic ones are more practical, since wood can dry out over time and injure the palm. Cones with a sliding mechanism are more convenient when removing soil from a hole and filling in seedlings.
When making a purchase, be sure to ask how long the warranty covers. Manufacturers of high-quality garden equipment assume a warranty of at least three years.
Features of an automated device for planting seedlings
Many gardeners will like a tool for quickly planting seedlings with partial automation. It consists of two main parts - a detachable (expanding) cone and a guide pipe. The pipe can be made of steel or plastic, and the cone can only be made of carbon steel.
The planter is equipped with a limit stop: this allows you to adjust the planting depth. Such a device can be used in a greenhouse, greenhouse and for planting seedlings of tomatoes, peppers and other vegetable crops in open ground or under film mulch.
Transplantation using such a tool occurs as follows.
When purchasing, you need to pay attention to the diameter of the guide pipe and cone and its compliance with the standard size of the cassettes used.
Transplanter machine device
The manual transplanter is suitable for planting vegetable crops, including peppers, tomatoes, eggplants, cabbage, as well as pumpkin and melon crops.
Its design consists of the following elements:
The principle of operation of a manual transplanter is similar to the operation of a device for planting seedlings, but there are some peculiarities in control.
DIY landing cone
You can make a simple planter (planting cone) with your own hands. To do this you will need a small piece of stainless steel and a template. A pattern can be made by measuring a factory tool.
The easiest option is to make a planter yourself
This simple device will be a good helper when planting tomato seedlings and other crops.
What it is?
A garden cone solves the problem of organizing holes and holes for green spaces.
When it comes to tree seedlings, you can’t do without a shovel: you need a large and deep hole, but it’s much easier to give it an even shape. But small plants - bulbs, seedlings, flower seeds and garden crops - need to be planted in very small depressions in the soil. Doing them by hand is inconvenient and time consuming.
A regular bayonet shovel is too big for this. The only more or less convenient option is a planting scoop, but even this is not very convenient, and besides, in order to make neat holes with it, you need a lot of practice. But a planting cone is the most suitable, and most importantly, a quick tool that allows you to make a depression in the ground.
Advantages of the device
Using a garden cone, a gardener or gardener receives a number of benefits that motivate the use of this simple but useful device for planting green plants:
- The pits are smooth and round . Using a planting scoop, you can achieve this result, but you will have to make more movements.
- Almost no soil falls into the resulting holes . This is achieved due to the physics of the process - the earth is either compacted with a cone to the sides, or remains inside due to the conical design of the working part. When working with a scoop, shovel or hoe, the earth inevitably further loosens.
- The time savings are obvious . Where you have to make two or three or even more movements with a digging tool, the cone can easily handle it in one.
- Indispensable when planting a large volume of material . Digging five or six holes under a window is not a difficult task. But if you have to root two or three boxes of seedlings or a bucket of bulbs of various flower crops, then the job can take the whole day. In this case, the landing cone serves as a real means of mechanization, albeit a very simple one.
DIY device for planting seedlings
This article describes a method for making a device for planting seedlings with your own hands.
Spring gardening work involves, in addition to the joy of communicating with nature, fatigue, pain in the legs and lower back. However, the result obtained: environmentally friendly ripe vegetables, fruits, berries, herbs, covers all the physical difficulties that arise when working in the beds. Probably the most labor-intensive and tedious process in this matter can be called planting seedlings with your own hands.
You can plant seedlings in open ground only with your own hands, or you can use various mechanical devices, among which the most popular are the following:
The corresponding industrial devices are sold in retail chains, but it is possible to make them yourself.
Important: Making a device for planting seedlings with your own hands will save the family budget (in favor of purchasing plant protection products and seeds) and will allow you to sort out the accumulated scrap metal, where you will definitely find parts for future tools
The process of making a mechanical cone-shaped device for planting seedlings, or a planting cone, with your own hands:
This tool, popularly called a planter, is the simplest and consists of a working part (cone) and a handle (tool holder). The sliding mechanism of the cone makes it convenient to excavate soil and fill the hole.
To make it, you need to select a small sheet of stainless steel and cut two identical trapezoids in accordance with the dimensions of the future hole in the ground. Next, the parts are connected to each other with an overhead strip. In this case, it is necessary to provide a gap of up to 15mm wide between the parts.
The tool handle can be made from two polypropylene pipes of different diameters, so that one pipe fits inside the other. First place a spring in a large pipe, then place a narrow pipe there.
Next, you can assemble the tool as follows: weld two curved metal strips to the body of the tool, attaching a handle to them.
The process of making a manual device for planting seedlings at home:
The tool is quite simple to manufacture and easy to use. It helps to quickly produce holes of the same size in the soil for planting seedlings.
For manufacturing, you need a metal or plastic container with a size equal to the future hole. An improvised metal piston (a thick bundle of wire, in the form of a double-sided loop) must be placed in this container. The device itself should have the shape of a glass (an open part on one side and a hole for the piston handle on the other side). The piston is a double-sided loop: a horizontal loop for grasping soil (similar to the loop of a construction mixer, only with a diameter equal to the size of the container) and a loop that performs the function of a piston handle.
The operating principle of this device is to place the open side of the container into the ground by lowering the piston handle. At this moment, the soil is captured and a hole is formed for planting seedlings. Next, the piston handle must be pulled out and the earth will fall out of the hole in the desired direction.
Hole markings
December is a lull in work on the plot of land for the gardener. This time can be used to make useful tools. The most popular are homemade devices for marking holes when planting vegetables. Anyone who loves neat beds with even rows of onions, garlic, carrots - let's do it! We make markers for various vegetable crops, taking into account their growing characteristics.
Types of markers
There are different tools for marking holes:
All these devices significantly facilitate work, reduce the time when planting seeds, when instead of one hole you get several at once, and make the beds more beautiful and well-groomed.
Needle markers
This tool is used for sowing seeds and picking seedlings. Most often, the base is a board or strip into which needle teeth are driven at a certain distance, for example, every 6-8 cm.
You can use nails, screws, wooden or plastic pins, and even wine corks glued to the base as teeth. The length of the needles depends on the depth of planting of specific seeds.
hole marking
Jagged markers
- Such a device can be made from wooden blocks or a metal corner, the service life of which is much longer. The teeth are made from reinforcement, long bolts or wooden spikes, fixed to the base with an equal distance from each other. This tool is convenient to use when planting garlic or onions. Simply press the device with your foot and you will get identical indentations into which the garlic cloves are placed. A limiter for the next row can be mounted to the device.
- Another option for a tool for marking holes can be made from a thick sheet of plywood or chipboard (chipboard). Blind holes are drilled at the base of the sheet and wooden spikes are glued into them. It is advisable to attach a pen to the sheet for ease of use.
- The easiest way to make a marker is to attach teeth to a regular rake on the back side at a certain distance.
- You can also make the necessary rakes yourself, where plastic teeth are attached to a steel angle or pipe at a certain distance using bolts.
Universal manual planter
There are different types of garden planters that are designed for different crops and their seedlings. Today in this article we will talk about a manual universal garden planter.
Purpose
The universal manual planter is used to perform the following operations:
The planter has the following positive advantages. It is simple in design, so you can make it yourself.
The planter consists of two ordinary quadrangular iron shovels. The dimensions of the holes she makes ensure painless survival of the planted plants. The hand planter is durable, versatile and convenient as a tool, in addition to being easy to work with. Compared to an ordinary shovel or a planting scoop, it provides significant productivity and a great economic effect.
Planter device
It consists of two quadrangular iron shovels, which are shaped like a truncated cone. Each of the shovels is bent in a semicircle along its length, forming “flaps” or a split chamber-glass. The doors are hingedly connected to each other with bolts.
Rice. 1. Planter design
A nut with a lock nut is screwed onto the end of a small diameter bolt.
Planter operation
Making holes for planting seedlings
Making holes with a planter is done as follows. The planter is immersed in the ground in the closed position of the valves, i.e. in a position where they form a truncated cone. To do this, the planter handles are moved apart until its halves are closed. In this position, the planter is immersed in the soil, then it should be sharply turned around its axis half a turn to the right and left to form smooth walls of the hole in order to avoid destruction of the walls when excavating the earth.
Rice. 2. Making holes for planting seedlings
After immersing the manual seedling planter in the soil, its leaves should be further compressed, for which the handles are moved to the sides. This must be done in almost all types of soil, especially in dry, loosely cohesive soil. Otherwise, when you pull the planter out of the ground, the soil crumbles and remains in place. The release of the soil-monolith from the planter is done by opening the doors by bringing the handles closer to each other. The holes are made 10-12 cm deep. This depth is sufficient to completely embed the root system of the seedlings into the soil with a planter. The peat humus pot should be immersed 2-4 cm below the surface of the earth.
The depth of the hole depends on the type and condition of the soil, and on the force with which the planter is immersed. On well-cultivated soil, the planter can be immersed to the desired depth only with manual effort. On somewhat compacted soil, the planter is immersed by applying pressure with the foot. When planting, it is very important to maintain straightness in the rows, this is achieved with the help of a cord.
The photo shows a planter in operation
To maintain the same distance between plants in longitudinal rows (along the cord) and obtain straight transverse rows, when making holes in the first and second longitudinal rows, markings are made with a certain measure to establish a given distance in the rows. For early cabbage, for example, this distance is set between the rows at 50 cm and in the rows also 50 cm. On the third and subsequent longitudinal rows, marks are not necessary, since you can be guided by the plants planted on the two previous longitudinal rows. This way you can get exact squares.
Transplanting plants with a clod of earth
It is very important that a plant being planted in another place has the same soil around its roots where it previously grew. Transplanting plants with soil is easily achieved with the manual planter we recommend, for example, replanting strawberries.
It's done like this. In the place where the plants are to be transplanted, holes are first made with a planter, and at this time, in the area from which the plants are transplanted, a hole is dug with a planter. In this case, the aboveground organs of the transplanted plant are placed between the valves and in this position the planter is immersed in the ground.
Rice. 3. Transplanting plants with a clod of earth
Then, by slightly squeezing the flaps, the planter is turned half a turn to the right and left, and the plant is pulled out along with the ground. Carefully, in order to maintain the shape of the pots, the dug plants are placed in a box and transferred to a new place where the holes have already been made. Otherwise, the process of planting and embedding is no different from planting seedlings in peat pots from greenhouses into open ground.
The best planters for bulbous plants - review and recommendations for selection
Adding an article to a new collection
If you love bulbs, then you know how exhausting planting these wonderful plants can be. However, progress does not stand still, and now you can make your work easier by purchasing a special planter.
It is difficult to find an area where there would not be room for a flower bed with bulbous plants. Some limit themselves to a small garden bed, while others create real works of art in their flower beds using dozens of plants. Planters were invented especially for such gardeners.
“Classic” planter for bulbous plants
The most primitive planter for bulbs looks like a cylinder or an inverted truncated cone with a handle. The operation scheme is quite simple: the tool is immersed in the ground to the required depth, then it is rotated around its axis, thus capturing the lump of earth that remains inside.
On the one hand, the simplicity of this device makes it reliable and durable, but on the other hand, it requires additional movements with the hand. This won't cause much inconvenience if you need to plant a few bulbs, but it will be tiring when creating a flower bed with a large number of plants. In addition, there is a risk of not delivering the earthen ball without loss, spilling a good part of the captured soil. However, engineering science does not stand still, and simple designs have been replaced by improved analogues.
Advantages : easy to maintain, durable, does not take up much space.
Disadvantages : work must be done bending over or squatting, it is difficult to pour soil into the hole with the onion, not suitable for preparing holes for small onions.
Bulb planter with spring handle
Externally, this planter is very similar to its predecessor: the same shape, the same principle of working with the soil. However, if you look closely, you will notice that its landing cone consists of two parts, and there is a button on the handle. It is she who sets in motion the mechanism that opens the cone to a cylinder. The principle of working with the planter has changed slightly, but it seems so only at first glance. The spring mechanism greatly facilitated the landing process. Now, in order to get a lump of earth, you do not need to rotate the cone around its axis.
A planter with a spring handle is an ideal option for those who plant tulips, hyacinths, hazel grouse, daffodils and other plants with large bulbs on their plot.
Advantages : no need to make unnecessary hand movements, it’s easy to fill the bulbs.
Disadvantages : uncomfortable body position during work, not suitable for planting small diameter bulbs.
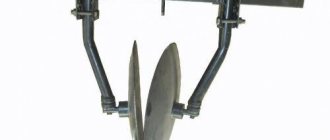
Planter with two blades
Another variation on the theme of a planter with a spring mechanism. However, this time the place of the cone was taken by two blades, which are driven not by a button, but by pressing a horizontal bar. This tool is good for making shallow holes that are suitable for planting small bulbous plants. It can also be used for replanting many other plants. However, such a planter is not suitable for preparing holes for larger flowers.
Advantages : easy to use, suitable for various types of work.
Disadvantages : the open mechanism requires regular cleaning; you cannot dig deep holes.
Planter-shovel for small bulbs
If you plan to plant crocuses, muscari, galanthus or any other small-bulbous plants on your site, you will need a planter that makes shallow holes with a diameter of no more than 5 cm. A cylinder spatula with a beveled edge is ideal for these purposes.
Advantages : durable, suitable for working with small-diameter planting material, easy to fill the bulbs.
Disadvantages : not at all suitable for planting large and medium-sized bulbs.
Bulb planter with long handle
Planters with a long handle are very convenient because when working with them, a person does not have to bend down every time they need to make a hole with a diameter of about 10 cm. Most of these tools are made on the principle of a shovel with a special foot, by stepping on which you can easily drive the device into land.
Advantages : you can work without bending over, copes with heavy soil.
Disadvantages : takes up a lot of space, is not suitable for small bulbs, there is a risk of the earth ball getting stuck inside the cone.
Planter with beveled edge and long handle
This type of planter was created specifically for digging holes for small bulbs without bending over. It differs from a conventional planter with two handles in the shape of the planting cone (a cylinder beveled at the top) and the presence of only one leg support.
Advantages : comfortable position for work, relatively light weight, it is possible to work with small bulbs.
Disadvantages : not suitable for creating holes for medium and small bulbs.
Bulb planter with two handles
This tool works on the principle of forceps. At the end there are two curved metal plates, similar to small sharp blades, which, when closed, form a cone. When opened, the device is driven into the ground, rotated several times around its axis, and then carefully removed along with the lump of earth.
These tongs will become an indispensable assistant in a neglected area. After all, with their help you can make holes even in the turf. They will also become indispensable when digging up bulbs after flowering.
Advantages : comfortable body position during planting, versatility, ability to “cut through” the heaviest soil.
Disadvantages : Muscular force is required, the mechanism requires careful handling.
Attachment for a screwdriver or drill
If time is running out and you need to plant a large number of bulbs in the shortest possible time, then the best solution to the problem is to use special attachments for a drill or screwdriver. Some of them look like smaller copies of an earth drill, others look more like hand-held cone planters.
Advantages : it is possible to choose the diameter of the nozzle depending on the size of the hole to be drilled; does not require much storage space.
Disadvantages : you need an additional tool (screwdriver or drill); while working you have to squat or bend over; there is no earthen ball with which to cover the planted bulb.
What to look for when buying a bulb planter?
Each of the models listed above has its own advantages and disadvantages. If you have already decided on your preferences and are ready to go shopping, be sure to pay attention to the following criteria.
The material must be durable, with no signs of damage or rust. If it is metal, then stainless steel is better; if it is plastic (for infrequent work), then it is strong and inflexible. Before purchasing, be sure to inspect the instrument from all sides. Make sure there are no scuffs or scratches on it. If the planter has already acquired damage during transportation, think about whether it can “survive” several hours of working with the soil.
Mechanism . When buying a planter with a spring or in the form of tongs, check the operating mechanism - it should move smoothly, without jamming.
Ruler . Most cones (especially models with a regular handle) have divisions that help you more accurately determine the depth of the hole.
Notches . An optional but desirable element that greatly facilitates the work process.
At first glance, a planter for bulbs is not the most indispensable thing in gardening. However, once you try it, you will be able to appreciate the delights of working with this tool.
A gardener-inventor made a hand-held planter for seedlings from rebar
I couldn’t miss this idea without posting it specifically for subscribers and everyone interested. It’s a pity that television does not promote the ideas of homemade inventors. And thanks to the masters for sharing ideas with us, distributing them on their own. This master should definitely be invited to work in factories and design bureaus as a technical innovation engineer. Such tools exist and there are modifications. But what is surprising about this development is the combination of practicality and relative simplicity of its planter. And the presentation of his product to the general public is worthy of praise: no slurred speech, interjections or omissions. Everything is clear and to the point. It's easy to repeat with these instructions.
Cool design of seedling planter
The tool is very high quality. It is important that the working part does not compact the soil, but the soil is cut and carefully pulled out of the hole. Potatoes and seedlings will quietly take root.
Inventors shop at a budget Chinese online store.
Inventions for DIYers in a Chinese online store.
Beautiful and, most importantly, comfortable thing!
The author of the video is a blogger of the YouTube channel “GARDEN, VEGETABLE VEGETABLE, WITH YOUR OWN HANDS”
The owner made a convenient device for planting seedlings in the ground. Drawing
Konstantin Solomatin shared his homemade product to streamline the work of amateur gardeners. The owner of the garden tried it out when planting strawberries, and it is convenient to plant with this device.
The advantage of this development is ease of manufacture and neat results. Suitable for leisurely work on the ridges, with comfort.
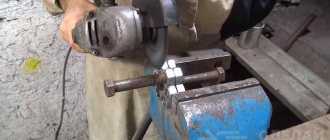
For his device, the master took a piece of duralumin pipe. These are used in chimneys. Its diameter is 6 cm. Two suitable plates are used for the handles.
Due to bad weather, it was not possible to film how the homemade product works. But let's explain in words. The tool works like this. A seedling is placed inside the cone from above, roots down. The cone is inserted into the ground. The “jaws” unclench, leaving the plant in the hole, and the tool rises up.
In the video, the master addressed the issue of optimal sizes and showed how he made his product (YouTube channel “Konstantin Solomatin)
DIY seedling planter: drawings, photos, videos
Manual planter for seedlings: drawings, dimensions, photos, videos.
Planting seedlings manually is a tedious process; you have to bend down every time to lower the sprout into the hole, and this is primarily a load on your back and in this mode you quickly get tired. But a hand-made homemade seedling planter will greatly simplify the entire process of planting; in this article we will look at how to make a seedling planter. The design of the planter is extremely simple; making it will not be difficult.
With a planter you can make planting holes in the soil and replant seedlings with a lump of earth; the planter is great for planting seedlings: cabbage, peppers, tomatoes, strawberries and other plants.
Seedling planter drawings.
The figure provides drawings with dimensions for the planter.
A hand planter consists of two shovels, each shovel is bent in the shape of a semicircle, together the shovels form a cone-shaped glass.
Each shovel is attached to a handle, which acts as a lever; the shovels are attached to each other by a hinge joint, which ensures their rotation relative to each other.
To make a planter, you will need sheet metal, from which you need to cut two blanks for shovels.