Poultry farming is gaining momentum. More and more people are keeping chickens for eggs and meat. But in order for the birds to produce results, they must be kept in appropriate conditions. For these purposes, buildings are erected from various materials. A cheap, durable and warm option is a do-it-yourself frame chicken coop. Even a beginner in the construction business can handle its installation. And our article will help with this. Next, step-by-step instructions will be provided for assembling a poultry house from OSB boards.
Material overview
What is OSB
Let's say right away that the abbreviation OSB is only partially correct. If you focus on the English version - OSB (oriented strand board). Translation: oriented strand board.
This means that it would be more correct to call this material OSB. However, in many sources there is a variation of OSB. We will stop there too.
This material is based on shavings (or thin chips), arranged in multi-layers, bonded with resins, waxes and boric acid. The chips in the inner layers are located across the sheet. And in the outer layers - along.
Advantages
This stove has a lot of advantages.
Price: it is made from forest waste. Therefore, not expensive.
Strength: much stronger than chipboard and fiberboard.
Water resistance: the board is not subject to deformation when exposed to moisture.
Beautiful appearance.
Ease of processing: it can be sawed, drilled, cut.
Hardness: this material holds nails and screws better.
Flaws
A few disadvantages include the release of harmful gases. Although here too the OSB board is competitive with chipboard and fiberboard. Its constituent fibers are larger, so there are fewer bonding resins.
Fragility: this disadvantage is inherent in all such materials. Including solid wood boards.
Types of poultry houses
Portable structures can be divided into several categories according to the following criteria:
- transfer method;
- size;
- type of construction.
According to the method of transfer, they are divided into structures on wheels and poultry houses that can be moved by hand. In the presented photos you can see such products.
The fence allows you not to monitor the birds while walking. Thanks to this, there is no need to further equip the area in which the chicken coop is located.
By size, the described structures can be divided into poultry houses, which are used for several birds, and into products designed for more than 20 birds. The first option is more convenient, but is not suitable for everyone.
Is it worth building a chicken coop from OSB?
A frame chicken coop will come in handy when keeping a small number of chickens.
There are many advantages to such a poultry house. It comes together quickly. Even one person can complete the construction in a week, in his free time.
The building is light in weight. This means that you can build a chicken coop on any plot of your dacha or country house.
If you decide to raise more chickens, you can easily make an extension.
In addition, this is a budget type. Construction from foam blocks, cinder blocks or timber will be much more expensive. And construction skills play an important role in this case.
You should not install a frame chicken coop in regions with very cold winters.
Care must be taken to protect the structure from rodents.
If you take the basic steps into account at the beginning, you can complete the chicken coop assembly faster.
Now let’s look at how to make a frame poultry house from OSB boards.
Requirements for chicken cages
In this article we will talk about chicken cages into which young animals are moved after the brooder. At such a young age, birds face a huge number of dangers that they cannot cope with on their own.
A chicken cage serves not only as a home, but also as protection from danger.
We are talking primarily about:
- animal attacks;
- negative environmental impacts.
When mentioning animals, a full range of dangers is implied, for example, the farmer’s pets - cats and even dogs who love to feast on chicks. You should also expect attacks from other predators - birds such as falcons, rodents such as rats and forest dwellers such as ferrets. It is not difficult for all of the listed animals to get into a chicken coop or improvised polycarbonate buildings. It is necessary to properly protect the birds by blocking the path for predators.
It will be great if, instead of a stationary structure, the farmer decides to make a portable cage, since on warm summer days this will allow the birds to be taken outside and placed with all amenities, periodically moving them to refresh the pasture and choose sunny or, conversely, shaded places.
The chicken cage is portable
It is necessary to equip lighting and heating inside the cage or outside near it, since the temperature level of living for small chicks is reduced in a gentle manner, gently and gradually. For cages exposed outside, it is also necessary to make a canopy, so as not to move them at the speed of light into the pen at the first drops of rain, but simply to shelter the birds from:
- rain;
- drafts;
- scorching sun rays.
The design of the cage largely depends on what intentions you have regarding raising chickens. If you get several pieces, just for yourself and the population will never exceed 8-10 individuals, then the cage can be made as simply as possible, from an ordinary metal mesh or welded lattice. However, in the case of breeding a large number of chickens for sale of meat or eggs, it is better to take care of building a multi-tiered cage.
You can build a cage in several tiers
Let's look at the pros and cons of this option.
|
As you can see, the cellular housing option has many advantages. So, if you have a tiny shed and a small space inside, you can install a cage inside with a large number of individuals living inside.
Most often, the cage is mounted on supports, which are also easy to make with your own hands. Thanks to this, a distance is formed between its base and the floor, which prevents small predators and rodents from entering. The top of the cage is also protected by a roof or metal bars, so the sharp claws of birds of prey will not help them get their dinner.
For construction you need materials that can be bought at any hardware store.
The materials needed to build the cage can be purchased at any hardware store or market. They are not expensive and easy to process. With little construction experience, you can easily assemble a chicken cage with your own hands. As a rule, every owner of a private farm has such experience.
Preparatory stage
Determining the size
The area of the chicken coop is chosen taking into account the number of birds.
For 10-15 chickens, an area of 10-15 square meters is enough. There should be a walk nearby, approximately 2 by 2 meters. Ventilation must be installed in such a house. And at least one window.
20-30 chickens: area - 18-20 square meters. The height of the chicken coop must be at least 2 meters. Since it is advisable to install the nests in 2 tiers. And also 2-3 perches. The walking area should be increased to 6 square meters. If the area of the plot allows, you can build a chicken coop with a vestibule.
50 or more chickens: in this case, the area of the house must be at least 50 square meters. Such a chicken coop will require additional heating. In addition to wall insulation. The walking area is increased to 12 square meters. You will need 8-10 nests. And they need to be placed in 2 tiers against the far wall.
Place to build
We decided on the sizes. Now you need to choose a place on the site.
The chicken coop should not be located in damp or marshy areas. This threatens chicken diseases. It also reduces the service life of the building.
It is not advisable to build it in a lowland or on a slope. It is better to choose a direct site located on a hill, on the south side. Sunlight is good for chickens. Although the walking area should be placed so that in the summer it is partially in the shade.
Chickens don't like loud noise. It is better to build a chicken coop away from the house, road and other sources of loud sounds.
Drawing
Before construction, it’s a good idea to make a drawing. It marks the size, location of doors, windows, nests, perches, vestibule (if planned), place for walking and other nuances.
The chicken coop drawing is built in two positions: top and side views.
Required materials and tools
Before starting construction you need to prepare:
- timber of different sections, boards (for the frame);
- facing material, in this case OSB sheets;
- roof covering: corrugated sheets, slate or tiles;
- fastening tools: screws, nails, staples, self-tapping screws;
- saw, drill, screwdriver, screwdrivers, hammer, drill;
- finished door;
- window opening and glass or a ready-made window;
- insulation: polystyrene foam, mineral wool, polystyrene foam, sawdust.
Drawings, materials and free time available. It's time to figure out how to make a chicken coop from OSB with your own hands.
What is a chicken coop?
It's safe to say that this is the first home that little chicks come into. Naturally, it must be durable and protect children from bad weather, predators and any unpleasant surprises. It should be spacious enough, especially if it will contain a large number of kids. In addition, do not forget that the chicks grow, and quite quickly, so there should be enough space for all the inhabitants.
It is advisable that the chicken house also have a heating lamp, because it is important to create a certain temperature for the babies and protect them from the cold. Poultry farmers also believe that the structure for chicks should be located so that this place is closed from drafts and heat.
Construction from foundation to roof
About the foundation
The choice of foundation for a chicken coop depends on how deep the groundwater is in the area.
When soil moisture is low, the choice falls on piles - wooden or bored.
On loamy soils it is better to build a foundation in the form of columnar supports. The pillars can be made of brick or concrete.
Installation of blocks
To install such blocks, dig a hole 30-40 centimeters deep. First, crushed stone is poured in a layer of about 20 centimeters. Then sand. Both layers are compacted well. And they put up blocks of 20x20x40 centimeters. They do it “to the horizon”.
For proper installation, use a building level or stretched string.
The size of the chicken coop will determine how many supports to make. So, if the length of the wall is about 3 meters, supports in the corners are sufficient. If it is about 4 meters, you need to make another support in the middle.
After installing the blocks, the strapping is laid. It is made from timber or logs. It is mandatory to lay 2-3 layers of roofing material on concrete posts under the strapping.
Screw piles
Screw piles can be used. This is an iron pipe with blades or screw threads at one end. This end is screwed into the ground. And a support platform is put on the second end of the pipe, to which the chicken coop harness is attached.
The advantage of screw piles is the speed of their installation. Thanks to the screw blades, they are not subject to tensile loads. Such piles can be used several times.
Disadvantages include metal corrosion. And the impossibility of use in peat and sandy soils.
About gender
The floor in the chicken coop should be made of environmentally friendly material. This could be: wooden boards, concrete or earthen flooring.
The floor must be safe, durable, and moisture resistant. There should be no protruding nails or screws.
Find out more in the article “What is the best material for making floors in a chicken coop.”
There must be bedding on the floor. This could be hay, straw, corn tops. And also sawdust, shavings, sunflower husks.
In winter, the litter is rarely changed. This is done so that heat emanates from it, resulting from organic processes.
You can use special fermented compounds to maintain positive temperatures in the chicken coop. Or you can cook it yourself. To do this, wet grass must be laid between layers of dry hay or straw.
Construction of walls: first stages
After installing the trim, you can begin building the walls. To do this, set up the vertical supports of the box.
First, install supports in the corners. To do this, use a larger beam, with a cross-section of 7 by 7 centimeters. It can be even wider - 7 by 9 centimeters.
The frame of the sides of the chicken coop can be mounted on the ground. And then attach the whole structure to the base.
Then the side walls are leveled and secured with struts to the frame.
Final stages
After installing the frame walls, the top of the supports are connected to the upper timber frame. A gable roof is attached to it.
All joints are connected with self-tapping screws. To strengthen the fastenings, angles, steel plates and metal brackets are used.
To increase the rigidity of the chicken coop structure, thin bars are stuffed into all the spaces between the vertical posts. It is convenient to subsequently attach insulation to these bars.
Then all sides of the frame are sheathed with OSB boards. It is necessary to leave spaces for doors and windows unsewn, focusing on the drawing.
Rules for installing windows and doors
The window should be installed on the south side. So that sunlight fills the chicken coop for as long as possible.
There is no need to make a large window or several small ones. Even if they are well insulated, for example, when using double frames, the glass will still be cold.
The total area of windows should not be more than 10% of the area of the chicken coop.
For a poultry house of 10-15 square meters, one window 40 by 40 centimeters is enough.
And for a chicken coop of 50 square meters you will need 2 such windows.
You should not make a window opposite the door to avoid drafts.
The windows must be made so that it is possible to ventilate the poultry house.
The door should be wide enough to make cleaning the chicken coop easier. And it should open outward.
What you need to know about the roof
It is better to make a gable roof. This is convenient because you can construct an attic for storing tools. And the snow will not linger much in the winter. This means that it will not break the roof under its own weight.
The roof of the chicken coop consists of a rafter structure and sheathing. The rafters are made from edged boards. The distance between the rafter structures is 50 centimeters. And there are 10 of them in total. The joint at the top of the structure - the ridge - is reinforced with a metal plate.
After the rafters are erected, the sheathing is made with boards, the width of which is 10 centimeters and the thickness is 2.5 centimeters. Afterwards everything is sheathed with OSB boards.
Wall insulation
The floor and roof can be insulated already during construction. The following is used as insulation:
- mineral wool;
- polyurethane foam;
- sheet foam;
- expanded polystyrene.
Any of these insulation materials are used to line the inside of the chicken coop.
You should not use any kind of cotton wool in the chicken coop. Because there is high moisture there. And even with a vapor barrier, the wool will get wet.
Self-tapping screws and staples are used for fastening.
The floor in the chicken coop is insulated, just like in any other room. First, the subfloor is laid, then the selected insulation and the main floor on top.
The ceiling must also be insulated, as well as the walls.
Continuing the topic, we advise you to read the information from the article “How to insulate a chicken coop for the winter with your own hands.”
Interior decoration
After covering the insulation with a vapor barrier, you need to think about what to make the inner lining from. There are many materials suitable for this purpose. For example, lining, edged boards, chipboard, plasterboard, plywood.
Based on the price and other qualities described above, you can again opt for OSB boards.
The inside of the chicken coop should be equipped with nests, perches, drinking bowls, and feeders. What else chickens may need, and how to install it all correctly, is described in the article “Rules and tricks for arranging the inside of a chicken coop.”
Ventilation
The chicken coop must have properly organized ventilation to avoid drafts. The easiest way is to make a small window above the door. Cold air enters through the door, and warm air exits through the window.
You can make two holes in the roof and insert two pipes into them. This type is suitable for winter ventilation.
Various options for the ventilation system and methods for their installation are given in the article “How to properly ventilate a chicken coop.”
Lighting
Lighting plays an important role in the life of chickens. In summer the daylight hours are long. It is enough for the bird’s well-being and egg production.
But in winter the days are short. And chickens spend more time in the chicken coop, where there is even less light. Therefore, additional lighting is installed.
Chickens need 14-15 hours of daylight for good egg production. Therefore, the light should come on around 6 am.
More information on how to properly equip a room with additional light is described in the article “Winter and summer lighting in a chicken coop.”
We make it ourselves
Surely most of the necessary materials are already available on your farm, but you will still have to buy some things. Thanks to a detailed description of the steps, you can make a chicken coop with your own hands without much difficulty. Our version is made in the form of a box with a mesh bottom and minor modifications. You can see other projects in the photo and video from the Grankin Family channel - a simple version of a summer chicken coop.
Tools and materials
To build a chicken house you will need:
- wooden beam;
- plywood or OSB board;
- mesh with a cell no more than 0.5 cm;
- self-tapping screws;
- saw;
- screwdriver;
- construction stapler;
- cable and cartridge.
Step-by-step instruction
By following our tips, you will quickly make a chick box. It will be completely ready to receive new residents and will become a good home for them.
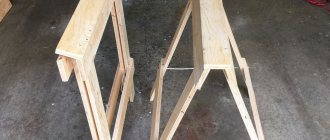
- First of all, we assemble the frame. It will be the base of the cell, so all connections must be strong. We make two rectangles from the timber, 120 cm wide and 250 cm long. Every 50 cm we fasten transverse sections.
- We make racks. We cut the timber into 60 cm segments and connect the previously prepared rectangles. The finished structure will look like a rectangle with edges.
- We cover the side walls with plywood or OSB. We make them solid without any holes. This will help conserve heat inside the box.
- We attach the mesh to the bottom of the cross beams using a stapler. If it is a solid piece, that’s good, but if there are joints, the edges of the mesh need to be covered with something to protect the bird’s legs from injury. Thanks to the mesh floor, the chicken coop will always be clean and dry.
- To preserve heat, we cover the top with plywood or OSB board. To feed the chicks and properly care for them, you need to make two open sections. A removable top is made above them, which can easily be made from a sheet of the same plywood, secured with hinges. It is under the opening sections that the feeder and drinker are installed, and in the opposite part of the box a lamp is mounted for lighting and additional heating.
- To make caring for birds easier, a tray is installed under the mesh floor to collect droppings. It can be made from a sheet of plywood and covered with plastic film. This way, the droppings will not saturate the tray and emit an unpleasant odor into the room.
Building such a chicken coop will not take a lot of effort and money, but will allow you to raise good livestock that will fully meet your expectations.
Loading …
Briefly about chicken pens
For a full life and good egg production, chickens need walks in the fresh air. A corral is built for this purpose. It can be erected simultaneously with the chicken coop. And it will be good if part of it is under the roof.
Or you can simply fence off the area adjacent to the chicken house with a net with small cells. The site should be in the sun. But so that the chickens have a place to hide from the scorching rays on hot days.
There must be at least 2 square meters of land per individual. Don't make the pen too small. Chickens don't like cramped spaces.
The types of walking areas and the secrets of their construction are described in the article “Building a pen for chickens with your own hands.”
Finishing
In order for the chicken coop to blend with the landscape and serve as a decoration for the garden plot, it is painted or decorated with decorative elements.
Use paint with additional properties: protection against wood insects and protection against moisture. Do not forget about the safety of decorative elements; they are free of splinters and have smooth edges so that the chickens do not get hurt on them. Do not use too bright materials; let your chicken coop have calm tones.
A mobile chicken coop is suitable for keeping birds at any time of the year. The convenience is that the room can be moved from place to place, the chickens will always have access to grass. Used on small farms and cottages.
In winter, chickens are moved to the second level of the chicken coop, heat sources are supplemented, and self-heating is used in warm regions. Some people use such houses in urban environments, if access to the yard allows it.
mojaferma.ru
Approximate cost estimate for an OSB chicken coop
Let's calculate how much it will cost to build a frame chicken coop made of OSB boards for 4 square meters:
- Forest. You will need 2.5 cubic meters: 15,000 rubles.
- OSB board. You will need 28 sheets: 10,000 rubles.
- Insulation. Polystyrene foam 50 mm - 20 sheets. This is 2000 rubles.
- Fastening tool: 1000 rubles.
- Vapor barrier: 2000 rubles.
- Corrugated roofing: 2000 rubles.
- Lighting lamps, wiring, pipes for ventilation, a heating device (for example, a heater), glass (or a finished window), drinking bowls and feeders: 20,000 rubles.
Let’s do the calculations and see that building such a chicken coop will cost approximately 52,000 rubles.
Dear fellow poultry farmers, as well as readers of our site, was the information given in the article useful to you? You may have already assembled buildings from OSB (OSB) boards. Please share your invaluable experience and observations in the comments.
Please distribute this article on social networks - help novice farmers build a chicken coop correctly and economically. Special thanks for the 5 stars.
Let's start tinkering
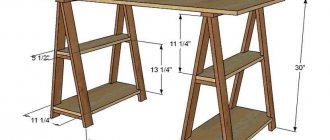
When you have read all the recommendations and, taking them into account, have drawn up a drawing, you can begin making a broiler cage with your own hands. Let's get started? For this:
- make 6 racks, the dimensions of which should be as follows: height 7x2 cm, width 7x2 cm, length 165 cm;
- connect with slats (two pieces 5x2 cm, six pieces 3x2 cm, three pieces 10x2 cm) to form a frame;
- Make 9 side walls from plywood. Dimensions – 30.5x57.5 cm;
- To be able to collect waste, it is necessary to make metal pallets from sheets. The pallet must meet the following parameters: 20 cm height, 66 cm width, 30 cm length;
- make a roof (70x140 cm), either from plywood or from the same sheet of metal;
- complete the open part of the broiler cage. For this you just need a mesh. The chickens will have the opportunity to eat the feed.
Broiler cage drawing
Important advice! If you want to achieve maximum convenience for yourself, make cages with wheels by attaching them to the base. You can easily move them around for easier cleaning and more.
Walling
It is more convenient to assemble the wall frame separately, on the ground. The assembly is similar to the base: first you need to make a wall frame, and then secure additional jumpers in it. The distance between the jumpers is 50 cm.
The finished frame is installed on the base and secured with screws. The verticality of the wall installation is checked with a plumb line. In addition, temporary supports can be placed on the wall.
When the frame is ready, you can install windows and doors. For the summer version of the chicken coop, the window openings can simply be covered with metal mesh, and dampers or shutters can be provided on the outside. For the cold season, windows with double frames are needed.
Cell lighting methods
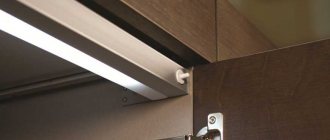
As mentioned above, for lighting you can use incandescent lamps, which simultaneously provide heat. These cheap devices are definitely suitable for fully raising chicks.
Installing an incandescent lamp inside the cell is not difficult
In addition to incandescent lamps, with which you can kill two birds with one stone, there is another way to illuminate cells, which can be rationally used in conjunction with an electric or stove heating system. We are talking about diode lamps, which in summer are placed over several cells or the entire tier. It is very convenient to use these lamps; they illuminate every corner of the cage, have little power and consume a minimum of electricity. Save and enjoy.
Photo gallery
Photo 1. Cage-shaped chicken coop
Photo 2. Small chicken coop with chicks
Photo 3. Chicken coop in the process of manufacturing