Zoya Reasonable
Autumn basket. Master Class
Autumn basket. Master Class
Required materials and tools:
• Mayonnaise bucket
• Roses from maple leaves
• Vaseline or any greasy glue
• A piece of foam rubber or a brush
To work, we need a mayonnaise bucket.
We tighten the bucket with twine and fix it with a glue gun from time to time.
We tighten the bucket with twine until the end. In the end it turns out like this.
For the handle of the future basket, I used vine branches.
Intertwined with each other, shaped into a handle.
Using a glue gun, I glued the handle to the inside of the bucket.
You can put roses in the basket; it looks good this way. But this did not satisfy me, I decided to decorate both the basket and the bouquet
To decorate the handle of the basket I used physalis lanterns.
I glued the physalis lanterns to the handle at some distance from each other using a glue gun.
To decorate the basket itself, I used watermelon seeds (I dried them especially for crafts made from natural materials)
I glued the seeds in the form of flowers and leaves over the entire surface of the bucket, and decorated the edge of the bucket in the form of cloves.
Flowers and leaves were painted with acrylic gouache.
We place roses from maple leaves and maple leaves in the basket.
To keep the leaves color, I first ironed them between two sheets of printer paper.
Add twigs with rose hips and ironed almond leaves to the bouquet.
I used the basket to decorate the group.
Thank you to everyone who visited my page!
“Easter basket” (master class) Hello, dear colleagues! On the eve of the Orthodox holiday of Easter, the senior group of children and I performed a collective task.
Master class “Easter Basket” Like a bright coloring book, Easter came to our home, Brought it in its basket, Eggs, buns, cakes, Pies, pancakes and tea, Easter fun.
Flower basket. Master class This kind of basket can be made from ordinary colored cardboard. To make a basket, you need to take a sheet of cardboard 22 cm wide and high.
Master class “Fruit Basket” Autumn beauty. Not only a beauty, but also a rich woman. How many goodies, how many delicious vegetables and fruits she brings us. A few of us.
Master class “Basket with flowers” In order to make such a gift, you will need: a dish sponge, cotton swabs, satin ribbon (90 cm red and 2 meters 10.
Master class “Basket with apples” Good evening, dear guests of my page! Introducing children to the traditions of the Russian people, we also talk about the Orthodox holiday of Apple.
Master class “Basket with snowdrops” Dear friends, I bring to your attention a master class on making a gift for dear and beloved mothers, grandmothers and girls. Like this one.
Master class “Easter Basket” Easter is the most important Orthodox holiday. Translated from Greek, the word “Easter” means “deliverance.” On this holiday everyone is Orthodox.
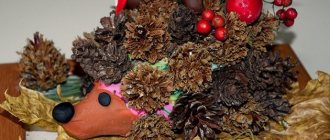
"Autumn Basket". Master class on crafts using natural materials AUTUMN Autumn is coming in our park, Autumn gives gifts to everyone: Red beads - Rowan, Pink apron - Aspen, Yellow umbrella - Poplars, Fruits.
Save the pleasant and colorful moments of autumn! Master class “Autumn Basket” This wonderful time of year has come - autumn! When the rustling of leaves under your feet fascinates, and the beauty of nature dazzles with its abundance of colors.
Master Class. Maple leaf roses
Master class “Basket with roses”
Master class presented
for teachers and children of preschool and school age. The composition is intended to decorate a group and can be used as a gift to your favorite teacher or educator.
Target:
Learn to create beautiful, interesting crafts and decorations from natural materials with your own hands.
Tasks:
Develop the child's imagination and creative abilities. Instill aesthetic taste. Develop fine motor skills of the hands.
Raw material:
To make this craft you will need: maple leaves, red and yellow gouache, wood varnish, polystyrene foam, a basket, fern leaves, Christmas tree branches.
Step-by-step manufacturing process:
Maple leaves can be taken in any color; the leaves must be fresh, not dry.
Fold the edges of the leaf inward
Roll up the leaf
We got a small bud - the core of a rose
We take a second maple leaf, slightly larger in size than the first, and apply our core to the front side of the second leaf.
How to make a basket of flowers from leaves
We wrap the upper part of the denim trouser leg inside and also glue it to the walls of the pot.
We take any sheet of cardboard, cut a strip 2 cm wide and 28 cm long from it. If this is cardboard for children's creativity, then glue several strips together, since you need to get a strip of good thickness. We cut strips 2 cm wide from the jeans and glue them using a winding method onto a cardboard base. This will give us a handle for the basket.
Glue the ends of the handle to the inside of the basket.
We take old newspapers, crumple one sheet at a time and fill them inside the made basket. To cover the newspapers, glue thick plain paper or cardboard on top of them.
Let's start making flowers. They need large leaves, preferably oblong in shape. It is good to use chestnut and cherry. Poplar is not suitable; its leaf is too dense. It is advisable to collect from the floor (those torn from the tree may not roll well) and use fresh leaves (dry ones will break). Take a leaf and bend it along 1/3 of the back side.
We start twisting on one side.
We twist it to the end and fasten the tip of the resulting rose with thin wire or thread so that the flower does not unwind. It is better to immediately cut the wire (thread) and then twist the leaf and immediately tie it with a prepared fastening element.
We seal the inside of the basket and half of its handle on the front side with green leaves.
Peacock
The highlight of this applique is the luxurious tail made of multi-colored foliage. Place a dark round leaf in the center and add blanks for the eyes and beak. Everything needs to be fixed with glue.
Categories
- March 8 (14)
- Uncategorized (17)
- DIY jewelry (4)
- valentines day (14)
- baked goods (6)
- knitting (2)
- guests on the doorstep (1)
- country crafts (18)
- country houses (24)
- Children communicate (1)
- interior design (22)
- games for a walk (3)
- how to dress stylishly (49)
- pictures (49)
- painting nails (nail art) (23)
- new year (60)
- omelettes and casseroles (1)
- gifts (6)
- paper crafts (50)
- fabric crafts (9)
- natural material (32)
- Work and business (1)
- garden and vegetable garden (1)
- salads (1)
- wedding (8)
- sew it yourself (1)
- learn to draw (10)
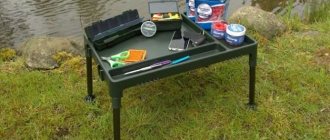
Vases with decorative filling
It was already mentioned above how fresh peeled carrots are placed in a transparent container for a bouquet and filled with water. Instead, a glass vessel can be filled with walnuts, acorns, apples, grains and other natural materials. The main thing is to select crops that do not need water replenishment. If you fill the workpiece with liquid, it will darken and lose its original beauty. The only option is to take two containers - a large and a smaller one - and insert one inside the other, and fill the free space with any components. Then you can safely pour liquid into the vase and place live armfuls.
DIY autumn COMPOSITIONS - 28 photo ideas for crafts.
Good afternoon - we continue the theme of autumn crafts for interior decoration . And today we will talk about compositions and pumpkin ... about elegant flower and fruit compositions with wicker baskets ... about how you can make beautiful autumn mounds in transparent vases ... and I will give a large selection of compositions with candles and candlesticks decorated in autumn style. In short, there will be many interesting interior ideas for creating an autumn atmosphere in the house, for decorating a wedding in the fall.
Autumn compositions - crafts with PUMPKINS.
Pumpkin is, one might say, a SYMBOL OF AUTUMN . And pumpkin crafts for interior decoration can be very different. You can paste over a white pumpkin with yellow autumn leaves (if they don’t stick well to PVA glue... you can put them on acrylic varnish )... Or you can stick the leaves on - and just apply paint on them - and apply it to the side of the pumpkin AS A STAMP... and it will remain on the pumpkin skin sheet imprint.
Or you can make a PUMPKIN CARVING. To do this, you need to... attach an autumn leaf to the pumpkin - trace the outline with a pencil... then cut out the outline with a knife - and peel off the skin inside the outline - you will get a beautiful CARVED PATTERN on the pumpkin (as in the left photo below).
You can put several pumpkins on the table and braid them with branches of a berry bush...
Or you can make beautiful LAMPS from pumpkins. To do this... you need to cut off the lower part (bottom) of the pumpkin... cut through this cut and remove all the pumpkin pulp - so that only the walls remain. Then we need to cut out round holes - for this to work out well - it is best to use metal tubes with thin sharp walls and a hammer. We apply the cut of such a metal pipe to the side of the pumpkin from the INSIDE - (that is, we put the tube inside the pumpkin... and the pumpkin should lie on the side that we are going to pierce). And so we apply an iron tube to the side - and hit it with a hammer (or press hard) - and the sharp edges of the tube perforate the pumpkin side (just like a cookie cutter perforates the rolled out dough).
You can choose the patterns at your discretion... if you take tubes of different diameters, you will get holes of different sizes.
If you have miniature decorative pumpkins growing in your garden beds, then you can use them to make a beautiful wreath arrangement with asters cones and bright ribbons (as in the photo below).
If the pumpkin does not have a convenient tail to tie a ribbon on, then you can drive a construction dowel with a metal eye into the pumpkin... or simply a long nail bent into a loop
To get such a bent nail, you first need to hammer it 1 centimeter into the board - and then hit it with a hammer at a crooked angle - so that the nail bends - and then remove it from the board and hammer it at an angle into the pumpkin - and you get a metal grip for tying a ribbon .
YOU CAN STILL make a wreath like this from small pumpkins and pumpkins (photo below).
For such a wreath you need a metal rim (quite strong) - you can screw dry branches in a circle - wrapping them with wire.
And then use the same wire to attach the pumpkins. To do this, each fruit must be holed - from one side with a through hole (like a button) - so that there is an entry hole for the wire and 3-7 cm from it an exit hole for the wire.
To get such an “underground passage” you just need to make a hole in the pumpkin with a bent nail ... the nail bent in the form of an arch will go into the pumpkin and come out immediately next to the entrance hole. And we will get an EYE like a button. We will thread a wire into this eye, and the pumpkin will be strung on it like a mushroom - and it can be tied to the wreath base.
And if you have small children and need an autumn craft for kindergarten or school, then I invite you to my article “ 85 photos of children's PUMPKIN crafts - for kindergarten and school. "
Autumn compositions - IN BASKETS.
Ordinary wicker baskets can also participate in the creation of autumn interior crafts.
Basket filled with autumn gifts
The next way to make an autumn basket is to take a ready-made wicker basket as a basis and beautifully fill it with various autumn gifts of nature. What is needed for this:
Related article: Blue wallpaper in the bedroom
- We take an ordinary basket (with which we go mushroom hunting) and put a floral sponge inside (you can buy it at any flower shop);
- We place all the autumn flowers and everything that requires care and watering there.
If we want a fake - to make a durable basket, then it is better to use dry materials: acorns, cones, fallen leaves, twigs, tree bark.
Advice : if the original appearance of the basket leaves much to be desired, then it can also be revived using natural materials. Take acorns or small cones and cover the front side of the basket with them.
So, let's decorate the basket:
- if the basket is too deep, put the fabric on its bottom;
- we lay leaves of different colors (oak leaves will look especially harmonious) and scatter acorns on them;
- You can place a small pumpkin in the middle, with apples and bunches of rowan berries nearby.
All these components have bright autumn colors and will delight and remind you of this wonderful time for a long time!
Garlands of dry leaves
The photo of crafts made from leaves shows that the garland is made by attaching the processed elements to a strong thread, fishing line or wire.
- This decoration is suitable for both the nursery and the living room.
- The main thing is to choose a wall decorated in a neutral color so that all this decor does not get lost in the interior.
- In the garland itself, to maintain harmony, it is recommended to combine yellow and red leaves.
- They can not be pierced, but attached to the thread with miniature clothespins.
Young woman
This work requires a ready-made template.
- You can take it from a children's coloring book or draw it yourself.
- The girl's hairstyle and dress are made from leaves.
- A couple more leaves are also added to simulate leaf fall.
- If you use whatman paper for the applique, then the finished craft can be inserted into a frame and hung in the nursery.
Bouquets
This is the simplest way to preserve fall colors. In order for the leaves to retain their flexibility and color, they must be treated with hot wax.
- You can also leave the material for a couple of days in a container with a glycerin solution.
- In addition to leaves, dried flowers, ornamental grains, and herbs can be added to the bouquet.