Those who like to sit with a fishing rod have often come up with the question of how to make a fishing table with their own hands. You can, of course, buy it, but manufacturers rarely guess the wishes of customers and instead of the desired option, they are either too high, sometimes too small, sometimes unstable, sometimes of poor quality. This list of disadvantages can be continued for a long time, but this DIY fishing table will definitely be to your liking.
Preparation of materials for work
You can make a feeder attachment table yourself at home. This option will not be disassembled, but in general it will also not take up much space. A folding table requires a more careful approach, but its demand will not be too frequent. And even when assembled, it does not take up much space in any vehicle. If you still want to have folding legs, then you should use special corner fasteners that will control bending and firmly secure them in the required position. A DIY fishing table requires the following tools for its manufacture:
- The tray is the size you choose, the material of the tray does not matter.
- PVC pipe for electrical cable.
- Corners for securing the legs of a fishing table.
- Plugs.
- Stainless steel screws.
All installation work can be carried out at home. We begin to make a table with our own hands for fishing from the main frame, which will consist of pipes and to which the tray will be attached. The corners serve as frame holders; they help make the structure more durable and strengthen the legs. The legs are subsequently attached to this frame, and all the attachments in the form of plugs are put on last.
You can decorate the table with special hooks on which you can hang bait when the opportunity arises. You can also put a cover with a pocket on it, creating additional space for small fishing items. When fishing, the convenient location of the devices is of great importance, because the correct reaction plays an important role in this matter.
If you know how to make a fishing table with your own hands, you can save yourself from spending extra money.
For men, this will be good practice and training for their construction capabilities. Moreover, you will not be able to find such an option that you have built for yourself in any store!
Requirements for a homemade tent for winter fishing
To stay on a pond in winter, you need a tent that can protect you from bad weather. There should be enough space for resting, cooking and eating, and sleeping. The range of specialized stores includes a wide variety of models of winter tents. But they all have a fairly high cost, and therefore many fishermen make tents with their own hands.
If you can’t buy a tent, you can make such a structure yourself
In order for a homemade product to turn out no worse than a finished product, it must meet the following requirements:
- Light weight and compact. For city dwellers, it is desirable that the structure be foldable - this makes it easier to store.
- An important characteristic is mobility, since the tent often has to be moved from place to place.
- The fabric should be dense, but at the same time breathable.
- The fisherman should not have any problems setting up and dismantling the tent.
- The frame and fastening elements must be strong, strong and reliable.
- The tent should be warm and cozy.
A homemade tent should be light and compact.
If all the requirements are met, a homemade winter tent will be no worse than a purchased one, and in some cases, even better.
Only with self-production can you be completely confident in the absence of defects and the quality of the work in general.
Reasons to make a folding table with your own hands
Today, a potential buyer can easily find a huge number of folding tables of various types and designs on sale. However, making a round folding table with your own hands will not pose any difficulties. Moreover, this is almost always more economically profitable and rational:
- The dimensions of the table can be precisely selected based on your needs.
- The choice in the type of table designs is also unlimited. Choose what best suits your needs.
- The design of the table varies freely depending on the interior of the room and personal preferences.
Materials and tools
To start making folding tables from wood or metal, you don’t have to complete a carpentry course. To get started, buy all the necessary materials and be patient.
If you have ever done minor repairs around the house, then most likely you already have all the necessary tools. To assemble a wooden table, use only high-quality timber and boards. The miser pays twice, as they say.
Before starting work, prepare the basic fasteners, varnish and primer for wood. Here is a list of materials that will be needed:
- timber for legs;
- boards for making a table frame;
- plywood sheets for shelves and tabletops;
- hinges;
- stainless steel screws;
- metal dowels.
Before starting assembly, it is recommended to find drawings and diagrams of folding tables. With their help, it will be easier and faster for you to assemble the structure. And also don’t forget to prepare the legs and frame.
Options for attachment models
You can also make a feeder table yourself. Of course, this design cannot be disassembled, but it does not take up much space. Creating a folding table will require a more careful approach. To have somewhere to put small fishing items, you can create additional space and put a cover over it. In order not to spend a lot of effort on making the structure, it is recommended to use plastic shelves, which are sold in sections. This is a great option for creating a feeder platform . You will have a finished surface with legs that can be extended if necessary.
Table assembly
For high-quality and quick assembly of the structure, it is advisable to have a drill and a circular saw in your arsenal. The assembly process at first glance seems complicated, but only at first glance.
The workpieces are connected according to the following algorithm:
- First of all, start assembling the frame for the tabletop. After aligning the grooves, the joints must be secured with countersunk hexagon screws.
- Pre-prepared legs with cross-shaped cuts are mounted on the frame.
- The next step is to cut out the shelf. To ensure that it stands securely and without distortion, we install it on each leg at a distance of 22 cm from the bottom along a metal dowel.
- To assemble the retractable supports, boards are inserted into the grooves on the timber and securely fixed with countersunk hexagon screws.
- Before painting, all parts of the table must be sanded with fine sandpaper and coated with wood primer. First, the slats, tabletop and footrests are painted.
- Now we begin assembling the internal lintel for the shelf. We connect the side beams to the main beam. Holes are drilled at one level to secure the support rails.
- The next step is to fasten the base of the lintel to the frame, and don’t forget to install additional slats.
- We attach legs to the jumper, which will extend in the future.
- We connect the tabletop to the frame.
Now you can exhale, the table is assembled and almost ready for use in any conditions. You can download a photo of a folding table from the Internet and compare your result with the picture.
It is important to remember that it is best to treat wood before the assembly begins, and not after it is completed. If you have any difficulties, you can watch visual assembly video tutorials on the Internet.
It is worth saying that a folding metal table is made and assembled in a similar way. The main thing is to take into account the peculiarities of using various materials and tools for their processing.
Do not forget that wood really does not like moisture and dampness. Before you take your new product out into the wild, you should take care of its protection. First of all, treat the table with an antiseptic. It is recommended to shed the ends of all workpieces with olive oil. The olive must be heated in a water bath until it is as liquid as possible.
You need to be careful with varnish. Thoughtlessly “bathing” bars in a container of varnish will have virtually no effect. The varnish needs to be rubbed into the wood and it is better to do this 2-3 times. Finally, you can take care of making an improvised waterproof cover to protect and conveniently carry the folding table.
If everything is done efficiently and in compliance with technology, then such a table will delight its owner for many years. And with the money you save you can buy comfortable camp chairs. It’s better to make them yourself, because it’s also not difficult.
An alternative to a tent - polyethylene
It will seem surprising to many, but the tent can be replaced with the most ordinary piece of polyethylene. You only need a three-meter piece of medium-density material. Such a shelter has many advantages - it weighs little, takes up minimal space, is cheap and can be used for a variety of purposes. However, it should immediately be noted that this solution is not suitable for fishing directly, but it will be a completely acceptable option for an overnight stay or recreation.
The polyethylene tent design provides for the absence of a frame
To use polyethylene instead of a tent, you need to find two trees. Tie them with a rope, having previously put a plastic sleeve on it. The main thing is to adjust the height correctly by putting some things inside the sleeve for weight. The lounger should reach the ground, but not overtighten the walls of the shelter. After making sure that the walls do not sag, you can tighten the rope tighter. From the side of the head, pull the polyethylene into a bun, while the lower edge should rise. The resulting side will provide shelter from wind and snow. And so that the material does not slide to the center, it needs to be pulled to the trees by the corners.
Before setting up the tent, you need to find a place between two supports and fix the polyethylene to the rope
The entrance to the shelter can be made with skis, and a backpack can be placed at your feet. You can additionally insulate the shelter using a fire lit at a distance of about 1.5 meters.
In order for heat to be reflected and retained to the maximum inside the polyethylene, you should hang, for example, a raincoat on the side opposite the fire, and cover the outside of the fire with stones.
Making a fishing table with your own hands
A table for summer fishing is a very important thing. Without it, it’s basically a mess on the shore, you’re always looking for little things in the grass and preparing gear on your knee.
Therefore, I was actively interested in tables in stores and on the Internet, but came to the conclusion that the designer who would design a table to suit me had not yet been born. Sometimes small, sometimes tall, sometimes uncomfortable, sometimes unreliable. And those tables with legs cost a lot of money.
So I decided to make a table myself, to suit my requirements and with my own hands. I thought for a long time about coming up with something like this, so that it would be easy to manufacture, would not require the use of special tools, would be easy to use and transport, and would be inexpensive.
Until, by some miracle, I wandered into a Russian forum, where someone like me had already come up with everything and I just needed to borrow his idea and slightly change the design to fit the available materials. (Kowtow to the fraternal Russian people for the development)
It turned out that making a good fishing table is very simple and trivial. All you need is an aluminum profile, sheet plastic (I used 5 mm PVC), a couple of hardware, a simple tool and the correct direction for the growth of your hands.
And this is what I got as a result of “painstaking work”:
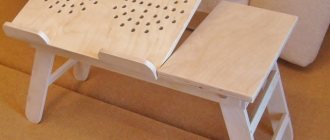
Table for fishing in transport form
Dimensions: width 60 cm, length 40 cm, thickness 4 cm. Total weight 4 kg. Easily fits into a bag with a chair and does not require additional space during transportation.
In working position
For use, there are two tabletops with an internal size of 54cm x 38cm. + Shelf for mobile, walkie-talkie, etc. There’s plenty of room to spread out and you don’t have to hold anything in your teeth or look for it in the grass. The height adjustment of each leg allows you to cope with uneven shores. The profile sides prevent objects from falling off the table. Thanks to the ability to lower the center of gravity, the homemade table is not prone to tipping over.
How to set up a homemade tent on ice
Making a winter tent is still half the battle. It is also important to install it correctly on the ice to protect yourself while fishing. To securely fasten the house you need to follow several rules:
- Determine where the wind is blowing from and place the tent so that the door and ventilation elements are located on the opposite side. Otherwise, cold wind and frost will quickly get inside and the room will be very cold. Moreover, this will prevent the structure from falling and the awning from inflating.
- For fastening on ice you need to use reliable fasteners. Factory or homemade elements, for example, special pegs or screws, are suitable for these purposes. If you don’t have anything like that with you, you can sprinkle the edges of the tent with snow or freeze them to ice. But this method is less reliable and can only be used in extreme cases.
- The hole can be made on the leeward side, after which the roof and ice ax can be fixed. This method has a disadvantage - the ice ax can freeze tightly if the hole is too deep.
Homemade fasteners for fastening a tent on ice can be made from thick wire or self-tapping screws
Having reliably strengthened the structure before starting fishing, the fisherman will not have to waste time and effort later on saving his own shelter. He will be able to calmly enjoy his favorite pastime, feeling completely safe.
DIY fishing table with feeder
Do you still put bait and tackle on the ground? It's time to get a special table. The prices for it in fishing stores are rather high (USD 30-100), but you can pick up a small suitable table for a picnic and convert it to your needs.
But you can also make a table with your own hands that will make life easier when fishing and can be useful for outdoor recreation. Bait, bait, flavors, dips and necessary feeder accessories - all this can fit on the table and be always at hand. And this is time saved that can be put to good use.
Homemade fishing tables can be divided into several types:
- According to the materials used in the frame and legs. They come in metal (usually aluminum) and PVC materials (usually water pipes or electrical wiring).
- According to the material of the tabletop. The simplest tabletop is a plastic tray of the required size. Instead, you can use laminated plywood, window sills, galvanized and aluminum sheets.
- By design. More often they make simple models that cannot be disassembled. Although such tables are small in size, they require space during transportation. More complex designs have removable legs that are adjustable in length.
We make a feeder table from a metal structure
Aluminum is often used for a homemade feeder attachment table. Its main advantage is its strength and low weight. They use an aluminum corner for the frame, pipes for the legs, and sometimes sheets for the table top.
The first option for fishing from Vladimir Kruglov. For it you will need:
- Aluminum corner.
- Pipes made of the same material.
- A suitable piece of window sill - used as a table top.
The corner serves as a frame; its edge prevents feeder accessories and baits from falling during fishing. The legs are made of two pipes of different diameters, which allows you to adjust the height while fishing. Window flashing (painted sheet metal) provides a durable and pleasing surface.
The next option for a fishing table for metal baits
In this option, the frame and fastenings for the legs are welded, which makes the structure even stronger. To reduce weight, the author suggests using three legs. You can cut a circle in the tabletop for a container with maggots, another attachment or bait for the feeder.
In the next video, the author offers a model of a fishing table made from sheet aluminum. The corner for fastening the structure is not used. The plate is bent at the edges, forming sides. For this option you will need:
- Aluminum sheet.
- A strip of metal for the frame.
- Metal pipe for legs or attachment to a fishing chair.
Here a sheet of aluminum is used for the table.
And another option with telescopic legs. Although this attachment table is more suitable for ice fishing, it is not difficult to convert it to attach to a chair, or add legs to place it on the ground separately.
Do-it-yourself attachment table made of PVC materials
In the first version, the entire frame is assembled with your own hands from a PVC tube, and the surface is from a tray. The main disadvantage of such a device: it cannot be disassembled.
For this design we will need:
- Tray of suitable size. Serves as a tabletop and work surface. It should accommodate the feeder's necessary things for fishing.
- Rigid PVC pipe for laying cables (electrical wiring).
- Corners - for attaching table legs.
- Plugs.
- Stainless steel self-tapping screws.
A frame for the tray is made from the pipe. The frame is fastened with self-tapping screws, and a corner is attached to its ends. Legs of the required length are soldered or glued to the corner.
The easiest way to make a feeder attachment table is to use a bookcase. Some plastic bookcases are sold by section. You just have to choose a model that fits the size. We get a finished surface with small legs, which can be extended with the same PVC pipes.
How to turn a camping tent into a fishing tent
Fishing tents are designed to protect fisherman from snow, frost and wind. But their difference from ordinary tourist ones is the absence of a bottom or the presence of holes for holes. Given this small difference, it is not difficult to figure out how to turn a tourist tent into a fishing tent. It is enough to make holes at the bottom of the shelter, which will be used for holes.
You can make a hole using a flange - a round device consisting of two parts connected by a screw connection. The flange is suitable for single-layer and multi-layer underfloor heating and can be installed independently.
Holes for holes are formed with special flanges
To mount the flanges, you need to cut holes of the appropriate shape in the bottom of the tent and secure the devices in them. The high degree of compression of the material ensures complete tightness of the cut. This is important because the bottom of the flange may be covered with water.