A sideboard is a cabinet with shelves and a closed lower compartment, which is designed to store dishes, groceries and all kinds of household items. The upper part is open and glazed. In factories, chipboard is used for production, but it is best to make a buffet with your own hands from natural wood.
First of all, you need to choose what type of wood to make it from. Then borrow or draw a drawing yourself. And after that, start manufacturing. For convenience, in the article we will consider the straight and angular configuration of the buffet. The methods are radically different and each has detailed instructions.
DIY kitchen buffet
A buffet is not just furniture, it's style. Maybe, after looking at the photo, you decided that this was a poorly restored old sideboard? Not at all, everything is as planned. All this ostentatious “shabbyness” is a carefully designed design. Of course, it's a matter of taste. Some people prefer boring modern kitchens, while others like the original retro style kitchen interior. If you want to make a similar buffet for the kitchen with your own hands , then here you will find detailed plans, drawings with dimensions of parts and step-by-step photos.
True, from the photos presented by the author it is difficult to grasp the assembly sequence, especially if you do not yet have much experience in making furniture. Therefore, to get more information, you can use the link located under the gallery. The site has detailed instructions with a description of each stage, as well as lists of materials and tools that you will need for the job.
Author: Jamison Rantz Photo Source: rogueengineer.com/diy-farmhouse-buffet-plans/
Partial restoration
If the thought of completely removing the varnish and applying a new coating is not to your liking, then do a partial restoration. This applies to varnish that is damaged in certain places.
Related article: Second life of an old chest - restoration and design techniques
Step-by-step description of actions:
- if the defective area does not contain prominent bubbles or cracks, then wipe it with gasoline - this will remove grease;
- rub the dry, grease-free area with an iron wool, removing the layer of varnish;
- Use a dry cloth to remove any remaining varnish dust and apply fresh varnish. You need to use the same type of varnish that was used for the previous coating;
If the measures described above do not save your sideboard, then later in the article you will find how to completely update the coating.
The benefits of making it yourself
If a home craftsman is comfortable with carpentry tools, it will not be difficult for him to please the housewife and make a buffet with his own hands, which is necessary in any kitchen.
For maximum convenience and comfort, you should equip it with not only beautiful, but also functional furniture, such as a buffet.
An excellent solution for any home is to install a corner kitchen cabinet.
A self-made kitchen cabinet has a number of advantages over its “store-bought brothers”:
- you can choose a unique design for it;
- choose the material to your liking;
- use original fittings;
- choose the color scheme of the buffet that best matches the kitchen interior.
To make the interior original, you can make it yourself, putting your soul into the work, using any materials.
The most important nuance when installing such a cabinet is calculating the trajectory of the door opening.
In addition, wood products are extremely beneficial for health: they do not contain toxic compounds and do not emit harmful substances, but they fill the room with the aromas of essential oils.
Sideboards and buffets for the kitchen do not have much difference and are very similar in appearance to each other, because... The ancestor of both is considered to be the closet.
A kitchen buffet is an excellent solution for your kitchen interior.
A wooden sideboard is durable and comfortable. It will last for decades and is easy to restore and repair.
A sideboard made of natural wood will look rich and elegant, but at the same time it will cost a much larger amount.
Another important advantage of making a kitchen cabinet with your own hands is the ability to make it in an original configuration and size that best suits convenience and comfort.
To get a beautiful product without spending too much, you can make the furniture body from cheaper raw materials, such as chipboard, and the facades from more expensive and beautiful ones.
Tree selection
Breeds for making furniture are divided into three categories:
- soft: spruce, pine, alder, linden, aspen;
- hard: oak, ash, walnut, beech, larch, birch;
- super-hard: acacia, boxwood, yew.
Let's look at the advantages and disadvantages of some types of wood.
Pine
The structure of this wood is soft, so it is easy to cut, saw, surface planer, glue and paint. Pine can withstand high humidity conditions. Furniture made from it exudes a subtle pine smell and phytoncides, which destroy harmful microorganisms in the kitchen atmosphere.
Unfortunately, pine is susceptible to scratches and chips with slight mechanical impact on its surface. The service life of pine furniture can be a couple of decades. In hot conditions, wood releases resin, which can significantly deteriorate the appearance of the cabinet.
Pine boards and trunk cut
Oak
The most expensive and durable type of hardwood. The saw cut may be light or yellow-brown in color. An oak sideboard will decorate the most sophisticated interior. The surface of the furniture is varnished to highlight the beauty of the wood structure.
Oak is a durable, wear-resistant material that is not subject to rotting and can withstand sudden temperature changes. Oak furniture can last for centuries.
What types of kitchen buffets are there?
In the classical sense, a buffet is a rather massive closed cabinet located on the floor, and on top of it is a cabinet with glass doors.
However, here it is necessary to clarify that doors can be of two types:
- Completely transparent, displaying all kitchen utensils, which are neatly arranged on shelves, for everyone to see;
Transparent model
- With a small transparent window through which only part of the entire contents of the buffet is visible.
A very unusual model with small windows
There can also be an open countertop between the top and bottom. Frequently used items, vases with fruits or flowers, and all kinds of figurines are most often displayed on it.
Note the built-in countertop
Based on shape and size, the buffet can also be divided into several types. But the most optimal of them is a two- or three-door cabinet with a glass display case. Lots of convenient drawers, shelves, and an open display case – very functional.
Advice! The lower closed cabinet can easily accommodate large kitchen utensils (pans, jugs, pots, wide dishes) and even small household appliances (steamer, blender, bread maker). And in the upper showcase you can put decorative items, for example, an expensive tea set.
True, such a buffet requires quite a lot of space, so it is unlikely to be suitable for small kitchens. The approximate dimensions of this beauty are: width from 120 to 200 cm, height about 200 cm, and depth about 45 cm.
However, there are also buffets that are more modest in size; they are lower and not so deep. You can also fit a corner model of a sideboard into a compact and harmonious design. It has a semicircular shape and fits perfectly into a corner without interfering with free movement around the kitchen.
Compact buffet for a small kitchen
Polysemantic words (homonyms)
Maybe even cause a flood, even pour water into a glass, build a hundred-story building, and stop the train.
There is it at the suitcase And at any schoolgirl, There is at the door of the restaurant And at the blue cup.
Whoever skins him will roar in three streams, Without him the arrow will not be able to reach the target.
In the summer it turned green in the garden, fell to the ground in the fall, is in a book and in a notebook, even wrote music.
Without it, it is difficult to distinguish a car from a car, and, in addition, it can be soaked from an envelope.
Without it, we can’t sew a fur coat, The flames in the forge can’t be fanned, The squirrels in it jump across the oak tree, We take it like a flask on the road.
In the diary he is a chagrin, a shame, a disgrace of a student, and a goat on an adventure does not allow him to escape from the meadow.
When it sparkles from the sky, there is so much noise, roar, it’s just creepy! On the ground, he can only fasten his jacket quickly.
An experienced herdsman knows, both the girl and the river, what is made of metal, hair, and sand.
He is not afraid of the hippopotamus, but he is afraid of the fox. There is a hunt for him both on the tram and in the forest.
Men never have them, And women often have two, But sometimes even more - on their legs and head at once.
It is very dangerous to get sick with them, it is better to catch them in the river, in it it is green, but it will only turn red in boiling water.
They will make holes in all the leaves, gnaw off all the flowers, and over ruts and bumps, they will take the cannon into battle.
They are happy to store perfumes, And there is a place for pills, And in a glass of lemonade There are so many of them that you can’t count them.
It is in twenty half rubles, a small piece of land, it is on the pig’s face, in the cash register, in the bank, in the wallet.
He can give him some water to drink, He can unscrew a nut, And he can also open the lock, To let the owners into the house.
Every fisherman gossips about it With the fishermen around the fire, In dominoes this means that the game is over.
We wash our hands over it and wash the dishes with a sponge, and when we open it, we will find a pearl.
Both the mole and the fox want to live in it, the mouse keeps his supply, and for some reason she climbed into our chicken coop at night.
Silently, he lies in the gym for belay on the floor, If they said him out loud, The kids stand in the corner.
In them, the leaves sleep on a branch, To open again in the spring, And they clean and filter the blood in a person.
A set fee for services and travel. He rushes, yapping, somewhere and even eats cutlets.
With dust from under his feet he strives, With smoke from the chimney he goes, Glad to unite with him Who dances or sews.
Who will come to the poultry yard to profit from a cockerel and deceive the hunter, but will not cope with the mushroom picker?
He flies in sea water, electrocuting everyone. The roof lets down rain in summer and snow in winter.
She’s on the floor - oh, horror! - The ladies beg you to help them, and when you turn on the computer, you immediately don’t mind making friends with her.
Deciding on design and construction
Making your own kitchen cupboard opens up a wide field for the imagination of the home craftsman. He can make it, in accordance with his vision and ideas, in various styles:
- retro;
- high tech;
- art;
- minimalism and others.
Modern buffets for the kitchen can be made, guided by a step-by-step description of this process.
Cabinet designs can also be very diverse, including corner and round.
All homemade products radiate the coziness and warmth with which it was made.
How to make a buffet for the kitchen
Most of these products use hardwood plywood. The outer layer of plywood is a hardwood veneer such as oak or birch. This way you get the look of hardwood at the expense of plywood. Plus, it's very smooth, making it easy to work with! The sheets of plywood are large, so they may be difficult to transport in a passenger car; they certainly won’t fit in the trunk. kitchen buffet assembly is actually very simple. You make the box first and then add the trim and doors. It is convenient to use a Kreg Jig to make a box. You can add a small piece in the middle to act as a sagging support brace. Simply cut a small piece of plywood and attach with glue and screws. You can also use a Kreg Jig to make doors. Make pocket holes on the short scraps and attach to the longer ones. For the doors, you will have 4 long pieces without pocket holes as shown in the photo, as well as 4 small pieces, each with pocket holes on both ends. Attach these things using wood glue and 3cm screws to create rectangles. After this, attach the mesh to the doors. How to make a buffet with your own hands is shown in step-by-step photos .
Photo source: www.shanty-2-chic.com/2015/01/diy-sideboard-free-woodworking-plans.html
Facade and decor options
The exterior or front side of the buffet is called the front. Facades can be solid or block. Solid facades are considered more reliable; they are made from solid wood. This quality makes the façade easy to clean.
Frame facades benefit in price; they consist of a base and edging. The two components of a framed buffet are usually made of different materials, which allows you to play with one color or another in an interesting way.
What decor can be present on a kitchen buffet?
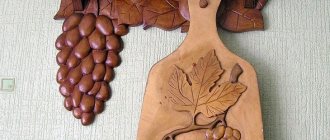
- Thread. This decoration element is ideal for a wooden surface.
- Engraving. It can also be applied to metal.
- Glazing. It is especially advantageous to use glazing on the top of the buffet. Moreover, it is not at all necessary to use transparent or translucent glass. Non-standard solutions are in fashion – colored mosaic designs.
- Veneering. This is the name given to the external treatment of MDF with a thin layer of solid wood. An excellent option that will allow you to save your budget and buy an inexpensive buffet.
Drawings, diagrams
Before starting the manufacture of any furniture, you must draw a drawing indicating the dimensions. The procedure is as follows:
- Determine the installation location and its dimensions.
- Draw a diagram by hand with the location of the main parts and elements inside the cabinet body;
- Create a drawing based on the drawing.
- Make a specification of all assembly elements, indicating dimensions and quantities.
- Select the type of wood from which you will make the china cabinet.
Required Tools
To make a kitchen buffet to your liking, you will need an individual set of tools, but among them there are those that you cannot do without, regardless of what material, design and configuration of the product the master chooses.
In the classic version, there are work surfaces. This part is always decorated with decorative elements.
Standard set:
- drill;
- wood drills;
- jigsaw;
- a circular saw;
- Sander;
- screwdriver
and other tools and devices that should be at hand.
The most common are closed cabinets.
What will you need for work?
To make a sideboard, it is best to use 2 cm thick laminated wood boards. If you are going to use another material (chipboard, MDF), make the appropriate corrections to the specification.
Wood selection
Solid wood is a natural and therefore environmentally friendly material. Its qualities depend on the type of wood chosen.
For example, pine has medium strength and is easy to process and glue. Larch has unique moisture resistance. Oak is very durable and almost does not rot, but it is poorly treated with varnish.
What tools and materials to prepare
Working drawing of the product.
- A circular saw.
- Jigsaw.
- Sander.
- Drill and screwdriver.
- Milling (vertical) machine.
- Varnish.
- Several wood drills.
- Sandpaper (abrasiveness 120-240 units).
- Scotch.
- Tape measure and soft pencil.
- Clamps.
- Plate made of laminated wood and fiberboard.
How to make a buffet with 3 sections
The buffet, with its relatively small size, holds many useful things - dishes, serving elements, tablecloths, napkins and much more, which makes it a convenient addition to any home.
Buying a new buffet is an expensive proposition. Of course, it’s cheaper to make a buffet with your own hands , but making a completely buffet from scratch is also not easy, and not everyone has such an opportunity. Here is an option to solve this problem.
You can buy three cheap nightstands that come with doors and drawers (not the fake drawers used for a sink) and set aside one day to just put them together. This buffet will serve you for many years. Buy pretty legs separately and add moldings for a decorative look.
How to do this, look at the step-by-step photos.
Author: Jennifer Stimpson Photo source: www.thisoldhouse.com/how-to/how-to-build-sideboard-stock-cabinets
Where and how to buy a sideboard inexpensively
Inexpensive sideboards and display cases for the living room, kitchen cupboards and pencil cases for the dining room are available in stores and online catalogs with delivery throughout Moscow, St. Petersburg and the regions.
Living room design with a wooden buffet in the interior
Solid wood buffet in the living room interior
Modern living room interior with buffet
Sideboard in the living room interior
Design of a living room with a sideboard When purchasing, it is worth clarifying what is included in the price of the sideboard, is delivery within the region and lifting without an elevator provided? The price for cabinet furniture includes assembly and delivery.
Pay attention to stock offers, discounts, promotions and seasonal sales. In showrooms, before the arrival of the new collection, the sideboard will be half the price
Buying an exhibition copy with pick-up after the exhibition is also profitable.
DIY corner buffet
This corner buffet will turn an empty corner into a convenient place to store dishes and other accessories, both in the kitchen and in any other room.
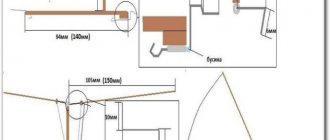
The design is quite simple, and if the dimensions do not suit you, there is nothing difficult in changing the drawing and making the corner cabinet a little wider. Just use 1x12 boards instead of 1×8 boards for the back. According to the plans, the shelves are made from 1x12s boards, so they will be approximately 28cm long.
So first measure your angle. Do you have 55 cm of free space? Then you can start.
Buffet dimensions:
- 72" (183 cm). Width and depth may vary depending on design.
Parts Dimensions:
- 1 PC. 1 × 8 72" (183 cm) long back
- 6 – 1 × 12 30 1/2″ (78 cm) long, both ends cut at 45 degree angle
- 2 – 1×3 72" (183 cm) long front side trim
- 2 – Side panel 16 1/4" x 72" (41 x 183 cm) size for precise fit
2 – 1×4 length 26 1/2” (68 cm) top and bottom adjustment, size for precise fit- 1 – 1 × 2 26 1/2″ (68 cm) long table top
The doors are the hardest part because most of us don't have a router or circular saw. If you have the necessary tools, you can make a door insert as shown in the diagram. Doors should be no more than 20mm thick, so the panel will need to be inserted into the door frame. There are other options, you can make an overhead door. See the diagrams in the photo gallery for the assembly steps.
Photo source: www.ana-white.com/2010/12/plans/corner-cupboard
What is a display buffet?
A sideboard, a sideboard and a display case are three pieces of furniture identical in purpose, but different in design. Let's look at this issue in more detail.
If you add sliding or hinged doors to an ordinary modern chest of drawers, you get a sideboard.
A buffet differs from a sideboard by the obligatory presence of an open niche with a tabletop between the upper and lower parts, in which snacks, sweets, and various drinks are placed. This niche serves as an auxiliary surface for setting the dining table for meals.
A showcase is a cabinet with glass doors, usually used to store beautiful and expensive sets, porcelain and crystal. Can be of absolutely any shape.
Current furniture fashion combines all three of these items into a single whole, allowing you to create spacious and beautiful sets. A modern display cabinet for a living room is an independent piece of furniture. Often dishes are stored in it, so when choosing a place for a display case, you need to take into account the proximity of the dining table so that it can be conveniently set for a family or formal meal.
Indeed, in the past it was customary to place a display buffet mainly in the kitchen. Nowadays you can often see this piece of furniture in the living room. Moreover, now it is used to store not only tableware, but also other things. The cabinet can consist of two parts: the upper one traditionally has glass doors, and the lower one has regular doors. The display buffet must be in harmony with the rest of the interior and match it in style.
Recommended articles on this topic:
- Wooden floor mirror (photo): a luxurious and elegant piece of furniture
- How to choose hallway furniture that will make it attractive
- Furniture consoles in Provence style: how to choose and where to put them
Manufacturing process: step-by-step instructions
Before you take up the tools, you need to clearly imagine what kind of buffet you will make, and reflect your thoughts and ideas on the drawing, indicating all the details of the product.
A sideboard is part of the kitchen furniture.
First, the largest elements of the product that form its basis are prepared according to the available drawings, taking into account the necessary parameters. In order not to disturb the assembly order and not to lose the necessary parts, experienced home craftsmen advise numbering all parts.
It has the shape of an ordinary cabinet with a closed and an open part.
After completing the preparatory work, the cabinet is assembled in the following order.
- Preparing the side parts of the furniture, drilling holes in them. It is worth paying attention to the advice of experienced craftsmen who recommend using a depth limiter to control the distance between the recesses. Its use allows you to protect furniture parts from through drilling.
- Connection of buffet partitions
- Connection of the upper part of the product and the outer side parts. The top of the product is located on the end fasteners, and the side parts and bottom are pushed all the way.
- Installation of internal parts. First, the buffet body is mounted on the rear ends. Screws are used to secure the lower part, and mounting angles are used to connect it to the upper part.
- Assembly of base parts and their fastening. To mark the plinth, a drawing of kitchen furniture is used, according to which the panels are fixed on bars located at the corners of the structure.
- Decoration of the façade. The plate is placed in its place, and protrusions of the required size are left on the sides. They are needed for hanging doors and fixing the back panel.
- Securing the back wall. The sideboard body is laid out on its side to secure the canvas in the required position.
- Installation of doors and hinges. The left and right doors, the bottom and the top are marked with marks, after which the hinges are installed according to the marked marks. The cabinet doors are mounted in place, securely fastened on the hinges.
- Installing furniture in its permanent place, installing shelves and drawers, checking the quality of installation and ease of use of the product.
The designs of such cabinets vary.
However, in other designs you can also find kitchen furniture with engravings, plinths and cornices on the facades.
We create it ourselves
If you don’t have a suitable old piece of furniture, but you are eager to create, don’t despair, there are many techniques for creating a buffet with your own hands.
Made from wood and other materials
Since hand-made is now in fashion, on the Internet you can find many master classes on creating sideboards, chests of drawers, tables and other furniture with your own hands.
- So, for example, you can create a buffet from clapboard. This material is usually not used in the manufacture of factory furniture, but it is easy to process, and therefore is excellent for a homemade sideboard. In addition, the lining resists moisture and temperature changes well. In this version of the sideboard, bars for window frames are used as a frame. The drawer is made of plywood, and the front panels are covered with veneer.
- You can make a buffet with your own hands from wood. Of course, this will require more solid skills and close familiarity with carpentry tools. The lower part of a wooden sideboard is usually held together with pegs and glue. The back part and drawers are held on with screws, and other planks and horizontal surfaces are attached with glue and nails.
- Quite often, sideboards are made from chipboard and MDF.
The technology for making a buffet can be divided into several stages:
- Project development. Before starting work, you need to create a drawing of the future sideboard. This piece of furniture usually includes the following components:
- The body, that is, the lower part of the sideboard, represented by the tabletop, sides and back;
- Top box;
- Shelves;
- Box;
- Doors;
- Fastenings and handles.
- Manufacturing of parts. If you do not have sufficient skills, the components of the buffet designed by you can be ordered from the workshop. Having decided to create a sideboard yourself, in addition to the material, you will need a number of tools, in particular, a jigsaw and a circular saw. Having made the frame, you can supplement it with purchased doors. This solution is appropriate when the material for the buffet is chipboard or MDF;
- Assembling finished parts together. Here you will need a screwdriver (or drill) and fasteners. The assembly is performed in the following sequence:
- Creating a frame;
- Attaching backdrops to the frame;
- Hanging the upper part of the sideboard and installing supports, which can be decorative balusters;
- Installation of shelves;
- Door fastening.
- Finishing. After the buffet is assembled, we begin decorating. Glass and mirrors are inserted, cornices and trims are added, crystal and dishes are displayed.
DIY Asian style sideboard
In Provence style and more
Of course, only a professional carpenter can create a full-fledged classic buffet with his own hands. In addition, such a product will require expensive wood, glass and various metal decorations.
It is much easier to create a sideboard or buffet with your own hands in one of the rustic styles, for example, Provence or country. The materials used in such interior items are cheaper, and the finishing on them is much simpler.
- A rustic buffet should be practical, which means it should have drawers, closed and open shelves. The tone chosen for it is light (white in Provence and natural wood colors in country).
- Aiming at country, the wood is not painted, but carefully sanded and varnished.
- Sideboards in the Provence style are created by artificially aging the wood using white paint, and then complemented with patterns, among which small flowers predominate. The easiest way to recreate the French provincial style is to use the decoupage technique.
- Minimalist styles (high-tech, Scandinavian) are unlikely to need a buffet. Here, greater preference is given to wardrobes, niches and shelves.
- A sideboard in the Rococo style, like other furniture, should be turned and carved. However, even if your buffet is devoid of openwork, you can add some decorative elements to it yourself to get closer to the desired style.
So, curlicue painting, asymmetrical overlays made of bronze and copper, and plastic inserts imitating gilded metal will come to the rescue. You can purchase fancy door handles. If it is possible to make a replacement, match the curved legs to the buffet.
A buffet in an English interior is trendy. Here he acts as the custodian of not only porcelain dishes, but also the owner’s library. Such a sideboard should be made in darker and richer colors.
Photos of old sideboards and cupboards after restoration with your own hands
Buffet finishing
Probably, many will agree that the new furniture looks impeccable, but, alas, the price is not at all pleasing. If you suddenly inherited your grandmother's sideboard, consider yourself lucky! After all, as you know, furniture used to be made for work, with the expectation of long-term use. And you can bring it into the proper, and most importantly, desired, form yourself, without spending a lot of money on it.
Five ideas for decorating old furniture
We offer you several interesting options for remodeling kitchen furniture.
Even at home, a kitchen buffet with your own hands can be transformed from seemingly shabby furniture into a real interior decoration!
- Painting and replacement of kitchen facades. An old wooden or painted surface must be thoroughly cleaned of grease stains and dust, washed with warm water and detergent and dried. Next, a light sanding with fine-grit sandpaper will be required. If there are cracks in the furniture, we fill them with a special wood putty. The already dried surface must be re-treated with sandpaper (only with medium-grain sandpaper). This is followed by a primer with universal paint and light sanding.
Snow-white cabinets with replaced doors and fittings
Then you need to apply the selected paint in two layers. The cabinets in the photo above are painted white, and some of the doors have been replaced with new glass ones. New metal fittings were also selected. Beautiful dishes complement the overall composition.
Attention! Instead of replacing the doors, you can add a beautiful design to the old doors.
With application of ornament
- Decoupage technique. Here you will only need special napkins or a pre-printed design, scissors, brushes, glue and acrylic. With a little imagination and effort, you will get a truly original and spectacular thing!
Stunning buffet decoupage! And all this with your own hands
- In this version, the cabinets are painted in a delicate light green color, and a colored stencil is applied to the doors. You can experiment with any shades!
With stencil application
- Bright furniture! All with just paint, new fittings and charming curtains. You might like this option.
A kitchen that plays with bright colors is amazing!
- Black and white contrasting furniture. Quite an interesting solution for modern kitchen interiors in high-tech, art deco, minimalism or modern style. And all unnecessary decorations from cabinets in the form of carvings and balustrades can always be removed.
Black and white version
Decoupage of an old sideboard - the atmosphere of Provence
To perform decoupage you will need to supplement the list of materials and tools.
Materials for decoupage:
- new “antique” handles and door hinges;
- napkins for decoupage;
- PVA glue;
- White paint;
- furniture varnish;
- sandpaper;
- stain;
- wood putty;
- metal brush.
You can buy napkins for the decoupage technique at a craft store. Choose those that you like, but in a floral theme of blue, lavender or burgundy. If you have chosen furniture handles with ceramic inserts, then this pattern should be in harmony with the image on the decoupage napkins. We dealt with the old coating in the previous sections. In addition, you need to replace all the old hinges for the doors, repair skewed drawers, and also make other repairs, if necessary.
Let's get started with a step-by-step description of how to decoupage a sideboard with your own hands:
quickly wipe the entire surface of the sideboard with a damp cloth so that no moisture is absorbed;
cover all cracks with wood putty;
go over the entire surface with sandpaper, removing all defects;
cover the wood with stain and let it dry;
now is the time for a unique aging technique - apply wax to all corners, drawing on them with a wax candle;
coat the sideboard twice with white paint, however, all pale pastel shades are well suited for Provence, especially mint and lavender;
After the paint has completely dried, remove the wax by carefully manipulating it with a metal brush. This is a simple and effective technique for simulating antiquity;
We coat the napkins with PVA glue and glue them to the lower or upper doors, carefully smoothing them out to remove air bubbles;
To make the glue work faster, direct a stream of hot air from a hair dryer at it;
Cover the decoupage areas with clear varnish. Do the same with the aging areas.
The new Provence style sideboard is ready, the only thing I would like to add is that if there were glasses in the sideboard, they can either be painted over or replaced. And, of course, don’t forget to place a bouquet of lavender in a white ceramic vase on it.
Completion
1. Apply finishing coat to all surfaces that have not been previously finished.
2. Install doors with hinges and latches. Congratulations, you have completed the project!
Buffet for the kitchen in Provence style
Provence is unity with nature, soft waves of the sea, gentle sun, endless fields of lavender with a charming aroma, clean air. Provence is a style that combines elegance, comfort and simplicity, which has several features:
- soft shades;
- use of natural materials;
- direction for “antiques”;
- emphasis on detail.
Elegance and lightness fit into a style with a wide range of convenience. Provencal interior design is based on comfort and simplicity, and the unobtrusiveness of the lines allows you to enjoy the furniture for a long time without any desire to change the situation. This used sideboard for dishes meets all the criteria of the Provence style, the main material is a solid board made of natural wood. Maple, linden and moisture-resistant plywood 18 mm thick were used for production. The design of the sideboard is made in an antique style, although the frame turned out to be massive and complex, but in full compliance with the style. You can read the manufacturing instructions on the website, and below see the master class on assembling a buffet in the Provence style with detailed step-by-step photos.
Author: Vadim Portnov Photo source: www.dd-space.com/2014/01/provance-bufet.html#more