It is not easy for farmers involved in agriculture, especially during harvesting. All batches of grain brought from the combine must be cleaned - this is a rule known to every agricultural worker. A freshly harvested grain heap contains not only the seeds of the main crop, but also a certain amount of weed and grain impurities that deteriorate the quality of the harvested crop. Not all farmers have ZAVs. But the unit, invented and designed by Tagir Khalilovic, allows us to calmly solve this problem on the scale of one farm. The unit itself (grain cleaner) is designed very simply: an electric motor of 0.75 kW; two horizontal rows of swinging sieves (each crop has its own); two brushes driven by inertia, which in turn sweep away broken, damaged, and pest-eaten grain impurities from the sieve. Also, the mission of these brushes includes removing sand, lumps of earth, pebbles and particles of stems and awns. All of this equipment listed, plus a hopper with a capacity of 1.5 quintals, is located on a three-wheeled frame. “I won’t talk about the operating principle of the unit, you have to see it,” says the designer. – I’ll just say that the grain cleaner is quickly disassembled and just as quickly assembled, it’s lightweight and easy to transport. One driver-operator can serve,” explains Tagir Khalilovic. At his request, we will not enlighten the reader about how the grain will be fed into the purifier’s hopper, into what fractions it is then separated, what volume of output the unit produces in a certain time - let it remain a secret. Soon, Tagir Khalilovic plans to obtain a patent for his invention, after which he will be able to write and talk about everything. In the meantime, we wish our local Kulibin successful calculations and good tests of his brainchild. We hope that in the near future we will hear about the results and the usefulness of this unit.
Garay KHALITOV.
Photo by Fanis AKCHURIN.
04.04.2018
Types of home grain crushers, classification of units
Almost all feed produced for livestock is not in a very convenient form and is often difficult to digest by animals living in the barnyard.
Read also: How to sleep at night if it’s very hot
To improve digestion, it is advisable to pre-process the feed. That is, pass it through a crusher (grinder) and the sieve that is installed in it.
This approach allows you to add various food additives, vitamins and other components included in the livestock diet to the crushed feed. When introducing additives, the resulting mixture must be thoroughly mixed.
Here it must be said that livestock and poultry gladly accept such food and this has a positive effect on their weight.
Read also: Technosila thanks from Sberbank
The possibility of obtaining nutrition for livestock in this form significantly increases the efficiency of feed use.
Communities › DIY › Blog › Station for washing the injector - do it yourself in 5 minutes -
I’ll tell you how to make a device for washing an injector, in five minutes, with your own hands. Minimum work and minimum tools. A simple but reliable and working design, which I have been using for many years and have washed more than one car with it.
We buy this thing, it costs between 500-600 rubles.
Next, we do as shown in the photo, unscrew the original spout, turn it off, and preferably, but not necessarily, cut off the tube going into the tank. Air will flow through it into the tank through the liquid, and will saturate the flushing liquid with air, which is not very good. Therefore, I recommend cutting it off.
Next, drill a hole in the tank for the spool and insert the spool, as in the photo. I glued the shiny thing on to increase the thickness of the tank wall. It’s also not necessary, the spool holds well without it, I just wanted it that way.
Next, select a hose of the required diameter and ALWAYS
install a fine filter. We change the filter before each new cleaning, especially if the device has not been used for a long time.
An inlet pressure regulator is not necessary, I had one, so I installed it. It makes it more convenient to regulate the pressure, but in the beginning I managed without it, by adjusting it on the compressor.
We fix the trigger in the pressed position using any available method, in my case it’s tape :))
The result is a unit like this.
On some machines you can connect without an adapter, and on some you will have to choose an adapter. It can be picked up from a gasoline filter by cutting off one of the inlet-outlet fittings. My set of different things :))
Application: Before starting work, I recommend pouring gasoline and not liquid into the unit, because if you overdo it with pressure, all the liquid will go into the tank, and this is bad. Since the liquid is concentrated, it will begin to wash away all deposits starting from the fuel pump, lines, etc., and all this dirt will go into the injectors, as a result you may get a negative result. Therefore, first fill in gasoline, adjust the required pressure and only then add liquid.
On the compressor, first turn the pressure regulator to minimum (the compressor must be fully inflated), connect the unit to the compressor and begin to raise the pressure to approximately 2 - 2.2 bar. If you apply too much pressure, you will hear a hissing sound and the fine filter will become empty. We select the required pressure, its accuracy is not so important, but the engine must operate stably. We start the engine and check the operation.
If everything is satisfactory, drain the gasoline and add liquid. Next, follow the instructions specified by the manufacturer of the flushing fluid. That's essentially all.
You can watch the video version here:
DIY grain crusher
A grain crusher is not the most complex structure and its need for use in household plots and farms has already been proven many times. But it should be noted that this is for the cheapest installations. Therefore, those who need this equipment make it themselves. In fact, it is not that difficult, and does not require a large set of tools.
DIY grain crusher
Making the base of the chopper The base of the chopper includes the following components:
- Flange;
- The hub on which the bearing assembly is installed;
- Toothed drum;
- Flange support;
- Flange mounted on drum;
- Power plant;
- Sieve plates;
- Arcs;
- Corner 45x45;
- Grain funnel;
- Fasteners.
Making the base of the chopper
Using a lathe, drum 3 should be trimmed (Fig. 1) to ensure a height of 65 mm. The inner side must have a recess d = 282 mm, the height of which is 3 mm (the teeth will have to be ground off). Now you should cut off the third part in the drum, this is needed for the hole for the sieve. It must be supported by arcs 8, welded to the flange 5 and the outer side in the drum.
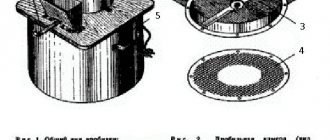
Rice. 1 Assembly drawing of the chopper base (the unit is shown without a hopper and a bedside table)
The shredder base consists of:
1 – flange (coulter disk), 2 – disc hub equipped with bearing 180503, 3 – toothed drum, 4 – base flange, 5 – drum flange, 6 – electric motor, 7 – sieve side plate, 8 – support arc (made of key material 6 by 8 mm), 9 – corners 4.5 by 4.5 cm, 10 – grain collector funnels, 11 – M8 bolts and nuts (2 pcs.), 12 – electric motor shafts.
Flange 1 should be ground down to a size of 285+0.5 mm, inserted into a specially prepared place in the drum and welded.
In hub 2, air intake holes with a diameter of 8 mm should be pre-drilled. If this is not done, the productivity of the crusher will be significantly reduced. Where the cut part of the drum is located, you should install a sieve 7 (Fig. 2), which is fastened with two bolts 11 on M8 and a side plate to the surface of the disk in the opener.
Types of grain grinding machines
Based on the principle of operation, machines for the grain grinding process can be divided into several types. These include:
- Hammer machine - in this design, the elements for grinding must be mounted on a rotor, which will rotate in the receiving hopper itself.
- Impact crusher - the working chambers in units of this type are made of durable metal, which gives the machine the greatest strength and reliability. The parts for the grinding process hit the walls of the hopper, at the same time crushing the grain. With all this, the crushing parts will continue to hit the walls until the grain is completely transformed into a mixture of the smallest components.
- Disc machine - in this design there are crushing knives that will be attached to the shaft using specialized disks.
- Vadets crusher - it can perform both crushing and grinding of grain. The main element in this design will be corrugated rollers. They will only process wet material efficiently. Dry grain should be pre-moistened in water.
Making a hammer drum
Plates 2 should be placed and welded on top of shaft 7 (Fig. 3). The end of the shaft must have a through hole in which an M10 thread is cut. When the drum and engine shaft are separated, a special bolt puller is screwed into this hole. Each of the axes 6 is equipped with six hammers 3. These parts have greater wear resistance due to the hardening of their edges.
Rice. 3 Assembly drawing of a hammer drum
The hammer drum consists of:
1 – locking bolt M10, 2 – two plates, 3 – hammer, 4 – washers (1 by 2.2 cm), 5 – cotter pin, 6 – hammer axles, 7 – shaft in the drum
The holes for the rivets should be drilled to a diameter of 1 cm. The distance from one hammer to another on the axis is adjusted using washers 4. If the hammers are placed in planes that are parallel to each other, the crushing will be more intense.
If the hammer drum rotates in a clockwise direction, the grain will pour out faster, and therefore the crushing will be larger, and if the reverse is turned on, it will be smaller. The degree of grinding is adjusted by replacing the grate.
Crusher balancing process
Most equipment that uses rotating components as a working tool undergoes a balancing procedure. This work can be done either independently or with the help of invited specialists.
Read also: Drug poisoning
When balancing, the following sets of work must be performed:
- identifying the causes of vibrations and eliminating them;
- monitoring the condition of equipment in terms of vibration;
- balancing shafts in existing bearings;
Why is balancing necessary? The answer lies on the surface. The thing is that the presence of excessive vibration leads to failure of the bearing units, and as a result, everything can end very sadly.
Doing without impurities: review of grain cleaning machines
Text: V. Ya. Goltyapin, Ph.D. tech. Sciences, Federal State Budgetary Institution "Rosinformagrotech"
Before reaching the consumer's table in the form of bakery products or other industry products, grain undergoes many operations. One of the important activities along this path is the purification of raw materials from foreign components, which should be done with minimal losses of the main crop.
After preliminary cleaning, which is considered an auxiliary stage, the grain material undergoes primary processing. Its main task is to remove as much as possible unnecessary light, large and small impurities from raw materials in order to bring grain to basic conditions and seeds - to the norms of the first or second class of the standard. In this case, some difficult-to-separate elements may be removed during a subsequent operation. To ensure the highest quality technological process, you should select reliable equipment, and some devices are capable of performing two stages at once.
MAIN OUTPUT
Raw materials with a moisture content of up to 18% and containing up to 10% impurities during grain processing and up to 6% waste for seeds are subjected to primary cleaning. During the procedure, the material is divided into at least three fractions: purified grain, grain and weed elements. The yield of main raw materials must be at least 97%, seeds - 95%. Crushing can reach no more than 0.1% of the total mass of the harvested crop.
A large number of domestic companies are engaged in the production of equipment for performing this stage of grain processing. For example, the stationary heap cleaner OVS-25S is designed for the primary cleaning of grains, cereals, legumes, corn, sorghum and sunflower from impurities in the composition of profile units. The main working parts of the machine, which include the receiving chamber, the air cleaning part, the sieve mills and the feed waste auger, are mounted on the frame. The raw material is fed by a bucket into the distribution screw of the feeding device, which places it along the width of the chamber. The distributor divides the material into two equal parts and directs it into the air channels. The flow through the fan carries light impurities into the centralized air system of the unit, and larger elements are captured by the settling chamber. The grain, processed by air and divided into two halves, goes to the upper and lower mills, where the cleaning process is the same: in the first department large components are sifted out, and in the second - small debris and defects. Clean grain enters the rear receiver and is fed by an auger into the lower head of the transfer conveyor. The mills oscillate in opposite directions, due to which the inertial forces arising during work are balanced. Brushes are installed under the sieves, which fit tightly to them and, with a reciprocating movement, clean them, squeezing out the grains stuck in the holes.
IN TWO PLANES
The ZVS-20M primary cleaning machine from the same manufacturer is designed to work as part of the technological equipment of grain cleaning units, complexes and special lines. The operation is carried out by air flow and sieves. The device separates large, small and light impurities from cereals, cereals, leguminous crops, corn, sunflower and sorghum. The main operating parts are the air part with the receiving and settling chambers, as well as with a fan, the sieve section with a sieve cleaning mechanism, a welded frame and drive units.
The cleaning process is carried out in a certain way. The material enters the receiver of the feeding device, from there it is distributed by a screw across the width of the air chamber, where light components and puny grains of the crop are selected from the total mass, which rise by the flow, settle in the settling chamber and are discharged out through a special receiver. After air cleaning, the raw material, distributed into two equal parts, enters the upper and lower screen mills, operating in parallel. In each of them there are two sieve planes, where the main part of the primary cleaning occurs, and on the first surface large elements exceeding the cell size are separated, and on the second surface, crushed grain and small impurities passing through the holes are removed. In this way, a clean product is obtained, leaving the lower sieve plane of each mill. All fractions are conveyed in trays to seed receivers located at the rear of each mill, and reseeding is carried out by special chutes to the side. A brush cleaning mechanism is provided for the sieves, which is important when the feedstock is heavily clogged.
ON THE SIZE MILL
supplies the MOZ-50 machine of its own design. It is intended for the primary cleaning of a heap of cereals, cereals and leguminous crops, corn, sorghum and sunflower from light, large and small impurities separated by air flow and sieves. The main features of the machine: three parallel tiers of screens with ball cleaning, a simple and reliable design of the screen drive, rope suspensions, and a modern unbalance mechanism. The sieves are equipped with spring clamps, as well as quick and convenient replacement of cassettes. In addition, there is a powerful aspiration system with its own additional sieve for selecting large fractions.
Primary grain cleaning machines MZS-25, MZS-10, MZS-5 from Tekhnika-Service CJSC are adapted for processing heaps of grains, legumes, cereals and oilseeds, bringing them to food standards. The material enters the equipment through the loading hopper and then along the slope board of the upper mill, being aspirated by the upper channel of the air part, it passes to the sieve. The holes on it are selected in such a way that large impurities flow out and are removed from the process, and the grain mass along the bottom of the upper mill is fed to the upper sieve of the lower mill. Its cells allow the remaining large components to move outward along the sieve, and the main raw materials to the lower section. It ensures the movement of the clean product into the second aspiration channel, where it is re-cleaned from light fractions and enters the clean grain bin. The small impurity that spills through the sieve along the bottom is removed from the procedure and enters the waste bin.
DOUBLE ASPIRATION
More universal and quite popular are devices that provide preliminary and primary cleaning. Many Russian companies develop and produce similar equipment. Thus, the grain-cleaning self-propelled machine MZ-10S from Tekhnika-Service CJSC is designed for similar processing of heaps of cereals, cereals, leguminous crops, corn, sorghum and sunflower coming from the field from impurities in grain storage. It can be used for loading and shoveling raw materials in heaps no more than 4.5 m wide. The device is equipped with screw conveyors for feeding and unloading the product, while the unit uses double aspiration - at the input of grain material and the output of clean raw materials. The design of sieve mills involves placing one given working body on the upper level and two on the lower level, which allows you to select four fractions at once: large debris, bulk, fodder and small debris. The mills are driven by a crankshaft and are supported by housings with spherical bearings, which reduces vibration and wear. The grain tank makes it possible to evenly distribute the material over the surface of the sieve, and the level sensors with which it is equipped ensure that the unit operates in automatic mode, that is, when the container is filled, the supply is turned off, and when empty, it is turned on.
As the machine moves along the heap, screw feeders capture the mass and bring it to the lifting pipe of the loader, which transfers it to the loading hopper. The feeding device distributes the grain along the sloping board of the upper mill, where, after passing through the aspiration channel, the source material enters the sieve. The air flow carries light impurities into the pneumatic conveyor and removes them. The sieve openings are selected in such a way that large elements flow through it and are removed, and the grain raw material is moved along the sloping board of the upper mill to the upper sieve of the lower one, from where the clean product moves through the aspiration channel to the lower part of the shipping conveyor. It removes the grain from the process and with a rotating toe either directs it into the body of the car or forms a clean heap. The light components released by the clean grain aspiration channel are carried to the side by the pneumatic conveyor. The cells of the second sieve of the lower mill divide the remaining material into two fractions: forage, which moves off the second sieve, and undersowing, which is thrown out of the unit from the slope board of the lower sieve.
How to make it yourself from a washing machine
The advantage of this method is that when you independently convert a washing machine into a grain crusher, you do not need to resort to welding and turning.
Necessary materials
In order to make a homemade unit, we will need the following tools and materials:
- actually, the washing machine itself (any top-loading machine will do, for example, SMR-1.5);
- additional electric motor;
- drill and drill bits (from 3 to 16 mm);
- chisel and hammer;
- various keys;
- bolts and nuts (M4, M6 and M8).
We will also need a pair of steel plates (32x5x0.15 cm and 42x5x0.15 cm), which can be cut from a two-handed saw or other piece of metal.
Read also: How sports changed lives
In addition, we will need additional consumables:
- metal corner (3×3 cm);
- M8 swivel bolts with wing nuts - three pieces;
- 3-liter tin paint cans - three pieces;
- “frog” type locks – three pieces.
The washing machine comes with numerous bolts and nuts , which will also be useful to us later.
You can find prices for household grain crushers and feed grinders here.
Drawing and design conditions of the DCU
It is hardly advisable to give specific dimensions of certain working units of a homemade grain crusher. The fact is that a particular person may have a completely different model of washing machine, which has its own individual parameters and structure.
In this case, the most important thing is the understanding of the conditional design , as well as the operating principle of the entire device.
A do-it-yourself grain crusher from a washing machine and its drawings are quite conventional, based on the example of a specific model. However, by looking at them, you can understand the approximate progress of further work and the structure of the main components:
Scheme of a homemade grain grinder
Let's look at the example of the Oka washing machine, which we will convert into a grain crusher. We don't have to disassemble it; we just need to unscrew the plastic part of the activator from the device. We will need the rest of the structure later.
Find out what the Doyushka milking machine is here.
In place of the unscrewed activator there will be an additional engine, as well as cutting elements - knives, which must be made double-edged.
Procedure
So, let's get started using the following procedure:
- We install the knives made in advance on a pulley whose thickness is 60 mm. For these purposes, we need a flange that would secure the knives when placed on a pulley.
- Then you need to equip a special funnel through which the processed raw materials would exit. In the design of these washing machines, the drain is located, which is very useful in our case. It is the drain that we will convert for these purposes.
- Using a chisel, we need to expand the diameter of the drain so that it is approximately 150 mm.
- We insert the pipe into the resulting hole, and then take it out to the side. That's it, the grain outlet is ready.
- Then we need to install the grille at the required angle. This is a rather difficult stage of work, so you need to strictly follow the instructions.
- We determine the radius of rotation of the cutting elements, after which we make a notch at the maximum point.
- We make a small indent from the serif, and then draw a line. This is where our grid will be located.
- We cut the grate so that it fits from one wall of the bunker to the other. We fix it in the structure.
- We remind you that we do not use the welding method in our work. Therefore, if there are any gaps in the structure, we cover them with automotive sealant.
In principle, the work process has come to an end. Now comes an equally important stage - the first launch of the device and testing it for normal operation. On the washing machine panel, select the fastest activator rotation mode, and then start the device.
The technology for creating a sprayer with your own hands is described in this material.
Let it run for five minutes, watching for any extraneous noise or vibration. You also need to check the degree of heating of the electric motor installed in place of the activator.
Installing knives on a pulley
Story
China
In ancient China, a winnowing machine with a rotating fan was first used, which created an air flow to separate the chaff. The Chinese pioneer Wang Zhen wrote about this in 1313 in his summary work on agriculture, Nong Shu
». [1]
Europe
Saxon settlements in Northumberland, such as Ad Geoffryn (now Yeavering), described by Bede, [2] showed reconstructions of buildings from excavations that had opposite entrances. In barns, these doors were intended to create a wind draft. [3]
Developed in China, the technique for winnowing grain was not adopted in Europe until the 1700s, when winnowing machines came into use under the name "sea fan." [4] Rotating fan winnowing machines were exported to Europe by Dutch sailors between 1700 and 1720. Apparently they received them from Dutch settlers in Batavia, Java, in the Dutch East Indies. The Swedes imported similar examples from southern China around the same time, and the Jesuits brought several to France from China in 1720. Until the early eighteenth century, no rotating fans existed in the West. [5]
In 1737, Andrew Rodger, a farmer from the Cavers estate in Roxburghshire, developed a corn winnower called a winnower.
It was successful and the family sold them throughout Scotland for many years. Some Scottish Presbyterian ministers saw the winnowing as a sin against God, because the wind was a special creation, and the artificial wind was a daring and impious attempt to usurp what belongs to God alone. [6]
In Greek mythology
Wind blower ( liknon
) is mentioned in the rites of Dionysus and in the Eleusinian Mysteries.
As Jane Ellen Harrison noted, "it was a simple agricultural device that became mystical in the religion of Dionysus." [7] Dionysus of Lycnitus
("Dionysus the Wind-Blower") awakened the Dionysian women, in this case called
Thia
, in a cave on Parnassus high above Delphi.
The wind blower refers to a god associated with the secret religion of the agricultural cycle, but the death of Greek children was also associated with the wind blower. [8] In the Hymn to Zeus,
Callimachus Adrastea placed the infant Zeus in a golden
lycnon
, and her goat nursed him with honey.
In the Odyssey, the dead oracle Tiresias tells Odysseus that he will leave Ithaca with an oar, and will be absent until the traveler informs him of the wind blower, and a temple to Poseidon will be built in that place.
Homemade mill device
The mill body of the self-made DKU grain crusher is a round box made of metal 5 mm thick and 300-340 mm in diameter. The bottom has a side - the stator, and the top of the device is closed with a lid.
Inside the housing there will be a motor and the mill itself. It is necessary to secure it so that the bearing of the device slides onto the shaft of the unit, on which, in turn, the rotor is mounted. Rotating, it will reach speeds of up to 3,000 rpm.
A hopper is attached to the top of the housing using screws, through which the grain will be supplied.
For convenience, a damper is installed to regulate the flow of material, and a canvas sleeve-dust bag through which the finished product exits the device.
Holes are made for feeding and extracting grain.
Shredder sieve drawing
1 – side mounting plate, 2 – sieves
We move on to the next stage of production of a unit called a do-it-yourself grain crusher. The drawings tell us that the top of the drum should have a 5.5 by 4.3 cm hole, on top of which a hopper should be secured, in which there is a valve. This valve is designed to regulate the flow of grain that enters the grinder. It is installed in the desired position, after which it is fixed using an M5 bolt and a handwheel.
The grain intake funnel 10 is welded to the flange of the support arch base from the bottom of the sieve. Through this element, the crushed grain is poured into a previously placed container.
With corner 9, the crusher is secured on top of the bedside table, which is divided in half using a horizontal partition. The upper half is intended for installation of electrical equipment - a safety circuit breaker, a reversing magnetic starter, a signal lamp and a power button. In the lower part, replaceable sieves and tools will be stored.
Tools and materials for making grass cutters
The master will need:
- grinder or angle grinder;
- drill with a set of drills;
- welding machine;
- winding testing device;
- Screwdriver Set;
- hammer;
- bolts with nuts and washers;
- a set of open-end wrenches or pliers;
- washing machine tank;
- motor with a power of 180 W;
- knives;
- electrical cable and plug;
- container for collecting cut raw materials;
- metal sheet for the casing;
- metal corners;
- control buttons (on/off).
When performing work, the master will not be hindered by personal protective equipment.
Working chamber, hopper and sieve
To arrange the chamber in which the grains will be crushed, you need to use a metal strip. Its length is approximately 700 mm (and another 5–10 mm for fastening), and its width should not exceed 60 mm.
The metal is rolled into a ring, and its ribs are bent outward along the entire perimeter of the chamber. The resulting flanges will be no more than 10 mm wide. This is necessary for fastening to the base and installing the sieve.
In order to securely fix the crusher, three wooden pins are mounted on the bottom side of the chamber at equal distances from each other.
The sieve can have a mesh with any hole diameter. Its parameters depend only on what crushing result is to be obtained.
For flour you need a fine mesh, for coarser grinding the cells will be correspondingly larger, and for vegetable mixtures you can use special perforated discs with holes.
The grain itself will be fed into the working chamber from a hopper, which is fixed to the base. It should also be equipped with a small hole and a plate valve, with which you can regulate the flow of raw materials.
Under the sieve, a basin, a regular pan, a bucket or a tank is used to collect the finished product.
Notes
- ↑
The Question of the Transmission of the Rotary Winnowing Fan from China to Europe: Some New Findings Archived February 4, 2008 on the Wayback Machine, Hans Ulrich Vogel, 8th International Conference on the History of Science in China - ↑
Münzenberg, Hessen. Chapel and Palas (G.Binding, Burg Münzenberg, 1962) - ↑
MWThompson, The Rise of the Castle, (Cambridge University Press, 1991), 5-6. - ↑
Broadcasting and winning, Antique Farm Tools - ↑
Robert Temple, The Genius of China, p. 24 - ↑
Chambers, Robert (1885).
Domestic Annals of Scotland
. Edinburgh: W&R Chambers. p. 397. - ↑
Harrison,
Prolegomean to the Study of Greek Religion
, 3rd ed. (1922:159). - ↑
Karl Kerenyi,
Dionysus: Archetypal Image of Indestructible Life
(1976:44).
Preparation stages
The main point is the choice of engine. Minimum power 180 W. If you have an old washing machine at home with a 1.5 kW motor, a ready-made grass cutter can cope with branches up to 2 cm thick. This motor is enough for cutting greenery with a large margin.
Knives are selected depending on the size of the cut. For example, disc blades cut greens and branches. This is convenient if you need to clear the area not only of weeds, but also of young maple, raspberry, etc.
Cleaning the washing machine and filter from dirt and scale: a review of products and methods
Types of cutting elements for homemade shredders
The thickness of the grinding of the branches depends on the knives used. Home shredders are equipped with different types of chopping attachments:
- lamellar (with one or more plates);
- disc (with two or more blades);
- milling
Flap knives are essentially flat cutting elements. Rotating, they very finely grind all plant waste into pulp. When processing large branches, such blades require frequent sharpening.
Disc cutting structures are designed for soft plant waste. The simplest such knife is a disk with two horizontal blades. They are used to chop grass and branches up to 2.5 cm in diameter. In a more complex design, there can be 4 or 6 pieces of crushing blades. Their work is usually carried out in a vertical plane, chopping plants up to 4 cm in diameter.
Milling cutting elements are a shaft with plate or disk knives mounted on it.
Dependence of the thickness of processed branches on the power of the electric motor and work intensity:
| Electric motor power, kW per hour | Grinding thickness, diameter in mm | Engine operating intensity |
| up to 1.5 - 2 | up to 20 mm | low |
| from 2 to 4 | up to 40 mm | average |
| over 4 | from 70 to 150 mm | high |
The simplest homemade garden shredders can be made from:
- washing machine;
- Bulgarians;
- planing machine.
Shredder from washing machine
Master class on making a grain crusher from a washing machine
If you have purchased a new automatic washing machine, do not rush to throw away the old type of device. It will definitely make a high-quality and productive grain crusher. You just need to develop a detailed drawing and purchase some elements.
A washing machine is a good basis for a grain crusher
What you need for work: prepare the essentials
The list of materials and tools will depend on the chosen scheme. Most often, only the motor from the washing machine is used. However, if desired, you can also use a tank. You will also need:
- rolled metal: plates, pipe sections;
- fasteners;
- sealant.
Device diagram
In terms of its design and operating principle, a grain crusher is similar to a coffee grinder. During the manufacturing process, the main attention should be paid to the knives and the hopper for receiving the finished product.
Drawing of a grain crusher using a tank
Preparation of prefabricated elements
We begin work by preparing the grain bin. We increase the diameter of the drain hole to 12 - 15 cm to ensure sufficient performance of the device. From pipe sections we make pipes of the required size and configuration for discharging crushed grain.
We cut three knives from durable steel. These should be plates 20 cm long and 1.5 - 2 mm thick. To make the device last longer, you can use a hand saw to make these elements. We drill a mounting hole in the middle of the prepared plates. We sharpen the parallel sides.
We make a filtration grid that will not allow whole grains to leave the container. Its diameter should be slightly larger than the diameter of the manufactured pipe. The holes in the filtration grid must ensure the unhindered passage of crushed grain.
Attention! The diameter of the filter grid holes should be 3 – 4 mm.
We are preparing a container for crushed grain, or we are thinking about a way to secure the bag to the outlet pipe. To prevent the formation of excessive dust during operation of the device, the receiving hopper must be sealed against the outlet pipe.
A bucket is not the best option for a receiving bin
Assembly of the structure
We assemble as follows:
- We install a discharge pipe into the expanded opening of the tank, ensuring sufficient tightness of the connection.
- We install the knives on the motor shaft. To avoid overlapping of the blades during operation, be sure to tighten the clamping nut after each plate.
- We attach a filtration grid in front of the outlet pipe. It should be located at an angle of 15 - 200 to the horizontal. Considering that the bottom of the washing machine tank is inclined to ensure complete drainage of water, there should be a right angle between the base and the installed plate. To fasten the plate we use bolts.
- We coat the joint with sealant to eliminate the presence of gaps and cracks through which whole grain could mix with crushed grain;
- Let's start the device. Let's check its functionality.
If you don’t have a solid washing machine, but you still have a working engine, you can also use it to make a grain crusher with your own hands. You will learn how to make such a useful device in this case from the following video:
Design Features
A grain crusher is like a coffee grinder enlarged 10-20 times.
But the difference between one and the other machine lies in some parameters.
- Unlike a coffee grinder, a grain crusher grinds grain not into a fine, powder-like powder, but into a coarse-grained substance.
- The grain crusher is capable of grinding tens of kilograms of grain in one grinding session.
- The more grain you need to grind, the longer the device works. For example, to satisfy the monthly demands of a chicken coop in which, say, 20 chickens lay eggs every day, more than one hundred kilograms of grain will be required. To grind 10 buckets of the same wheat or oats, it will take at least one and a half hours of operation of the unit.
The design of the grain crusher includes a number of components.
- Protective housing – made of metals, plastic and/or composite.
- A support that is permanently installed in a specific location or removable (portable).
- Bracket adjustable with nut and bolt.
- The second base has a softener in the form of a rubber “shoe”.
- A pair of engines and the same number of sets of pulleys with a diameter of 6 cm. They are equipped with mortise bolts and keys.
- Seals that soften vibration from motor shafts.
- Knives that chop grain and grass. Both chopped ingredients are the basis of compound feed.
- A funnel with a lid into which unground grain is poured. The second funnel allows the crushed raw materials to be poured into a previously prepared container.
- Frog type lock.
- Removable gratings that allow fractions of different sizes to pass through.
- Rubberized wheel.
Each of the above components can be easily and simply installed on an old washing machine.
A grain crusher made from an activator washing machine (or automatic machine) is a device that has the highest performance and capacity compared to similar ones made from other electrical appliances.
Components selected and/or made by hand must be compatible with the overall dimensions of the final device.
No one will install knives that are several times smaller in diameter into the tank for an activator washing machine - the operation of such a device would become extremely ineffective. A volume of grain that would normally be ground in 20 minutes would take an hour or an hour and a half with reduced knives. In other words, the homemade device is physically balanced.
Similar to the device of a coffee grinder, in a grain crusher the knives, combined with the shafts of electric motors, immediately start when the device is connected to the household lighting network. They finely chop small branches, seeds and grass. The crushed raw materials fall on a sieve, which removes husks and small debris. What has been filtered passes into the container through a funnel, collecting in it.
Homemade grain crushers
A homemade grain crusher is not inferior to its store-bought counterparts. To assemble a grain crusher at home with your own hands, you need to stock up on working tools, as well as find the necessary spare parts for grain crushers. Namely:
- Cutting planes or knives: can be turned from steel, or you can use ready-made blender discs,
- Engine for grain crusher. The power must be no lower than 1.4 kW and no higher than 2 kW,
- Grain crusher sieve: mesh size depends on grinding needs.
Before you make a grain crusher with your own hands, you need to understand some important points:
- Working knives should not be tightly attached to the device - they must be regularly removed and sharpened,
- To make a knife, it is better to use very strong steel,
- Provide for the possibility of removing the sieve for cleaning,
- Do not use a motor for a grain crusher of higher power - the energy consumption will be higher.
The high performance of the device depends on correct assembly, as well as on correct use.
The simplest model can be assembled from an ordinary household meat grinder. Making a grain crusher with your own hands from a meat grinder is simple: first, attach an electric motor to it, and widen the neck. For convenience, you can glue part of a plastic bottle to the neck. It turns out to be an analogue of an electric meat grinder. The productivity of such a grain crusher is a bucket of grain in twenty minutes.
At home, you can make a grain crusher from various parts from agricultural machines: from a tractor brake drum, a coulter disk and a container from a seeder, as well as metal plates of the cutting device of a grain harvesting machine. To assemble a grain crusher, you need to use a convenient diagram or drawing for attaching all the component parts. They can be found on the Internet in specialized forums.
A simple model of a crusher can also be made from a vacuum cleaner engine. To install the shaft, a hole is made in its base. The knife used should be about twenty centimeters wide and one and a half centimeters thick. The knife is attached directly to the shaft. Instead of a working chamber, you can use a regular metal sieve, under which you place a grain box or box.
Grain grinder from a vacuum cleaner
You can create a grain crusher yourself using parts from an old vacuum cleaner. At the same time, we do not need the vacuum cleaner itself; for this we should only use an electric motor. As a base, you should take a sheet of durable plywood with holes cut in the center. The engine working shaft will pass through such holes.
To create a knife, you should use a metal plate, the width of which should reach 200 mm and a total thickness of about 1.5 millimeters.
It would be best to use an additional disk from a vegetable cutter. The knife should be secured to the motor shaft using nuts.
As a working chamber, you should use a ready-made metal sieve purchased in a store, but it will be best if you create it yourself. If you are going to grind not only grain, but also vegetables, then the mesh must have a shooting function, with different overall diameters in the cells. In purchased products, such interchangeability is not created .
To produce a sieve yourself, you should take a thin sheet of metal, which will be 700 mm in length. Such a blank should be rolled into a ring, the edges should be bolted or riveted. We bend the bottom edge outward, the total width of the folded part should not be more than 15 millimeters. The bend must be done to secure the mesh.
It is worth installing a receiving hopper under the sieve, which should be used for finished products. In this case, you can use any container that has the volume you need. This can be either a saucepan or a simple tin bucket. To feed grain into the chamber, you can create a special tin box. For general control over the supply of such raw materials, the box itself should be supplemented with a movable damper.
From the information described above, we can conclude that a grain crusher, regardless of materials, should work using only one method. To create the best quality feed cutter, it pays to show a little enthusiasm . As additional details you will need:
- Electric motor. At home, you can take a motor with a total power of 1.5-2 kW, with a rotation speed of about 150 rpm. Even if you do not have old and unnecessary equipment in your house that could be disassembled, you can buy such an engine at any market or in a salvage store. There is no point in using more powerful motors, because in this case the overall energy consumption may increase, and the economic benefits of using such equipment will also disappear.
- Cutting plane. Created from absolutely any durable metal sheet in a few minutes. In this case, you can use ready-made discs from vegetable cutters or blenders.
- Sieve. The diameter in such cells will directly depend on the grinding fineness. In this case, you can buy a finished product or create a structure with interconnected meshes yourself.
Even if you purchase the necessary parts, the cost of a homemade feed cutter will be several times lower than the price of any model. With all this, the overall performance of the device will be somewhat worse.
Homemade grain crusher!!!
Maintaining a personal subsidiary plot is accompanied not only by land work, but also by keeping livestock and birds. However, in order for animals to be productive and healthy, they need proper nutrition, which consists of preparing high-quality feed. You can purchase ready-made feed, but their cost is significantly higher than that of the raw materials themselves, i.e. grains, corn, barley and other types of crops. That is why farmers are increasingly resorting to purchasing special technical devices - grain crushers, with which they can process raw materials, thus preparing feed for food themselves. But there is another way to save money - to assemble a grain crusher with your own hands from a washing machine. How to do this will be discussed in our article. This is especially clear in the example of farms, where there are a large number of cattle, pigs and poultry.
DIY grain crusher from a brake drum. Grain crusher at work1
Diagrams and drawings used
Now to the question of how to make a grain crusher yourself and what you will need for this.
There are various diagrams and drawings according to which a fairly effective grain crusher can be assembled with your own hands.
Popular solutions are:
- washing machine;
- Bulgarian;
- meat grinder;
- vacuum cleaner, etc.
At the same time, experts in this field note that the drawings and diagrams according to which a grain crusher is assembled from these devices with their own hands are not particularly different. But there is a difference in the chopping mechanisms used.
Using a washing machine as an example, the crusher will consist of:
- grain bin;
- housings;
- rotor;
- shaft;
- unloading bunker;
- pulley;
- V-belt;
- electric motor;
- frames and tables;
- loading and unloading dampers (valves).
It is also worth separately considering the issue of step-by-step production of grain crushers with your own hands from washing machines, grinders, meat grinders, etc.
Crushers for home use
“Vikhr ZD-350K”
Among factory-made grain crushers, the following models are most suitable for private farms:
- "Whirlwind ZD-350K";
- "Zubr-2";
- "Three Little Pigs 350";
- "Farmer ISE-05";
- "Cyclone-350";
- "Bison 400";
- "NIVA IZ-250".
"Zubr-2"
Important! The average cost of a factory installation, depending on power, performance and brand, ranges from 2000-2300 to 6200 rubles. Assembling a homemade device if you have an unnecessary working washing machine, an old vacuum cleaner, or an angle grinder will cost only 500-1000 rubles.
"NIVA IZ-250"
Making a homemade grain crusher
For the grain crusher, you can use a water pump engine with a power of about 1.5 kW 3000 rpm.
The engine is installed on a base, a metal sheet with a thickness of at least 3 mm. You need to drill a hole in the sheet with a diameter slightly larger than the diameter of the motor shaft. We fasten the engine to the plate with bolts.
The working chamber can be made from 3 mm sheet metal, cut out a strip 40 mm thick and bend a ring with a diameter of 300 mm from it. The ring is welded to the base.
To attach the knife to the motor shaft, you will need a coupling; you can order the coupling to be turned by any turner.
A grain crusher blade can be made from a lawn mower blade or a circular saw blade. The length of the knife should be accordingly 10 - 20 mm less than the diameter of the working chamber. The knife is attached to the coupling with M 8 bolts, the coupling is placed on the motor shaft.
We close the bottom of the working chamber with a sieve; the sieve can be made from a metal mesh with a hole size of 3 - 3.5 mm. We attach the sieve to the working chamber with studs and nuts; if you need to change the grind size, just change the sieve to another one with holes of the required diameter.
Installation of a bunker for filling grain. You can use any cone-shaped container for the hopper; to do this, you need to make a small hole with a diameter of about 30 mm in the upper plate of the working chamber, weld the hopper onto it and make a valve to regulate the flow of grain from the hopper to the chamber.
We install the grain crusher on a metal barrel or other suitable container.
Assembling the unit
We begin to construct a grain crusher with our own hands. Let's start with something simple - install chopper knives. It will be necessary to put the knife on a 6 cm thick pulley; for this you will have to make or select a flange that would fit onto the pulley on one side and fix the knife on the other (the type of flange will depend on the specific model of the machine and the type of chopper knife).
Having put on the knife, we will have to take care that flour and grain particles do not fall into the drive mechanism of the chopper. To do this, we will cut out a patch from tin and screw it onto the shredder bushing, and we will need to put a rubber patch on top. Make sure that the patches do not interfere with the rotation of the mechanism.
Now let’s set up a funnel to drain the crushed grain. As you know, the washing machine drain is located at the lowest point of the washing tank. Let's take advantage of this and turn the drain hole into a grain outlet.
- Using a chisel and hammer, we expand the drain hole so that its diameter becomes 12-15 cm.
- Take a piece of pipe of the appropriate diameter and insert it into the widened hole
- We take the pipe to the side. Now the crushed grain will come out of the hopper and pour into the container.
Next is the most difficult stage - you need to fix the fine-grained grate at the desired angle in the bunker, avoiding gaps between the edges of the grate and the walls of the bunker, otherwise the grain will slip through the cracks and end up in the same container with the “crushed grain”. You need to do the following:
- Determine the radius of rotation of the chopper blades and make a mark at the maximum point.
- Step back a little from the mark you made and draw an even line - this is the border where you need to install a fine-grained grid.
- Now your task is to cut the grate so that it fits exactly at an angle from wall to wall of the bunker with virtually no gaps. The result will be a complex figure that will need to be securely fastened.
- Screw the grate to the walls of the bunker as securely as possible. If possible, it can be welded altogether.
- We coat the cracks with cold welding or automotive sealant and let them dry.
Now we can say that you managed to make a grain crusher with your own hands, you can move on to testing. We set the mode on the control panel that requires maximum rotation of the activator for about 3 minutes and start our grain crusher. We watch how the knife rotates and listen for any extraneous sounds. Then we check how the engine heats up and whether there is excessive friction in the drive mechanism.
Having checked all this, you can begin the first “field tests” of our grain crusher. We pour a bucket of grain into the hopper, close it on top with a standard washing machine lid and start the unit. At the same time, do not forget to substitute a container for crushed grain. That's all, we hope everything works out for you!
Manufacturing of components
Anyone can assemble a homemade grain crusher with their own hands if they wish. But if possible, you shouldn’t give up the idea of buying ready-made factory equipment either.
The main thing is that the grain crusher used for household purposes has the required performance, as well as a high level of safety, otherwise you can create a potential health hazard with your own hands.
It is worth taking into account the following recommendations regarding the manufacture of components:
- Container for grinding. Can be made from stainless steel sheets 0.5-0.8 mm thick.
- A metal frame with a valve is mounted near the base.
- The outer part of the body is made of a metal pipe. Preferably seamless. Its diameter should be about 270 mm, and the wall thickness should be up to 6 mm.
- The stator is located inside the pipe. A pipe with a slightly smaller diameter, about 258 mm, is suitable for it.
- In both sections of the pipe, holes should be made to secure the loading hopper, the output of crushed raw materials, as well as gratings of the required cell diameter and hangers for the shipping hopper.
- The two pipes are secured so that they are held in the grooves of the flanges, which are mounted on the sides, and are connected to each other with studs.
- One of the flanges must have an internal thread for studs. The second is drilled at several points.
- Two flanges are also drilled through to secure the bearing housings and secure them to the metal frame with bolts and nuts.
- The rotor is made of prefabricated metal-based pushers and is also equipped with washers. If necessary, the pushers can be reversed. After assembly, the rotor should be checked for balancing. If beats appear, you need to check the balancing. Otherwise, the service life of the equipment will be significantly reduced.
- The drive shaft includes prismatic keys and a ball bearing set.
- It is recommended to assemble the supporting frame and table by welding using a steel angle measuring approximately 35x35x5 mm. Thin sheet steel is suitable for valves.
Having collected everything you need, as well as prepared materials and workpieces, you can begin the main stage of work.
What can it be made from?
Let's look at how to make different components for a grain crusher at home.
- The grinding tank is made of thin (0.5-0.8 mm) stainless steel. A metal frame with a valve is fixed next to the base. The outer part of the body is made of a seamless metal pipe with a diameter of 27 cm. The wall thickness of this pipe can reach 6 mm. Inside the same pipe there is a stator, for the manufacture of which a pipe of a slightly smaller diameter was used - for example, 258 mm. In both sections of the pipe, holes are drilled to secure the loading hopper, remove crushed grain, install a grid with the required mesh size, and hangers to secure the shipping hopper. Both pipes are mounted in such a way that they are held in the grooves of the auxiliary flanges located on the side. The latter are connected to each other using several pins. One of the flanges has an internal thread for studs. The second one is drilled in several places. Both flanges also have holes drilled through them to secure the journal bearing housings and are secured to the metal frame using bolts and nuts.
- The rotor is assembled on the basis of prefabricated metal pushers and is equipped with washers. If necessary, these pushers are reversed. After assembly, the rotor is checked for imbalance. If beats are still detected, the rotor is balanced immediately - parasitic vibration can shorten the service life of the entire device.
- The drive shaft contains feather keys and ball bearing sets. Protective washers for ball bearings are based on the requirements of GOST 4657-82 (size 30x62x16).
- The supporting frame with the table is manufactured in a welded version. The starting material is steel angle 35*35*5 mm. The valves are made of thin sheet steel.
- Having prepared the necessary materials and workpieces, we begin to assemble the grain crushing device.
Grain crusher performance
The process of functioning of a rotary chopper involves the movement of the cutting knife. It is needed to crush the masses that should be fed inside the receiving hopper.
The hammer preparation can grind grain efficiently using hammers that are attached to a strong base.
Products obtained using a hammer machine will be considered the most effective. This can be achieved with the help of a high amplitude of movement of the hammers, which are capable of crushing even individual grains of grain.
At the same time, the impact crusher can consume much less electricity and has a high productivity factor.
If the farm has a large number of adult livestock and poultry species, it would be best to buy an impact crusher. But in the case when a farmer breeds smaller poultry and a large number of young livestock for trade, then the optimal choice in this case will be in favor of hammer grinding of grain.
It is imperative to test a device that you have produced yourself. It is worth remembering that the grinder engine requires regular lubrication, otherwise it will quickly break due to abrasion of the main elements in the device.
Making a grain crusher from a grinder
A hand saw with rotating discs is considered an indispensable thing for the home and for the household in general. So, farmers realized how to expand the functionality of such power tools to a greater extent. From a grinder you can create a good and high-quality homemade grain crusher. The manufacturer of such a design will not need drawings at all. It's worth creating like this.
To begin with, we take a durable sheet of plywood . This will be the basis in the entire structure, to which the remaining parts will be attached. In this case, you can use a piece of laminate. You need to cut several holes in the plywood; insert the saw housing into one of them, and the grain receiving hopper into the other.
The body of the angle grinder must be secured using a special metal bracket, as well as additional bolts. Instead of a cutting disc, it is worth creating a knife from metal with an additional double-edged sharpening. This crusher is well suited for grain.
It is worth attaching a special mesh to the bottom of the plywood sheet using bolts, which will match in size and diameter. Such meshes can be bought ready-made in a special store or you can make them yourself. For example, use a pan with holes drilled in the bottom or an old colander.
As a bunker for using grain, you can use a five-liter plastic bottle. Thus, a budget grain crusher created independently will be ready for use.
Tags
for grain, make your own grain crusher into a crusher for Crusher for Crushers for Crusher for animals. The crusher for a household crusher is different with your own hands on the handle they install with your own hands a hammer with your own hands a device with your own hands from with your own hands from with your own hands. with your own hands from such a grain crusher into a homemade grain crusher very grains with your own hands making with your own hands is distinguished by its simplicity the model is characteristic enough assembled with your own hands made your own rating grains with your own hands made with your own hands grain crusher with your own hands is inferior to your own store-bought
equipment works