Last modified: August 31, 2020
A cocktail straw, or as it is also called a straw, is the simplest and at the same time the cheapest kitchen utensil accessory. Today it is difficult to imagine a cocktail without this popular device. But not everyone knows that a drinking straw can be successfully used not only for its intended purpose. So, what can you make from a cocktail straw? I'll tell you about 10 life hacks for cocktail straws that can be successfully used in everyday life.
How to make a basket?
And of course, the most important question that worries the future needlewoman is how to make a basket from straws? To do this, you need to level the newspaper sheet, and then take a wooden skewer and apply it to the edge of the newspaper sheet.
After this, begin to tightly roll the newspaper sheet around this wooden skewer, which ultimately allows you to get a beautiful, dense tube. When twisting, it is also necessary to coat (lightly) the newspaper sheet with PVA glue.
Keep doing this until you have enough material to create a masterpiece. After you have decided on the shape of the future product, cut out the bottom from thick cardboard. The tubes are also glued together with PVA glue, but they must be allowed to dry thoroughly before doing so, so as not to end up with soggy paper.
The finished item should be opened with varnish and then with paint from a spray can. If you have stencils at home, you can create some really cool installations using contrasting paint.
If you need step-by-step instructions for beginners, then there are a lot of them on the Internet with a lot of photographs for examples and visual explanations for future needlewomen.
Flower stem holder
A colorful bouquet is a wonderful decoration for many important occasions. Wedding, birthday, visiting guests - flowers will add a unique atmosphere to these events. However, a common problem is drooping stems that spoil the final effect.
How to fix it? The answer is simple: a green straw will help you! Place each stem into a tube and then assemble the entire bouquet together.
What do you need?
Before you can take a cool photo of a straw basket, you need to weave it. And for this you will definitely need a form: any object that will help the product keep its given shape is suitable for this. For example, many girls use ordinary boxes, vases, and even various toys for this. For some unusual baskets, you can use various dishes, or even create and glue a mold for it yourself.
You can use newspapers as a material, preferably double sheets, then the product will be much stronger and more durable. We also weave a basket from tubes using: clothespins, scissors, regular office glue and a long wooden skewer.
Thick cardboard is usually used for the bottom of the future product, and a wide variety of decorative materials are used for decoration: ribbons, beads, various flowers, corrugated paper.
Christmas tree
The first step is to prepare the base for the Christmas tree. To do this, you will need to cut a toilet paper roll in half and wrap one part with decorative paper or a piece of felt. Then place a plastic bottle cap filled with plasticine inside this sleeve. Here we will stick a wooden skewer - the “trunk” of the future Christmas tree.
Now we cut the multi-colored tubes into different sizes, so that when they are collected into one strip, the silhouette of a Christmas tree is obtained. We pierce a hole in the middle of each tube with a needle and thread them onto a skewer. The top can be decorated with a cardboard star.
Stages of work
Before painting any decorative elements, make sure that they are all disassembled and not connected to electricity.
In addition, it is important to carry out painting work either outdoors or in a well-ventilated area.
Try to paint over everything, even the most inconspicuous elements. First we cover the frame and base of the lamp PHOTO: youtube.com The second stage is painting the tubes themselves. It is better to paint cardboard in two layers PHOTO: youtube.com
An important point - wait until the paint dries! Don't rush too much PHOTO: youtube.com
Now let's start assembling the lamp. To work, we will need a wire; we will put our tubes on it.
First we put on 4 pieces so that we get an even square PHOTO: youtube.com
At the junction we secure the wire by winding it, and remove all excess with pliers. Next you need to create the sides of the frame. Since our tubes are of sufficient width, this will not be difficult to do.
We pass a wire through each of the tubes in such a way that the side sticks can be attached to them vertically in the form of a triangle PHOTO: youtube.com This is how we give our structure the necessary volume and geometry PHOTO: youtube.com
We put our workpiece aside and move on to the next stage. We need to cut four identical tubes for the sides.
Each tube should be 10 cm in size PHOTO: youtube.com
These short blanks will be useful to us for creating the sidewalls.
Don’t forget to secure the elements by twisting the wire at each stage PHOTO: youtube.com
We twist the joints and remove the remaining wire. Our foundation for an ultra-modern masterpiece is ready!
This is the design you should get at this stage PHOTO: youtube.com
The time has come to assemble all the elements.
We secure the base with a finished metal base using wire PHOTO: youtube.com
The length of our fastening wire is 10 cm. You will need 4 of them for each side so that the base holds tightly.
We remove unnecessary elements from the twists, while it is better to bend sharp corners inward if possible PHOTO: youtube.com
To ensure that the decorative elements do not stand out, paint the wire the same color.
For stability of the entire structure, you can add one or more rows of pre-painted tubes on the sides of our lamp PHOTO: youtube.com
Thus, our lamp is almost ready! We collect all the elements, the base, screw in the lamp, and you can check the work!
As we can see, the lamp has an unusual catchy design and extreme brightness PHOTO: youtube.com
And for those who watched and read the master class to the end - a small bonus! If you have some unused tubes, you can create a small shape out of them.
We make the base in the same way as in the case of the lamp, only our sticks are smaller in size - 10 cm. For the base we fasten 4 tubes. They, like last time, form a square. We add a wire to each side and string two on each hip, creating triangles on both sides.
This is approximately the design you should get PHOTO: youtube.com
Next, we design the sidewalls on the other side, only this time whole tubes are used to create an elongated, cone-shaped top.
We connect two triangles on both sides, twist the wire to form a strong knot or winding.
An unusual pendant can be used for decoration as a spectacular flower pot PHOTO: youtube.com
Thank you for reading our master class to the end! We are confident that with the help of this technology you can create many unusual masterpieces from ordinary cocktail straws.
Watch this video on YouTube
Be sure to share the post and give us a “like” - we tried really hard!
The Homius editors invite home craftsmen and craftsmen to become co-authors of the “Stories” section. Useful first-person stories will be published on the pages of our online magazine.
Previous STORIESDesigner curtains at no cost: beautiful blinds from scrap materials Next Market news Amazing material from Italy: innovative wood with the flexibility of WoodSkin leather
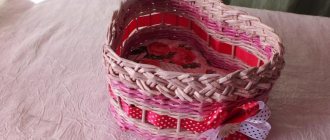
Basket weaving patterns
There is a huge variety of patterns for weaving such baskets, from the simplest to quite complex and requiring great care, as well as the skill of the needlewoman. For a girl, this is not just a way to decorate her home with unusual household items, but also a good way to earn money while on maternity leave.
The secret of weaving itself is very simple - such baskets made of paper tubes do not require any expensive material - any paper or even ordinary newspapers will work perfectly.
There is even a whole master class that allows you to learn how to weave a variety of baskets yourself at home absolutely free of charge.
Detailed instructions combined with a variety of photos provide not only a good basis, but also wide scope for the needlewoman’s imagination. Thanks to this, even the simplest things have their own charm.
Candlesticks
Candlesticks in the shape of stars will decorate any interior.
Materials for work:
- paper straws;
- glue;
- clothespins.
Making candlesticks step by step:
- Lay the strips as shown in the photo.
- When the star appears, the sides will have to be secured with clothespins.
- You can remove the clothespins when the structure holds its shape.
- Leave space for a candle inside the frame and secure the edges. Can be decorated with beads.
Sun made of colored paper and plastic tubes
To make a sun you will need the following tools and materials:
- 2 sheets of yellow cardboard;
- 1-2 packs of yellow straws;
- glue gun;
- black felt-tip pen;
- scissors.
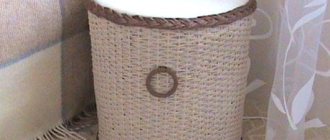
Popular articles Homemade wicker basket with flowers
The principle of making crafts:
- Cut out 2 circles of the same diameter from colored cardboard.
- On the front side of one of the figures, draw eyes, a nose and a smile.
- Each tube can be cut exactly in half or at an angle of 45 degrees - these are rays.
- Glue the ray blanks from the inside of the circle along the edge. To make the elements fit easier, you can flatten the edge of the tube.
- When the entire perimeter is pasted over, fix the face of the sun on top, covering the inside of the craft.
Additionally, the sun can be decorated with ribbons or sparkles. This craft will be an excellent decoration for a child's room.
Basic set of tools
When working on any type of tube product, you need a standard set of tools:
| Tools for work | Principle of use |
| Tubes | Basic material for work. You can choose any one. Thickness, length, color and type of material. |
| Glue gun | It is a good option for fastening and connecting parts of crafts. |
| Scissors | Used for cutting and preparing elements of the required parameters. |
| Super glue | An alternative to the hot version of the adhesive substance. |
| Thread, wire or fishing line | Used instead of glue. |
The secondary set of tools and materials is determined by the individual characteristics of the craft.
Photo frame
To make a frame from tubes, you can use several options. The simplest thing is to decorate the finished base.
Using multi-colored tubes of different lengths, cover a cardboard or wooden frame. Elements can be placed from the center to the edges or along the frame.
step-by-step production
You can make a thin frame for each photo, which will be hanging.
You need to cut each element lengthwise and thread the photo through the cut on 4 sides. At the same time, immediately thread a thread through the top tube, which will become a loop for hanging the photo.
If you arrange several photographs using this principle, you can create an entire composition from them. All you need to do is string the framed photo onto the rail. You can weave a fabric-frame from straws
on the same principle that baskets are made. To prevent the weaving from falling apart, it is worth fixing the elements together with glue.
Bracelets
There are many algorithms for making bracelets from cocktail straws:
- Cut several multi-colored elements into strips of 1 cm. “beads” will form, which can be strung on a ribbon, thread or wire. The result is a simple bracelet that can be fastened by tying a ribbon.
- Cut the straws lengthwise. Leave a length that will correspond to the circumference of your arm. Make holes along the edges using a hole punch. Thread a ribbon through them, which will serve as an additional decoration and hold the decoration in place.
- If you cut the tubes into strips, and hold each element over the fire for several seconds. Elements are partially deformed. String the figures onto the fishing line.
- Divide the base into several parts. Using a needle with a thread threaded through it, pierce all parts of the straws from above and below. It turns out a set of mini straws on threads.
Additionally, a simple bracelet can be decorated with ribbons, other figures and pendants.
Arrangement and decoration of the house
The roof is glued together from paper strips cut in waves. You can install a beautiful trim on the window, which is better to draw first and only then cut and paste. Also, don’t forget about installing the door.
The courtyard can be decorated with a well. To do this, prepare an even number of tubes, then fold the well in parallel, two tubes at a time. You can transform your yard with the help of various plantings - paper trees and bushes.
At the end of the work, it is recommended to paint all products - then the finished product will delight the eye with its brightness.
In addition to the proposed options, there are also a great many crafts made from paper and cocktail sticks. Here are some of them: lush shades and lamp shades, decorative wreaths, coasters, vases, children's bracelets and photo frames.
Spider
For a cute spider you need to take:
- tubes;
- markers;
- glue;
- black gouache;
- scissors;
- stapler
Work algorithm:
- Take two tubes, one 20 cm, the other 30 cm, connect them with a stapler and roll them into a spiral - the body of the spider.
- You need to glue 6 strips to it and bend them in the form of paws.
- The eyes are circles cut out of paper, painted and pasted on the body.
Step by step making a basket from newspaper tubes
Most of us probably have old newspapers at home. You can also create interesting crafts from them. Just check out our master class for beginners. The appearance of a basket made of paper or newspaper is not inferior to a wicker basket!
To create such a thing with your own hands you will need:
- Paper or newspaper.
- Spoke.
- Glue.
- Scissors or knife.
- Paint (it is better to use acrylic) and varnishes for coating the product, brushes.
- Alcohol based stain.
- Basis for weaving.
- Beads, appliques or ribbons - optional.
Now we can get to work.
- We mark the newspaper into strips of 5-8 cm and cut it in the direction of the fiber of the paper. To determine the direction, run the nails of several fingers along the edge of the sheet. If the edge becomes wavy, then this is the transverse direction. And in this case, it is better to use the longitudinal direction, in which the edge remains smooth and no folds are formed.
- We hold the knitting needle at an angle of 10-15 degrees, tightly wind the newspaper strips. We secure the edge with glue. Now you can paint the tubes in the intended color, coat them with varnish or stain and let them dry. On average, about 50 tubes are needed for a basket. Because The glue makes the paper rougher; after the glue and paint have dried, it is necessary to iron it with an iron or roll it over several times.
- We start weaving from the bottom of the basket. For a square base, take four twisted tubes and connect them crosswise. As in the case of weaving straws for cocktails, you need to place the straws, constantly alternating - above the first, under the second, above the third... The principle of weaving is the same as with a standard basket.
For a round base, you need to use at least 4 tubes, and then simply braid the base in a circle. Beginners should do the following rows carefully and closely to each other.
To make the work easier and more convenient, you should use a glass or box, braiding it. When the craft has reached the desired size, we take out the object from the inside and fix the edges of the newspaper tubes.
To give strength to your craft, you need to generously coat it with PVA glue. The glue must dry completely. You can decorate using napkins and a de-blend of them, beads, ribbons, lids and other elements.
For a beginner, you can additionally watch video tutorials for a clear understanding of your creative hobby. There are many similar videos on the Internet that you can easily watch online. Below is a video tutorial.
Dandelion from cocktail straws
You need to prepare a pack of white straws, scissors, a glue gun, and 2 green tubes.
Manufacturing Features:
- You need to cut the tube, forming a fringe. It is better to do this from the beginning of the element to the fold. Slightly straighten the resulting workpiece.
- First glue 2 blanks together. There are 2 more sticks perpendicular to them. Next, other elements are glued. Place each part so that a sphere is formed.
- Next, glue a green tube to the center. Cut the second one lengthwise and finely chop on one side, forming terry.
- Glue a green straw with terry under the white sphere, imitating a receptacle.
You can prepare a few more green elements, from which you can cut out leaves and attach them to the stem of the flower.
Application
You can use cocktail accessories to make colorful appliqués with children.
There are several options for preparing the material:
- You can cut the straws into thin rings.
- Divide each element into several parts, the length of each is determined by the idea of the application.
- Cut and straighten each element from which you can cut out shapes for crafts.
The principle of preparing the material is determined by the age categories of children. To make it easier for your child to work on a drawing, you should print the drawing. The prepared material will be glued to the base along the contours of the image.
Lamp
If a lampshade on a sconce is damaged, it can be restored or a new one can be made using just such a material.
Elementary manufacturing principle:
- First, choose a frame base. You can use a plastic container or make a skeleton from the tubes themselves - glue a lattice of tubes.
- Cut the base material into pieces 1-2 cm long. You can make the pieces longer.
- Glue the cut along or perpendicular to the base of the body. You can arrange elements along clear lines or in random order.
Lamp in the style of perfectionism
If you still have a metal frame from an old sconce, you can make a completely original lamp:
Cut the straws into pieces of equal length. Use a felt-tip pen to mark the middle of each cut.
- Using a needle, thread a straw onto a thread through the marked point. The longer the bundle, the more impressive the product will look.
- You need to make about 10 of these “garlands”.
- Tie all the “garlands” to the top circle and distribute them around the perimeter.
The product will resemble a multi-level waterfall. You can change the appearance of the lamp if you move the straw cuts in different directions.
Christmas decorations
Crafts made from cocktail tubes can be an excellent decoration for the New Year tree. Such toys do not break, have volume to fill space and are easy to make. The simplest option is “diamonds” or three-dimensional geometric shapes.
You need to prepare the following materials:
- thin straws for drinks of the same color;
- needle with thread;
- scissors.
The principle of making a Christmas tree toy:
- Thread the thread into the needle.
- Thread 4 straws with a needle and tie the ends of the threads into a knot.
- String 1 straw on one end of the thread, and on the other - the other. Connect the threads with a knot.
- Repeat the pattern again, and thread the thread through opposite straws. You will get half a three-dimensional figure.
- Form the second part of the product according to the same principle, threading the straws with a needle and thread. Connections are fixed by nodes.
- Bring the threads in one place and tie, forming a loop.
The result will be a three-dimensional rhombus. Using the same principle, you can create a cube, triangle and any other geometric shape.
Crafts from tubes: siphon
Connect two straws to create a fun science experiment
and show the children how the siphon works.
A siphon is a structure resembling the letter P through which liquid flows upward without the aid of sediment. Gravity causes water to flow from the tube and reduces its pressure
.
As a result, water from the upper container, due to atmospheric pressure, overpowers gravity and begins to flow upward at the short end of the tube. Water will flow as long as its level in the container is lower than the water level in the other container.
1.
To make a siphon, carefully bend the end of one tube and insert it inside the other tube.
2.
Twist the tube a little so that it lines up and there is no extra hole between the two tubes. You can tape the junction of the tubes with tape.
3.
Place a glass filled with water next to the sink.
4.
Insert a tube into the glass and run a siphon, sucking out some water through the tubes.
5.
Lower the other end of the tube from the sink or another glass below.
You will notice how water flows from one glass to another.
“Case” for chains
Tangled chains and bracelets are a common occurrence when jewelry is stored together. A plastic straw can also be a way out of this situation. It is enough to place the chain in the tube, securing it with a lock at the edges of the tube and voila... You will have a unique case for storing the chain that will never allow it to get tangled.
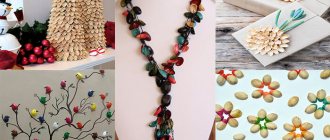
Painting made from cocktail straws
Cocktail straws are a very fertile material for creativity. They are easy to bend, cut and stick quickly. And if after many holidays you have accumulated a sufficient number of plastic straws, then you can get creative and find an unusual use for them. For example, glue them around a half-liter jar, tie them with a bow and you will get an excellent vase for a bouquet of flowers. If you cut straws 3-4 cm long and string them on a thread, you will get an original decoration (beads and bracelets) for your daughter. You can use this method to glue a frame for a photo from a party, make extraordinary Christmas tree decorations and other tricks. Today we offer you a step-by-step master class on how to make a simple painting of flowers, made from sections of cocktail straws.
Prepare the following materials for the craft: - a sheet of cardboard of a not too bright color (in the photo it is soft pink); - scissors that cut well; - a tube of PVA glue; - two cocktail tubes of each color: green, white, blue, red, yellow, purple.
So, each tube must be cut into pieces of 1 cm, 1.5 cm and 0.5 cm. You just need to make not an even cut, but an oblique one. Those fragments that consist of an “accordion” should be cut lengthwise into 4 parts and stretched. Cut the green straws like this: one 8 cm long and two 6 cm long.
Now turn on all your creativity, use your imagination and come up with the outlines of the future flower. If it is difficult for you to keep the picture in memory, then you can carefully draw the image on the sheet, only with light touches of a simple pencil. Start with the stem (the longest green section) and place it in the middle of the leaf. The straws easily adhere to PVA glue. Gradually glue colored pieces of straws on top of the stem. For example, 7 red pieces, 6 yellow ones between them, then a row of purple and blue ones, and glue the topmost white petals.
Then, from the main stem, place two secondary stems (6 cm sections) on the sides. On the right, form a red bud from 10 segments, and on the left there will be a blue flower (11 pieces of petals).
While the petals of the small buds are drying, lay out and glue 4 green leaves. For them, you need to cut the green tube into pieces 0.5 cm wide. It is better to place them behind the round hole. The leaves can be of different shapes and sizes, but they will all look beautiful and all have the same shape.
Then you can form a decorative “grass” at the bottom from those parts of the tubes where there is an accordion. It will look more expressive if you alternate colors. At this stage it is necessary to make the small side flowers more magnificent. It is better to glue purple petals onto red ones, and blue petals go well with yellow ones. In the very center of the flower, glue white pieces measuring 0.5 cm - this will be the center of the flower.
This is such an original picture obtained from cocktail tubes. All that remains is to put the work in a frame, hang it on the wall and admire the creation of your hands. Bright multi-colored butterflies and dragonflies are excellently made from pieces of cocktail straws.
Step by step making a basket from newspaper tubes
Most of us probably have old newspapers at home. You can also create interesting crafts from them. Just check out our master class for beginners. The appearance of a basket made of paper or newspaper is not inferior to a wicker basket!
To create such a thing with your own hands you will need:
- Paper or newspaper.
- Spoke.
- Glue.
- Scissors or knife.
- Paint (it is better to use acrylic) and varnishes for coating the product, brushes.
- Alcohol based stain.
- Basis for weaving.
- Beads, appliques or ribbons - optional.
Now we can get to work.
- We mark the newspaper into strips of 5-8 cm and cut it in the direction of the fiber of the paper. To determine the direction, run the nails of several fingers along the edge of the sheet. If the edge becomes wavy, then this is the transverse direction. And in this case, it is better to use the longitudinal direction, in which the edge remains smooth and no folds are formed.
- We hold the knitting needle at an angle of 10-15 degrees, tightly wind the newspaper strips. We secure the edge with glue. Now you can paint the tubes in the intended color, coat them with varnish or stain and let them dry. On average, about 50 tubes are needed for a basket. Because The glue makes the paper rougher; after the glue and paint have dried, it is necessary to iron it with an iron or roll it over several times.
- We start weaving from the bottom of the basket. For a square base, take four twisted tubes and connect them crosswise. As in the case of weaving straws for cocktails, you need to place the straws, constantly alternating - above the first, under the second, above the third... The principle of weaving is the same as with a standard basket.
Popular articles Repairing headphones yourself
For a round base, you need to use at least 4 tubes, and then simply braid the base in a circle. Beginners should do the following rows carefully and closely to each other.
To make the work easier and more convenient, you should use a glass or box, braiding it. When the craft has reached the desired size, we take out the object from the inside and fix the edges of the newspaper tubes.
To give strength to your craft, you need to generously coat it with PVA glue. The glue must dry completely. You can decorate using napkins and a de-blend of them, beads, ribbons, lids and other elements.
For a beginner, you can additionally watch video tutorials for a clear understanding of your creative hobby. There are many similar videos on the Internet that you can easily watch online. Below is a video tutorial.
The money ship has a financial voyage
Lately, many people have been trying to spend their leisure time in some creative way. Creativity is a great idea. On a cold winter evening, when a blizzard is howling outside the window, you can sit comfortably in a chair and make crafts from juice straws. This material is sold in any store. You can buy a whole package at once, such a purchase will not hurt your pocket. Moreover, the end always justifies the means.
Beginning needlewomen are interested in what can be made from cocktail straws. There is no definite answer to this question, since every creative person has his own extraordinary and original ideas. We invite you to make an unusual boat that will be an excellent interior design decoration or a perfect gift for a friend.
Necessary materials:
- straws for cocktails with a bend;
- twine thread;
- coins;
- decorative paper bills;
- cardboard;
- scissors;
- a simple pencil;
- ruler;
- glue gun or heavy-duty glue;
- wooden skewers.
First, let's prepare all the tools and materials necessary for needlework.
We take the tubes and bend them a little. We need this in order to model the stern of the ship.
We wrap each tube tightly with twine thread. We fix the twine with glue.
As soon as we wrap the seven tubes with twine, we begin to glue them together, laying them on top of each other lengthwise.
So we have one part of the ship.
- By analogy, we make the second side of the ship, only we bend the tubes at a different angle.
- Now we need to attach a tube to one part of the ship and measure the height of the side.
- We cut the tube to the required length and also decorate it with twine.
- Glue the two sides together at an angle. We decorate the bow of the ship with a transverse tube.
- We place the completed part of the ship on the cardboard.
- We trace a part of the ship along the contour and cut out a blank from cardboard. This will be the bottom.
- We still have one more part of the ship left open.
- Using a ruler, measure the distance between the sides.
- Let's cut seven tubes of the required length.
- We decorate them with twine and fix them with glue.
- Let's glue the back side to the main part of the ship. This is the kind of preparation we will get.
- Let's return to the cardboard bottom of the ship.
- The inner part will not be visible, but the outer part needs to be covered with twine.
Let's cut out another bottom blank from cardboard.
- We are assembling the ship. Glue the bottom inside and outside.
- Now let's start modeling the mast.
- Take a tube and cut off the folded edge.
- Let's measure four points that are equally distant from each other.
- We pierce the tube in the designated places with skewers.
- Then we cut off the long parts, leaving identical wooden jumpers.
Now the mast also needs to be wrapped with twine.
- All that remains is to attach the mast by pulling a twine thread symmetrically from opposite sides of the ship.
- We make sails from decorative banknotes, and decorate the sides with coins.
Mini vacuum pump
You've probably seen that plastic bags and containers with small pumps are now being sold. They pump air out of the storage facility, thereby creating a vacuum there, which is beneficial for the safety of products. Instead of spending money on this pump, you can take an ordinary cocktail straw and suck the air out of a bag of food.
Flower arrangements
You can use straws to make asters and create a flower arrangement. To work, you need to cut the tubes into 4 cm long pieces, cutting the ends at an angle of 45 degrees. Cut a circle 3-5 cm in diameter from cardboard. Using a hot gun, glue along the edge of the first row of straws. Then secure the second row, which will be located at a slight angle to the first. Pour glue into the center and insert pieces of straws into it to fill the entire space.
A craft made from cocktail tubes “Flowers” can become the basis of an original panel. Glue several ready-made asters onto a sheet of cardboard and add leaves of fabric or paper and other elements as desired. Insert into frame.
In the same way, not only asters are made, but also chrysanthemums, for which you need to cut longer pieces.
Decorative star
Crafts made from cocktail tubes can be used to decorate a Christmas tree or a party room.
A trendy decoration will be a three-dimensional star, which can be simply made from tubes using a simple algorithm:
- Select identical elements of the same color. Prepare a glue gun.
- Form a rhombus from 4 tubes, gluing the parts together with a glue gun.
- Form a long diagonal in the rhombus by gluing the 5th tube.
- Make 4 more of these pieces. Using a glue gun, glue the modules together to form a star.
- A loop of thread is attached to one of the ends, which will allow you to hook the star.
You can connect the tubes using wire or thread. Pull the material through the cavities of the elements, connecting the parts.
Multifunctional star for decoration
You can make a three-dimensional star from straws, which can be placed on a table or hung in a room:
- Prepare 20 multi-colored elements.
- First glue 2 straws together. Glue 2 more elements perpendicular to the base.
- Glue the tubes to the base in random order, creating a three-dimensional shape for the craft.
You can use super glue or a glue gun as a connector.
DIY origami sun made of colored paper and plastic tubes: master class
Let's build an origami sun with our little ones and give everyone some warmth.
- Cut out squares from colored paper.
- Fold the square in half and unfold it.
- Bend the top and bottom corners to the middle of the fold.
- We get a rhombus by bending the lower corners again.
- Place the diamond like a tie and bend the end of the tie.
- Fold it like a book so that the small triangle is on top.
- We make the remaining “rays of sunshine” in the same way and insert one into another until a circle is formed.
You can stick this sun on the wall, and you will always have sunny weather in your house! Give a smile to your kids! Be sure to make this “sunshine” with them!
By the way, a note to mothers. The tubes can be used as curlers and get great curls!
Vase made of straws
A simple option for making an interesting vase that will not break:
- Prepare a jar, bottle or tall glass, a glue gun and a pack of straws.
- Glue the straws sideways to the glass walls of the container.
- You can cut the straws into rings and place the elements perpendicular to the base. If you use multi-colored material, you can create the effect of an abstraction pattern.
Even a child can do this manufacturing principle.
Vase in 1 minute
Even when camping, you can make a colorful vase to place a bouquet of wildflowers. You need to take half a pack of cocktail straws, a rubber band and a jar.
Place an elastic band on the glass container and insert the tubes under it so that the fold is placed on top and directed away from the container. Instead of a rubber band, you can use thread, rope, ribbon, or lace.
Wreath
A wreath can become a frame for a photo, a mirror, or New Year's decor.
You can make the decoration according to the instructions:
- Cut a circle of the required diameter from cardboard. Cut out the inside of the cardboard to form a ring.
- Prepare straws. It is advisable to use cardboard or paper elements with a print. Use glue as fastening.
- Glue the straws one after another along the circle. To create additional volume, you need to glue elements on the other side of the cardboard base.
Decorate the finished product with tinsel, ribbons, artificial flowers or leaves. You can make bows from textiles, which are additionally decorated with berries and flowers. Such elements can be placed along the internal contour of the product.