- October 30, 2018
- Needlework
- Holly Golightly
Girls' interest in the iconic Barbie dolls has not slowed down for many decades. However, despite the huge assortment of children's stores regarding clothing and furniture for these dolls, not everyone can afford them. After all, branded clothes and household items for Barbie cost a lot of money. But don't despair. Today we will tell you how and what you can do for Barbie with your own hands.
Classic dress
To sew an evening dress, you don’t have to look for a tutorial video. It’s enough just to study a simple master class. As a result, you will be able to make a beautiful classic outfit for your doll yourself.
For work you will need:
- pattern;
- textile. For example, silk or chiffon;
- lightning. It can be replaced with regular Velcro or buttons;
- needle and thread;
- scissors.
The first step is to start making the pattern. It can be printed on a sheet of A4 paper. All details are subsequently cut out from it.
All elements of the diagram are cut out, applied to the canvas and outlined. After this, all that remains is to cut them out, leaving small allowances.
Then the resulting pieces are stitched and thus assembled into a single whole. After completing these steps, you need to process the edges, insert a zipper or sew on Velcro and buttons.
If you don't create an overly complicated design, you can create a DIY outfit for Barbie very quickly. The work will take a maximum of 20 minutes.
Who invented the toy and how?
This lady is of respectable age. She was born in 1959, her “mother” was the American Ruth Handler. The woman noticed how her daughter liked to dress up a paper figurine of a girl in paper outfits, and she decided to make a three-dimensional doll for her.
The prototype of Barbie was the comic book heroine Lily - a flirt, a seductress with a bright appearance. As a result, the first Ruth doll turned out to be not quite childish, with “war” paint on the face and strange body proportions. However, the rights to its production were soon bought by a well-known American toy company.
The design of the toy was finalized, its appearance changed, it became more delicate, but not without a twist. The development of the feminist movement in those years left an imprint on the “evolution” of Barbie - the doll began to be produced in the form of representatives of almost 80 professions, her costumes were distinguished by their severity, she had friends, fans, a husband and even children in the form of charming dolls.
Coat
Outerwear for Barbie dolls is no less simple to make. It can be sewn or knitted. Both options for creating a coat should be considered in more detail.
Sewing
In this case, DIY clothes for Barbie are made using the following materials and tools:
- textile. For example, boucle or wool would be great;
- sample;
- fur for making a collar;
- buttons and strap;
- threads with a needle;
- scissors.
Making clothes for Barbie with your own hands is quite simple. The first step is to print the diagram on paper and then mark all the elements on the canvas.
The details of the future coat are cut out, connected and sewn.
The resulting product is decorated. In the same way, you can sew a jacket for a doll, simply by changing the length of the workpiece.
Knitting
The process of making an outfit using this method will be more labor-intensive, but the result will be impressive.
When creating a knitted coat you will need:
- yarn. It is recommended to give preference to acrylic threads or wool, but not very thick;
- Crochet hook;
- buttons.
Knitting is done from top to bottom. In this case, you need to strictly adhere to the scheme in order to get a beautiful, unusual pattern.
The edges of the sleeves, like the collar, need to be tied using yarn of a different shade. After this, all that remains is to sew the sleeves and sew buttons to the coat. The outfit at this stage is already ready.
Making a Barbie doll
You can fashion a toy with your own hands from salt dough or polymer clay. The second option is preferable, it is less time consuming, the figurine will serve or be stored for a long time. And working with clay is much easier, especially for beginning puppeteers.
For work you will need
- clay that does not require firing;
- special knives or thin stationery;
- fine sanding paper;
- pliers, wire or strong cord, twine;
- brushes of different thicknesses, paints;
- glue and hair material.
The first stage is design, development of the Barbie project. You need to think through every detail - skin color, hair, size, whether she will have bendable arms and legs, and other points.
The next stage is the production of a frame and blanks from clay. A frame is made from wire or twine according to the prepared drawing. The softened clay is divided into pieces and two parts of the body, a head, arms and legs are formed from them (there will be 4 parts each).
While the clay is warm, the parts are “put on” the frame and given the desired shape. You can start shaping Barbie’s face and give her a “hairstyle.” The hair can be made from woolen threads or from artificial curls, which are sold in handicraft stores.
Irregularities on the body can be smoothed out with your fingers during sculpting or with thin sanding paper after the material has hardened. If the clay does not have this property, then it will have to be baked in the oven, following the instructions for use, and only then polished.
Barbie is ready, all that remains is to sew clothes for her, make her shoes, several pairs, like a real fashionista, and the gift is ready. Or maybe it will become a collectible toy in many, many years, like its ancestors from the 60s.
Fur coat
To sew a beautiful fur coat, you should make sure you have the following materials:
- fur;
- a piece of knitted fabric for lining;
- silk or satin ribbon;
- felt-tip pen;
- needle and thread;
- scissors;
- Velcro.
You also need to print the pattern.
All the details of the future fur coat are cut out.
All that remains is to sew them, combine the fur with the lining fabric and decorate them at your own discretion.
Collecting general parameters
Before you start working on the design of clothes for a Barbie doll, you should familiarize yourself with the model itself in more detail, study and measure its dimensions, structure and features of the doll’s body. Most often, Barbie is produced as a girl who has the ability to straighten and bend her limbs - arms, legs and even fingers. This all happens thanks to the presence of flexible pliable hinges at the joints. Such innovation has greatly diversified the entire doll industry as a whole. There probably isn't a single little girl in the world who hasn't played with Barbie at least once in her life.
The main dimensions of the doll are quite compact. She reaches thirty centimeters in height. Most often, Barbie is produced with white hair - she is a real blonde. Hair can be tied up in a neat, stylish ponytail, or less often, loose or arranged in an elegant, sophisticated hairstyle.
The girth of the doll's neck is large, but still proportional to the ratio of the body parameters of a real person - the doll's parameters in this place reach two centimeters. Barbie's breasts are quite voluminous; in real life they would correspond to a full size three. The doll's girth is only twelve full centimeters. The model has seven centimeters at the waist, and up to twelve centimeters at the hips.
Slippers
You can not only sew clothes for the doll yourself, but also make shoes. With a minimum of effort, you will be able to get original slippers that will obviously not be out of place in the wardrobe of Barbie or Monster High. To make them you will need:
- yarn;
- ribbon;
- scissors.
The color of the yarn can be chosen at your own discretion. The main thing is to pay attention to the diagram. If you strictly adhere to it, you will be able to create an excellent wardrobe item. The central image shows the foot. This is where the knitting process begins. Then the workpiece is knitted in a circle.
All that remains is to thread the ribbons into the finished slippers. After this, you can try on the slippers.
Headdress
- For a doll's hat, we measure the head - usually the diameter does not exceed 10 cm. You will need a little - only about 4 x 12 cm.
- Sew the edge, make a hoop by joining the joints - this will require a needle.
- Fold the piece in half so that the “face” faces up.
- Trace along the contours, leaving a seam allowance of no more than 0.3 cm. Do not move the details.
- Cut out the fields from a 13x13 cm square piece, fold it in four, then place a solid circle in the center. Mark and cut out the center piece.
- Place the bottom to the top so that it is easy to sew on. Leave a tail for the side seam.
- Sew all the places on the machine with a zigzag along the edge, making sure that there are no shifts, folds or excess. It is more important to outline everything well, then sew it properly, than to alter it.
Our cute example of hat craftsmanship is ready - all that remains is to dress up the fashion model and take her out for a walk to the envy of everyone.
High heels
Designing heels is quite challenging, but really fun. All steps of their manufacture should be considered in as much detail as possible. For work you will need:
- fabric size 100x100 mm;
- cardboard;
- miniature wooden blocks for creating heels;
- glue;
- a pair of beads;
- rubber;
- glue.
Step 1. Using the diagram, transfer all the elements onto the fabric and cut them out.
Step 2. Cut out the base of the insole from cardboard and glue the corresponding fabric element to the resulting part.
Step 3. Glue the back of this shoe model.
Step 4. Fix the toe and heels to the workpiece.
Step 5. Attach one bead to each clasp.
Having made a template from a pattern, in the future you can create many different shoes. In the future, it will take significantly less time to manufacture it.
Shoes
Original shoes for a doll can be cut from an ordinary bottle cap. To do this, you will need a pencil with a soft lead and a stationery knife, a cocktail tube, and a piece of paper with glitter.
We divide the cork into two equal parts, from each we cut out a blank for shoes, placing Barbie’s foot on it. For a rag doll, the size is not important, since the shoe will need to be glued to the leg, otherwise it will fall off. For a clay figurine, it is very important to accurately follow the curve of the foot.
We cut out the insoles of the shoes from paper with glitter and attach them to the sole. We make the top of the sandals from a piece of tube, you can make two jumpers, a heel, and then you will get full-fledged shoes. We attach the plastic to the base with glue and decorate it with rhinestones or ready-made miniature flowers. You can cut out a “stiletto heel” from the sole or leave it as is – in the form of a “wedge heel”.
Both the Barbie doll and the wardrobe for it are ready. There is nothing complicated, the main thing is to get carried away and go through the most difficult stage (creating a figurine). Any girl will be happy with such a gift, and if she took part in the work, then she will be even more happy when she sees the result.
Clothes made from old socks
It often happens that one sock disappears somewhere without a trace, and the second is left without a pair. You can give it a new life by making it into original clothes for your favorite doll. It will turn out original and stylish. Even a child can cope with such a task.
From an ordinary sock you can make various wardrobe items:
- elastic band is suitable for a top and a skirt;
- the top of the sock and elastic can be used to create a dress. The shoulders will be open;
- long socks make a long dress;
- the heel is used to create an extraordinary collar or hood.
You can make an unusual hat out of socks. They are also used to make a jacket. To do this, you just need to cut holes for the arms and head. If you sew sleeves to such a blank, you get a very unusual, stylish jumper.
DIY accessories
What additional things can be done for dolls? In addition to new types of clothes, our little fashionistas probably need mini things for dolls that will help organize their lives. For example:
Hangers made from paper clips. Take pliers, straighten out large paper clips and form them into “hangers” that can be hung on a string or crossbar. Now the entire mini-wardrobe of doll outfits will be in order.
Jewelry box. Beautiful necklaces, belts or bracelets can be stored in a nightstand or box made from several matchboxes glued together. On top you can paste them with multi-colored magazine clippings. A more reliable approach is plastic miniature boxes of jelly beans or chewing gum.
Hanger for caps and hats. Take a strong wire and a stand for a Christmas tree or pyramid, and use pliers to wind the pieces of wire onto the trunk. Twist the ends into a spiral or concentric circles (they should not injure the child). You can hang any hats on these improvised “branches”; you always have a choice of all the available items before your eyes.Skirt
To sew a skirt, you will need a rectangular piece of fabric with dimensions of 18x10 cm. You can choose fabrics of a wide variety of colors. You will also need an elastic band for the belt. Its length should be 9 cm. The width of the elastic should not exceed 0.5 cm.
You can sew such a skirt on a sewing machine or by hand. To do this, just make a seam by connecting the narrow parts of the rectangle. The upper and lower parts of the future skirt should be processed with an overlocker. If it is absent, the edges are simply folded and hemmed.
The next step is to sew an elastic band to the waistband. For this purpose, an indent of about a centimeter is made from its edge and an elastic band is applied to the wrong side. It is carefully sewn on by slightly stretching it. If tension is not applied, the elastic will simply not be enough to cover the entire width of the skirt. All that remains is to cover the fabric that remains above and stitch the workpiece again. This way the elastic band is completely hidden.
Sewing clothes for a doll is an incredibly exciting process. If you show your imagination and don’t be afraid to experiment, Barbie’s wardrobe will expand significantly. It will be possible to make many different outfits for her. Naturally, playing with such a doll will be much more interesting and the child will be completely delighted. After all, the girl will have the opportunity not only to dress up her Barbie, but also to create new images on her own.
Sewing process
The seam should be applied in a zigzag pattern from the edges of the sleeve. Bend the fabric from the back 1 cm, sew Velcro there. There is no need to sew any more stitching on the edging; just attach one more piece of Velcro to the reverse side. As a result, our work is simply and neatly fastened.
Fold the front and back, sew a seam no more than 1 cm wide. The lower part expands during processing.
Perform the first fitting on the doll. Put the blouse on inside out, mark the locations of the darts, and stitch them. Since the back is shorter than the front, trim the excess with a 5mm margin for finishing the edges.
We finish sewing the skirt. For it, reserve a square of 10 x 35 cm, process the cut with a decorative seam. In this case, it is better to loosen the top thread so that a couple of decorative stitches of 2-3 mm each can be placed there. Pull the thread for a neat gather.
Recommendation: tie all the threads into knots so that nothing comes unraveled or untied.
If you did everything correctly, the top and bottom of the model will be equal in length. You don’t have to sew the skirt and bodice and leave them separate, although according to the classics, they need to be connected. Connect both parts and sew with a 5mm seam. All folds should be distributed evenly; it is important to insure yourself with extra fitting.
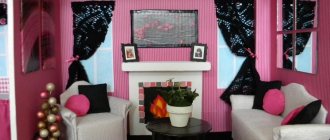
What available tools and materials may be useful?
To create doll furniture and decorate the interior of a toy house, the following will be useful:
- matchboxes - they will become drawers of chests of drawers, desks, dressing tables, cabinets, chests of drawers for linen;
- cigarette packs – suitable for equipping Barbie’s dressing room and storing her boots;
- shoe boxes - these will make beds, tables, cabinets for large dolls;
- boxes of baby cereal, perfume, and other cosmetics;
- colored plastic bottles, yogurt cups;
- soft foam sponges, viscose napkins;
- pieces of plywood, fiberboard, wood cuts, boards;
- scraps of fabric, leather, gauze;
- plastic “eggs” from Kinder surprises;
- remnants of wire, chains, foil;
- sewing, knitting threads, laces;
- metal tin cans;
- paper, cardboard, wallpaper, PVA glue;
- tape, colored self-adhesive film;
- polystyrene foam, plasticine, polymer clay;
- gouache, acrylic, nail polish;
- beads, buttons, LED lights.
With minimal skills in wood carving, sewing by hand or on a machine, embroidery, it is easy to create incredible doll crafts.
Dresser or dressing table
It is very convenient to cut from a small box, where the cabinet is about 7 cm, the wall for the mirror is 16 cm, the width is 8 cm. Connect everything by gluing foil as a mirror and handles with beads. Decorate according to your desire and imagination.
Another simplified version of a chest of drawers is glued matchboxes. All children will like it because it has drawers.
It is enough to glue the boxes tightly to each other, or you can additionally attach a cardboard frame. Cover with wallpaper, napkins or other decor.