In order to get a good harvest, the land not only needs to be plowed and sown. During the growth of various crops, the soil also needs to be loosened and cultivated. It is necessary to pull out all the weeds and it is especially important to hill up the soil. A cultivator is perfect for these purposes. You can make such a device at home with your own hands, you just need to have a great desire.
Do-it-yourself cultivator for walk-behind tractor, drawings and dimensions. How to make a cultivator for a walk-behind tractor
Before making a cultivator for a walk-behind tractor with your own hands, it is necessary to treat all metal elements with a special anti-corrosion compound to prevent the premature appearance of rust after frequent contact with the ground.
Simple models can be made without drawings. To make and correctly assemble more complex devices, it is necessary to plan the work, calculate the dimensions of the module and parts.
A homemade cultivator made from a pitchfork is a simple way to reprocess (remake) products. To do this, the teeth of the mechanism are bent with a hammer like a corkscrew and placed on the handle. A shovel handle is used as a handle. Electrical tape is used for fastening.
Some craftsmen manage to make a cultivator with their own hands from a bicycle frame with a wheel. A steel rod is welded or bolted between the 2 base blocks. The head is mounted to the crossbar. For this design, it is recommended to take a medium-sized wheel.
In order to correctly assemble a disc cultivator and work correctly with cutters, it is necessary to design diagrams of components and individual parts. Taking into account the deformation of the discs, special adjusting nuts are used. The discs are welded to bushings located on a rotating axis with brackets. It is necessary to provide a protrusion on the bracket where the pipe will pass. The cultivator handle is attached to the pipe surface.
Disc harrow for cultivation
A disc harrow can be constructed from a battery formed by 8 discs that are spherical in shape. According to the type of work, it will be a homemade cultivator for a walk-behind tractor, the width between the cutting elements of which will be 15 cm. The harrow interacts with the frame according to the hinged principle. The length of the base can reach 130-140 cm, and the width - 65 cm. In this case, corners with a section of 45 x 45 cm are used for the frame. The depth of penetration into the soil is up to 10 cm, and the approximate working width is 120 cm. The advantages of such a harrow It’s also worth mentioning the ability to adjust the angle – up to 17 degrees.
Do-it-yourself cultivator for a walk-behind tractor, drawings. DIY hand cultivator
The simplest option for making a cultivator at home. This is a small design, the capabilities of which are enough to grip a strip 20 cm wide. The basis of the device will be a handle in the form of a metal pipe with a diameter of 2.4 cm. The length of the element is selected specifically for the height of the user. A strong wooden axle must be installed on the bottom of the pipe. The processing organs will be attached to it. Despite the simplicity of the design, homemade hand cultivators can be equipped with wheels. They can be cut from a metal sheet 0.3 cm thick and secured with nuts.
There is another design option, which involves a base in the form of a strip of springy metal. In this case, the parameters of the workpiece should be as follows: length - 5 cm, width - 2 cm, and thickness - approximately 2 mm. A wooden handle is attached to this part, through which processing will be carried out. The tape is folded, so it can be shaped into a loop, and then the edges can be turned on both sides with a file. The diameter of the loop can be any; this parameter is calculated based on the area of the garden.
Electric walk-behind tractor
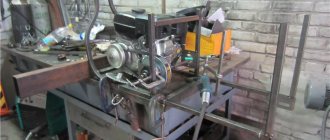
Every peasant living on his own land, even if poor, must have a tool for cultivating it (the land). At the beginning I had one shovel, then two, then a rake and a fork were added to them, and finally, the need arose to purchase a mechanical device, in common parlance - a walk-behind tractor. Well, really, how long can you bend your back on the field? A cultural shopping trip in search of something suitable plunged me into despondency; everything “suitable” cost from 20 thousand Bank of Russia tickets. Or more. And then, as always, she helped me out. a bunch of scrap metal that a good friend of mine collects from our village.
So, from this scrap metal I got what was left, namely: a frame with a frame, a piece of a motor and augers from a Mole walk-behind tractor, which is somewhere. once upon a time. in Soviet times, I was plowing something... in someone's garden. It’s clear that everything that was inherited was in a deplorable state, but of course, who would sell a good thing for scrap metal!
To make an electric walk-behind tractor, I needed the following:
1. Actually, the walk-behind tractor itself is in the form of a heap of old scrap metal 2. Electric motor from an old elevator 4 kW 3. Capacitors 1. 3 microfarads 400 V in the amount of 70 pieces. 4. Switch 250V 10A 5. Cord with plug 5 m 6. Electrical tape 2 rolls 7. Bolts, nuts for attaching the engine to the frame. 8. Drill, drill bits. 9. Grinder, welding.
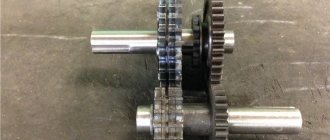
I went through the gearbox, straightened the augers with a sledgehammer, and removed everything unnecessary, leaving only the pulleys, frame and steering wheel of the walk-behind tractor. Without even trying to restore the disassembled engine, I immediately decided to bolt it on instead. electric motor!
Moreover, a 4 kW motor from a freight elevator had been rusting in the garage for a long time. I also got it on the occasion when a freight elevator was being replaced in a friend’s store. I couldn’t take the entire elevator; I only got the electric motor.
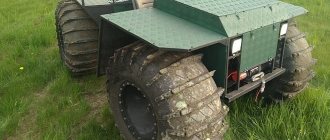
As it turned out, the motor was three-phase, 380 V, so we had to redo the circuit for connecting it to a single-phase 220 V network using a phase-shifting capacitor.
There are plenty of diagrams and formulas for calculations on the Internet on this topic; after a short search and several practical experiments, I chose this one.
Previously, I had used various gasoline walk-behind tractors many times, renting them from friends or neighbors. But now I felt, as they say, the difference. The impressions from the work are fantastic, it plows quickly, without noise or smoke, everyone likes it and everyone wants to try it! It plows a six-meter bed in two passes in 7-8 minutes. And the cost of operating such an electric motor unit is several times lower and simpler than a gasoline one.
Homemade cultivator for a walk-behind tractor with your own hands. For mini tractor
To make a homemade cultivator for a mini tractor or for a walk-behind tractor with your own hands, you will need metal plates, square, 15*15 centimeters in size, rectangular - 25*4 centimeters and a steel pipe. You need to start making a cultivator with cutters.
In order for the cutters to be reliable and suitable for processing all types of soil, and not just loose black soil, they must be assembled using bolts - holes must be drilled in the workpieces, the number of which depends on the size of the metal strips that will serve as blades.
For mini tractor
The longer they are, the more holes are needed to secure them securely. Next, the strips are fixed to the workpieces, overlapping each other in a circle, and clamped with bolts.
Welding can also be used for these connections, but in this case they will not be strong enough, and repairing and replacing knives will be a complex process. Welding is used here to connect the cutters together. To do this, holes are made in the blanks, the diameter of which must correspond to the outer diameter of the pipe.
The cutters are put on top of it and secured with tacks or short seams. This product can now be put on the shaft of a mini tractor and used for its intended purpose.
Electric garden bed: do it yourself
Not so long ago, the market was blown up by a new product - a home electric garden bed. Its essence lies in the use of natural power sources and the conversion of free earth electricity into current due to the movement of quanta in a gaseous environment. The low potential of electricity is almost equal to the power of the processes that occur in plants, which is why they are used to stimulate plant growth. This device helps to speed up, in particular, the processes of sap flow, which allows you to get several harvests in one season.
Cultivator for walk-behind tractor
Cultivator for Motor Sich walk-behind tractor photo
Attachment for walk-behind tractor, cultivator for walk-behind tractor.
A cultivator for a walk-behind tractor is an attachment for cultivating land.
Cultivators are used for continuous tillage of the soil before sowing and for cultivating crops, loosening, weed control, moisture conservation, and hilling are carried out.
The difference between a cultivator and a plow is that a cultivator performs loosening without turning over the soil layer.
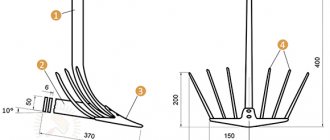
Cultivators consist of a cultivator stand and a cultivator arrow photo.
From left to right:
- Flat-cutting pointed cultivator share
- universal cultivator share
- loosening rigid cultivator share
- loosening spring cultivator share
The arrows of the cultivator paws are made of steel grade 65G; when sharpening the cultivator arrows, the metal must not be overheated.
It is also possible and necessary to harden and heat treat the cultivator pointer. For hardening, the paw is heated to 820° (light cherry-red color of heat), after which the pointer is cooled by immersing it in an oil bath. After cooling, the cultivator needle is released, that is, it is again heated to 400° (gray tarnish) and slowly cooled in air.
After such operations, the file does not leave any mark on the cultivator arrows and the cultivator tines normally perform their job of cultivating the soil.
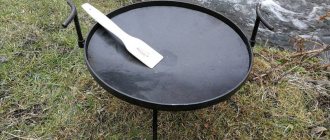
Option #4: a production meat grinder to help us
All of the above equipment is quite simple. But in your own workshop you can make a homemade electric cultivator. This once again proves that the possibilities of home craftsmen are almost limitless. To implement this idea, you will need an old industrial meat grinder. On its basis, an effective electric gardener’s assistant will be built.
An electric cultivator can be made on the basis of a meat grinder for industrial purposes: you get a fairly powerful unit that will last for several years
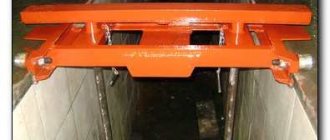
Everything is not as difficult as it seems if you have a welding machine and a master who knows how to use it for its intended purpose. Two corners should be attached to the gear housing. Bent pipes are welded to the corners, which will be used as handles. Another piece of pipe is welded between the resulting handles - a spacer, which gives the structure the required strength.
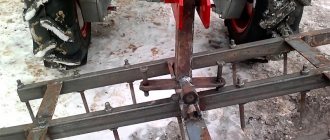
The main structural part is the shaft. It will have to be turned out of ordinary scrap. The connection is carried out as in the original: in a slot. The meat grinder attachment is chipped off with a sledgehammer, after which a bushing with thick walls made of cast iron remains. A blank machined from scrap is placed into it, to which lugs in the form of a screw are welded. They are cut from car springs. Other lug material options were used, but these proved to be unviable.
The lugs are located at an angle of 120 degrees. They need to be screwed out as they rotate, then it will be easier for them to enter the ground, and the cultivator itself will be easier to control. The engine of the device is connected according to the “triangle” circuit, the start is capacitor. For ease of operation, the engine switch is installed on the cultivator handle. The device will last a long time if, before starting work, you lubricate the mating of the homemade shaft in the cast iron bushing with any used oil.
Take a good look at what the lugs should be and how they should be positioned: the efficiency of the device and its durability depend on this
DIY cultivator for walk-behind tractor. DIY flat cutter for walk-behind tractor
In recent years, many land owners are increasingly using new technical developments that can make life much easier and spend much less time on certain tasks. Walk-behind tractors, cultivators, mini-tractors and other devices have a tangible impact on the life of an agronomist.
If traditional hoes were previously popular, which forced them to cultivate heavy soil in a half-bent state for several hours, today they have been replaced by innovative flat cutters designed for operation together with a walk-behind tractor.
Flat cutters for a walk-behind tractor: advantages and disadvantages of using the device
Flat cutters can be safely called a kind of hybrid of a harrow and a knife. They are mounted parallel to the ground or at a slight angle. As a result, the device sinks into the soil to a shallow depth and cuts off the roots of weeds, thereby turning the soil itself, promoting better preservation of moisture and nutrients.
In addition to the above positive aspects, flat cutters:
- improve soil condition;
- destroy crusts and lumps formed after heavy rain;
- repel pests;
- prepare the soil for long-distance planting;
- perform inter-row cultivation of crops;
- saturate the top layer with oxygen.
Naturally, in some cases, owners purchase flat-cutters with a ripper for a walk-behind tractor, which not only perform the mentioned tasks, but also remove excess load from a person, are easy to operate, do not require lifting, and are characterized by excellent productivity. Such devices often have a fairly affordable price, but some craftsmen manage to create flat-cutting rippers for walk-behind tractors with their own hands.
Do-it-yourself flat cutter for a walk-behind tractor: a simple manufacturing method
If the walk-behind tractor has quite impressive characteristics, it is advisable to make several flat cutters and place them on the device. Thus, you will get an even more productive unit that will not only save time, but also energy.
For excellent maneuverability of the created flat cutter, you need to take care of the appropriate wheels. Almost any materials are suitable for them. An iron tube would be an excellent choice for an axle.
Then, it is advisable to weld two circles on both sides of the concrete cutting. According to the diameter, you need to attach several wires (using a welding machine), the diameter of which does not exceed 8 mm.
On the inside of the axle, it is necessary to leave space for placing the bearing and further installation of a homemade plane cutter. Since the walk-behind tractor body is not always made of very durable material, the main emphasis is on the axle. After the bearing is attached, a plate should be welded to it.
Flat cutter blades can be created from separated mower parts. Their lightness and compactness make them ideal cutting element components. It is important to make sure that they are securely fastened, otherwise the structure will move from side to side and will not perform its task efficiently.
To limit the depth of immersion, small wheels are often used. A standard children's car can be an excellent “donor”.
The wheels themselves can be supplemented with iron parts so that the plastic does not deteriorate while driving. The immersion depth must be at least 5 cm.
To increase the weight on the flat cutter for the cultivator and increase the pressure for entering the soil, you can weld a weighting agent in the form of any part. If the necessary components are missing, you can use a basket of bricks, but such a solution is not convenient.
For a better understanding of the design features, it is suggested that you familiarize yourself with the drawings. Featured videos
can also become a guide, because on these materials many craftsmen share their experience with users and reveal the secrets of creating truly durable and reliable attachments for walk-behind tractors.
It is worth noting that the created flat cutter is suitable for both Neva walk-behind tractors and equipment from the brands Centaur, Salyut and others. The versatility of the product allows you to create a truly excellent assistant at home and without any special financial costs!
Useful tips
Before you start manufacturing a device or modifying it, you need to decide why it is needed. For example, units for removing weeds and simply loosening beds can be very different. For greenhouses, you should choose lightweight models with manual control only. If the areas being processed are quite large, then you should opt for options that run on fuel or electricity.
The stages of manufacturing a cultivator are important, but do not forget about the operating rules of this unit. The most important thing is to keep the driving mechanism in working order.
When the cultivator will not be used for a month or more, it must be stored. To do this, you need to remove fuel from it, clean the engine surface and all other elements. It is not advisable to clean parts of the device using strong water pressure. Metal parts must be lubricated with oil to avoid unwanted corrosion. The unit must be stored in a dry and dust-free room.
To learn how to make a cultivator with your own hands, see the following video.
Cultivator for MTZ walk-behind tractor. Description
The active growth and development of small farming in the 90s provoked industrial enterprises to produce compact units to facilitate agricultural work. These machines were significantly superior to tractors, which the average farmer could not afford to maintain. They were not only compact in size, but also highly maneuverable and productive.
However, by this time the Minsk Tractor Plant (MTZ) had already introduced small-sized models Belarus-05, MTZ 082 and MTZ 112 to the agricultural market, which immediately gained popularity due to their reliable design and ease of maintenance. Serial production increased and it was decided to move further production to the Smorgon Aggregate Plant, which was a branch.
The MTZ model range was expanded with walk-behind tractors with different characteristics and, accordingly, they had different indices in the name 05, 06, 07, 08, 09, 10 and 12. But only some 05, 06, 08, 09 and 12 gained popularity thanks to a successful combination functionality and reliability. Today, the main focus at MTZ enterprises is on the production of models 06 and 09.
Advantages of MTZ models
- Versatility, thanks to which you can connect any attachments to the walk-behind tractor to facilitate agricultural work. The design provides not only for the use of plows, cutters, harrows, and other things, but also brushes, blades and snow blowers for cleaning the area.
- Small dimensions allowing the walk-behind tractor not to take up much space when stored.
- Maneuverability, which is achieved through a well-thought-out design despite the significant weight of the unit.
- Easy to maintain.
- Possibility to repair without resorting to service centers.
- Low requirements for the quality of fuel and lubricants.
- Availability of spare parts.
Disadvantages of MTZ walk-behind tractors
- High cost compared to analogues from other manufacturers;
- Unclear gear fixation (as noted by owners);
- The need to apply effort to switch the differential;
- Mandatory running-in before use.
- Weight. It can be considered as advantages and disadvantages at the same time, because such walk-behind tractors are quite difficult to control on wet soil.
Cultivator for the Neva walk-behind tractor. Equipment for plowing land
Most often, a motor unit is purchased to be used as a motor cultivator to perform the hardest work on earth: autumn plowing and cultivation of the fertile layer. Thanks to the very large torque output from the gearbox, the power is 7-10 hp. enough to process even loamy or saline soils in several passes.
To restore the soil structure, the manufacturer offers the following tool options for work:
- A plow for a Neva walk-behind tractor with a coupling device is most often equipped with a standard or universal design of a coupling device with a frame. The walk-behind tractor allows you to plow medium-heavy soil, roots and young growth of trees;
- Cultivators and cutters for the Neva MB 2 walk-behind tractor allow you to more deeply and thoroughly fluff up the soil, chop the roots of weeds, turn vegetation debris into mulch, and use the walk-behind tractor as a multi-cultivator.
In addition to the single design, there are paired plows that allow processing with a pair of cutting edges with soil dumping in two rows, as in the photo. But it is recommended to work with such serious devices on the Neva MB 23 or Neva MB23SD motor units.
You should not expect to plow virgin soils with a walk-behind tractor; medium-heavy soil with a lot of roots and weeds is usually too tough for even the heavy MB 23 walk-behind tractors. The Neva was created to work on already plowed soil. In this case, cutters, cultivators, and plows work great.
On salt marshes and clayey soils, the rotational power of the lugs and their weight are not always enough to plow the compacted layer of soil. Often, the hooks are welded with additional weights, for example, flywheels from trucks, which lowers the center of gravity of the walk-behind tractor, makes it more stable and makes it heavier by 20-25 kg. The width of one lug wheel is 210 mm with a diameter of 460 mm.
Using the attachment on the hiller's motorized unit, you can quite successfully loosen the soil, both before planting and to remove weeds in the rows between plants. But working with such a device is quite difficult; knowledge of the specifics of setting up the tool is required.
Classification and principle of operation
The design and operating principle of the unit are not very complicated.
That is why many summer residents decide to make an electric cultivator with their own hands.
Drawings of the device prove that it is quite possible. The main design elements are:
The frame houses the electric motor and gearbox. The working parts - opener and cutters - are installed on the output shaft of the last element. The steering wheel with handle is attached to the frame using a mating element. The frame also has a wheelbase. The depth of the dig can be adjusted using a bolted opener or a handle. The average productivity of industrial units is about 3 acres per hour.
A similar indicator can be achieved with a homemade device.
Nowadays you can find a large number of cultivator models on sale, differing in technical characteristics. Most often, these units are classified according to the following parameters:
- Weight - lightweight models weigh no more than 10 kg.
- Power - the range is quite large and ranges from 1 to 12 hp. With.
- Number of attachments - when choosing, a summer resident should decide on the possible range of work, since the required number of attachments depends on this factor.
The cultivator up to the walk-behind tractor is self-propelled. What is a walk-behind tractor
A walk-behind tractor, or motor-cultivator, is a self-propelled two-wheeled unit that is equipped with an internal combustion engine. The device moves freely forward, and the summer resident walks behind it, holding handles with various components and controls. Many available models have multiple forward and reverse gears. In order for the operation of such an invention to be as productive as possible, it is equipped with additional tools, including a plow, which allows plowing and cultivating the land.
The average weight of a walk-behind tractor reaches 100 kg, and the engine power often exceeds 8 horsepower. Due to such features, such a tool can become indispensable for plowing a garden area.
You should pay attention to the fact that all walk-behind tractors are equipped with a special drive for attachments, which allows you to transfer part of the engine power to a suspended mower. Basically, such a universal mechanism allows you to cope with various agricultural work, including:
- plowing the land;
- cultivation;
- transportation of the crop (in this case, you need to get a small trailer);
- cutting the grass.
With the help of such miniature trucks, residents of our regions transport firewood, fertilizers and crops. In winter, it can be used as a snow removal tool. Even the weakest model can easily pull a load weighing up to 400 kg.
Design and principle of operation of an electric cultivator
An electric cultivator is a device consisting of an electric motor and a gearbox, which are placed on a frame. The working bodies (cutters and opener) are attached to the output shaft of the gearbox. The steering wheel with handle is connected to the frame through an interface element. A transport wheel is mounted on the frame. In some models, you can move the steering wheel and lock it in a given position.
Operating principle of an electric cultivator
Through a worm gearbox , the electric motor transmits rotational torque to the working parts (cutters).
Thanks to the sharp blades of the cutters, high-quality soil cultivation is possible. The plowing depth can be adjusted with a coulter clamped with bolts or by moving the handle of the device up and down. The width of tillage can reach half a meter, and the maximum plowing depth is 25 cm.
The average productivity of electric cultivators is approximately 3 acres per hour, but the value of this characteristic is largely influenced by the nature of the soil (sandstones are easier to cultivate than loam). The rotation speed of the knives is 50 rpm. Power consumption of devices is up to 2 kW.
Using a steering wheel connected through an interface element to the frame, a person controls the electric cultivator. Thanks to the wheel, the unit can be transported. Some models provide the ability to adjust the position of the steering wheel (in accordance with the physical characteristics of the user or due to the peculiarities of the technological process, when a person must be on the side of the device and not walk on plowed soil).