It's nice to ride a bike in dry, warm weather, feel the fresh breeze, and admire the beauty of nature. But sometimes during a pleasant walk you encounter troubles - the circuit may open. Our conversation will focus on how to remove a chain from a bicycle without a lock.
Separate sections of the chain on bikes of domestic manufacturers are interconnected by locks, which are easy to disconnect if you need to replace it. The chain travel in ordinary bicycles is straight, without deviations from the sprockets. Speed bikes are more delicate and prone to mechanical damage. The solid chain in them is located at an angle to the frame and the sprockets are not connected to each other by a straight line. Therefore, their owners are often faced with the task of removing the chain from a speed bike without a lock. Our article will help owners of different bikes with this.
Sequence of actions for removing a chain from a bicycle without squeezing it yourself
The squeezer is a useful device. However, it is not always at hand. What to do then? The prospect of being left in the middle of pristine nature somewhere many kilometers from the city does not look attractive. You can remove the chain from the bike without squeezing it. Doing this on your own will not be easy, but it is quite possible. Let us consider in detail the options for disassembling a chain with and without a lock.
Model with lock
Lock.
How to check if a chain has a lock? As easy as pie! A quick inspection to see if the chain has a link that is different from its neighbors. This is the castle. You can disconnect it by moving the pins on each of the links with your hands or pliers. To assemble the chain, you need to do the same steps in reverse order.
Model without lock
In this case, it will be difficult without squeezing. And the result will be unpredictable. But, if there are no other options, choose the lesser of 2 evils. So, we remove the chain without a lock from the bicycle using improvised means in this order.
- Screw an ordinary vice to the table.
- Secure the chain in a vice by placing a nut on one side, the hole of which corresponds to the pin.
- Attach a small screw with a head on the other side.
- While holding the vise, push the pin into the nut hole with the ball.
Important! In order to open the circuit, freeing one side is not enough. You need to move the link and remove the chain or add another ball and continue trying
Summing up, we can confidently say that the squeeze is an indispensable thing on the road for every cyclist. And if a broken chain with a lock can still be removed from the bicycle without this device, then as for a chain without a lock, it will be difficult to do without it. However, in case of form major circumstances, you can use the instructions given above.
Other replacement options
The men used a variety of available tools instead of the usual wrench.
Pliers
Simple and reliable - tested more than once. Using pliers incorrectly is simply impossible! Grab yourself tightly and twist!
adjustable wrench
Of course, if a master finds himself in such a situation, he may well have an adjustable wrench.
You will only need to adjust it so that the fastener being unscrewed is firmly grasped by the jaws of the key.
Files
Two files will do the job. Their canvases at one edge must be securely secured with wire, tape, a suitable ring, etc.
After this, the files are placed on both sides of the fastener. This is done so that the nut is approximately in the middle of the blades. Holding both handles of the file at the same time, they begin to unscrew.
Small vise
An option familiar to handicraft craftsmen who have small vices. The nut is secured in a vice and then unscrewed.
Calipers
Another alternative option is a caliper. They operate similarly to the options already described.
It is important not to forget about your own safety! If the caliper comes off the fastener, it can cause injury. Sometimes men risk performing the necessary action even with the help of large scissors
They clamp the nut with the handles of scissors
Sometimes men risk performing the necessary action even with the help of large scissors. They clamp the nut with the handles of scissors.
We do not think that this operation should be repeated. Especially if you do not have such experience and you do not feel confident in performing the procedure.
Wooden strip and nylon tape
Not the most traditional way, but why not try it if you don’t have anything more suitable at hand.
A nylon rope (at least 15 cm will be needed) is tied tightly in the middle of the wooden plank. The free edge of the nylon begins to be wound around the nut. Twist the rope until it ends. Now unscrew the bar. Together with it and the nylon, the fasteners will move from place.
Reasons for the break[edit]
All possible causes of a circuit break are not fully known, and this can happen to anyone, but, nevertheless, such a breakdown is a rather rare occurrence. It is believed that the following reasons can lead to a break:
- Heavy chain wear;
- Incorrect chain assembly;
- Incorrect use of the front derailleur;
- Heavy biker weight.
In real life, the greatest chance of breaking the chain comes from excessive force applied to the pedals. The power, as they say, is there - no need for intelligence. Moreover, there may be some intrigue here - what won’t hold up first: the pedal axles, connecting rods, sprockets, or even the chain. As a rule, when a break occurs, only one (which turns out to be the weakest) link of the chain is damaged or destroyed; in order to continue movement, it is necessary to remove it and put the chain back together. In this case, the chain can be shortened to a critical length, so after repair, as soon as possible, you should check the length and, if necessary, increase the chain with spare links.
Installing a chain on a bicycle
To install a chain on a singlespeed, you just need to hang it on both sprockets, press in a pin or snap the lock. With high-speed bikes it will be a little more difficult:
- Fix the derailleurs on the small chainrings.
- Taking into account the location of the tension rollers, put the chain on the sprockets.
- Combine the links.
- Clamp the chain and press in the axle. If the bicycle chain has a lock, we do without squeezing it.
After the installation is completed, you need to check the chain movement: spin the pedals several times. If there is no sagging or difficulty during torsion, then the chain has the optimal length and is installed correctly.
Every owner of a two-wheeled horse can cope with the removal and installation of a bicycle chain. A simple and simple procedure will not take much time, but it will be a great help on future trips!
If you ride a bicycle for many kilometers, the spare parts will sooner or later wear out. After a long mileage, the bicycle chain will “stretch” and will need to be replaced. Technically the chain does not stretch
, but the pins that connect the links wear out, increasing the length of the chain.
Stretched chain
accelerates wear on the cassette and chain rings on the sprocket, so getting a new chain when the stretching is already noticeable is a good idea. It is recommended to replace the chain every 1000-1500 kilometers. By the way, replacing a chain is much cheaper than replacing cassettes or chain rings on a sprocket.
The chain repair and shortening information below will be very helpful.
Elimination of defects
A common type of wear is sagging of the chain when its length increases relative to the original. Previously, critical values of the length of a bicycle chain were considered at which it cannot be used. Everything is true, but the chain does not have to be thrown away immediately, but can be repaired. Under prolonged loads, the axles become loose, which causes longitudinal and transverse expansion. It is impossible to eliminate the transverse one, but it is quite possible to tinker with the longitudinal one.
The extra links must be removed in such a way that the chain runs smoothly and without tension along the large sprocket. Using a squeezer, excess links are removed, and the axle shafts are completely pulled out from the elements being removed. The main thing here is not to make a mistake and not pull out too many links.
If you have to drive with a stretched chain, then in order to prevent it from falling off, you can install so-called chain stabilizers - parts that prevent the chain from flying off when driving. There are several types of such devices:
- Roller with two locks.
- With wide casters.
- Frame (or rollerless).
Using dampers as protection is, of course, good, but it would be better to think about changing the chain.
Opening the lock and squeezing the link axis
Opening the lock is quite simple: use a screwdriver or other object (for example, a knitting needle) to pry up the pincer clamp. The main thing here is not to damage it, and even better, not to lose it, otherwise you won’t be able to fix the chain later. Next, we uncouple the entire link. That’s it, you can remove the chain and do whatever you want with it: clean it, throw it away or shorten it. However, we'll talk about this a little later.
Lock in disassembled condition
You can disconnect a continuous chain only with a special tool - a squeezer. With its help, you can easily disassemble the link without damage. The procedure is simple, but there is no need to rush:
- First, select a link for disassembly.
- We insert the chain into the position of pressing out and pressing in the pin (link axis).
- We tighten the screw with a handle and pull out the axle. The direction of extrusion is towards the squeeze screw, that is, towards yourself.
You should not remove the pin completely, as it will not be easy to return it to its place later.
Hall chain release device
Squeezing loosens the axle a little, so when disengaging again, you should select a different link. Pressing the axle into a link is carried out in the opposite order: connect adjacent links and press the pin with a screw.
The best ways to secure a chain
Among the most reliable methods of re-fixation are the following options:
- Soldering the rod to adjacent links using a soldering iron. This method will allow you to fix the chain, but if you disconnect it again, you will have to break the structure.
- Using a special lock to connect the balls. It can be purchased at the store for a small amount.
- The use of a lock in the form of a hook for reliable fixation and convenient and quick fastening of the ends.
Using the methods described will help the owner to separate the ends of the chain and reuse it. The use of a lock will make it easier to use the product in the future, thanks to this a person can easily remove and put on the chain.
Execution technique
We suggest using the method of attaching a special lock with a hook for quick closing and opening. This can be done according to the following plan:
- Separate the rod anywhere using wire cutters or carefully tear it apart with your hands.
- Take two small pieces of wire and loop them around each ball at both ends to form a loop.
- Thread the wire through the hole in the lock.
- Using pliers, pinch the wire and secure it in the form of a loop or knot.
- Connect the edges of the lock, the chain is ready for use.
Bicycle chain parts and necessary tools
Chain wear indicator
: A typical chain wear indicator hooks onto a pin in the chain while the other end is inserted between two pins or rollers. The numbers on the tool will show how worn the chain is and whether it is time to change it.
New chain
: The type of chain depends on the number of speeds of the bicycle. So, for example, if the bike is 9-speed, you need to buy a 9-speed chain. More advanced chains include a special coating that will delay the appearance of rust, or they are already made of stainless steel.
Replacing pins or connecting link
: New chains immediately come with a new pin or special link called a connecting link that connects the 2 ends of the chain together. If you are repairing an existing chain, you will need to buy replacement pins or connecting links separately - they must be compatible with the chain speed and brand.
Squeeze
: If you have a standard link chain, you will need a compatible puller that will allow you to easily remove the old pin and install the new one when disconnecting and joining the chain.
Pliers:
If you have a chain that connects to a connecting link, you will need pliers to make the process of disconnecting and connecting the connecting link easier.
Symptoms of a problem
First of all, you should pay attention to chain malfunctions on multi-speed bikes. Traditionally, riding time is determined by mileage, but these values are too approximate, because everything depends on the cycling conditions: road quality, gear selection, speed, load on the pedals and, accordingly, on the front sprockets
The first signs of a bicycle chain failure are inaccurate gear shifting and suspicious sounds (provided that the chain has not lost its lubrication). The following method will certainly help you determine the malfunction: bend it away from the largest sprocket and look at the number of free teeth. If the chain moves freely from three or more teeth, replacement is required urgently. Two teeth “warn” that wear is just around the corner, but you can still ride.
Using the same method, you can see if the chain is loose on a single-speed bicycle: bend it away from the front sprocket and look at the number of teeth.
Determination of the degree of attenuation
Another way to determine wear is to measure the length:
- 304.8 mm is the optimal chain length.
- 306.5 – 307.5 – average wear, suitability for repair. You can still drive.
- 308 mm – high degree of wear of both chain and sprockets.
- More than 308 mm – damage to the entire transmission.
Measuring elongation requires removing the chain completely from the bike.
Standard removal process
All guides describe the same procedure for removal. To do this, you will need, first of all, a small set of tools - without them it will be quite difficult.
Tools
- rear wheel removal wrench;
- pliers for holding segments and pins;
- squeezer - a device for pressing out pins, without a lock - the most important tool in the process.
Process
Let's take a step-by-step look at how to remove a chain from a bicycle:
- We clean the links from dirt - it will interfere with each subsequent step.
- Removing the rear wheel is not a necessary step, but it is much easier to work without it.
- Press out the pin (the metal cylinder that closes each link) using a squeezer.
- Disconnect one link.
- Remove the outer links from the switches.
The reverse sequence is similar - put the chain in place and assemble the structure back, riveting the pin using a squeezer and rotating it in the opposite direction.
No tools
In the absence of a squeeze, you can install everything back without it. Pliers and any strong cylinder, for example, a small hexagon, will help. By carefully clamping the cylinder, the pin can be riveted in the same way as a squeezer, it just requires much more attention and force.
Models with a lock can be unlocked using a tight rope or cable. This allows for quick repairs literally in the field, for example, when the chain suddenly breaks on a short hike.
Removing the lock link without tools
Customer Reviews
Vladislav, 26 years old, Perm: “I bought a puller from BIHAND. A good tool, you can take it. Despite the fact that the cassette was over-tightened, he coped with his task, and the edges remained in perfect order.”
Sergey, 31 years old, Vladivostok: “I have Shimano cassettes on my bike. That's why I bought the puller from the same company. I’m happy, it’s made of high-strength steel and has been in service for two years now.”
Anton, 42 years old, Moscow: “I bought an expensive set of tools. It contained a puller with a handle, I don’t remember the manufacturer. No problem, it does its job.”
Using a chain squeezer
In some chains, a split link is used to remove and install it, so a squeeze is not used. But, when traveling, you need to have it, since the chain sometimes breaks, and it needs to be repaired - replace a section of the chain, or if the rooster or rear derailleur breaks, shorten the chain and turn a multi-speed bicycle into one high-speed one.
It is difficult to do all these actions without squeezing the chain. Very often, a chain squeezer is included in a universal tool, although such squeezers are inconvenient to use.
An indicator of the reliability of chain squeezing is the material from which its pin is made. It should be fairly rigid and not bend after several uses. Sometimes marc from well-known manufacturers works much worse than inexpensive ones of unknown origin.
Also on this topic:
Knives for cyclists. In folding knives, the blade is hidden in its handle. This makes the knife portable and reduces its size by half. Devices for opening a knife have different designs - the simplest ones are opened with two hands, the more advanced ones have a button or lever...
Bicycle multitool. A bicycle multitool is a set of tools for bicycle repair and maintenance in the form of a folding knife. The standard tool for repairing modern multi-speed bicycles at home and in the field. It allows you to avoid having to carry around a lot of keys and has…
Cone key. A cone wrench is a type of wrench. Designed to adjust and tighten bushing cones. A cone key differs from a regular key of the same size by being much thinner and is approximately 2 mm. The hub tapers have narrow splines, so...
Pullers for bicycle repair. Connecting rod (system) puller is a tool for removing a non-integrated type system from the carriage shaft. As a rule, it combines two functions: the puller itself and a hexagon for disassembling the pedals. The connecting rods on the carriage shaft are held with an 8 mm internal hex bolt...
Tightening torque of threaded connections on a bicycle. All threaded connections on a bicycle: screws, bolts and nuts are tightened with a certain force. This ensures a safe ride and allows the bike components to last longer. Manufacturers indicate a numerical value for the tightening torque of threaded connections. It must be exactly as indicated...
How to make a universal wrench 13-27 from a 27 open-end wrench
With this wrench you will be able to unscrew bolts and nuts from M13 to M27, which, of course, are not stuck and completely rusted, but for this there is another tool, and this is a universal one. When choosing a wrench, do not choose the cheapest one, because... its structure is not uniform and it itself is too thin. We will need: Open-end wrench 27, drill, screw, grinder and hands.
1. Mark the future location of the cut; we need exactly the part that comes into contact with the bolt/nut. We saw off with a grinder and use it to cut off and sand the excess. On the workpiece we mark the edge of the horn; it will need to be cut off and the place for the hole.
After we have drilled the hole, we cut a slot with a grinder, our handle will be inserted into it. We mark the handle and saw off the excess. We drill a hole for the screw and grind it evenly on both sides so that the handle fits into the slot cut with a grinder.
We fasten the parts with a screw and cut off the excess part of the thread so that it does not cling and interfere.
Ready.
zen.yandex.ru/masterdoma/
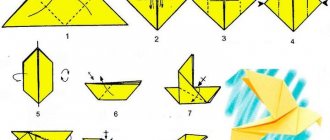
Chain assembly[edit]
When assembling the chain, it is necessary to overcome the tension of the rear derailleur spring, so an assistant will be appropriate here to hold the derailleur (or remove the chain from the system).
Place the chain so that the protruding pin faces your direction.
Grasp the link that does not have a pin protruding from it and guide the chain from right to left through the front and rear derailleurs. The rear derailleur has 2 “holes” next to the rollers that you need to thread the chain through. Connect the ends of the chain at the bottom against the resistance of the rear derailleur spring. Have an assistant hold the switch.
Place the link to be connected in the squeeze, on the stop that is closest to the fixing screw.
When adjusting the position of the chain, move the pin to the clamped pin so that they are coaxial.
Tighten the link with the fixing screw
Attention! Skipping this step may result in broken squeezer.
Rotate the handle to press the pin into the link. Constantly monitor the degree of immersion of the pin in the adjacent ones - it should not be completely flush with the cheek, but stick out a fraction of a millimeter.
Remove the chain from the squeezer, check how symmetrically the pin fits
If necessary, adjust its position.
Check the mobility of the assembled link. If it bends tightly, then you need to grab the chain on both sides of the assembled link and forcefully bend it in the transverse direction.
Steering column, brake system and transmission overhaul
Let's move on to the elements of a bicycle that provide precise control, movement and stopping.
Steering column
There are two types of speakers on bicycles - integrated with industrial bearings and semi-integrated with balls.
Maintenance of steering wheels with industrial bearings only includes timely lubrication. With semi-integrated columns, everything is more complicated: over time, the loads inside it are redistributed, causing the balls to crumble. As a result, the steering wheel turns or becomes difficult to move. Repair of a steering wheel with bulk balls includes their replacement and thorough lubrication. It is also a good idea to check the column for dirt. Work must be carried out before each season or as necessary.
Brake system
Keeping your brakes in good working order is key to safety. The system should be checked as often as possible, on average twice a week. We check:
- worn out pads;
- condition of the braking surface;
- integrity and tension of cables;
- lubrication of the moving parts of the caliper and handle;
- line to air (for brakes with hydraulics).
For effective braking, it is important to set the pads correctly: the gap should be minimal, but not slow down the wheel. Of course, there should be no distortion on the rim itself. The surface (rim or disc) must be wiped clean and not allowed to become oily or dirty.
The surface (rim or disc) must be wiped clean and not allowed to become oily or dirty.
The accuracy and speed of braking depends on the tension and general condition of the cables. Optimal tension - the pads instantly fit and bounce when the handle is pressed/released. The good condition of the shirt is of great importance - no cracks in the shell or stretch marks in the winding.
For hydraulic brakes, the line must be maintained in working condition. The reason for poor performance lies in the presence of air or contamination of the liquid. The system is bled using a special tool once a season. The liquid must comply with the manufacturer's instructions.
Transmission overhaul:
- checking and replacing bearings in the carriage, lubricating the unit;
- inspection of the integrity of connecting rods;
- cleaning and lubricating the bicycle chain;
- checking and replacing sprockets on the cassette;
- switch settings.
The carriage and connecting rods can only be removed using special pullers
Particular attention is paid to the condition of the connecting rod pair (there should be no cracks) and the condition of the bearings inside the carriage. Abundant lubrication with a special compound plays a key role. Cleaning and lubricating the chain is necessary to reduce wear on expensive transmission components - cassettes
You can remove the chain manually if there is a lock or using a squeezer. The transmission mechanism needs to be serviced as needed, but it is a good idea to periodically wipe the surface of the sprockets and chains from dust.
Cleaning and lubricating the chain is necessary to reduce wear on expensive transmission components - cassettes. You can remove the chain manually if there is a lock or using a squeezer. The transmission mechanism needs to be serviced as needed, but it is a good idea to periodically wipe the surface of the sprockets and chains from dust.
Worn sprockets on cassettes can be replaced individually. To free the rear wheel axle from the system, you will need a special wrench with a chain whip to hold it.
Switching speeds depends on the state of the switches: their settings and the condition of the drive cable. Here are detailed instructions for setting up the front and rear derailleurs.
Bicycle maintenance – keeping it clean, lubricating mechanisms, replacing worn parts and consumables – is an integral part of a cyclist’s life. Timely correction of all defects, careful handling and forethought allows you to get the most from your bike and enjoy riding for many, many seasons.
How to remove a chain yourself using a squeezer
Perform actions in the following sequence:
- select the area you want to disconnect. If the element has been disassembled more than once, select a previously unrepaired link;
- a link is inserted into the squeeze so that the clamping axis and pin are opposite;
- the part in the chain squeeze is fixed with a screw;
- to push the pin out, rotate the handle of the device;
- when the pin is pressed out, the links are removed;
- the outermost ones are connected, making sure that the pin, which is located “in the cheek”, looks outward, i.e. He “looks” at the repairman making repairs. The part is first passed through the switches, after which two links are placed on top of one another, making sure that the pin coincides with the bushing;
- The “cheeks” are opened with pliers. The pin extending outward prevents the links from coming apart once they are in place;
- To press a pin into the hole, the squeeze is inserted into the link so that the axes of the rod and pin ideally coincide, and the funnel is turned;
- Next, check that the “cheeks” of the pin links are symmetrical. If this is not the case, they will have to be corrected;
- the connected links are checked for mobility. If they are motionless, the position is corrected using pliers.
Types of bicycle chains
Let's consider 2 main types of bicycle chains:
- Keyhole;
- Solid.
Keyhole
Its peculiarity is that it has a special clamping device. It is not difficult to remove one from the stars, as well as to put it back on. To do this, you just need to disconnect the lock.
The location of the split link can be determined by visual inspection. If the links are clean, finding the connector is easy. As a rule, the manufacturer's mark is stamped on the connector.
Solid
It is impossible to completely remove such a bicycle chain. If you remove it completely from the sprockets, it just hangs on the frame. Of course, compared to the option equipped with a lock, the solid design is less convenient. However, there are also advantages. The lock may become loose and the connecting pin may get lost. The links disengage. There are no such problems with a solid chain. If it breaks, then this is purely a quality cost.
Disassembling the chain[edit]
Wear gloves that you don't mind.
Remove the pomace and collect it if necessary.
Place the link to be pressed into the press, on the stop that is closest to the fixing screw.
When adjusting the position of the chain, move the pin to the pin being squeezed out so that they are coaxial.
Tighten the link with the fixing screw
Attention! Skipping this step may result in broken squeezer.
Rotate the handle to move the pin out of place. It may take a lot of effort, but the rest will be easy.
Slowly move the pin about 3-4 mm
Knowing the pitch of the thread on your squeeze, it is easy to calculate the number of turns of the handle required to move the pin the required distance. If you feel an increase in force on the handle (this means that the pin has almost completely left the opposite cheek), stop immediately!
Here our task is to squeeze the pin so much that it stops holding the chain together, but at the same time remains clamped in the cheek. If you push out the pin completely, it will be very difficult to insert it back in the field.
Remove the chain from the squeezer and check whether it can be separated by spreading the jaws with your finger.
If not, insert the chain back into the wringer, tighten it with the screw and pin, and turn the handle another half turn. If necessary, repeat several times - there is no need to rush here.
When the chain comes apart, ideally, the pin will stick out inside the link by about 0.5 mm, which will simplify subsequent assembly.
Bicycle Chain Installation
It's time to thread the chain through the rear derailleur and connect it
Pay attention and make sure the chain goes straight through the drive wheel on the rear derailer
Using pins
: If the chain does not have a connecting link, then use a squeezer to connect the chain to the pin that is already in the new chain.
If you are repairing an old chain, always use a new pin instead of the old one. The new pin must be compatible with the chain, its speed and brand. The new pin must be inserted halfway using a squeezer, then pulled out on the other side using pliers. Using connecting links
: If you are connecting a chain with a connecting link, place one half of it on each end of the chain, connect the ends of the chain, assemble the connecting link with a tool to put it in place.
It is also possible to connect the connecting link without tools. Connect it and pull the chain in different directions to lock the connecting link as much as possible. Then loosen the derailer clutch, if equipped, and rotate the pedals so that the connecting link is at the top of the drive chain. Using the brakes, step firmly on one pedal, tension will be applied to the chain and it will snap into place.
How to replace a chain on a bicycle - video
It happens that you need to remove a bicycle chain - for example, to clean it, replace it or adjust the length (the latter is done if your new cassette has a different number of teeth, and you need to change the length of the chain accordingly by adding or removing a certain number of links) .
How to remove a chain with a lock
Inspect the chain: if you find a link that is different from all the others, then you are lucky - you have a chain with a lock. In order to separate it, move the pins (pins, axles) on each half-link (cheek). The circuit will open. The whole operation will take literally a minute. You don't need any special equipment: if you suddenly can't move the pins by hand, use pliers. Assembly is also done without any tricks, in reverse order.
How to remove a chain without a lock
If you have a chain without a lock, then you will need a special tool - a chain squeezer. It is inexpensive and takes up little space, so we recommend that you always carry it with you, along with a set of hexagons and a repair kit for cameras. Anything can happen on the road - if the chain suddenly breaks, you can easily remove the damaged links using a squeezer and connect the chain again.
How to remove a chain without squeezing? And is it worth doing?
How to remove a chain without squeezing is a pressing question. But no matter how often it is asked, it is better to remember one life rule. For good repairs and maintenance, it is better to use specialized tools! In this case, it is squeezing the chain.
There are two types of squeezers, most have two seats. One of them is for assembling and disassembling the chain, the second is for adjusting the position of the axle in the chain link bushing. If your squeeze is just like this, with two seats, then insert the chain link so that it is on the side closest to the adjusting screw. If you place the chain in the wrong place, you may accidentally break off the partitions between the squeeze seats during operation or crush the cheeks of the link.
Let's assume that the chain is laid correctly
Now carefully rotate the handle. You may have to apply significant force, so try to work carefully so that the link in the squeezer does not become distorted, otherwise it can be damaged
Make sure that the tip of the squeezer presses directly onto the pin. There is no need to turn the screw quickly; you should stop at the moment when the pin is squeezed out of the entire link, but remains on the far cheek. If you push it all the way out, believe me, it will be very difficult for you to put it back in. Also be careful not to accidentally knock the pin out of the cheek: this could cause it to roll away in an unknown direction and get lost.
When assembling, you will not need anything other than the same squeeze. I remind you again: be careful, don’t get carried away, so as not to squeeze the pin out of the link.
Two important notes:
- If your chain is equipped with a lock, you should not disassemble it by squeezing it.
- If you have to disassemble the same chain many times, then choose a new link each time: if you squeeze out the same pin over and over again, this will deteriorate the strength of the chain
Author of the article: Alexey Zheludkov
After using a bicycle for a long time without maintenance, the chain often begins to sag. How to shorten a bicycle chain at home? What is required to determine the correct length? We will look for answers to these and other questions in the presented material.
Instructions for shortening
If there is a squeeze, the answer to the question of how to shorten a chain on a bicycle is obvious. If it is not there, the process turns into a lottery. Perhaps the operation will be successful. But it is also likely that the cyclist will be left without a vehicle.
With squeeze
To open a chain with a closing link and shorten it, you must proceed according to the following instructions:
- Place the bike on the rack. If it is not available, place it on any hard, flat surface with the wheels facing up.
- Using a rag and kerosene (or other suitable means), thoroughly clean the chain from dust, dirt, and lubricant residues.
- Find the closing link (“lock”). Manufacturers usually make the task much easier by making it a little darker or lighter than others. Another distinctive feature is the presence of protruding ridges, held together by an outer plate, and a large oval hole around 1-2 of them.
- Crank the pedals, moving the closing link between the gears. This makes accessing it much easier.
- Open the locking link on the bicycle chain. Structurally, this can be done in different ways, so you need to read the instructions in advance. Most often, the roller is removed by rotating on hinges or the link is opened by bending. Less often it is disposable, then you need to remove the element, for example, with needle-nose pliers.
- Determine how many links will need to be removed. It's better to remove less than to overdo it. Installing them back is problematic for beginners.
- Using a clamp or squeezing clamping mechanism, fix the next link from the end of the chain from which the closing one was removed.
- Place the squeeze pin exactly above the shaft of this link. Start squeezing it out, smoothly turning the handle clockwise. You cannot remove it completely, otherwise it will be almost impossible to assemble the chain later. The roller should appear on the outside, but still be securely fixed inside the link.
- Repeat with the second roller, completely disassembling this link. Remove the outer plate, opening access to the central part, where the next one is fixed. Continue until the required number of links has been removed. Before shortening a speed bicycle chain, you need to make sure that after removal there are still different types of links at its ends. The narrow one is inserted between the “ears” of the wide one. To disassemble a bicycle chain without a lock, you can start from any link.
- Assemble the shortened chain by placing a “lock” on both ends. It is more convenient to do this with pliers and a screwdriver. Align them so that the rollers can be snapped into place. If the closing link is disposable, you must purchase a new one in advance.
- Install both links into the outer slot on the squeezer so that the rollers “look” towards its pin. Rotate the handle counterclockwise until the head appears on the opposite side. The length of the protruding parts of both rollers should be the same.
- Slightly loosen the chain by placing the link in the inner slot of the squeezer and pressing its pin against the roller. Turn the handle about a quarter turn.
- Apply a thin, even layer of lubricant to the chain.
Bicycle chain tensioners
A special bicycle chain tensioner can be an effective and useful accessory, the use of which allows you to maintain the necessary chain tension while riding. This accessory is used mainly by fans of extreme, aggressive driving.
Chain tensioners are usually installed on single-speed bicycle models. Such accessories consist of one or more rollers, a lever and a spring. Tensioners work on the principle of systematically pulling the bicycle chain in the required direction, which creates the required tension. Moreover, the presence of a tensioner prevents the chain from falling from the drive sprocket located on the bushing.
Experienced cyclists are advised to always have several chains in stock. Each of them should be operated with a rolling distance of no more than 600 km. After which the bicycle chain is replaced. A new, shortest one is put in its place. As a result, the life of not only all existing chains, but also the transmission of the two-wheeled vehicle is significantly extended.
Lock and solid chains
The locking chain is equipped with a special clamping device. It is not difficult to unhook and put it on - you just need to disconnect the lock. To find it, carefully examine the chain on both sides and find a split link. In principle, it will not be difficult to find it on a clean chain: there is a plier on top that fixes the link and does not allow it to move apart. Also, the manufacturer's inscription is usually stamped on the lock link. If you can’t find the lock for a long time, then either the chain is dirty, or it is lockless, or solid.
Bicycle chain with lock
You can’t just disconnect a bicycle chain without a lock: all the links on it look the same, however, they are also interlocked. This causes great inconvenience during cleaning; for example, it is necessary to carry out “general cleaning” in a solvent. In the case of the keyhole, everything is simple - steal it and put it in kerosene. A solid bicycle chain, even removed from the sprockets, will remain hanging on the frame.
In terms of removal, a chain with a lock is certainly more convenient than its counterpart. However, for some reason the fastening may become loose: the pincer may fly off, and the link itself may come loose. Bicycle chains without locks do not have such weak points, and if it breaks, then the matter is solely in its quality.
Types of products
The bicycle chain is one of the key elements of the transmission. There are two types of such products:
- Keyhole. This type is supplemented with special locks that serve to secure the links together. To remove the clamping device, you simply disconnect it. The easiest way to find connectors is on a previously cleaned circuit. Usually there is a manufacturer's mark on the surface of the part.
- Solid. It is a continuous line of links without connectors. Such products cannot open while driving or get lost. Removing the chain is more difficult than in the previous version. If you detach from the sprockets, the canvas simply sags down, so the whole process can take quite a lot of time. The main disadvantage of the model is the inconvenience of use.
Experts do not recommend repairing the chain on fast bikes on the road, as it is a dirty job. Most likely, the clothes in which such manipulations are performed will have to be thrown away. If a breakdown occurs on the way, it is better to ask friends to take the vehicle home, and then carry out all the procedures there.
Keyhole
Solid
When should you change your bicycle chain?
A good bicycle chain lubrication can significantly increase the service life of the entire system responsible for movement. At the same time, you need to be able to notice the moments when it begins to need maintenance or repair.
Excessive wear on a bicycle chain not only causes constant discomfort while riding, but also causes active deformation of the chainrings. If a worn chain is left unattended for a long period of time, it is guaranteed to lead to the need to replace a whole set of expensive mechanisms.
In order to assess its condition as objectively as possible, it is necessary to look not at the mileage, but first of all to measure the length of all its links. The chain length in normal condition is approximately 305 mm. The reason for its replacement is its stretching to 308 mm or more.
Puller device
The cassette removal tool is a splined head. It is unscrewed with an adjustable wrench or wrench with a diameter of 21 or 24 mm (depending on the set of stars used).
Bicycle puller device.
Also, certain types of dismantling tools have a guide for firmly securing the device in the socket.
In some more expensive models, a rubberized handle is already attached to the head of the puller, preventing your hand from slipping while unscrewing the nut.
Bikes without chain lock
To remove the part, use improvised means, performing the following manipulations:
- attach a regular vice to the table;
- The chain is fixed in them by placing a nut on one side so that the hole of the nut and the pin correspond;
- the screw is attached with a head on the opposite side;
- the pin is pushed into the nut hole when the vice is clamped with a ball.
Advice:
To remove a part, it is not enough to open only one side. You need to move the link to remove it or continue trying by adding a ball.
After a successful attempt (or an unsuccessful one), the cyclist understands how indispensable a squeeze is: if a chain with a lock that requires repair can be removed from the bicycle, then, regarding this part without a lock, it is extremely difficult to do this without a squeeze. The given instructions will help out in force majeure situations, but you need to work hard.
Video: How to disconnect, rivet, open a bicycle chain. Remove the lock.
How to shorten a chain without squeezing?
If there is no special tool, you can use any sharp object with a small enough diameter to push out the connecting pin. This could be a nail, an awl, or any other strong steel pin that can withstand a hammer blow. In addition, you will need a stand - for example, a brick.
You must act carefully so as not to bend the plates of the chain links. To ensure safety, the top plate must be supported by inserting a nut or other strong piece of metal inside the link. Most likely, the chain will first have to be removed from the bicycle. And for prevention, it will be possible to remove the rear wheel, clean it, lubricate it and install it in place.
If the belt option does not justify itself, we make a chain one
Sharpening a chainsaw chain at home
To make your own chain puller, you will need a piece of half-inch or inch used pipe with uncorroded, undamaged walls and a thread at one end. The length of the piece must be no less than the height of the filter. We select a suitable plug for the pipe so that it screws onto its thread. You'll also need a bicycle chain.
Bicycle chain and pipe
We drill a hole with a diameter of 9 mm in the center of the plug. Using a triangular file, we give it a square shape with our own hands. We carry out the processing until the dimensions of the hole are suitable for the ratchet wrench, or more precisely, for its end. The latter should fit into the resulting opening of the plug quite tightly, with almost no play. Screw the plug onto the end of the pipe and tighten it very tightly. To prevent it from unscrewing when using the puller, it is recommended to attach it to the pipe by welding.
As a last resort, you can try to crush the metal at the end of the thread using a dull chisel and hammer, but only carefully so as not to deform the pipe. We make markings on the pipe for drilling holes for the chain. To securely grip the filter, 2 pieces of it installed on the puller opposite the opposite ends of the cleaner are enough. But you can also make a 3rd hole, between the 2 outer ones, for another 1st chain. In this case, the puller will become more versatile, as it will allow you to unscrew filters with different height sizes.
Homemade device for securely grasping the filter
Having threaded a chain through one of the drilled holes in the pipe, we loop it around the filter, trying out how long the pieces will be needed. We measure out enough so that the puller, when unclamped, fits freely onto the cleaner. You can even make some supply of chain length for filters whose diameter is larger than that installed on the car. But we must take into account that it will be less convenient to work with such a puller. Along the measured length, we disassemble the chain into separate fragments - squeeze out the pins and separate the links at this point.
Having threaded the resulting sections through the holes in the pipe, we make loops out of them - we connect the links of the ends and press in the pins. To unscrew the filter, we put the puller loops on it and, if necessary, when the chains are too long, we manually turn the pipe counterclockwise, thereby removing the slack. Then we insert a ratchet wrench into the plug and, with its help, begin to dismantle the purifier.
Having decided to change the oil in their car themselves, many car owners are faced with an unexpected obstacle - the oil filter does not want to be unscrewed by hand.
Everything is complicated by the round shape of the filter element housing, which is impossible to grasp properly. It’s good if there is a car store nearby that sells special pullers of different types (they are chain, screw, end, belt, etc.), but what if there is no way to purchase a key, but you desperately need to remove the filter?
In fact, everything is much simpler than it might seem at first glance: there are several simple ways to remove the oil filter without a key. We will talk about them in detail in this article.