We welcome all DIYers, gardeners and summer residents! What garden tool do you think is used most often in the summer? No, this is not a rake or a shovel, but an ordinary chopper. With its help, they loosen the surface layer of soil, cut off weeds and hill up various plants. In short, there is enough work for almost the entire summer, and therefore high demands are placed on the convenience and reliability of the hoe. But factory tools that can be purchased in a store are often made of low-quality steel. Fortunately, there is still a way out - a do-it-yourself hoe, made from scrap materials at a minimum cost!
DIY hoe
Test or how to use
Weeding is faster and easier
The entire load falls on the wheel and hoe. Weeds are removed by forward movements of the device. If cutting the roots of the weeds did not work with the first movement, then repeat it and move a little forward and continue cutting the weeds.
Pruning is easier than loosening and removing weeds by the roots. The pruning method allows you to move between rows and cut off new weed formations in a short time. It is recommended to walk once or twice a week - this is a walk without much effort.
How to make a wheel hoe
Device for effective weeding
10 Total Score
Device for effective weeding
Did our article help you?
10
Functionality
The type of model determines its functionality. Basic:
- weeding;
- hilling;
- row spacing treatment;
- soil aeration;
- loosening;
- formation of grooves and holes;
- planting seeds;
- soil preparation for the lawn;
- removal of weeds.
Important! The hoe has been the main tool for the gardener's work for many centuries.
Method of growing potatoes without weeding
Particularly radical adherents of green farming argue that potatoes should not be weeded at all without damaging the future harvest. At the same time, this method was invented back in the 19th century and is actively used by some agronomists. This method also involves weed control, but it comes in a different form.
To grow potatoes without weeding, the soil is prepared in the fall. To do this, it should be cleared of weeds in advance, dug up or plowed, but without loosening, so that the soil can breathe better. After this, humus mixed with ash, urea, nitrogen and potassium fertilizers, which are destructive to Colorado potato beetles and other pests, is added to the soil. The top of the area is covered with a thick layer of straw.
During the autumn-winter, the straw will rot, preventing pests and weeds from penetrating the soil, forming a layer of natural mulch. Sprouted potatoes are planted without removing this mulch, fertilizing the holes with pre-prepared humus.
After germination, a layer of mulch prevents the appearance of weeds, maintains a favorable soil temperature and retains moisture.
Important! Instead of straw, you can use green manure (alfalfa, rapeseed, peas and other legumes), which are sown in advance in August. By September-October they form a fairly tall grass cover, which is mowed for the winter
Thus, mulch is obtained from hay grown in the same area.
Thus, weeding potatoes is an integral part of agricultural technology for growing potatoes, although there are growing methods that do not involve weeding. There are also many devices for weeding potatoes - from traditional manual ones to mechanized ones. Undoubtedly, the use of modern mechanized tools greatly facilitates and speeds up the process of weeding potatoes.
Main stage of work
In order to make a cleaver, you will first need to arm yourself with a pencil and draw a sketch on paper. After this, you need to make a blank. In our case, the ideal source would be a large-diameter steel saw blade. The blade of the future cleaver should be drawn on it. You can cut the workpiece along the contour using a grinder. Now all that remains is to sand and clean our workpiece, giving it the required shape.
You will need to drill several holes in the tail of the cleaver. This is where the handle will be attached. Each should be carefully processed with a round file. When everything is ready, you can move on to creating the blade and cutting edge. We harden steel in the most accessible way - heat it and then dip it in oil. After this, we grind with sandpaper and polish the product.
Description of design
Hoes are an indispensable tool for creating irrigation furrows before watering with your own hands, rather than with automatic watering. An indispensable tool for hilling plants, since with the help of a long handle you can loosen the most remote areas. A summer resident's kit always consists of several types of gardening tools, for example, a hoe and its hybrid (hoe, ripper), both factory-made and assembled with your own hands.
Garden hoes are made in different variations, which allows you to easily do a wide variety of work on a good site. Depending on the required work, choose a hoe with different blade widths, with pointed or rounded corners, trapezoidal or triangle shaped.
The material from which a hoe is often made is carbon steel. This material is easy to sharpen with your own hands, but it is most susceptible to corrosion. To ensure that such a tool serves you as long as possible, after each work in the garden, thoroughly clean any remaining soil and grass from the blade, and then lubricate it with oil. Stainless steel hoes are more popular among summer residents, since stainless steel is more durable and requires simple maintenance. The only negative is the price.
The difference between the hoe-ripper hybrid and the classic type is the presence of non-curved ends, with which you can easily weed out weeds from creeping plants.
Practical use
A hoe is a multifunctional classic garden tool. Schematically it consists of a long handle and a working part - a metal cutting blade located at right angles to the holder.
The long handle allows you to lower the working part deeply into the ground without much effort - due to the lever effect. There is no need to bend over or squat while cultivating the soil.
Tip: to make the job as easy as possible, the cutting edge needs to be sharpened periodically. With a sharp working edge, even a light hoe easily sinks into the soil, allowing you to completely remove weed roots.
Scope of application:
- hilling up plantings;
- loosening the soil;
- cutting and removing weeds;
- leveling lawn edges;
- cutting rows for sowing;
- application of fertilizers.
Even heavy-duty tools are not designed for breaking ice or working in dry, hard soil. The edge will quickly become dull and the blade will crack.
Weeding trimmer attachments
For work, it is recommended to use a factory-made cultivator attachment. This is both easier and cheaper than making the device yourself. When selecting, it is recommended that you first take your trimmer and measure:
- rod diameter;
- number of splines on the shaft.
This information will allow you to choose the right nozzle. Typically, the description of the nozzles indicates the outer diameter of the rod - 26 or 28 mm and the number of splines on the shaft - 7, 9, or the cross-sectional shape of the end - square. To accurately select the right size, you should also measure the diameter of the shaft itself - they also differ in size, there are shafts with a diameter of 7, 8 and 9 mm.
If you are using a branded tool from well-known world brands, and not Chinese consumer goods, then it is better to order a branded attachment. This will extend the life of both the attachment and the brush cutter. In Moscow, for example, it is worth visiting branded stores, where professionals will select the nozzle; here you can also consult on the procedure for servicing the units.
To work on small areas, a regular disc cutter will be sufficient, but for large areas it is better to use reciprocating and drum cutters.
It is recommended to sharpen the cutters before each use.
When selecting a working tool, you need to focus on the dimensions recommended by the manufacturers. The hand will not be able to hold the blades that are too large, and the blades that are too small will not cope with the task. If you can select several sets of cutters for a cultivator, then you should consider purchasing cutters of different diameters - this will allow you to choose a tool for each specific type of task.
Miracle hoe for easy weeding
Neumann's Miracle Hoe is a relatively recent invention. The working part is made in the form of two springy metal rods, between which a string is stretched (performs the function of a cutting edge). It is fixed in the locking grooves.
Video about what Neumann's Miracle Hoe is and how to work
The tool is convenient because it allows you to vary the width of the working part. To do this, the string is removed from the grooves, the spring rods are brought together or opened to the required distance, and a new string of suitable size is inserted into the locking grooves. This tool is not suitable for dense soil. The string will have to be changed frequently, the quality of the soil treatment will be worse.
Is it worth making a cultivator attachment yourself?
The technology for caring for vegetation will also change: first, use a knife attachment to walk through the beds, cutting off the grass, and only then use a cultivator attachment.
Having decided to make your own cultivator attachment for the trimmer, you should first evaluate the following:
- The design of the output section of the boom: if it is a flexible shaft, then you will have to forget about the cultivator: it will not withstand the constantly changing amplitude of torques. The cardan transmission is more functional, and the most successful design is considered to be a multi-slotted rod, and a straight one, not a curved one.
- Drive power: If it is less than 1000W, the motor will overheat and the cultivation performance will drop sharply.
- Fuel tank volume: energy consumption will increase significantly, since the cultivator attachment will have to be made from scrap materials. Therefore, the tank must contain at least 1 liter of fuel.
- Handle design. Ergonomics experts believe that the most comfortable is the T-shaped handle, which provides the most accurate and reliable direction. The J-shaped handle common in some models makes it difficult to hold a gasoline trimmer with a cultivator attachment.
If the existing trimmer meets the listed requirements, and its owner has sufficient experience in performing such work, then it is quite possible to make a disk attachment with your own hands. As for gear-type nozzles, making them yourself is very labor-intensive and will not provide the desired quality.
Technical features
If we talk about the technical characteristics of a country tool, then, in fact, a hoe is a small metal shield, which is attached at an angle of 90 degrees to a long wooden handle. The shield is made in the following shapes:
When purchasing, choose the type that is most suitable for the work ahead. Pay attention to the material used to make the metal blade, as this is what determines the quality of the purchased tool. Often, farms need hoees and shovels of different lengths and shapes for hilling, forming beds and removing weeds.
Deadlines and ground rules
The area is cleared of weeds several times a season.
It is especially important to do this until the time when the vegetable crop has become so strong that it can defend its rights to full growth.
The first time weeding should be done approximately 15-20 after planting. Weeds grow much more actively than potatoes, so it is necessary to remove competitors and allow the vegetable sprouts to strengthen.
If the tubers were planted sprouted, then seedlings will appear quickly and during the first weeding, the potatoes will be easy to distinguish from other vegetation. In the case where the planting was done with unsprouted tubers, the emergence of vegetable sprouts will be late and weeding must be done very carefully.
The next weeding should be done before flowering begins. It can be combined with hilling. This will be in early July. It is necessary to thoroughly clear the area of weeds. Since in the future it will be difficult to use different mechanisms for weeding potatoes, and removing grass by hand is very difficult.
Important technical points
Almost every summer resident has several different hoes on his farm. This could be, say, a hoe for hilling potatoes or chopping cabbage, a flat cutter, a Futyukha hoe, baking powder, etc.
Weeding tools
The blade of the tool can have different widths, the corners can be sharp or rounded, be trapezoidal or triangular in shape... Carbon or stainless steel is usually used to make hoes.
Chopper - an assistant in weed control
On a note! A hoe is a type of chopper. The hoe blade is shaped like a hemisphere and pointed at the end, which is convenient when forming planting holes or when hilling, but the tool is also often used when creating potato/vegetable beds.
In general, a hoe is a small metal shield to which a wooden handle is attached at a right angle.
- Hoes can be very different
- A few examples of homemade hoes
- Heavy ax chopper
- DIY garden hoe
If desired, you can make a hoe yourself using various available materials. But we note that for an avid gardener one hoe is not enough - as they say, you will need a full set of devices for various purposes. Therefore, below are step-by-step instructions for making different types of garden hoes. But first things first.
How to use a trimmer for weeding potatoes?
Not all gardeners choose this device, believing that it is better to pull out weeds with their hands, but there are also those who claim that it is very convenient. The device for weeding potatoes with a trimmer allows the use of several different attachments, which can be included in the kit or can be purchased separately. A good option is to make the nozzle yourself from available materials.
Lawn mower attachment for weeding potatoes
To remove weeds between rows, in most cases a trimmer head with a line is used. Experienced gardeners recommend choosing a fishing line with a round cross-section, so that weeds will not grow back so quickly. When describing attachments for weeding potatoes on a gasoline trimmer or on a device powered by electricity, it is worth mentioning another option - a three-blade knife, but it should be taken into account that if the unit hits stones, it will break. There are also specialized attachments with four cutters.
Homemade attachment for weeding potatoes on a trimmer
There are several options for making attachments, for example, you can make a “three-layer” blade. Homemade devices for weeding potatoes involve the use of a piece of tin 5 mm thick. Three circles of different diameters should be drawn on it: 320, 220 and 110 mm. Use a cutter to cut out circles and make holes in the center of each to insert the operating shaft. Using welding and reinforcement, connect the discs at a distance of 1-2 cm from each other. All that remains is to weld the nails to the disks and you can use them. Other interesting options for attachments are also possible.
Use of stone by primitive people
The development of production increasingly increased the demand for stone raw materials, which were used not only for the manufacture of tools, but also for the construction of housing and fortifications of public buildings - megaliths. At the same time, menhirs (stone pillars) and cromlechs (menhirs located in a circle) were erected.
Entire rows of menhirs and dolmens, composed of several standing and covered slabs, have survived to this day. Some of the menhirs reach a height of up to 20 m and weigh up to 350 tons, and the weight of the dolmen slab reaches 40 tons.
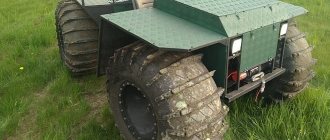
Device for cutting weed roots
Anti-weed cultivator
“No matter how much you weed, they still climb” is the eternal complaint of any gardener. Maybe it's time to try another method of controlling the weed - cutting down its roots. It takes less effort, and the back is less stressed. For this purpose, many devices have been invented, one of which is brought to your attention.
For this you will need:
- Bicycle fork and small diameter wheel - for example, from Salyut
- Wood hacksaw - needed for making a cutting structural element
- Some sheet iron - approximately 30 x 15cm
- Metal round and profile pipe
- And other metal - strips, rods and corners
Basis of the device
There are no clear sizes - everything is made to individual requirements.
Tools you will need:
- welding inverter
- Bulgarian
- and other locksmith tools
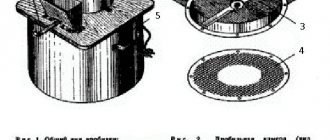
Step No. 1 - prepare the bicycle fork
Preparing the fork - the basis for attaching the “hoe”
Two metal plates need to be welded to it. You need to cut the steering column tube off the fork. The dimensions are taken from the fork and transferred to the metal. After the plates are cut, they are welded to the bicycle fork as shown in Fig. 3.
Step No. 2 - making the steering wheel
Steering wheel of the weeding unit
Two pipes need to be welded to the fork, which will control the weeding unit. The main thing that needs to be observed is the horizontal position of the fork from the bicycle.
In the photo above you can see one of the many ways to attach the steering wheel.
Small sections of pipe can be welded to a bicycle fork into which a handlebar made from wooden cuttings can be inserted. This design will be lighter and therefore more efficient.
Step No. 3 - making a hoe
Making a cutter
1
We will make the cutting element from a hacksaw blade for wood. It is optimally suited for this purpose - durable, flexible, memoryless, and holds an edge well.
2
We cut a plate about 5 cm wide and about 30 cm long from a hacksaw blade.
3
We weld two metal strips to it along the edges - this will be the attachment to the fork of our device.
4
Don't forget to sharpen one side of the plate using a hacksaw. Although this can be done when the device is completely ready.
Step No. 4 – fix the hoe on the wheel
Installation of the cutting part of the weeding device
We weld a U-shaped piece from a hacksaw on the bottom of the fork as shown in the photo above. We sharpen it if this has not been done before.
If you fasten the hoe with a bolted connection, then you can make a whole series of hoees of different shapes for different purposes.
How to get rid of weeds in your summer cottage forever: using folk remedies, chemicals and other methods | (Photo & Video)
Option No3. Metal plate hoe
We offer a fairly simple device instead of a regular hoe, which can greatly facilitate weeding the garden. In our example, the flat cutter is literally made from scrap metal, but you will be surprised how useful it will be!
Step 1 . A metal plate 30-40 mm wide is taken and a working knife is prepared from it.
Working knife of the future chopper
Step 2 . A workpiece 200-250 mm long is cut, one end is sharpened.
Step 3 . For sharpening, you can use emery or, alternatively, a grinder with a grinding disc.
The workpiece is being sharpened
Step 4 . The metal is cleaned of rust, as welding work awaits.
Metal needs to be cleaned of rust.
Step 5 . Next, you will need some scrap metal rod. These can probably be found in any household.
Metal rod scraps
Step 6 . A pair of segments are cut (each length is 400 mm), after which they are bent in a zigzag towards the center (see photo).
The segments are bent
What happened in the end
Step 7 . The trimmings are welded to the knife so that it ends up at a slight angle relative to the horizontal plane.
Welding sections to a knife
The knife should be at an angle
Step 8 . The bent scraps are combined with the pipe scrap, and the resulting joint is welded.
Curved rods need to be combined with a pipe
The connection is scalded
This is what happened in the end
Step 9 . You can also weld a transverse handle to the end of the handle. Well, you can start testing the tool. Place the flat hoe on the ground with the weeds and pull it towards you. Well, how is it working out?
Testing our flat cutter
Weeds are easily cut at the root
The knife is sharp enough, and therefore the weeds will be cut at the root. A very convenient and lightweight replacement for the classic bulky hoe!
Articles on the topic
Passionflower from seeds at home - it's easy!
How to get rid of midges in seedlings? Causes, prevention
How many years does an apple tree live? How can you extend her life span?
What can be made from tires (85 photos)
Video - Circular disk hoe
Mechanisms for weeding potatoes
It cannot be argued that there is an ideal mechanism for weeding potatoes that would satisfy the needs of any farmer
Therefore, in order to correctly select the right mechanism for weeding potatoes, it is important to know about the existing mechanisms and the cases in which this or that mechanism or attachment for it is used. In the video below you can learn how to weed potatoes using a walk-behind tractor
Walk-behind tractor with rotating cutters
A walk-behind tractor is a multifunctional mechanism that, depending on the type of attachment, allows you to perform operations such as cultivation, weeding, milling, transporting small carts, and digging up root crops.
The main components are the frame, engine, transmission, operating shaft and guide handles. In addition, there are various attachments that perform a specific function. Walk-behind tractors run on an internal combustion engine, and they come in two- and four-stroke types.
Important! Motoblocks with four-stroke engines are more powerful and more fuel efficient.
For mechanized weeding (cultivation), a special attachment is used - a milling cutter. It consists of a series of sharp star-shaped plates that fit onto the operating shaft. As they work, they rotate, grinding and pulling weeds out of the ground. The same nozzle is suitable for mixing organic fertilizers with soil.
Walk-behind tractor with pointed feet
Another attachment for a walk-behind tractor suitable for weeding potatoes is pointed paws. The attachment is a frame to which small V-shaped plows are attached. When weeding, the plow blades should be deepened 2-3 cm into the soil using the attachment.
The method of weeding is cutting weeds. Allows you to perform high-quality weeding in a small amount of time. The advantage of the paws compared to a milling cutter is that the paws are gentle on the soil, do not turn out its wet layers and do not form dense clouds of dust during operation.
Weeding potatoes with a trimmer
We have already discussed the effectiveness and rules of weeding potatoes with a trimmer. At the same time, the structure of the trimmer and attachments is so simple that you can make attachments with your own hands. At the same time, the lawn mower will not lose its effectiveness, but on the contrary, it will be more gentle on the beds.
The final stage of work
There is very little left. At the final stage of work, you should find a fairly hard type of wood and cut a handle for the cleaver from it. We cut, clean, polish and attach to the knife using rivets. Can be coated with mineral oil for better protection. If everything was done correctly, the end result will be a very neat and functional kitchen cleaver.
Need something else interesting? Then look at a simple and effective way to get rid of scratches under the car handles, which everyone is already tired of.
Did you like the article? Then support us, click
:
Source: novate.ru
Rules for weeding with a trimmer
The rules for growing potatoes provide for several operations - continuous cultivation until the potatoes have sprouted, weeding the rows, hilling the bushes.
For simple cultivation, drum cutters are used; for weeding, you can use disk, saber, or drum cutters. But for hilling it is better to make a stacked structure - make the internal cutters of a larger diameter, and the outer cutters of a smaller diameter. This design ensures ease of use of the tool when hilling under a bush.
Weeding rules are quite simple:
- a sunny day is chosen for work, so that the weeds dry out in the sun as quickly as possible;
- For protective equipment, you should wear goggles and a respirator, and for shoes, boots;
- when working, as well as when mowing grass, it is recommended to use a shoulder strap;
- weeding is carried out with a deepening of 1-1.5 cm, this is enough to loosen the top layer and increase gas exchange in the soil;
- It is recommended to weed the entire row spacing until the plants rise to a height of 10-15 cm;
- Weeding is done in a zigzag, the nozzle is first moved to the left, and then at an angle to the right. The next move to the left, taking over the next lane.
- Hilling is done to a depth of 10-12 cm, with the first movement being forward in the center of the row spacing, and after that, turning the nozzle left and right, a mound is formed near the bushes.
- It is recommended to select the operating mode with short breaks so that the trimmer has time to cool down;
- At the end of the work, the nozzle must be cleaned, unscrew the screws of the technological holes and add molybdenum grease to the gearbox.
Communities › Do It Yourself › Blog › A simple DIY kitchen knife-hatchet in an evening.
The knife is made from a 2 mm thick circular saw. The knife turned out to be 31 cm long and 8.5 cm wide. Handle thickness 22 mm. The handle is made of oak, impregnated with linseed oil and a piece of beeswax.
I printed a 1:1 picture from the Internet of the model I liked and the one that is realistic for my capabilities. I cut it out with a small grinder.
Sanding the edges with emery, where it is not possible to reach, then manually with files. Grinding the surface with a grinding machine.
Rivets made of 4 mm wire.
Timing for weeding potatoes
Potato seedlings, as a rule, appear after 2-2.5 weeks, at the same time, the appearance of weeds on the site can be observed already 5-6 days after planting the potatoes. Therefore, weeding should be carried out from now on. For the first weeding in an area with a smooth planting, it is better to use a hoe or flat cutters, since the rows are still difficult to see and there is a risk that the trimmer or harrow will cut off the potato sprouts that have not yet broken through to the surface. If the potatoes were planted using a mechanized method with cutting the ridges of the beds, trimmers and walk-behind tractors can be used for weeding. After the first weeding, its further frequency is determined independently, based on the rate of weed growth. On average, the frequency is once every two weeks. When the potato bushes get stronger and become such that it is impossible to walk between them, weeding is not required.
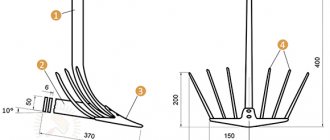
TWO HOOES
There are other successful solutions to the same problem. For example, Yu Reisler (Moscow) offers two original guns. The first is made from a cut piece of the scythe (Fig. 6), to the heel of the wider part of which I weld1 a hollow holder for the handle. It is used to destroy weeds in inconvenient places—slopes of ridges, potato ridges, irrigation furrows. The second hoe (Fig. 7) differs from the usual one in a special window cut into the blade. Naturally, this ripper is somewhat lighter than an industrial one, and during operation, wet soil does not stick to the surface of its blade, since with each subsequent blow it moves into the opening.
What is the device?
In the set of replaceable attachments for brush cutters, manufacturers have recently increasingly begun to mention such a device as a cultivator or weeder. Unlike classic attachments in the form of disks for mowing grass or a mowing head for synthetic fishing line, the cultivator is designed to work directly with the soil. The trimmer attachment is designed to loosen the soil in cultivated areas and partially in places where there is turf cover.
The attachment on the trimmer for weeding potatoes consists of
- from a housing with a worm mechanism;
- and the working body - disk, reciprocating or drum milling attachments.
The weeding trimmer attachment is attached to the rod instead of the lower gearbox. Conversion of a trimmer into a weeder is carried out within 1-2 minutes and does not require additional tools and equipment. The entire process is carried out using hex keys included in the brush cutter tool kit.
Using a brush cutter makes weeding much easier
The device body is collapsible. The housing contains special devices for adding lubricant. The body material is aluminum alloy, the cutters are made of steel. The shaft on which the cutters are installed is forged steel, the gear is bronze.
The principle of operation of the trimmer is simple - from a two-stroke engine through the clutch, rotational motion is transmitted to the shaft in the rod. Further, through the shaft, the movement enters the connecting shaft with a worm mechanism, from which the working shaft with cutters begins to rotate through a bronze gear.
The speed of the cutters is adjusted by adjusting the engine speed through the throttle handle - the more the carburetor damper opens, the higher the speed of rotation of the cutters.
Cultivator attachment for trimmer
Types of hoes
The working blade of a classic universal hoe is made in the shape of a trapezoid, the wide edge of which is the cutting edge.
To make soil cultivation easier, you can use several more types of tools:
- hoe - a semicircular cutting edge (in the form of a halberd);
- drop-shaped, wedge-shaped working blades, well suited for harrowing or processing dense soils;
- Dutch - with a hole in the canvas;
- weeder - in the form of a pitchfork. The roots of the weeds are not cut, they turn outward.
To break up clods of earth, it is convenient to use a “dragon” type hoe, which instead of a blade has a powerful trident surrounded by a pointed bracket.
For loosening and weeding, some summer residents use electric hoes (rotary). They are convenient for weeding soft soil, picking moss from the lawn, and mixing fertilizers.
How to weed potatoes with a trimmer
There are various methods of weeding potatoes - from traditional manual weeding to mechanical weeding. Each of them has its pros and cons, and experienced specialists say that the best effect is obtained if these methods are used in combination. The main tools with which you can weed potatoes include a trimmer (motor scythe) and a hoe.
A trimmer is a brush cutter that is powered by electricity or combustion of fuel (gasoline, diesel fuel). Fishing line, plastic or metal knives, and milling cutters are used as cutting tools. The advantage of the trimmer is the speed of weeding the potatoes, which cannot be achieved with manual weeding. At the same time, it is impossible to hill up potatoes using a brush cutter alone.
Important! It has been noticed that if you use a rounded fishing line in a brush cutter, rather than a faceted one (star-shaped), the results of weeding will last for a longer time, since the weeds grow more slowly after such treatment.
The trimmer is used primarily by fans of organic farming. They believe that it is impossible to hill up or loosen the soil too often, and even more so - to take cut plants from the garden, since the nutrients that they managed to get from the soil are taken away with them. On the contrary, supporters of organic farming believe that weeds cut with a trimmer should be left in the garden. At the same time, they perform the following functions:
- act as mulch, prevent further weeds from growing for a long time and retain moisture;
- attract worms and microorganisms that process weeds into nutrients, thereby fertilizing the soil.
Weeding with a trimmer should be done when the weeds are still small in size and can be easily cut with a knife.
At the same time, it is important to follow these weeding rules:
- You should work in a respirator and safety glasses, since when the trimmer operates, dust is formed and small pebbles fly around;
- you cannot work when other people are in front of the trimmer;
- The trimmer blade can be deepened into the ground no more than 1-1.5 cm;
- You can work with a trimmer when the first potato shoots appear, otherwise there is a risk of cutting them off;
- if the trimmer is low-power, you should take a break every 10-15 minutes to allow the engine to cool down;
- at the end of the season, the blades and working surfaces of the trimmer must be treated with fungicides, as there is a risk that pathogens of potato diseases remain on them.
Hoe sizes
Hand tools can come in several sizes, as they perform multiple functions. To till the soil between the rows, you should choose a hoe with a massive blade to quickly destroy thickets of weeds. For hilling, it is better to give preference to a light hoe so that this type of work is not very labor-intensive.
For very small plantings and garden work, it is better to choose a Fokina hand hoe. This is a new device that has already won the attention of supporters of agriculture. The hoe resembles a flat cutter in appearance and is distinguished by a sharp blade, which is attached to the handle in a special way. The tool allows you to destroy weeds, but does not harm the roots of plants. This is an unusual thin hoe, a photo of which is given below.
Pros and cons of the method
Weeding a garden with a trimmer, and especially the area where potatoes grow, has its own characteristics and specifics.
First of all, you need to pay attention to the fact that you need to choose the right tool for the job. It is preferable to choose powerful four-stroke engines as a working engine.
Such brush cutters have lower gas consumption and greater productivity compared to two-stroke ones. For two-stroke engines, the recommendations boil down to choosing a higher engine power; the more powerful the engine, the more efficient the work.
Weeding potatoes, unlike making hay or mowing the lawn, is a more labor-intensive process, so you need to be prepared for the fact that after work not only your back, but also your arms and legs will hurt. The fact is that during work you will have to keep the nozzle suspended, preventing the lugs from completely burying themselves in the ground. In addition, you will have to move the unit along the surface from right to left, which also requires significant effort.
But from an economic point of view, such potato weeding will be much more effective than manual weeding - in a season, using a cultivator, you can cultivate a much larger area than with your hands. In this case, repeated processing will be required after a longer period of time.
Alas, there is also a minus. This is a lot of gas mileage. In normal mode, gasoline consumption is usually 0.44-0.92 liters of combustible mixture per 1 hour of operation of the unit, depending on the design and type of engine. With the device installed, this figure increases by approximately 35-40%. So you have to choose either saving time and quality of work or saving money.
Cultivator attachment in action
Option No1. DIY hoe made from a steel disc
The most important part of any hoe is the steel strip with the cutting edge. If it is made of high-quality hardened steel, then the tool will last a long time. The only problem is that in stores you often find steel hoes that are not of the best quality. Below is an example of a factory hoe that we have already used.
Old industrial hoe
The tool, in principle, is not bad, the weight and shape are good, but the steel from which the working part is made has no heat treatment at all. The result is a rapid dulling of the cutting edge and the need for constant sharpening. And small pebbles generally leave decent notches.
The cutting edge dulls quickly
Here's another option - an imported chopper.
Foreign-made chopper
It is convenient because it allows you to quickly change attachments: you can install a fork, rake, or shovel on the plastic handle.
The handle can be equipped with different attachments
Very convenient, you will agree. But the hoe itself is made of a thin strip of steel, which is not very suitable for large weeds and heavy soils (that is, for our harsh conditions). But there is a way out - you can easily make a good hoe yourself, because its design is extremely simple - a steel tube (for installing a wooden handle) and a cutting plate welded to it. That's all, actually. The tools you will need are a welding machine and a grinder.
Let's see how to make a hoe from a steel disk 3 mm thick. By spending just 4 hours, you can acquire these handy tools.
- Homemade hoes made from a steel disc
- These choppers can be made in 4 hours
Step 1 . As you can see, all choppers consist of the two parts mentioned above. To make them, all parts (3 pieces of pipe and 3 plates) were previously cut out with a grinder, after which they were welded in pairs at a slight angle.
The plate is welded to the tube
Step 2 . Next, a hole was burned out in each plate by welding so that the handle could be easily knocked out and replaced if necessary. The steel plates are sharpened and the cutting edge is formed.
Hole for easy handle replacement
Step 3 . Each tube has a 4mm hole drilled for a screw (to secure the wooden handle). After this, the blanks were painted with black paint.
Hole for screw
Step 4 . All that remained was to install the wooden handles. In the example, a birch handle (from the store) was used. To install it, you needed sandpaper, a plane, a screwdriver and a hammer.
The handle must be placed on the hoe
On a note! It is convenient to make handles of different lengths with a difference of about 15-20 cm - this way each family member can choose the right tool for themselves.
Step 5 . First, the end of the smallest handle (about 150 cm) was slightly planed with a plane.
The end of the handle is planed
Step 6 . After this, the hoe was mounted on the handle.
The hoe is mounted on the handle
Step 7 . To insert the handle as tightly as possible, we used a hammer.
Hammer used
Step 8 . At the end, the handle was fixed with a screw and a press washer (length was 2.5 cm).
The screw is being tightened
Step 9 . The entire handle was thoroughly sanded using sandpaper.
Sandpaper treatment
Step 10 . Other handles were made in a similar way. One of them, by the way, was taken from an old hoe.
Handle from an old hoe
Step 11 . To make the handles last longer, they were painted in 2 layers (with an interval for drying).
Painting tools
Making a hoe from a piece of tin
If you don't have a bad shovel or saw, you can use an ordinary piece of metal as a blade. Strong steel, about 2mm thick, is best so that the work area has a solid weight. It should be remembered that the iron must be sharpened well, since with prolonged use, sooner or later this will have to be done. Let us now move directly to the manufacturing process.
It is best to take a rectangle, 7 by 25 centimeters - this is the ideal size; with such a blade it will be very convenient to process row spacing. We make the cut straight, not at an angle. We grind the edges so as not to get hurt during the following operations.
Since our main task is to make it high quality and inexpensively, we won’t waste money, we bend a 25x25 mm corner and weld it to the metal.
To do this, you can use ordinary knitting wire or metal clamps (you can buy them for 3-4 rubles on the market). 2-3 such clamps will be quite enough - the cutting will not go anywhere.
Now the hoe can be considered ready, you can sand the handle and coat it with varnish, sharpen the blade with a grinder to the desired state.
These were the cheapest and simplest options for making the instrument. For those who have extra financial resources, we can advise you to buy a ready-made blade, holder and assemble it yourself, but such a tool, as a rule, costs a lot.
Any professional gardener or just an amateur will tell you that you cannot start a single gardening season without a hoe. This universal tool helps us plow the garden, get rid of weeds and care for our crops.
Functions of an ax for chopping meat
The functionality of the device depends on its size and shape:
- A device with a wide blade and heavy weight does not cut. He cuts any pieces and bones. This helps maintain the integrity of the pulp of the connective fibers;
- The middle handle ensures perfect balancing. High-quality cutting of bones occurs. To do this, you do not need to debone the carcass first. A high-quality device will not leave crumbs and splinters in the pulp.
Advantages and disadvantages
The tool has a number of advantages:
- the ability to chop the hardest products, as well as frozen pieces;
- ability to perform the functions of a meat grinder;
- ease of care;
- the blade does not require regular sharpening;
- very strong steel.
The disadvantages include:
- fragility of the handle made of soft wood;
- the use of great physical effort at work;
- large mass.
The hatchet is heavy and bulky.
The best models and their prices
When choosing trimmer attachments, first familiarize yourself with the manufacturers and design characteristics
Pay attention to value for money. Monitor reviews of the model you like
We'll tell you about the best models of attachments on the market.
KAAZ Kat-MC250P
Refers to cultivator attachments. Equipped with a subsoiler. Suitable for use in small areas.
Characteristics:
- manufacturer - Japan;
- brands: trimmer ECHO PAS-Tiller Cultivator, brush cutter PAS-265ES;
- price: 9990 rub.;
- knife material: hardened steel;
- Dimensions of the working body: width – 24 cm, depth – 36 cm.
KR400MP MAKITA 195710-3
Designed for small areas. The working part consists of cutters.
Characteristics:
- manufacturer - Japan;
- brands: EX2650LH, DUX60Z;
- price: 17160 rub.;
- knife material: metal;
- Dimensions of the working body: width – 16 cm, cutter diameter – 23.3 cm.
Milling type working body
Designed for weeding, which carefully digs up the soil, facilitating the penetration of moisture and nutrients and saturating it with oxygen.
Characteristics:
- manufacturer – Taiwan;
- brands: for TAC lawn mowers;
- price: 7900 rub.;
- knife material: steel;
- power supply: petrol engine;
- weight: 5 kg;
- Dimensions of the working body: width – 18 cm, cutter diameter – 20 cm.
Rules of care and use
Proper care of your hoe will increase its service life. Basic simple rules of operation:
- Before work, check the sharpness of the blades and sharpen them if necessary;
- at the end of the work, clean the working surfaces from soil and leaves;
- use only for its intended purpose;
- do not leave on wet ground;
- store in a dry place;
- It is advisable to wrap the blade in cloth or newspaper.
Working with an electric hoe:
- hold with both hands and at some distance from the feet;
- avoid heavy loads;
- Do not use on hard soils or wet areas;
- do not go close to trees;
- clear away soil and grass;
- reduce operating time in hot weather;
- store in a dry, ventilated area.
Important! Working with an electric hoe consists of alternating equal periods of switching on and resting.
Every summer resident definitely needs a hoe, or better yet, several types for different jobs. When choosing, take into account the characteristics of the models and their capabilities. The service life of the tool depends on proper care, storage and use. We hope that our tips will help you choose the right hoe.
Homemade hoe from an old saw
Nevertheless, there are times when an old hoe breaks and a new one has not yet been purchased, and the gardener has to make a tool from scrap materials. For a homemade hoe, a hacksaw blade is best suited, since this metal will withstand any load and will not wear out for a long time. However, such a tool made from scrap materials will only serve you for one season. Next time you will need to take care of a new hoe.
To make a hoe with your own hands, you should follow these steps:
- first you need to saw off the canvas to the size you need; The best size is 25 cm;
- we take an unnecessary old wood saw and finally break it down; anyway, it will no longer be useful to us for its original purpose;
- using a grinder, we will make a cut at an angle of 45 degrees, towards the teeth of the file;
- Next, you need to drill 3 holes for fastening, and the holes should be at the same distance;
- using a drilling machine, you need to make the same number of holes in the metal corner with shelves;
- the next step is to secure the holder - for this we take a thick-walled metal pipe with a diameter of 25–30 mm and a length of 25–30 cm;
- We hammer one side of the pipe with a hammer 5 cm;
- In order for the corner to stand firmly, it is necessary to drill a couple of holes;
- as a result of all the work done, we get a finished blade with teeth, and now all that remains is to fasten the handle in order to use the homemade tool for its intended purpose; You can choose any tree for the cutting, the main thing is that you feel comfortable working in the garden with this material;
- Using sandpaper or a sharp knife, we cut one edge of the cutting and insert it into the pipe;
- To ensure that the hoe handle is firmly secured, we hammer a nail into metal and wood;
- then we will work with the old saw - we need to get rid of the teeth that are not needed in the hoe; To do this, we take a grinder and level the surface of the hoe, while the teeth can be left; some gardeners claim that with them the hoe loosens wet soil better.
A hoe for cabbage or for weeding can be made, for example, from a trimmer, a scythe or cardboard. This weeder will be no worse than the purchased version.
Characteristics of a meat ax
Its main difference is its wide blade and curved handle. They sharpen mainly on one side. Double-sided sharpening is a rarity. Options:
- blade length – 13.5 – 18 cm;
- handle length – up to 30 cm;
- It is based on alloy steel (it is durable and resistant to corrosion).
A convex cutting edge can:
- split the bones;
- penetrate the pulp without difficulty.
The curved shape of the handle with a thickening at the tip prevents injury to the hand. Hardwoods are the best materials for handles. The strength of the blade depends on its special hardening. It chops thick bones without splinters. Also suitable:
- frozen meat;
- fish.
You can make a hatchet with your own hands.
What is the difference between a hoe and a hoe and a flat cutter?
Gardeners usually call a hoe a small hoe with a short handle, which can be used to process beds with dense plantings or young plants. The hoe is designed for large areas and crops that do not require delicate handling of the roots.
A special type of garden tool is a flat cutter. The most popular is the Fokine model. It differs from a hoe and a hoe in the shape of the working part - it is made in the form of a poker or hook with sharpened edges. The task of the flat cutter is to cut off the above-ground part of the weeds, leaving the roots in the ground to rot.
How to do it yourself
Today you can easily buy the necessary garden tools at any specialized store. But if you are a “homely” summer resident and like to do everything with your own hands, then why not make a hoe yourself.
So, let's look at how to assemble garden tools from scrap materials with your own hands. For the handle, you can use any long stick from the available tools, and for the blade, you can sharpen any hardened metal from what you have in the shed and is no longer quite working.
Hoe
A hoe will help in the fight against frequently located and numerous weeds.
Sapa, hoe, double-sided hoe
The tool will not only remove weeds, but also loosen the soil, breaking up clods and allowing the roots of noble plants to breathe and make grooves.
They come in rectangular, triangular and trapezoidal, with handles of different heights. For example:
- The so-called garden glander has a thin blade, suitable for cutting roots. The most powerful, it allows you to remove even burdocks with roots, but this can damage the roots of the desired crops, so it requires caution when using. It is good for hilling, for example, potatoes, when weeds are removed along the furrow between plants. Moreover, the handle in this case should be large, like a shovel;
- hoe - compared to the glander, its blade is narrower and higher, but at the same time thick. It is used not for removing weeds, but for making beds or holes for planting;
- a double-sided hoe is the most popular; on one side it has a sharp blade, reminiscent of a hoe, and on the other, a small rake that allows you to loosen the ground and rake out weeds.
Now new varieties of hoes have appeared:
- Fokina flat cutter - a blade curved at 90 degrees is attached to the handle, reminiscent of a sharp poker;
- Pololnik Arrow and Stirrup - in the first the blade resembles an arrow, in the second a stirrup.
I’ll tell you from my experience that you need to have all the devices in your arsenal and use them each for your job. When loosening and weeding between plants with a hoe with a small handle and a rake, in the aisles - use a powerful and high one.
And to remove individual weeds with deep roots, use a root remover, and what modification is your choice.
Blade shape and angle
The blade of the tool, depending on the specific product, has different parameters.
To process row spacing, wide, massive blades are used, the shape of which can be used to distinguish the following types of hoes:
- Rectangular - with a blade in the form of a clear narrow rectangle, sharpened on one side.
- Trapezoid - with a trapezoid-shaped blade, where the widest side forms the cutting edge.
- Trapezoid - with a trapezoid-shaped blade, where the widest side forms the cutting edge.
- Triangular - with a blade in the form of an isosceles triangle, where equal sides are sharpened and meet at an obtuse angle if we are talking about a full-size tool, and at a sharp angle if we are talking about miniature models of hoes. In the latter case, the shape of the working part resembles a heart if all the corners are rounded. On the opposite side there may be a trident or a bident, as in the picture above.
- Arc-shaped - with a cutting part in the form of a circle segment. This shape is well suited for forming holes and wide furrows in the soil for seeds. The variety is crescent shaped. The blade is a flat blade and the tool is classified as a straight hoe, but this is not always the case. On the opposite side there may be a trident or a bident, as in the picture above.
- Arc-shaped - with a cutting part in the form of a circle segment. This shape is well suited for forming holes and wide furrows in the soil for seeds. The variety is crescent shaped. The blade is a flat blade and the tool is classified as a straight hoe, but this is not always the case. In some models, the blade has a smooth transverse bend, which is why they are called radius, and the shape of the cutting edge can be any.
The angle of inclination of the blade in relation to the handle is usually 70 - 90 degrees. The blade itself is rigidly fixed, however, there are removable options.
Purpose and benefits
The hoe is designed for shallow loosening of the soil, removing weeds, hilling plants, and applying fertilizers to the soil. This is a lightweight and easy to use tool.
Allows you to carefully walk around cultivated plantings, providing aeration of their root system and cutting weeds. The hoe is also used for cutting furrows for planting seedlings or sowing seeds. The tool is convenient for knocking out holes and marking sown areas without trampling on loose soil. Gardeners use a sharp blade to cut the grass, clearing the furrows.
Why cut grass: When the top of the plant is cut, its roots become rotten. The more often the cleaning is done with a hoe, the faster the underground part will die off, providing humus. There is no need to dig up and fertilize the soil.
Dimensions of parts and materials of manufacture
The parts of the hoe are rigidly fixed, but there are also collapsible models. The handle is made of wood, metal or plastic. To increase reliability, many manufacturers make the handle from reinforced plastic and provide it with a rubber coating.
If we talk about the tip, it is made only from metal. Carbon, tool or stainless steel is mainly used.
The length of the cutting varies from 100 to 1200 mm. It should be noted that the longer the handle, the less load on the back area during operation. The length of the shovel can be from 60 to 300 mm, the height of the cutting plate is about 20 mm.
How to choose a comfortable hoe
The speed of work directly depends on the quality of the chopper. You should choose according to several parameters.
The most important thing is the material. Soft metal products will bend and break. A high-quality, durable hoe has a working part made of carbon steel, and a handle made of metal or fiberglass-reinforced polyamide.
Choppers with an insert blade (a strip of metal, not a solid bent blade) are trustworthy. This means that the material is of high quality and is used sparingly.
The most reliable tool is a heavy forged metal hoe. Such tools are characterized by increased strength of the working surface. Forged steel does not deform and allows for processing dense clay soils. During forging, the structure of the metal changes from crystalline to fibrous. There are no cracks or bubbles in this fabric. Forged steel is commonly used by German, Finnish and Dutch manufacturers.
The second important parameter is the thickness of the blade. The sharper the cutting edge, the easier it is to work. The optimal thickness should be 1-2 mm. The thick edge does not penetrate the soil well. Clay soil will be especially difficult to process. Most models for sale have a 5-10mm blade. Experienced gardeners trim or sharpen them.
Hoes with blunt cutting edges can be used without sharpening on sandy soils. The width of the working surface is selected depending on the type of soil being cultivated and its purpose: for clay - up to 80 mm, for flower beds and beds - no more than 120 mm, for hilling potatoes and loosening the soil in the garden - up to 300 mm. You should also pay attention to the length of the handle. For a hoe, it should be such that you do not have to bend your back too much.