Every modern smartphone has a camera for taking photos and videos.
And this camera has an LED flash on the back of the phone!
It turned out that this flash can be adapted to solve other, very necessary tasks. Well, for example, as a flashlight, when once a month you have to “take” readings from electricity, water and gas meters. It is clear that these devices, as a rule, are located in the most inaccessible places where the body cannot be seen. Especially for “water”. This is where our multifunctional phone will help us out, highlighting all the hidden corners of our home.
Open flashlight using quick settings
Android didn't have a universal flashlight switch until Android 5.0 Lollipop was released in 2014. Before this, some phone manufacturers had a built-in way to open the flashlight, while others did not. Luckily, all modern Android phones have a built-in flashlight.
To turn on the flashlight, simply pull down from the top of the screen (or drag once with two fingers) to open the Quick Settings menu. You should see a flashlight . Click to instantly turn on the LED flash.
Depending on which icons appear first, you may also be able to access the flashlight from the notification shade (after taking it off the screen once).
When you're done, simply tap it again to turn off the flashlight. You can lock the screen or open other apps and the flashlight will remain on.
If you don't see the Flashlight , you may need to swipe left or right to access other icons. This menu will vary depending on your hardware manufacturer. The above shot shows stock Android, but if you have a Samsung, LG or other device, things will be different for you.
"OK Google, turn on the flashlight"
The quick settings switch is convenient, but what if you don't want to use it? There may be other shortcuts in Quick Settings that make access difficult. Or you may need to turn on the flashlight when your hands are busy or dirty.
For those times, you can rely on Google Assistant. One of the most useful Google Assistant commands is OK Google, turn on my flashlight . As expected, the assistant will turn on your flashlight as soon as you say so. To turn it off, you can tap the switch that appears in the chat window or say OK Google, turn off flashlight .
What makes this shortcut convenient is how many ways you have to access Google Assistant. If you have a Pixel 2 or 3, you can squeeze the sides of the phone to bring up Google Assistant. On other phones, you can press and hold the Home button to bring it up. If you use the hands-free method, you can also set the Google Assistant to respond every time you say OK Google .
Read more about this in our introduction to using Google Assistant
LED durability
Smartphone owners often doubt the durability of the flashlight and rarely use it. These are vain fears, because the flash uses an LED, which has undeniable advantages:
- LEDs are very shock resistant. If you drop your smartphone, the case or glass is more likely to be damaged than the LED;
- The LED consumes surprisingly little power, so it can run all night long;
- in total, a high-quality LED can last up to 50,000 hours. Naturally, this far exceeds the lifespan of other smartphone parts.
Use the flashlight app if you must
If for some reason you don't like any of the above methods, or you have an old Android phone where none of these options are suitable, you can resort to using a flashlight. There are hundreds of them on the Google Play Store, but you should take care in choosing them.
Turning on the flashlight is a fairly simple task. However, most flashlight apps require a ton of unnecessary permissions, such as your location, contacts, and the like. There is no compelling reason to grant these potentially dangerous permits. for applications that are likely to abuse them.
One of the most popular Android flashlight apps, Brightest Flashlight Free, is notorious for collecting contact and location data of its users. Many of these apps also display obnoxious full-screen video ads.
Some offer additional features such as increasing screen brightness and displaying colors, but in most cases these are unnecessary and not worth the privacy risk.
With all that said, we recommend avoiding flashlight apps. if you don't need it. If you do, try Icon Torch. This app lets you open the flashlight with a simple switch, and there are no ads or in-app purchases. Only absolute minimum permissions are required, so it's a safe bet.
Alternative way
Amateur firmware is common on Chinese smartphones; all functionality is not always fully implemented on them. In this case, you can download the application from Google Play. To do this, go to the store and enter the phrase “Flashlight” in the search. A list of products to download will appear. Such programs have a number of advantages, for example: additional settings, increasing LED brightness, SOS mode.
Try Gestures to Turn on Flashlight
Some Android phones, such as some Motorola devices, have built-in gestures that let you turn on the flashlight at any time. These include shaking and performing the double kick movement.
Feel free to try and see if they work with your device. Many apps on Google Play offer to add this feature (or other shortcuts, such as turning on the flashlight when you press the power button multiple times) to other phones. However, many of these apps are filled with ads, are unreliable, or haven't been updated in years.
We recommend avoiding them and sticking with the flashlight's built-in switches.
About choosing a lithium-ion battery for a flashlight
Any lithium-ion battery is suitable for upgrading a flashlight, regardless of the material from which its positive electrode is made and the form factor (shape and geometric dimensions). The battery capacity (expressed in Ah) also does not matter, just the larger it is, the longer the flashlight will shine.
It should be noted that if a battery that has been in use for a long time is installed in the flashlight, then its actual capacity, as a rule, is significantly less than indicated on its label.
You can check the feasibility of installing an old battery in a flashlight by measuring its capacity while charging, which will require the presence of measuring instruments, at least a USB tester. Or charge the battery completely, connect it to the flashlight's LED board and check whether its operating time is sufficient.
If the battery is insufficient in capacity, you will have to purchase a new one. The most suitable for the flashlight is the popular Li-ion battery type 18650.
About the built-in protection circuit in Li-ion batteries
There are lithium-ion batteries that have a built-in protection circuit board (PCB - power control board) against short circuit, overcharge and deep discharge. Such protection is mandatory installed in the batteries of expensive equipment, for example, cell phones, cameras, laptops.
A round-shaped protection board can also be installed at the end of a AA battery. In this case, the battery is slightly longer and has the inscription “Protected” on its body.
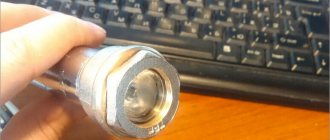
The photo shows an open cell phone battery case. It has a printed circuit board with a protection circuit. When used to install a cell phone battery in a flashlight, this circuit will serve as additional protection, therefore, if it is working, it should not be removed.
Solder the wires, observing polarity, to the outermost contacts, next to which there is a polarity marking.
The protection circuit, unlike the controller, does not limit the charging current, but only protects the battery. This is the difference between these nodes.
How to turn on your iPhone's flashlight
As you'd expect, Apple has also added easy access to the iPhone's flashlight in iOS.
The fastest way is to use the Control Center shortcut. On iPhone X or later, swipe down from the top right corner of the screen to open it. Those on an iPhone 8 or earlier should swipe up from the bottom of the screen.
Once you open Control Center (you can even do this while your phone is locked), simply tap the flashlight to turn it on. Click on this icon again to turn off the flashlight. If you don't see the icon, you may have hidden it when you set up Control Center. Go to Settings > Control Center > Customize Controls to add it back.
On iOS 11 or later, you can even adjust the brightness of the flashlight. To do this, press 3D (press deep) on the flashlight . You will see a slider that you can adjust between multiple levels.
If you prefer, you can also ask Siri to open the flashlight. Simply summon Siri by saying, Hey Siri , or hold the Home button (iPhone 8 and earlier) or the Side button (iPhone X and later) to summon it. Then say Turn on my flashlight .
Don't worry about flashlight apps for your iPhone. There are enough built-in options.
All your phone's flashlight options, covered
Now you know how to turn on the flashlight on your Android phone or iPhone. It's a simple task, but knowing where these shortcuts are means you won't be stuck in the dark for long.
While you probably won't damage your phone if you use the flashlight for long periods of time, we recommend not leaving it on any longer than necessary. Bright lights will drain your battery, and leaving them on all the time can cause your phone to heat up and further drain your battery.
A flashlight isn't the only tool that can replace your phone; Check out the best digital instrument apps for Android
Installing a lithium-ion battery in an LED flashlight
Before starting work, you need to check the functionality of the controller and battery.
The controller can be supplied with voltage without load. In this case, the output voltage is set to 4.2 V and the blue LED on the board lights up. Next, you need to check the battery by connecting it to the controller output and charging it completely. The red LED will light up while charging, and the blue LED will light up when the battery is charging.
After charging, it is advisable to run test the battery, connect it instead of an acid one and see how long the flashlight illuminates. It worked for me for 10 hours and continued to shine. I didn’t wait any longer, since this time was quite enough for my tasks.
New electrical circuit of LED flashlight
At the next step, a new electrical circuit diagram of the flashlight is developed. The negative wire is common to all components and the battery. In the left position of switch SA1, its common contact connects the battery to the positive terminal of the controller. By connecting the middle pin to pin 3, voltage is applied to the narrow beam board, and with pin 4 to the diffuse light LED strip.
The SA2 toggle switch is used to select the battery from which the LEDs will operate. Since there were two batteries available, I decided to install both in the flashlight. There is no clear answer to the question about the admissibility of parallel connection of lithium-ion batteries without a special controller. Therefore, I decided to go the proven route and provided the ability to connect the batteries separately.
Separate connection of each battery made it possible not only to ensure their operation and charging in optimal conditions, but also to know during the operation of the flashlight how long it will last. Knowing how much time was enough to operate from one battery, you will know how much more the flashlight can illuminate.
In addition, if one of the batteries fails, this will not lead to loss of performance of the flashlight. Two separate LED units and two batteries ensure you're never left in the dark.
Assembling a flashlight with a lithium-ion battery
Now everything is prepared and you can start upgrading the flashlight - reworking its circuit to work with a lithium-ion battery.
First, all wires are unsoldered from the switch and the old charger board is removed.
The body of the modernized flashlight had a compartment designed for a short power cord, which was closed with a folding bar with diffused light LEDs. The SA2 toggle switch for battery selection was inserted into it.
Double-sided tape in the form of two strips was used to secure the batteries. You can also secure the batteries using silicone.
Before attaching the batteries and the controller board, wires of the required length were first soldered to them with a soldering iron. Due to the fact that two batteries were not conveniently placed in one half of the flashlight body, I installed them one in each half of the body. The controller board was secured to the case using two screws with M2 nuts.
When soldering wires to the terminals of the battery, care must be taken so that the free ends of the wires do not accidentally touch and short-circuit its terminals.
The photo shows the lantern after installation. All that remains is to check the operation of its components and assemble it.
It is impossible to measure the charging current by connecting an ammeter to the open circuit after the controller, since the internal resistance of the device is large and the measurement results will be incorrect. I have a USB tester with which you can find out the voltage supplied from the charger, the current charge current, the charge time and the energy capacity that the battery has received. The tester showed that the controller charges the battery with a current of 0.42 A. Therefore, the controller charges the battery normally.
After assembling the flashlight, it turned out that its red body does not transmit blue light and it is impossible to know when charging is complete.
I had to disassemble the flashlight and make a slot hole in the area where the indicator LEDs are located.
Now that the battery is charged, the blue LED glow is clearly visible.