In order to develop a child’s sensory abilities and instill in him a sense of beauty, it is not at all necessary to buy expensive creative kits! You can make them yourself at home! For example, with the help of colored salt you can draw, learn colors and letters, and also make beautiful crafts!
bubbledabbledo.com
Read our material on how to make colored salt and how it can be used for a child’s development.
Selection of materials
For work, purchase any finely ground salt without additives or additional components. The larger the granules, the more capricious they are when painting, because it will be more difficult to saturate the particles of the substance well. Absolutely any pigments and dyes are suitable for the “Extra” brand product, since they are immediately mixed with the base and give it a uniform color. Food coloring, watercolor, gouache, pastel and crayons are best suited for this purpose.
Evaporation salt Extra
For coarse salt, gouache is used, and a larger amount of paint is used to make the color sufficiently saturated. If you want to give the powder a soft, light, translucent shade, use watercolor, and crayons will even paint it in pastel colors.
Volumetric crafts
Let's look at another popular method that allows you to sculpt from salt dough. For beginners, it is advisable to learn how to roll out material in your hands by moving your palms back and forth. This way you get a thin stick, as in the photo below.
Using your fingers, you can stretch out a ball of dough into pointed parts of the face of any animal. Let's list some modeling techniques that have been known to all children since kindergarten:
- kneading;
- pinching off pieces and pinching ends;
- rolling into a ball;
- flattening with fingers or palms;
- pressing and pressing when joining parts together;
- smudging;
- stringing elements on top of each other.
First painting method
Colored salt can be easily made using food coloring, which is found in Easter or confectionery kits. To work, you will also need the salt itself and a thick plastic bag (or several bags). Since the brightness of food pigments is approximately the same, to obtain a rich color of the powder you will need 100 g of the main product and 4 drops of liquid dye. They act this way:
- salt is poured into a bag;
- drip the dye inside the bag, tie it tightly;
- knead the mass until it is evenly colored;
- Untie the bag and use the substance for its intended purpose immediately.
Set of food colors “CHOCOLATE”
Due to the small amount of liquid in the composition, such salt does not have to be dried, and it is immediately ready for use. If too large a portion of the substance is prepared, it can be stored in a hermetically sealed bag, which will definitely not get wet, in a dark, dry place.
Modeling techniques
Now we’ll tell beginners how to sculpt from salt dough. The process is reminiscent of modeling from plasticine. The mass can be rolled out on the table surface with a wooden or plastic rolling pin, forming a thin layer. Using a stack, knife or cookie cutters, cut out parts of the desired configuration and size.
The remaining dough is collected back into a ball. Thin crafts dry easier and faster, so many craftsmen work only this way. From the rolled out layer you can create a wall panel from salt dough, make a picture or small crafts, for example, a keychain or a pendant for your neck. Christmas decorations made from thin dough look great, for example, snowflakes, ovals, rings, stars, Santa Claus heads, candies, etc. On the figures made by rolling, you can punch a through hole for pulling the thread. Pressed dots or stripes, lace prints or prints of other decorative elements look interesting on flat crafts. Many parents make marks from the palms and feet of their newborn baby as souvenirs, framing the craft in a frame. After production and hardening, the products are painted and varnished.
Second coloring method
This option involves painting salt powder for decoration using gouache or watercolor of the selected shade. The paint, no matter what type it is, is diluted with water in advance to the state of a semi-liquid paste, and then proceed as follows:
- pour the product into a plastic bag;
- paint is introduced inside (the more liquid is added to it, the less bright the shade of the finished decor will be);
- using a stick or brush, mix the salt with the pigment, distributing it evenly;
- tie the bag, thoroughly knead the contents again;
- pour the colored crystals onto a piece of paper and send them to dry.
Since the salt mass turns out wet, it must be dried, otherwise it will not be suitable for subsequent creative activities. The easiest way is to pour the powder onto paper and put it on the battery: it will dry out within a few hours. You can get the result faster in the oven - here you need to hold the colored powder for an hour at a temperature of about 100 degrees. It is possible to achieve complete drying of the mass even faster by using a microwave. The salt will dry in 3-10 minutes, depending on the power of the device.
As heating completes, the product will clump together in clumps. To use colored salt for holiday decorations, it must be ground again. The easiest way is to knead the mass with a fork, pestle, or pour it into a bag and roll it with a rolling pin. To ensure that the crystals are approximately the same fraction, they are sifted through a sieve before use.
Classic recipe
Let's start the master class on modeling salt dough with the simplest classic recipe for its preparation. Always use fine salt called “Extra” so that stone granules do not subsequently appear in the mass. The flour used is white, wheat, sifted.
To prepare the dough, take:
- a glass of table salt;
- the same amount of white flour;
- a teaspoon of vegetable oil;
- cold water (as much as it will take).
In a bowl, first mix the dry ingredients, then make a well in the center and pour in a small amount of water and oil. Stir first with a spoon, and then knead to the desired consistency with your hands, adding more liquid if necessary. Approximately half a glass of water per serving should be used.
The third painting method
You can prepare colored salt using crayons. This task will be quite long and troublesome, so it will require a lot of free time and patience. Salt is poured in a thin layer onto the paper and rubbed with colored chalk, holding it in your hand. Periodically pour the powder into a pile and continue similar actions.
After painting the first batch, pour in a second one, using the same or a different shade of chalk. To speed up painting, you can first crush the chalk with a grater, rolling pin, mortar, coffee grinder, and then simply mix it with salt. This technique does not require drying, so you can use the finished material immediately.
In addition, there is the option of coloring the product with pastels, which are similar to crayons, but are softer:
- pour some salt powder into the pan;
- grate the pastel and add it to the container;
- Place the product in a water bath for 5 minutes with constant stirring.
We sell useful minerals
Children's creativity will be entertaining for the whole family. Below are options for those who are bored with banal activities.
"Salty" drawings
How to use colored salt powder in New Year's creativity? The easiest way is to sprinkle it on finished drawings to give the effect of volume and shine. Salt with silver paint is ideal for creating frost, snow, frost and other winter pictures. In order for the powder to securely adhere to the surface, you need to apply thin strips of glue to the drawing and sprinkle them, and after a couple of minutes shake off the excess.
Layered decor for the little ones
Making is more like a game of perseverance. Decorating requires care and precision. This creativity is ideal for ages 2+, as the child gets used to completing assigned tasks and at the same time develops motor skills. The result for him will be a real miracle. With the right selection of shades and colors, building up layers, parents will be proud to put the work in a prominent place.
Creation stages:
- You can learn how raw materials are painted from the previous sections.
- Find a bottle with a wide neck so that a teaspoon can fit in it. Even adults are captivated by crafts made from salt in a bottle.
- Allow 1 hour for the process and should be performed with your baby.
In order to teach him independence and not limit his freedom to choose a palette, they perform the task in parallel with him. Using your own example, you need to show the importance of maintaining layers, perseverance, and calmness.
For motivation, it is recommended to show photos of the finished ones; the child will be excitedly involved in the production. In the first phases, it is better to choose small vessels. These could be miniature baby food jars. As they grow older, the hole for the mound may narrow.
"Rainbow" made of colored salt
You can make an original souvenir from colored salt to decorate your home or apartment. You will need a transparent jar or bottle with a lid and salt powder in several shades. The container is filled with salt layer by layer so that the layers do not mix with each other (7-10 colors in total). When the composition is ready, screw the lid on the jar.
Jars with colorful salt
Goals and objectives
The purpose of salt painting is to develop artistic skills.
Tasks:
- acquaintance with one of the original techniques of fine art, training in its practical application;
- education of aesthetic taste, the ability to see beauty;
- development of artistic abilities, imagination, imaginative thinking;
- improvement of finger motor skills;
- formation of independence, perseverance, diligence, hard work, accuracy.
Bright salt candlestick
The base - the simplest and most inexpensive candlestick - is coated with office glue or PVA, and then sprinkled with colored powder. If desired, additionally sprinkle the accessory with sparkles or glitter. If you want to paint only the edges of the candlestick, carefully dip them in glue and sprinkle them.
By placing candles in such a product, you can get an original and romantic decoration for the holiday table. Colored salt gives a lot of ideas for creativity and allows you to fantasize with children and other family members, brings you closer together and gives you a great mood
Preparing for work
Before the start of the lesson, the teacher should familiarize students with examples of salt work: show illustrative material, talk about the technique. Next, you need to choose a topic for your work. The teacher must talk with the children about the chosen topic and carry out educational and educational work. For example, if the topic is “Autumn Leaves,” you can talk about the beauty of nature in autumn, the change of seasons, and the importance of fallen leaves for the soil.
Next, you need to prepare materials and workspaces. To paint with salt you need:
- white cardboard or album for drawing with watercolors;
- a bowl of table salt;
- PVA glue in a tube with a narrow neck;
- watercolor paints;
- soft brush;
- glass of water.
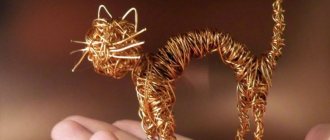
Connecting craft parts
In the sample of a product made from salt dough, shown in the photograph below, it can be seen that small parts are attached by indentation to the contours of the cat, cut out with a knife from the rolled out sheet. These are the eyes and nose, as well as the character’s hands with a coin in the center. They attach easily until the material hardens and dries.
The legs of the cheerful kittens are attached to strings. To do this, holes were drilled right through in the lower part of the craft. The same procedure was done with the paws, sculpted separately. The craft is decorated with beads attached to a thick nylon thread. You can also leave a hole at the top of the cat’s head, into which at the end of the work you attach a pom-pom or brush for the animal’s hairstyle.
Attributes for playing "Shop"
For children's games, items made from salt dough are just right. This material is natural and environmentally friendly. Crafts after production acquire hardness and strength. Even if the child drops the toy on the floor, it will remain intact. And if a breakdown occurs, you don’t mind throwing it away.
Be sure to involve children in working on the game attributes in the store. Firstly, it is useful for them to do modeling. This develops motor skills of the hands and fingers, as well as the creative abilities of children. Secondly, while making crafts, children better understand the properties of the material, the external features of the products, and get acquainted with their qualities and structural elements.
Picture "Owl"
A salt dough wall panel can be attached to a sheet of fiberboard or thin plywood and framed in a picture frame. First, the product is formed on a board. For convenience, you can draw an image of the future picture on a sheet of paper. Each part is molded separately and attached to the base in the form of a bird’s outline.
You can take a real twig, process it, clear it of bark, cover it with stain and varnish. The owl's feet are wrapped around a stick in a soft state. After drying, the product is painted and glued to a solid base. You can use both PVA and a glue gun for this purpose.