To maintain order on your home desk, you need to buy, or even better, make your own stands for pencils, pens and other office supplies. Thanks to the pencil holder, all writing objects will always be at hand and will not get lost at the most inopportune moment. Moreover, you can involve children in the work, who will definitely add something new and interesting to the design! Today we will show you various pencil holders with your own hands, all you have to do is choose a suitable idea and bring it to life.
DIY pencil holder
Option 1. Salt dough owl stand
Stylish desktop decoration
To make such a cute owl at home, prepare:
- flour;
- water;
- table salt;
- stack;
- toothbrush;
- a cardboard jar of a suitable size;
- acrylic lacquer;
- PVA glue;
- corrugated paper (can be replaced with decorative rope);
- scissors, gouache, brush.
Step 1 . To knead the salt dough, pour a glass of salt and flour into a large bowl, then add water and knead to the consistency required for modeling. Separate a little of the finished dough, add beige gouache to it and knead well.
The jar is wrapped in salt dough
Step 2 . Roll out the dough into a “cake”, the thickness of which is 1-1.5 cm. Apply glue to the outer side of the jar, then wrap it with dough. Trim off any excess dough and smooth the seams with a wet brush.
Step 3 . Using a toothbrush, make a slight stipple over the surface of the dough.
Step 4 . Then knead the brown dough and make the same flat cake 1-1.5 cm thick. Cut a 5 cm thick strip out of it and glue it to the bottom of the jar, as in the photo.
Creating eyes for an owl
Step 5 . Make 2 eye bases from the white dough and then attach them. Make the beak from brown dough, and the irises from turquoise.
Step 6 . Take the pink dough, roll 8 strips out of it, and from them make 4 ropes and make a bow. Leave the part for a couple of hours to dry.
Step 7 . Make teardrop-shaped wings from brown dough and glue them to the body. Glue the ropes woven from white dough to the neck.
Final decor of the pencil holder
Step 8 . Make a sausage from white dough, draw a lace texture on it with a stack, and glue the finished collar under the beak.
Step 9 . Place the craft in a warm place for 24 hours. After that, paint the bottom part with brown paint and make white dots.
Step 10 . Draw eyelashes and pupils, and after the paint has dried, paint white highlights on the eyes. Glue a bow above the wing.
Owl pencil made from salt dough
Step 11 . Glue a button with a corrugated strip bow on top of the lace. Apply varnish to the craft and wait until it dries completely. That's it, the pencil holder made from salt dough with your own hands is ready!
→ How to make a tattoo machine with your own hands
Option 2. Stylish cardboard pencil holder
Useful accessories made from toilet paper rolls
A roll of wallpaper or toilet paper is an ordinary piece of garbage, but not in skillful hands, who can even make cute pencil holders out of such seemingly unnecessary material!
Materials and tools
What you will need for work:
- bushings;
- thick fabric (velor or velvet);
- cardboard;
- decorative buttons;
- twine;
- ribbon;
- colored paper;
- glue.
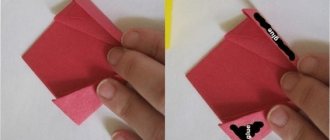
Step 1 . First, make a stand. Cut a circle out of cardboard corresponding to the diameter of the sleeve and glue it. You can additionally nail the bottom with small nails if the roll cylinder is tight.
The bottom is nailed down
Glue is applied
Step 2 . Cut out two circles from colored paper: one according to the size of the sleeve, the other according to the diameter of the bottom. Cover the bottom and inside with the resulting blanks.
Circle is glued
The inner side is glued
Step 3 . Apply a small amount of glue along the edge of the cylinder. After this, apply the twine and, as soon as it sticks a little, begin wrapping the sleeve. Proceed carefully, slowly, turn by turn.
Glue is applied along the edge of the cylinder
Twine is applied
Step 4 . Cut a circle from thick fabric along the diameter of the bottom and glue it. Decorate the finished product with a ribbon, attach a bow and sew on a button. Ready!
The twine is wound. The craft is decorated with ribbon.
Use bright thread
Circle of thick fabric
The bow is glued on. The button is sewn on.
On a note! The simplest pencil holder from a sleeve is made like this: strips of colored paper are cut out to fit the size of the cylinder, then it is covered with them and decorated.
Video – Penguin Pencils
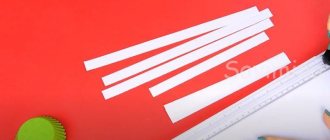
Option 3. DIY paper pencil
A simple, but beautiful and useful accessory.
To make such a pencil stand, you will need:
- toilet paper rolls;
- a simple pencil;
- colored corrugated paper;
- ruler;
- glue;
- scissors.
Step 1 . First, measure the circumference and length of the sleeve, then prepare pieces of colored paper based on the obtained dimensions.
Making a pencil holder from sleeves and corrugated paper
Step 2 . Cover each of the bushings with paper.
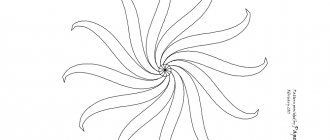
Step 3 . From a new sheet, cut out a cloud that will accommodate all the bushings. Glue the sleeves onto the cloud, then decorate the stand with cut out multi-colored flowers.
Can organizer
The work is not difficult, it will take a minimum of time and costs. But once you complete it, you won’t have to constantly look for your pens and rulers.
- First you need to prepare the cans. Dry them. Cover with glue and cover with paper.
- Make a rectangle with a handle from plywood. It must be tied with a tourniquet.
- Paint all the jars. Let them dry.
- Attach the cans to both sides of the base. Wrap with twine or glue.
In fact, there are a lot of ideas. By turning on your imagination and a little bit of imagination, you can come up with an organizer for everything: for the kitchen, for jewelry, for all sorts of trinkets, for underwear. There can be a huge number of options. Everyone will choose a job to their liking. In this article you got acquainted with only a few ideas for making stationery cups. A DIY pencil will remind you of the work done.
Option 4. Clay pencil holder
An idea for those who like to create clay products
. What you will need to make:
- clay;
- pen rod;
- rolling pin (can be replaced with a board);
- stacks;
- sackcloth;
- knife;
- lace with rough texture.
Step 1 . Cover the board with burlap and roll out the clay on top. It is necessary that the strip has a length corresponding to the circumference of the pencil.
A design imprinted on the clay
Step 2 . Place the lace on top and use a rolling pin to imprint the pattern.
Step 3 . Using a knife, cut a rectangular strip with a pattern to the desired size.
A rectangular strip is cut
Step 4 . Place textured fabric over the longitudinal sections, press with your fingers, and align the curved edges.
The fabric is pressed down with your fingers
Step 5 . Coat the short (side) side of the strip with liquid clay from the inside out. Roll the rectangle into a cylinder and glue it together.
The side is coated with liquid clay
The strip is rolled into a cylinder
Step 6 . Turn the top edge of the cylinder out. Additionally, make a bottom from a piece of clay.
The top turns outward
Another piece of clay is rolled out
Step 7 . Cut a circle with a diameter slightly larger than the diameter of the craft. Press down the cut of the circle with your fingers to make the edges thinner.
A circle is cut out
Step 8 . Turn the craft over and coat the bottom cut with liquid clay.
Step 9 . Place the cylinder on the circle with the coated side. Also coat the protruding edges of the latter with liquid clay, and then wrap it onto the cylinder.
The cylinder is laid on a circle
Step 10 . Roll the clay into small balls. Splash them, make 2 holes in the center with the rod from the handle. You will get buttons with which you will decorate a pencil holder.
Step 11 . Roll out a piece of clay onto a textured fabric, then cut a pocket out of it. Having aligned the cuts, glue the pocket using the same liquid clay. Stack the trim on the seams.
Buttons are glued
The pocket is glued
A patch is glued to the back
Step 12 . Roll out another piece on the textured fabric and glue the patch to the back. Ready! Fire the pencil holder in the oven, then paint it with light brown paint.
→ TOP 5 ways to make topiary from coffee beans
Option 5. Unusual pencil holder made of logs
An original table accessory in the loft style.
It is better to give preference to pear or birch.
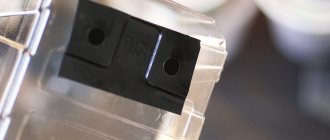
Step 1 . Prepare a log about 12 cm high, sand it on both sides. Drill the required number of holes of different diameters with a drill (their height should be 10 cm).
DIY log pencil holders
Step 2 . Sand each hole, for which you will have to change the nozzle to sandpaper.
Every hole needs to be sanded
Step 3 . Actually, this is where the work ends. An unusual and creative pencil holder is ready to use! If you want, you can varnish the product, but keep in mind: after this the color of the wood will change.
Log pencils
Creative coasters
→ DIY cat scratching post - TOP 9 master classes
Video – Cute pencil holders with faces
Paper ideas
Paper is a wonderful budget material for creativity. The art of origami is perfectly used in making coasters from this component. You can make a simple quadrangular box, or you can make a complex modular design for pencils. Cardboard is also ideal for the job.
Products made from it are in no way inferior to wooden ones. The only condition is to avoid getting wet. The cardboard technique is widely used in needlework. The easiest option is to download a template from the Internet and cut it out. Transfer contours and fold lines. Glue the allowances and connect all the elements following the drawing. This original masterpiece will wonderfully decorate your desktop.
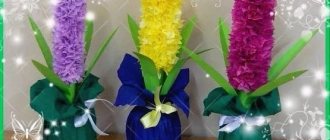
Stationery storage is a very relevant topic. The Internet is full of fascinating master classes on making storage for writing instruments. Below are a few ideas on how to make a pen organizer with your own hands.Option 6. Stand made of ice cream sticks
Amazing rainbow pencil holder
For this craft, prepare:
- threads of different colors;
- glue;
- scissors;
- brush;
- ice cream sticks;
- a thick plastic cup.
Tools and materials for crafts
Step 1 . Cut off the top of the cup, leaving the bottom and another 3-4 cm of the walls. Cover the glass with chopsticks, leaving small gaps between them.
Step 2 . From the inside, where the cup ends, glue the tip of the thread, then intertwine the sticks with it.
The sticks are intertwined with thread
Change the position of the lace
Step 3 . Having finished a row, change the position of the thread in the next one. That is, if it passed along the front side of the stick, then pass it from the back. Continue weaving the sticks in the same way, changing the position of the colored thread.
Step 4 . Complete the decor to the top, changing the color of the lace after a certain distance. Leave the tips of the sticks on top, as in the photo.
The end of the lace is glued
Pencil holder made from ice cream sticks
Step 5 . Glue the beginning and end of the thread. The rainbow pencil holder is ready! By the way, it is also good because it does not slip out of your hands when carrying it.
In a knitted case
Organizers crocheted or knitted look original and stylish. They knit both a whole box and covers for cans and boxes. It is convenient to use removable covers, which, on occasion, can always be removed, washed or replaced with new ones.
To work you will need:
- multi-colored woolen or synthetic threads for knitting;
- knitting needles;
- scissors.
Description of work:
- Knit the required fabric, you can use the simplest one without a pattern, from knit or purl stitches and put it on a container (tin, glass or plastic jars/bottles).
- If you want and have time, then these covers can be sewn with buttons or a zipper. In this case, they can be put on containers and conveniently removed as clothing.
Cases are made not only by knitting, but also by crochet. The more complex the pattern and the brighter the colors of the threads, the more original the products will look.
Option 7. Pencil pencil made of fleece and felt
Beautiful and original stand for pencils
To make such an original stand, prepare:
- tin can;
- plastic toy eyes;
- fleece (green and white);
- pencil;
- green felt;
- meter;
- scissors;
- a needle;
- padding polyester;
- threads;
- glue gun
Step 1 . Measure the diameter, height and circumference of the tin. From green and white fleece, cut out 2 pieces of the corresponding sizes (height of the can + 5 mm allowance and circumference + allowance).
Paired details and faces with ears
Step 2 . Sew the parts together using a sewing machine or a needle with a backward seam. As a result, you will end up with a pair of blanks, as in the photo - white and green. After turning out the white part, set the cylinders aside.
Step 3 . Make paired parts - muzzles with ears (18 pieces), sew them together, not forgetting to leave holes for stuffing. As a result, you will have 9 such faces. Mark on them the places where the eyes will be attached.
Step 4 . Fill the faces with padding polyester and sew up the holes. Glue plastic eyes in the right places.
Stages of wrapping a can
Step 5 . Wrap the jar with padding polyester, then sew the edges and sew on the bottom of padding polyester. Then take the green fleece piece and place it on the can. Glue padding polyester to the bottom.
Step 6 . Cover the bottom with glue and glue the white fleece piece. Sew the edges of the green and white fleece together using a blind stitch.
Final decor of the pencil holder
Step 7 . Glue the faces to the jar. Then cut out leaves from felt and glue them too. The original pencil stand is ready!
→ DIY bean bag chair
Option 8. Another option from a tin can
In the example, a linen cord is used.
To make such a pencil holder you will need:
- can;
- white paint (enamel, acrylic);
- linen lace (red and white);
- film or cardboard to cover the table;
- glue gun;
- acetone;
- brush;
- pliers;
- lighter;
- gloves;
- scissors.
Step 1 . Press down all the nicks on the can using pliers.
The notches on the can are pressed down
Painting a can
Step 2 . After treating the jar with acetone, put on gloves and paint it. Wait for the craft to dry.
You need to wear gloves when painting
Step 3 . Cut a piece of clothesline and singe one end. Secure the cord at the base of the can with a glue gun, then wrap it tightly in a circle.
The end of the rope is glued
The rope is wound in a circle
Step 4 . Having passed 1/3 of the can, cut the cord, singe the end and glue it.
Step 5 . Take the red rope, go another 1/3, then finish the cover using the white rope again.
White, red, white
Additional decor
Step 6 . Decorate the craft with small decorative objects. Soft toys and shells can also serve as decorations.
If you don’t have a gun, you can glue the rope with any superglue
Video – Cute pencil holder made from a tin can
Pencil craft
If you take apart a child's desk, you can find many interesting things. I think every parent has heard the phrase from a child: “I’m out of pencils.” They are present during such cleanings. Having accumulated a sufficient amount, you can come up with an unusual use for it. We prepare 32 pieces, glue gun, scissors.
- Glue 8 pieces together, forming a flat wall;
- we make four such walls;
- connect to each other, forming a square shape;
- Cut out the bottom from a sheet of cardboard and glue it to the base.
Option 9. Stand made from old jeans
An unexpectedly beautiful desktop device.
To make such a denim pencil holder, you need:
- old jeans;
- lace;
- a shoe box (or rather, just the lid);
- tin cans (or other containers) of different sizes;
- glue;
- paper clips;
- scotch;
- pencil;
- ruler.
Step 1 . Place the denim on the table and the lid on top of it. Mark the boundaries and connect them with lines.
Borders are marked with a pencil
Step 2 . Cut a rectangle along these lines, then, armed with double-sided tape, glue it inside the lid.
The fabric is glued inside the lid
Double sided tape is used
Step 3 . Cover the sides of the lid in the same way (see photo).
The sides are also covered
Step 4 . Place the can on the material, measure, cut off the excess, and then glue the fabric to the can. Don't forget to leave an indent at the top by folding it inward and gluing it. Wrap the remaining cans in denim in the same way.
The jar is placed on the fabric
Gluing fabric
Wrap each of the cans
Step 5 . Almost done. Wrap the pencil jars with braid, and you can also decorate the lid with it. Then assemble the entire composition.
Wrap the jar with tape
In the finished set you can store not only pencils, but also other small items that should always be at hand.
Option 10. DIY apple pencil
A simple craft using a few pencils.
To work you will need:
- oval plastic bottle;
- plate;
- red acrylic paint (liquid);
- file;
- golden lace;
- glue gun;
- artificial leaf.
Step 1 . Fill the bottle with paint and shake well to thoroughly coat the entire interior surface. Drain off any remaining paint.
Step 2 . Place the bottle on a plate and wait until the paint is completely dry. If necessary, file the neck and remove excess paint.
Making a pencil holder in the shape of an apple
Step 3 . Tie the neck with a golden cord. At the end, glue the leaf. The apple pencil holder is ready!
→ TOP 11 ways to sew gloves with your own hands
Creative pencil holder
You will need: glass jar, yellow liquid acrylic paint, black permanent marker, nail file.
Master Class
- Pour the paint into the jar, close the lid and shake well to evenly color the inside of the jar.
- Drain off any remaining paint.
- Wait until completely dry.
- File down the edges of the jar neck, removing excess paint if necessary.
- Draw a funny face with a permanent marker.
The creative pencil holder is ready! I recommend watching this video!
DIY Organizer for STATIONERY * 3 BUDGET options * Bubenitta
Option 11. Pencil for a young princess
Glamorous set for stationery
For this craft you need:
- jars of cotton swabs (2 pcs.);
- olive jars (3 pcs.);
- napkins with a pattern;
- plain paper.
Step 1 . Take pliers and bend the edges of the tin cans. Then wash all the jars thoroughly and degrease with nail polish remover.
Painting jars with acrylic paint
Step 2 . Paint the jars with white acrylic paint. Paint in two layers: the first with a brush, the second with a sponge (can be replaced with a sponge). You can apply paint on the inside in one layer.
Step 3 . Cut out rectangles from paper according to the internal size of the cans. Use the resulting blanks as a stencil for napkins and cut them out too.
Napkin blanks are glued
Step 4 . Glue the napkin blanks to the paper. After the glue has dried, apply two layers of PVA on top - the napkins are thin and can tear easily. Then, when the glue is completely dry, apply varnish in two layers.
Step 5 . As a result, you should make 5 blanks for the bottom and 5 for the sides. Glue all the parts in the inside of the cans; you can apply another layer of varnish for added security.
Blank for the bottom
Step 6 . The jars will stick to the stand, but they have ridges on the bottom. To solve this problem, cut out circles of the required diameter from cardboard and glue them. Glue felt cut to size on top (it will easily stick to any surface).
Universal PVA glue
Step 7 . Prepare a 25 cm piece of laminate and paint the side surfaces with brown paint. Apply white paint on top. Glue the napkin, then apply glue and varnish on top.
Step 8 . Return to the banks. Decoupage the outer surfaces. Cut the napkins to size, glue them, apply glue and varnish.
Decorate the jars with lace braid and beads
Step 9 . Finally, decorate the pencil holders with beads and lace braid. Glue the jars to the base.
On a note! Before painting the inside of the cans, be sure to sand the surfaces. Otherwise, the paint will not “lay down” and nothing will stick to the cans.
Glass from food containers
Many people have food storage containers in their kitchens. Most of them are lying around idle. Why not use it as an active element? The process itself will take very little time and effort. It is not necessary to remove the covers; it is enough to make holes in them with a powerful stapler. Connect several bases using hot glue. The order can be any. Use your imagination. If desired, a glass for pens and pencils can be decorated.
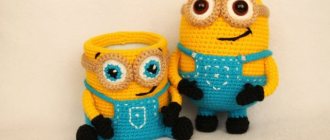
Option 12. Pencil in the form of a minion
Your child will definitely like this tabletop device.
To make such a pencil holder, prepare:
- template printout;
- Super glue;
- pencil;
- hole puncher;
- felt-tip pens (blue and black);
- scissors;
- EVA polymer material (it is used to make bathroom rugs) in several colors - brown, gray, black, white and blue;
- wooden skewer.
Materials for work
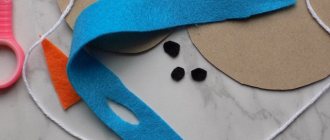
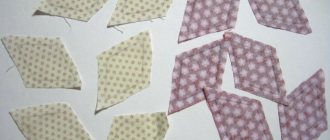
Step 1 . After printing the template, cut out such blanks.
Sample
Step 2 . Cover the jar inside and outside with yellow polymer. Then make a jumpsuit out of blue polymer and glue black buttons on top.
Glue the material to the jar
We cut out panties for the minion from blue material
Step 3 . Make eyes (white background + brown eyes + pupils). Also make a belt and gray glasses frames.
Step 4 . Take a blue felt-tip pen and use it to draw stitches on the clothes. Draw a smile with a black felt-tip pen. That's it, the minion pencil holder is ready!
Making glasses frames from gray
Finished pencil holder in the form of a minion
→ TOP 6 ideas on how to make squishies with your own hands
From toilet paper rolls
From this waste material, which many people throw in trash containers, they make a wonderful thing - a pencil holder.
Caterpillar
For work they take:
- bushings - 5 pieces;
- green, yellow, white and black paper;
- yellow cardboard;
- scissors;
- hot glue;
- a simple pencil;
- PVA glue.
Do it as follows:
- The bushings are covered with green paper.
- On a sheet of the same color, draw a round face of a caterpillar with horns and cut it out with scissors.
- Eyes are made from white and black circles.
- On yellow cardboard, draw an oval of such a size that all the bushings are removed from it.
- The bushings are pressed onto the base using a hot gun.
- The caterpillar's face is glued onto the first roll.
The pencil is ready. Thanks to the fact that it has five storage compartments, you can store pens, colored pencils and markers, as well as small rulers, compasses, and erasers.
Dachshund
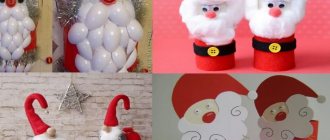
Using the same principle as a caterpillar, they make a funny dog - a taxi. To create it, prepare brown paper, which is used to wrap the sleeves.
The muzzle is made cone-shaped and elongated. Do not forget about the long ears and short legs (glued to the first and last bushings).
They also stick a black nose and an eye on the muzzle (one because the dog is in frontal view). Add additional details of appearance at your discretion.
FAQ. Questions and answers
Why is a pencil better than a pen? A pencil is much more practical. Firstly, text written with a pen may fade over time, but this will not happen with a pencil. Secondly, if you need to write on a vertical surface, the ink may drain and the pen will begin to write poorly, but the pencil will still write just as well. Thirdly, a broken pencil will produce two smaller pencils, but one pen will not produce two.
What are pencil holders for? A pencil is an indispensable thing on your desk. Agree, some office supplies constantly accumulate that can come in handy at any moment: you need a paperclip, a paper stapler, or an eraser. And about pencils and felt-tip pens it’s a completely different story!
What is foamiran? Foamiran is a soft rubber with pores, which is often used to create dolls, toys and jewelry.
What can replace fleece? To create a pencil holder, it is not necessary to use fleece; all parts can be cut out of felt. Felt is good because it is very pliable, easy to work with, and the variety of colors allows you to embody the most original ideas.
What were the very first pencils? The history of the pencil begins in the 11th century. Artists then drew mainly with sticks made from a mixture of lead and zinc, sometimes called “silver pencils.”
A pencil is a must-have attribute of any desk. Of course, you can buy it at any stationery store, but anything made with your own hands always has more advantages. This way you can make an exclusive pencil holder for every taste!